
Catégories populaires
Vous cherchez un fil?


Commentaires / Questions (84)
![]() Kim Oliver a écrit:
Kim Oliver a écrit:
At body increases every 10th row - I have done the arithmetic and don't think these should include side increases, just those on either side of the cables? Thanks for your ongoing help, Kim
11.07.2019 - 14:29DROPS Design a répondu:
Dear Mrs Oliver, on body you increase first in the P-sections you first decreased (= 6 sts increased), then increase every 10th row on each side of the cables: 18 sts increased a total of 7 times. There were 144-160-172 sts + 6 + (18 sts x 7) = 276-292-304 sts in size S-M-L. Happy knitting!
11.07.2019 - 14:55
![]() Kim Oliver a écrit:
Kim Oliver a écrit:
Hallo again, just checking the pattern correction for the body. I cannot see what is different in the correction. Do I work straight for 4cm before beg my decreases? Many thanks, Kim
07.07.2019 - 13:46DROPS Design a répondu:
Dear Kim, our pattern texts are updated immediately as there appears some correction - thats why you cant see any difference, i.e. pattern is correct, tab with correction details is for info what was corrected. Decreasing: after dividing piece you just continue with knitting pattern as before until piece measures 4 cm (from dividing); afterwards you start decreasing. Happy knitting!
07.07.2019 - 22:09
![]() Kim Oliver a écrit:
Kim Oliver a écrit:
Hello looking for advice with this pattern. I am knitting the smallest size and have charted the instructions starting at: ‘Now work pattern as follows from RS: 4 band sts in garter st, P 1, A.1 (= 4 sts) 2-2-2-3-3-3 times, P…’ the instructions that indicate where the garment is divided into sections, such as left front and then sleeve do not appear to be correct. Additionally, the instructions for increasing refer to A2 on raglan body and sleeve however if you read the pattern as
19.06.2019 - 15:10DROPS Design a répondu:
Dear Mrs Oliver, in size S you will work and increase for raglan as follows: 4 band sts in garter st, P1, A.1 (= 4 sts) 2 times, P1, K1, increase for raglan on front piece here (= left front piece), A.2 (= 8 sts on 1st row), increase on sleeve here, K14 increase on sleeve here (= sleeve), A.2, increase on back piece here K1, P1, A.1 5 times, P1, K1, increase on back piece here (= back piece), A.2, K14, increase on sleeve here (= sleeve), A.2, increase on front piece hereK1, P1, A.1 2 times, P1, 4 band sts in garter st. - see increase on body and sleeve for your size. Happy knitting!
19.06.2019 - 15:43
![]() Kim Oliver a écrit:
Kim Oliver a écrit:
Thank you. I understand the way to read the diagram - it is the stitches in between that I am unsure about. On the WS how should I interpret the pattern? Do I use the same instructions and repeat the stitches except for the changes to diagram stitches? Should I be purling where I previously knitted? Thanks! Kim.
06.05.2019 - 16:00DROPS Design a répondu:
Dear Mrs Oliver, the stitches between diagrams should be worked with K over K and P over P, ie where you worked at the end of RS row: P1, band sts, you will work band sts, K1 - and the sts worked K from RS will be P from WS. Happy knitting!
06.05.2019 - 16:05
![]() Kim Oliver a écrit:
Kim Oliver a écrit:
Yoke: 'Work one row from WS same way' - how do I read the instructions for the stitches between the chart. Do I begin : Band, P1, A1 - or do I change all purl stitches between the chart to knit?
06.05.2019 - 12:30DROPS Design a répondu:
Dear Mrs Oliver, from WS work the diagrams reading from the left towards the right (= 2nd row = WS), and K over K, P over P remaining stitches (with the 4 front band sts in garter st as before). Read more about diagrams here. Happy knitting!
06.05.2019 - 14:48
![]() Kim Oliver a écrit:
Kim Oliver a écrit:
Yoke: First set of elevations, then a purl row. My garment suggests the next row should be knit, not purl after elevations have been worked. Am I wrong? Thanks - Kim
30.04.2019 - 15:33DROPS Design a répondu:
Dear Mrs Oliver, the last short row on elevation is worked over 24-24-28-28-32-32 sts from WS, then turn and work from RS to the end of the row, turn and purl next row from WS over all sts (with 4 sts in garter st on each side), next row is now from RS. Happy knitting!
30.04.2019 - 16:52
![]() Bonita Poirier a écrit:
Bonita Poirier a écrit:
Please disregard previous question. I tried to delete it but could not. Thank you!
04.04.2019 - 19:22
![]() Bonita Poirier a écrit:
Bonita Poirier a écrit:
I have tried to alter the pattern to a size between what is given in the instructions. I am now at the part where I need to divide for sleeves. I am unable to tell from pictures whether or not the pattern on the raglan continues down the sleeve. I.e. when setting aside the stitches for the sleeve, are the pattern raglan stitches included? One raglan - from the front, or back or both?
04.04.2019 - 18:32DROPS Design a répondu:
Dear Mrs Poirier, when you divide piece for sleeves the raglan stitches will be divided in two, one part for sleeve and one part for front/back pieces, ie you divide in the middle of the raglan stitches. Happy knitting!
05.04.2019 - 09:10
![]() Ingrid a écrit:
Ingrid a écrit:
In A1, the K between cables instead of P, is this every 11th row until the end? Thank you
08.02.2019 - 10:31DROPS Design a répondu:
Dear Ingrid, correct, you will K the sts between cables every 11 row, ie every time you work row 11 in A.1 to the end. Happy knitting!
08.02.2019 - 11:59
![]() Chris Durb a écrit:
Chris Durb a écrit:
BODY: Inc 2 sts every other row 4-4-5-6-7-9 times and 1 st every other row 11-14-14-14-15-14 times ; Do I knit all 2 sts increase rows (row 1, 3, 5, 7 for Small) before I start the inc 1 st (for example starting with row 9 for small? Or am I to alternate 2 sts inc with the 1 st increase rows?
27.01.2019 - 22:18DROPS Design a répondu:
Dear Mrs Durb, on the first increase row in size S, inc 2 sts on front pieces + on back piece and only 1 st on sleeves (=12 sts inc) 1 time, then inc 1 st on body and sleeves (= 8 sts inc) on every other round. Happy knitting!
28.01.2019 - 12:03
|
|||||||||||||||||||
Lobelia#lobeliacardigan |
|||||||||||||||||||
 |
 |
||||||||||||||||||
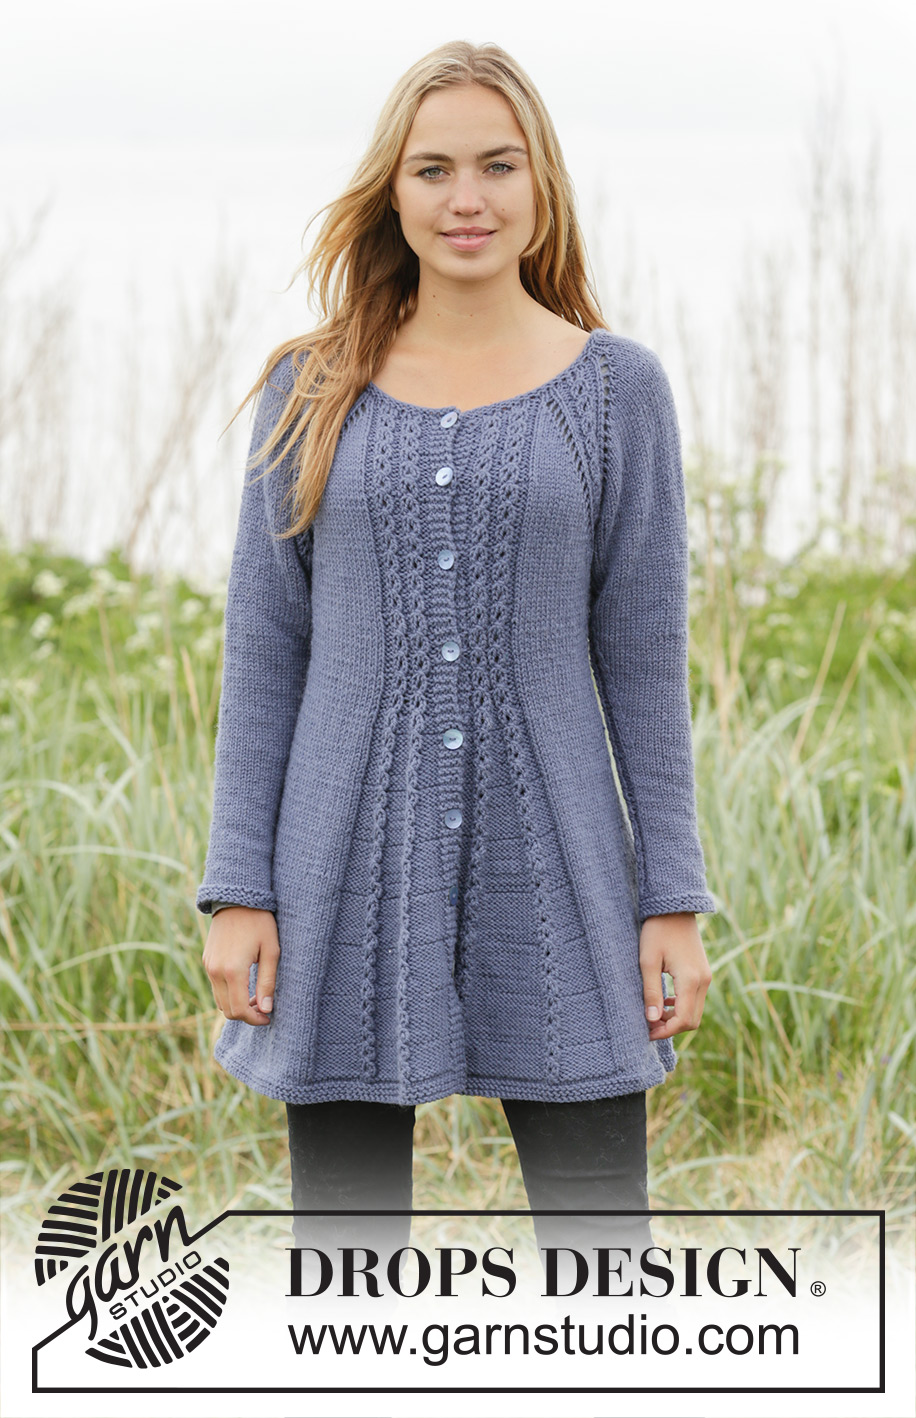
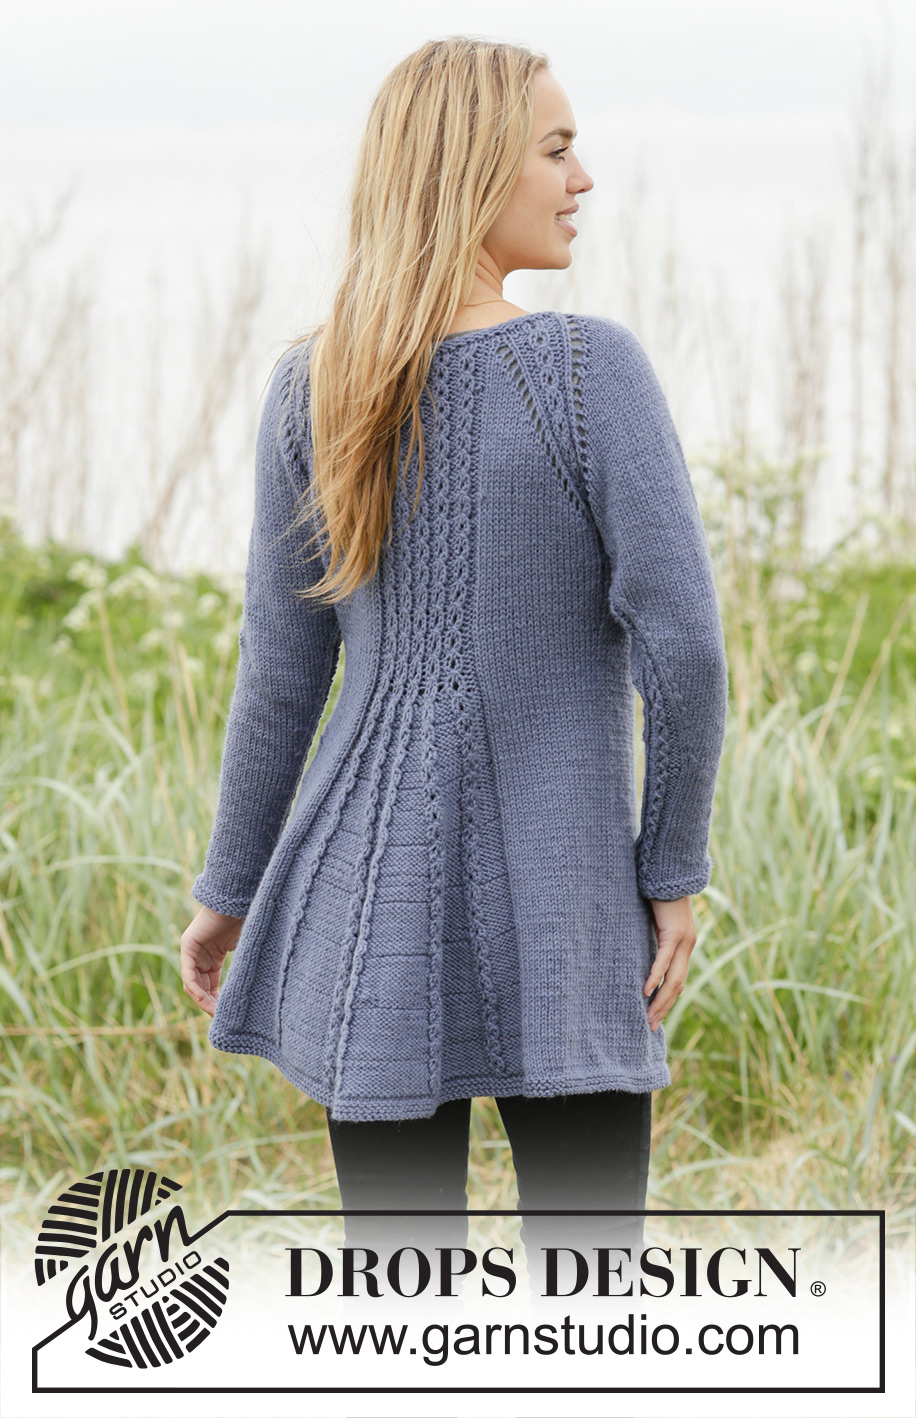
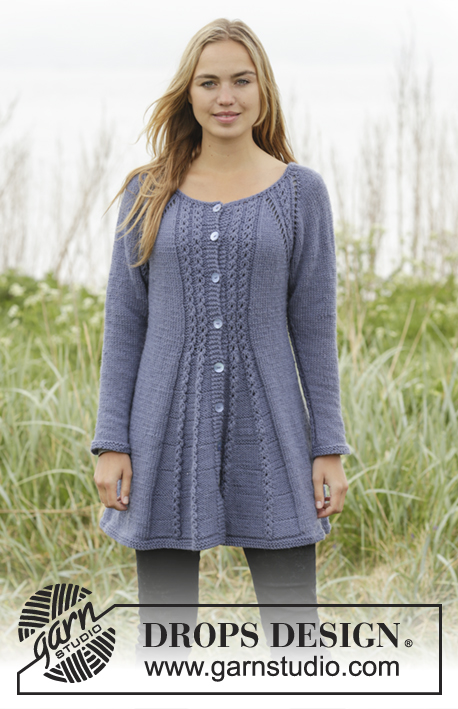
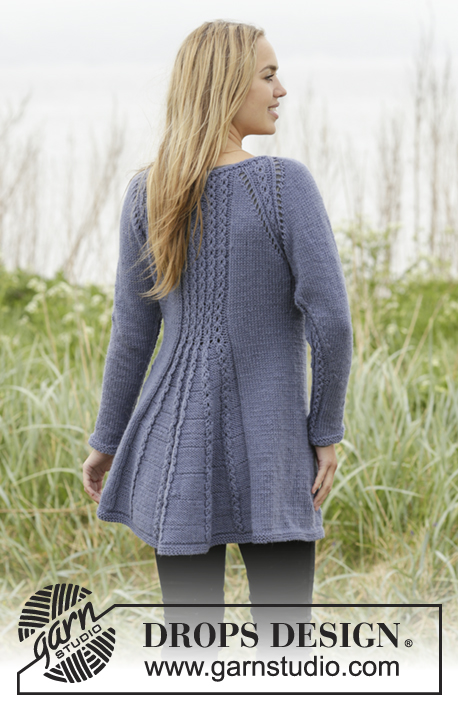
Veste raglan DROPS avec torsades, tricotée de haut en bas, en ”Nepal”. Du S au XXXL.
DROPS 171-14 |
|||||||||||||||||||
|
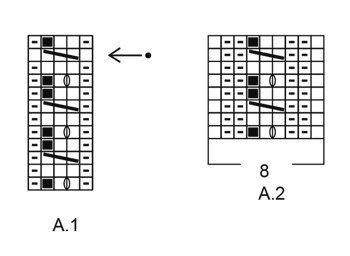
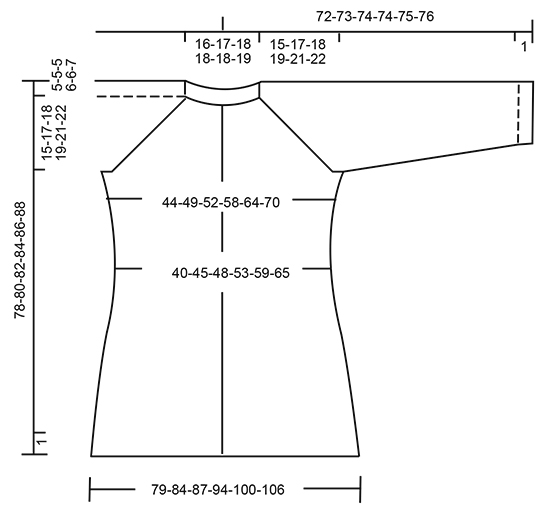
POINT MOUSSE (en rond): 1 côte mousse = 2 tours. Tricoter: * 1 tour end, 1 tour env*, répéter de *-*. POINT MOUSSE (en allers et retours): Tricoter tous les rangs à l'endroit. 1 côte mousse = 2 rangs end. POINT FANTAISIE: Voir les diagrammes A.1 et A.2. Les diagrammes montrent tous les rangs du point fantaisie, vus sur l'endroit. AUGMENTATIONS-1 (à intervalles réguliers): Pour calculer quand augmenter, prendre le nombre total de mailles (par ex. 97 m), moins celles des bordures des devants (par ex. 8 m) et diviser les m restantes par le nbe d'augmentations à faire (par ex. 20) = 4.4. C'est-à-dire que dans cet exemple, on augmente 1 m alternativement toutes les 4 et 5 m (ne pas augmenter au-dessus des bordures devant). AUGMENTATIONS-2 (dos & devants): Toutes les augmentations se font sur l'endroit. Pour augmenter 1 m env, faire 1 jeté. Au rang suivant, tricoter le jeté torse à l'end (= dans le brin arrière au lieu du brin avant) pour éviter les trous. RAGLAN MANCHES: Augmenter pour les manches 1 m après/avant A.2 en faisant 1 jeté (= 2 augmentations pour chaque manche). Au rang suivant, tricoter les jetés à l'env pour créer des jours. RAGLAN DOS & DEVANTS: Augmenter d'abord 2 m avant/après A.2 sur les devants et le dos (= 8 augmentations au total), augmenter ensuite 1 m avant/après A.2 sur les devants et le dos (= 4 augmentations au total). Augmenter 2 m avant A.2 ainsi: Tricoter jusqu'à ce qu'il reste 1 m avant A.2, 1 jeté, 1 m end, 1 jeté. Augmenter 2 m après A.2 ainsi: 1 jeté, 1 m end, 1 jeté. NOTE: Au rang suivant, tricoter à l'env les jetés les plus proches de A.2 pour créer des jours. Tricoter les autres jetés torse à l'env (= dans le brin arrière au lieu du brin avant) pour éviter les trous. Augmenter 1 m avant/après A.2 ainsi: Pour augmenter 1 m, faire 1 jeté. Au rang suivant, tricoter les jetés à l'env pour créer des jours. DIMINUTIONS-1 (dos & devants): Tricoter jusqu'à ce qu'il reste 4 m avant le marqueur, 2 m ens à l'end, 4 m end (le marqueur se trouve entre ces mailles), glisser la m suiv à l'end, 1 m end, passer la m glissée par-dessus la m tricotée. Répéter de l'autre côté (= 4 diminutions). DIMINUTIONS-2 (manches): Tricoter jusqu'à ce qu'il reste 2 m avant A.2, 2 m ens à l'end, A.2, glisser la m suiv à l'end, 1 m end, passer la m glissée par-dessus la m tricotée (= 2 diminutions). BOUTONNIÈRES: Ouvrir les boutonnières sur la bordure devant droit. C'est-à-dire la bordure devant en fin de rang, vu sur l'endroit. 1 boutonnière = tricoter ens à l'end la 3ème et la 4ème m à partir du bord et faire 1 jeté. Emplacement des boutonnières (en cm de hauteur totale) (depuis le rang de montage et le long de la bordure devant): TAILLE S: 2, 11, 20, 29, 38 et 47 cm. TAILLE M: 2, 11, 20, 29, 38 et 47 cm. TAILLE L: 2, 12, 21, 31, 40 et 50 cm. TAILLE XL: 2, 12, 21, 31, 40 et 50 cm. TAILLE XXL: 2, 12, 22, 32, 42 et 52 cm. TAILLE XXXL: 2, 12, 22, 32, 42 et 52 cm. ASTUCE POUR RABATTRE: Pour éviter que les mailles rabattues ne soient trop serrées, on peut utiliser une aiguille d'½ taille au-dessus. ---------------------------------------------------------- VESTE: Se tricote en allers et retours sur aiguille circulaire, de haut en bas. EMPIÈCEMENT: Monter 97-99-103-109-111-117 m (y compris 4 m de bordure devant au point mousse de chaque côté) avec l'aiguille circulaire 4.5. Tricoter 2 côtes au POINT MOUSSE - voir ci-dessus en répartissant 17-19-19-25-27-25 augmentations au dernier rang sur l'endroit - VOIR AUGMENTATIONS-1 = 114-118-122-134-138-142 m. Continuer avec l'aiguille circulaire 5. Tricoter maintenant une ré-hausse en jersey pour l'encolure dos ainsi: Tricoter les 61-63-67-73-77-79 premières m, tourner et tricoter 16-16-20-20-24-24 m, tourner et tricoter 20-20-24-24-28-28 m, tourner et tricoter 24-24-28-28-32-32 m, tourner et tricoter les mailles restantes du rang. Tricoter ensuite 1 rang env avec 4 m de bordure devant au point mousse de chaque côté. NE PAS OUBLIER LES BOUTONNIÈRES! Tricoter maintenant en point fantaisie ainsi sur l'endroit: 4 m de bordure devant au point mousse, 1 m env, 2-2-2-3-3-3 fois A.1 (= 4 m), 1 m env, 1-2-2-1-2-3 m end (= devant gauche), A.2 (= 8 m au 1er rang), 14-14-16-16-16-16 m end (= manche), A.2, 1-2-2-1-2-3 m end, 1 m env, 5-5-5-7-7-7 fois A.1, 1 m env, 1-2-2-1-2-3 m end, (= dos) A.2, 14-14-16-16-16-16 m end (= manche), A.2, 1-2-2-1-2-3 m end, 1 m env, 2-2-2-3-3-3 fois A.1, 1 m env, 4 m de bordure devant au point mousse. Tricoter 1 rang sur l'envers de la même façon. PENSER À BIEN CONSERVER LA MÊME TENSION QUE POUR L'ÉCHANTILLON! Au rang suivant sur l'endroit, commencer les augmentations pour le RAGLAN DOS & DEVANTS et le RAGLAN MANCHES – voir ci-dessus. NOTE: on augmente différemment sur les manches et sur les devants/le dos. DOS & DEVANTS: Augmenter 2 m 4-4-5-6-7-9 fois tous les 2 rangs et 1 m 11-14-14-14-15-14 fois tous les 2 rangs (= 15-18-19-20-22-23 fois au total). MANCHES: Augmenter 15-18-19-20-22-23 fois 1 m tous les 2 rangs. Quand toutes les augmentations sont faites, on a 250-278-294-318-342-362 m. Tricoter maintenant ainsi sur l'envers: Tricoter les 38-42-44-49-53-57 premières m (= devant droit), glisser les 52-58-62-64-68-70 m suivantes sur un arrêt de mailles (= manche), monter 6-6-8-8-10-12 m sous la manche, tricoter les 70-78-82-92-100-108 m suivantes (= dos), glisser les 52-58-62-64-68-70 m suivantes sur un arrêt de mailles (= manche), monter 6-6-8-8-10-12 m sous la manche, tricoter les 38-42-44-49-53-57 m restantes (= devant gauche). L'ouvrage mesure environ 15-17-18-19-21-22 cm le long de la bordure devant. DOS & DEVANTS: On a maintenant 158-174-186-206-226-246 m pour le dos et les devants. MESURER DÉSORMAIS À PARTIR D'ICI. Continuer en allers et retours comme avant et placer un marqueur au milieu des nouvelles mailles montées sous chaque manche. Diminuer ensuite de chaque côté et dans le point fantaisie ainsi: DIMINUTIONS CÔTÉS: À 4 cm, diminuer 1 m de chaque côté du marqueur sur les côtés - VOIR DIMINUTIONS-1 (dos & devants). Répéter ces diminutions 2 fois au total tous les 8 rangs = 8 diminutions au total. DIMINUTIONS DANS LE POINT FANTAISIE: À 6 cm, diminuer 1 m env en tricotant 2 m ens à l'env dans toutes les sections en m env entre 2 torsades = 6-6-6-10-10-10 diminutions (c'est-à-dire diminuer 1-1-1-2-2-2 m sur chaque devant et 4-4-4-6-6-6 m sur le dos). Quand toutes les diminutions sont faites, on a 144-160-172-188-208-228 m. À 15-15-16-16-16-16 cm, augmenter 1 m env dans toutes les sections en m env où on a diminué avant – VOIR AUGMENTATIONS-2 (= 6-6-6-10-10-10 augmentations) = 150-166-178-198-218-238 m. Au rang suivant sur l'endroit, augmenter 1 m env de chaque côté de chaque torsade = 18-18-18-26-26-26 augmentations. Augmenter ainsi 7-7-7-5-5-5 fois au total tous les 10-10-10-14-14-14 rangs (= tous les 5-5-5-7-7-7 rangs sur l'endroit) = 276-292-304-328-348-368 m. Quand toutes les augmentations sont faites, continuer en allers et retours en point fantaisie. À 56-56-57-57-57-57 cm – ajuster pour terminer après le 4ème ou le 8ème rang du point fantaisie, tricoter 2 rangs en jersey avec les 4 m de bordure devant au point mousse de chaque côté. Continuer avec l'aiguille circulaire 4,5 et tricoter 2 côtes mousse. Rabattre - VOIR ASTUCE POUR RABATTRE. MANCHES: Se tricotent en rond sur aiguilles doubles pointes. Reprendre les 52-58-62-64-68-70 m en attente sur les aiguilles doubles pointes 5 et relever 1 m dans chacune des 6-6-8-8-10-12 m montées sous les manches = 58-64-70-72-78-82 m. Placer un marqueur au milieu des nouvelles m. MESURER DÉSORMAIS À PARTIR D'ICI. Tricoter maintenant A.2 (= 8 m au 1er rang) au milieu sous la manche (c'est-à-dire que l'on a 4 m de A.2 de chaque côté du marqueur), tricoter les mailles restantes en jersey. À 4 cm, diminuer 1 m de chaque côté de A.2 - VOIR DIMINUTIONS-2 (manche). Diminuer ainsi 11-14-15-19-18-19 fois au total tous les 8-6-5-4-4-4 tours= 36-36-40-40-42-44 m. Quand la manche mesure 48-47-46-45-44-44 cm, changer pour les aiguilles doubles pointes 4.5 et tricoter 2 côtes mousse. Rabattre. Tricoter l'autre manche de la même façon. ASSEMBLAGE: Coudre les boutons sur la bordure devant droit. |
|||||||||||||||||||
Légende diagramme(s) |
|||||||||||||||||||
|
|||||||||||||||||||
 |
|||||||||||||||||||
 |
|||||||||||||||||||
Vous avez terminé ce modèle?Alors taguez vos photos avec #dropspattern #lobeliacardigan ou bien présentez-les dans la galerie #dropsfan Vous avez besoin d'aide pour ce modèle ?Vous trouverez 31 tutoriels vidéo, une rubrique commentaires/questions et plus encore en vous rendant sur la page du modèle sur garnstudio.com © 1982-2026 DROPS Design A/S. Tous droits réservés. Ce document, y compris ces sous-sections, est protégé par les droits d'auteur (copyright). Apprenez-en davantage sur ce que vous pouvez faire avec nos modèles en bas de chacune des pages de notre site. |
|||||||||||||||||||


Avec plus de 40 ans dans la conception de modèles tricot et crochet, DROPS Design offre l'une des plus vastes collections de modèles gratuits sur internet - traduits dans 17 langues. À ce jour, on compte 324 catalogues et 12291 modèles en français.
Nous nous efforçons de vous apporter le meilleur de ce que le tricot et le crochet peuvent vous offrir, inspiration et conseils mais également des fils de haute qualité à des prix incroyables! Vous souhaiteriez utiliser nos modèles autrement que pour un usage personnel? Vous pouvez lire ce que vous êtes autorisés à faire dans le Copyright en bas de page de chacun de nos modèles. Bon tricot!
Poster un commentaire sur le modèle DROPS 171-14
Nous aimerions connaître votre avis sur ce modèle !
Si vous souhaitez poser une question, merci de bien vouloir vérifier que vous avez choisi la bonne catégorie dans le formulaire ci-dessous afin d'accélérer la réponse. Les champs obligatoires sont indiqués par une *.