
Catégories populaires
Vous cherchez un fil?


Commentaires / Questions (290)
![]() Gayla Stokes a écrit:
Gayla Stokes a écrit:
Patterns are too confusing! I have been reading crochet charts, diagrams, and written instructions for 50 years and cannot make heads or tails of these.
25.11.2019 - 01:41DROPS Design a répondu:
Dear Mrs Stokes, The DROPS patterns are knitted and crocheted by thousands and thousands of people around the world. We understand however that in certain countries, with different knitting/crochet traditions than Scandinavia, our patterns might be written in a way that differs from what some are used to. But of course we want everyone to understand our patterns, so that’s why we have created an extensive library of tutorial videos as well as step by step lessons that explain how to follow the techniques we use and how to read the diagrams in our patterns. Give them a try!
25.11.2019 - 11:15
![]() Sylvia a écrit:
Sylvia a écrit:
I'm doing this in XXL and am up to the row after creating the arm holes, where I'm supposed to increase evenly by 9 to go from 36 groups to 45. You say to do 8 DC groups in each arm, so that makes 16. I then have 12 groups on the bottom of the round and 8 at the top, making 20 groups to work the extra 9 groups into - but the maths doesn't let me do that evenly. Can you please be more specific on which chains to do 2 groups into to get the 9 increases?
24.11.2019 - 05:05DROPS Design a répondu:
Dear Sylvia, you should increase evenly including in the chains for armholes, ie you skipped 6 groups for armholes, you should calculate the number of groups with 6 over each armholes, and increase then also over armholes, so that the increases are worked evenly on the round. Happy crocheting!
25.11.2019 - 12:03
![]() Madalane Turpin a écrit:
Madalane Turpin a écrit:
I have a pattern for an adult women's Poncho HUGO and it calls for "Nepal by DROPS Garnstudio, 14 skeins". How do I know what yardage of skein to purchase. The pattern does not say. Is this particular wool one size only. Thank you for your help.
16.11.2019 - 16:35DROPS Design a répondu:
Dear Mrs Turpin, please read more about DROPS Nepal, as well as order it here. Happy knitting!
18.11.2019 - 11:19
![]() Etta a écrit:
Etta a écrit:
3. piirroksen 2. kierrokselle pyydetään lisäämään tasavälein 9 pylväsryhmää. Lasketaanko myös hihakaaret tähän mukaan? Eli myös hihakaariin lisätään pylväsryhmiä? Vai rajataanko ne pois tästä "lisätään tasaisesti" kuvauksen alueesta? Aiempien kysymyksiin liitettyjen vastausten linkit eivät toimi.
13.11.2019 - 21:49DROPS Design a répondu:
Hei, pylväsryhmät lisätään tasavälein koko kerroksen aikana, eli myös hihoihin.
18.12.2019 - 16:49
![]() Cindy a écrit:
Cindy a écrit:
Is there a written pattern?
29.10.2019 - 22:23DROPS Design a répondu:
Dear Cindy, unfortunately there are no written out instructions for this pattern. However we do have a lesson on how to read crochet patterns here. Also, you can always ask for help in the store where you bought your DROPS yarn from. Happy Crafting!
30.10.2019 - 10:20
![]() Cindy a écrit:
Cindy a écrit:
I am an older and have crochet forever. New to graphs. Is there a written pattern that goes by rows? Thank you.
29.10.2019 - 22:07DROPS Design a répondu:
Dear Cindy, unfortunately there are no written out instructions for this pattern. However we do have a lesson on how to read crochet patterns here. Also, you can always ask for help in the store where you bought your DROPS yarn from. Happy Crafting!
29.10.2019 - 22:19
![]() DS Meyer a écrit:
DS Meyer a écrit:
The posts refer to pictures for additional help, yet the links to those lm ead to PAGE CANNOT BE FOUND. Where are those? I am confused by round 6, A1 diagram. I might have to return yarn if the diagrams dont become easier to follow...that would be a pitty. Thanks
28.09.2019 - 18:37DROPS Design a répondu:
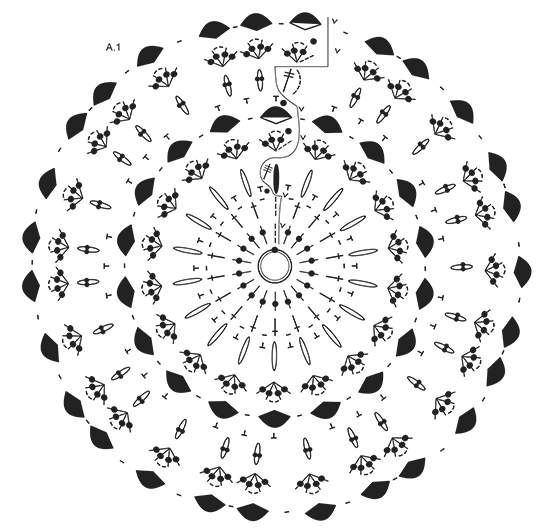
Dear Mrs Meyer, on the round 6 in A.1 you will increase: crochet sl sts to the middle of 1st ch-space on the round, then work: 1 sc, 9 ch, 1 sc around next chain, 9 ch, 1 sc around next ch (on tr-group), 9 ch, 1 sc around chain on next tr-group (= skip the chain between the tr-groups) and so on as shown in diagram. Happy crocheting!
30.09.2019 - 09:52
![]() Luz a écrit:
Luz a écrit:
Seria más interesante hacer un video en español..Gracias
14.09.2019 - 14:50DROPS Design a répondu:
Hola Luz. Todos los vídeos están hechos sin sonido para utilizar los mismos en todos los idiomas. Las explicaciones del texto siempre está en el idioma que elijas ( tienes un botón bajo las fotos de los modelos).
15.09.2019 - 20:49
![]() Eboneigh a écrit:
Eboneigh a écrit:
A.2, after you make the first armhole and repeat the ch12....for a L/XL wouldn't that be 12 repeats, as that makes math right and is symmetrical? It's got 14 for the L/XL size and 12 for the XXL/XXXL size right now. Which is right?
30.08.2019 - 16:45DROPS Design a répondu:
Dear Eboneigh, you repeat the 12 ch-spaces a total of 14 times in size L/XL and skip then only 6 st-groups for each armhole, while you repeat the 12 ch-spaces a total of 12 times in larger size and skip 7 st-groups for each armhole. Happy crocheting!
02.09.2019 - 08:25
![]() Krystal a écrit:
Krystal a écrit:
I have been crocheting for over 20 years and this pattern is very confusing. I am stuck on the 3rd row of the circle in diagram A1. It says ch-6 then double crochet with a symbol or ch-12 written in with a line drawn to separate then double Crochet’s in the ch-1 space and ch-12 from the top of the previous rows double crochet, this is not possible. Can someone please explain how they got the 3rd row to look like the picture?
17.08.2019 - 15:54DROPS Design a répondu:
Dear Krystal, row 3 in A.1 starts with sl sts until the middle of 1st ch-space, 1 ch (= see 4th symbol), then 12 ch-spaces with 1 sc between each ch-space, and finish round with 6 chains + 1 dtr in the first sc from beg of round. Happy crocheting!
19.08.2019 - 12:18
|
||||||||||||||||||||||||||||||||||||||||||||||
Fall Festival#fallfestivaljacket |
||||||||||||||||||||||||||||||||||||||||||||||
 |
 |
|||||||||||||||||||||||||||||||||||||||||||||
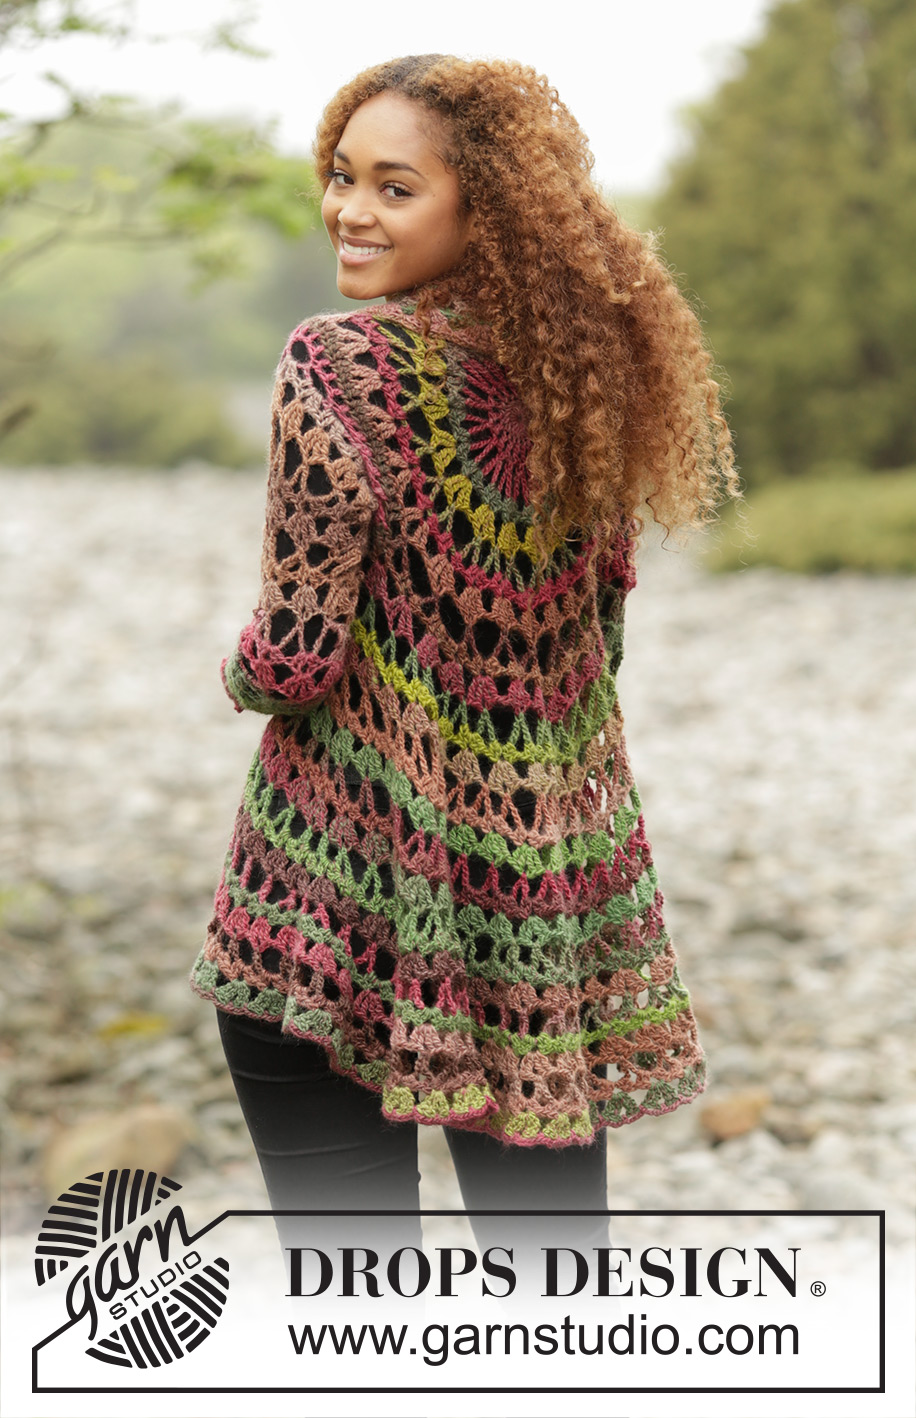
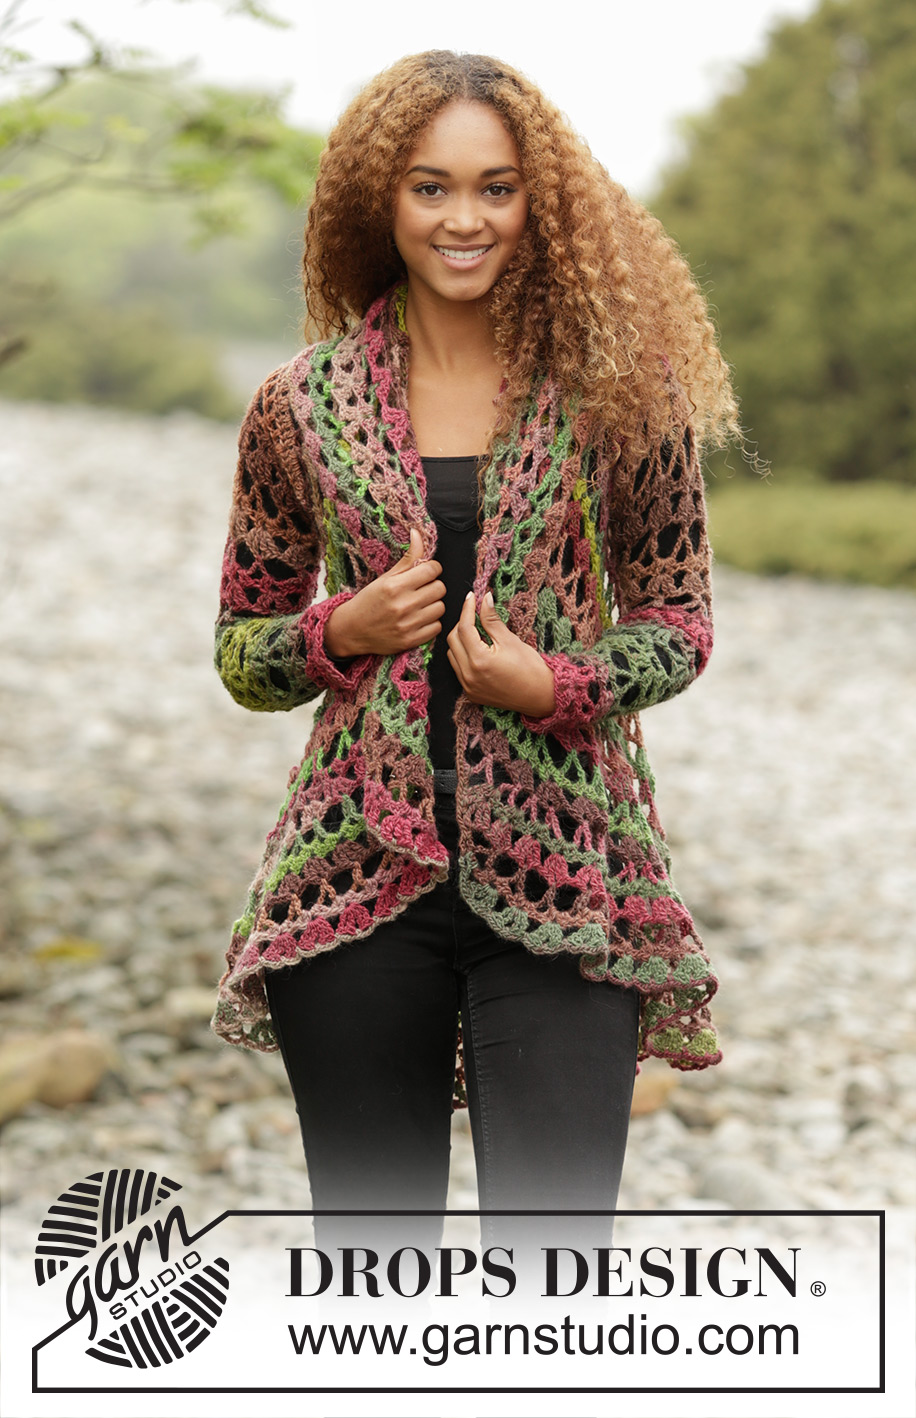
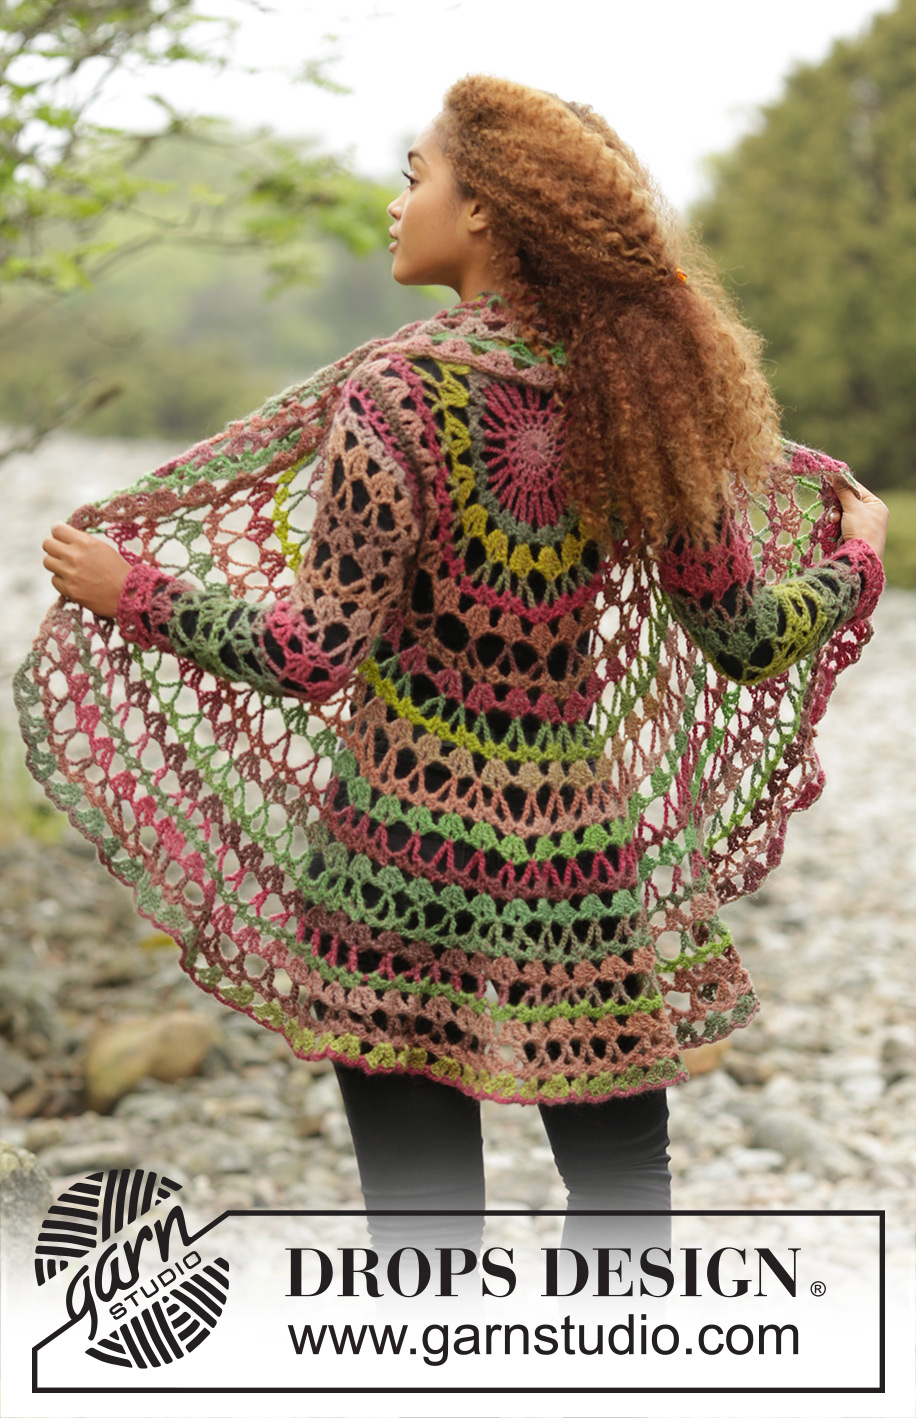
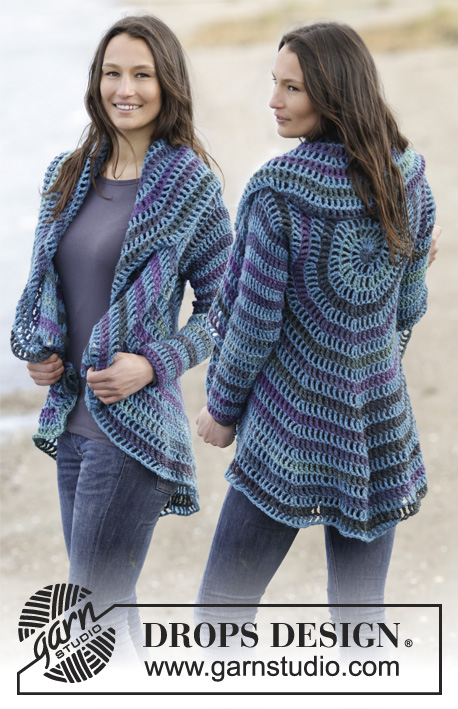
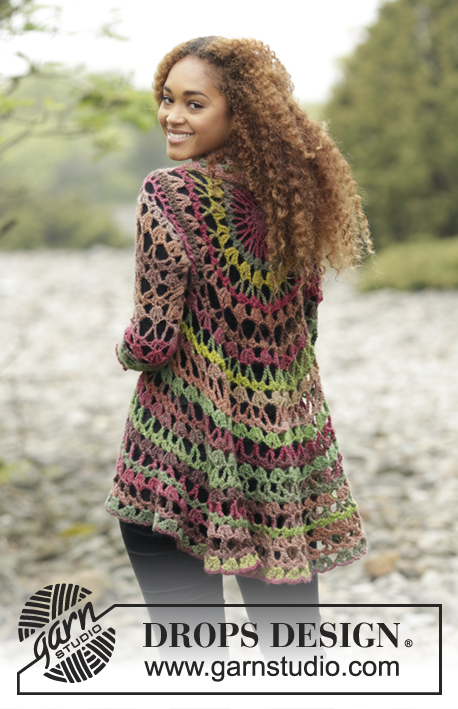
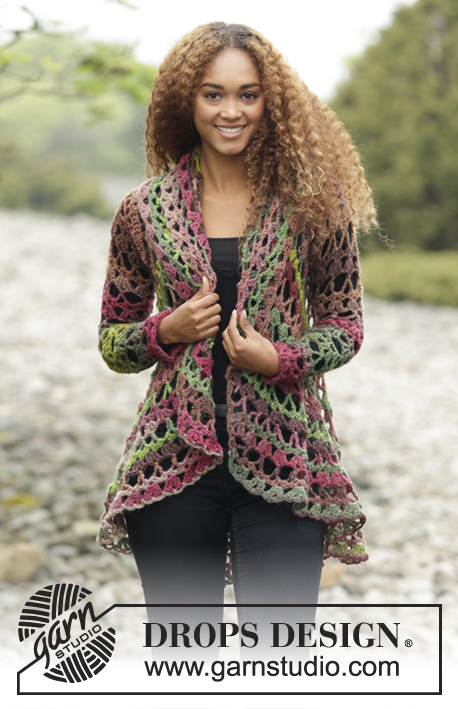
Gilet crocheté en cercle, avec 1 fil DROPS Big Delight ou 1 fil DROPS Fabel et 1 fil DROPS Flora". Du S au XXXL.
DROPS 171-21 |
||||||||||||||||||||||||||||||||||||||||||||||
|
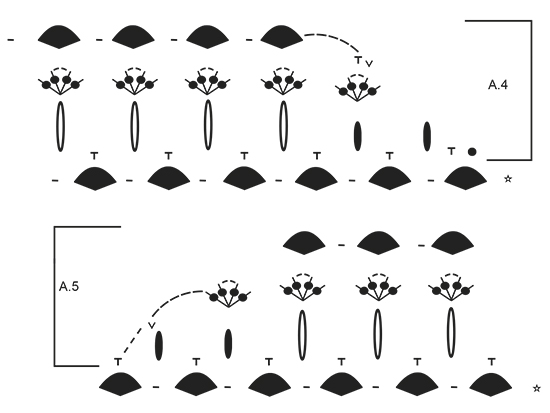
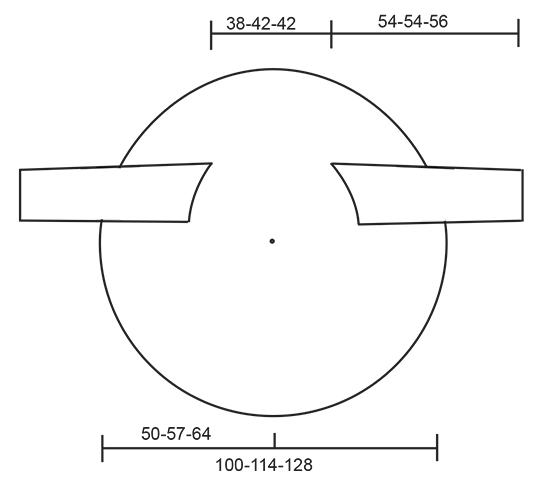
POINT FANTAISIE: Voir diagrammes A.1 à A.5. INFO CROCHET: Remplacer la 1ère ms au début du tour par 1 ml, terminer le tour par 1 mc dans la 1ère ml du début du tour. Remplacer la 1ère B au début du tour par 3 ml, terminer le tour par 1 mc dans la 3ème ml du début du tour. Remplacer la 1ère DB au début du tour par 4 ml, terminer le tour par 1 mc dans la 4ème ml du début du tour. ---------------------------------------------------------- GILET CROCHETÉ EN CERCLE: Monter une chaînette de 4 ml avec le crochet 5,5 et 1 fil Big Delight ou bien avec 1 fil DROPS Fabel + 1 fil DROPS Flora et joindre en rond avec 1 mc dans la 1ère ml. Crocheter ensuite en suivant A.1. VOIR INFO CROCHET! PENSER À BIEN CONSERVER LA MÊME TENSION QUE POUR L'ÉCHANTILLON! Quand A.1 a été crocheté, le cercle mesure environ 33 cm de diamètre et on a 27 groupes de DB. Taille L/XL-XXL/XXXL: Crocheter A.2, au 1er tour de A.2 augmenter 9 arceaux à intervalles réguliers (augmenter comme au 6ème tour de A.1, c'est-à-dire augmenter 1 arceau ainsi: Crocheter 1 ms autour de l'arceau au milieu du groupe de DB, 9 ml, 1 ms autour de la ml entre les groupes de DB, 9 ml, 1 ms autour de l'arceau au milieu du groupe de DB suivant) = 36-36 arceaux. Crocheter 1 fois A.2 en hauteur. TOUTES LES TAILLES: = 27-36-36 groupes de DB. Crocheter le tour suivant comme le 1er tour de A.3, EN MÊME TEMPS, former les emmanchures ainsi: 1 ms autour de l'arceau au milieu du groupe de DB, crocheter souplement 30-33-36 ml, sauter 5-6-7 groupes de DB, 1 ms autour de l'arceau au milieu du groupe de DB suivant (= 1ère emmanchure), *12 ml, 1 ms autour de l'arceau au milieu du groupe de DB suivant*, répéter de *-* 8-14-12 fois au total, crocheter souplement 30-33-36 ml, sauter 5-6-7 groupes de DB, 1 ms autour de l'arceau au milieu du groupe de DB suivant (= 2ème emmanchure), *12 ml, 1 ms autour de l'arceau au milieu du groupe de DB suivant*, répéter de *-* tout le tour et terminer par 1 mc dans la 1ère ms au début du tour (au lieu d'1 ms autour de l'arceau suivant). Crocheter le tour suivant comme le tour 2 de A.3 ainsi: Crocheter comme avant: 2 B + 2 ml + 2 B autour de chaque arceau, autour de chaque arceau des emmanchures, crocheter 6-7-8 groupes de B, EN MÊME TEMPS, augmenter 9 groupes de B à intervalles réguliers, augmenter 1 groupe de B en crochetant 2 B + 2 ml + 2 B + 2 B + 2 ml + 2 B autour d'1 arceau = 36-45-45 groupes de B. TOUR 3: Crocheter 2 DB + 2 ml + 2 DB autour de l'arceau au milieu du chaque groupe de B et 1 ml entre chaque groupe de DB = 36-45-45 groupes de DB avec 1 ml entre chaque. Continuer en suivant A.3, EN MÊME TEMPS, augmenter 9 arceaux à intervalles réguliers ainsi, à chaque fois que l'on fait le 1er tour: TOUR 1: Crocheter des mc jusqu'au milieu du 1er arceau (au milieu d'un groupe de DB), 1 ms, *12 ml, 1 ms autour de l'arceau suivant au milieu d'un groupe de DB*, répéter de *-* tout le tour, EN MÊME TEMPS, augmenter 9 arceaux à intervalles réguliers = 45-54-54 arceaux (terminer le tour par 6 ml et 1 triple B dans la 1ère ms au début du tour). TOUR 2: Crocheter 2 B + 2 ml + 2 B autour de chaque arceau tout le tour = 45-54-54 B-groupes. TOUR 3: Crocheter 2 DB + 2 ml + 2 DB autour de chaque arceau du groupe de B et 1 ml entre tous les groupes de DB tout le tour = 45-54-54 groupes de DB avec 1 ml entre chaque. Répéter encore 3-3-4 fois les tours 1-3, EN MÊME TEMPS, augmenter 9 arceaux à chaque fois que l'on fait le 1er tour = 72-81-90 groupes de DB. Pour obtenir une forme ovale, crocheter en allers et retours seulement sur les 47-54-61 groupes de DB du bas, ne pas crocheter au-dessus des 25-27-29 groupes de DB du milieu, en haut côté encolure. Commencer sur l'endroit et répéter 2 fois les rangs 1-3 de A.3 au total comme avant (c'est-à-dire que le dos est plus 6 rangs plus long en hauteur), pour une jolie transition quand on tourne, crocheter comme indiqué dans A.4 et A.5, EN MÊME TEMPS, augmenter 7 arceaux à chaque fois que l'on fait le 1er rang (= 86-95-104 groupes de DB au total tout le tour, y compris le groupe de DB côté encolure). Terminer par 1 tour d'arceaux tout autour du gilet (sur l'endroit) ainsi: *4 ml, 1 ms autour de l'arceau au milieu d'un groupe de DB, 4 ml, 1 ms avant le groupe de DB suivant*, répéter de *-* tout le tour, arrêter. MANCHES: Crocheter 60-66-72 B autour de l'emmanchure (environ 5 B dans chaque groupe de DB et environ 30-33-36 B autour de l'arceau – commencer au milieu sous la manche). Crocheter le tour suivant ainsi: *1 B dans la 1ère B/la B suivante, 1 ml, sauter 1 B*, répéter de *-* tout le tour = 30-33-36 B + 30-33-36 ml. Continuer ainsi: TOUR 1: *6 ml, sauter 5 m, 1 ms dans la m suivante*, répéter de *-* tout le tour = 10-11-12 arceaux. TOUR 2: 2 B + 2 ml + 2 B autour de chaque arceau tout le tour = 10-11-12 groupes de B. TOUR 3: 2 DB + 2 ml + 2 DB autour de chaque arceau du groupe de B et 1 ml entre chaque groupe de DB tout le tour = 10-11-12 groupes de DB avec 1 ml entre chaque. TOUR 4: *12 ml, 1 ms autour de l'arceau au milieu du groupe de DB*, répéter de *-* tout le tour = 10-11-12 arceaux mais en même temps, diminuer 1 arceau au milieu sous la manche ainsi: 1 ms autour de l'arceau au milieu de l'avant-dernier groupe de DB du tour, 6 ml, 1 B autour de l'arceau au milieu du groupe de DB à sauter, 6 ml, 1 ms autour de l'arceau au milieu du groupe de DB suivant). Au nouveau tour, crocheter le groupe de B au milieu sous la manche dans la B entre les 2 arceaux de 6 ml = 9-10-11 groupes de DB. Répéter les tours 2-4 et diminuer en même temps 1 arceau tous les 3 tours pour qu'il y ait 1 groupe de DB/1 arceau en moins. Quand on a 5-6-7 groupes de DB/arceaux, crocheter sans diminuer jusqu'à ce que l'ouvrage mesure 54-54-56 cm, ou longueur souhaitée, enfiler le gilet et vérifier la longueur. Arrêter et répéter pour l'autre manche. |
||||||||||||||||||||||||||||||||||||||||||||||
Légende diagramme(s) |
||||||||||||||||||||||||||||||||||||||||||||||
|
||||||||||||||||||||||||||||||||||||||||||||||
 |
||||||||||||||||||||||||||||||||||||||||||||||
 |
||||||||||||||||||||||||||||||||||||||||||||||
 |
||||||||||||||||||||||||||||||||||||||||||||||
 |
||||||||||||||||||||||||||||||||||||||||||||||
Vous avez terminé ce modèle?Alors taguez vos photos avec #dropspattern #fallfestivaljacket ou bien présentez-les dans la galerie #dropsfan Vous avez besoin d'aide pour ce modèle ?Vous trouverez 7 tutoriels vidéo, une rubrique commentaires/questions et plus encore en vous rendant sur la page du modèle sur garnstudio.com © 1982-2026 DROPS Design A/S. Tous droits réservés. Ce document, y compris ces sous-sections, est protégé par les droits d'auteur (copyright). Apprenez-en davantage sur ce que vous pouvez faire avec nos modèles en bas de chacune des pages de notre site. |
||||||||||||||||||||||||||||||||||||||||||||||


Avec plus de 40 ans dans la conception de modèles tricot et crochet, DROPS Design offre l'une des plus vastes collections de modèles gratuits sur internet - traduits dans 17 langues. À ce jour, on compte 324 catalogues et 12245 modèles en français.
Nous nous efforçons de vous apporter le meilleur de ce que le tricot et le crochet peuvent vous offrir, inspiration et conseils mais également des fils de haute qualité à des prix incroyables! Vous souhaiteriez utiliser nos modèles autrement que pour un usage personnel? Vous pouvez lire ce que vous êtes autorisés à faire dans le Copyright en bas de page de chacun de nos modèles. Bon tricot!
Poster un commentaire sur le modèle DROPS 171-21
Nous aimerions connaître votre avis sur ce modèle !
Si vous souhaitez poser une question, merci de bien vouloir vérifier que vous avez choisi la bonne catégorie dans le formulaire ci-dessous afin d'accélérer la réponse. Les champs obligatoires sont indiqués par une *.