
Catégories populaires
Vous cherchez un fil?


Commentaires / Questions (44)
![]() Nina CH a écrit:
Nina CH a écrit:
Hello, This is my first project and I am sorry if my questions are silly. I tried to research first but found no help. 1. When knitting Yoke, do I use stocking stitch (one round K, next round P)? 2. I really don't understand increases. What does "K2 in next stitch" mean? I understood it as knit 2 stitches in one but then it's a decrease! I read a similar question below but don't understand. Appreciate your help!
24.03.2025 - 12:30DROPS Design a répondu:
Hi Nina, The jumper is worked in the round to begin with, which means, for the stocking stitch, you knit all rounds. When you work back and forth later, for the split in each side, you knit from the right side and purl from the wrong side. Knit 2 in one stitch means you first knit 1 stitch in the front loop, then knit 1 stitch in the back loop of the same stitch so that 1 stitch becomes 2 (an increase). Happy knitting!
25.03.2025 - 06:48
![]() Kristine Bergsland a écrit:
Kristine Bergsland a écrit:
Hei, skulle gjerne sett flere bilder av denne modellen. Fra bakside, og et bedre bilde av hvordan den ser ut nederst. Vh. Kristine
25.02.2024 - 10:09
![]() Nora a écrit:
Nora a écrit:
Nora wrote a correction:: Oh no! I was doubling the 2 Xtra stitches for the body ineases, at each side of each PLACE MARKER instead of 4 inside the each body sections and 2 on each side of each sleeve section = 12 total.! That is why the raglan line did not line up !! :( I will have to unravel and only double the 2 stitches inside the body panes and only double one on the slee e sides.!!! Thank you for your patience. I just dont want to give up yet.
18.10.2023 - 22:15
![]() Nora a écrit:
Nora a écrit:
Oh no! I was doubling the 2 Xtra stitches for the body ineases, at each side of each!!! That is why the raglan line did not line up !! :( I will have to unravel and only double the 2 stitches inside the body panes only!!!
17.10.2023 - 20:55
![]() Nora a écrit:
Nora a écrit:
Thank you for your answer about the raglan increases! It helped :) Now, about the body increases. So there are 2 increases (1 on each side of the sleeve markers, totaling 8 stitches added for a certain number of rows per size. Then, it changes time only 2 increases on each side of the markers for a total of 4 increases, for a certain number of rows, correct?
16.10.2023 - 17:21DROPS Design a répondu:
Dear Nora, correct the increases are done on a different rhythm on body and on sleeves, but you will increase either 2 sts or 1 stitch on body and only 2 st on each sleeve, so when increasing 2 sts on body you will increase 12 sts (2 sts at the beg of front/back piece + 2 sts at the end of front/back piece + 1 st at the beg of sleeves + 1 st at the end of sleeves). Then you will increase only 1 stitch at the beg + 1 st at th end of front/back piece (and still 1 st on each side of sleeve). Happy knitting!
17.10.2023 - 09:15
![]() Nora a écrit:
Nora a écrit:
I don't understand the body increases: Before 1st and 3rd marker: Work until 3 sts remain before marker, K 2 in next st, 1 YO, K 2. After 2nd and 4th marker: K 2, 1 YO, K 2 in next st. K2 in next stitch means that you k and k through the back loop? And add a nee stitch in addition to yhe YO?
14.10.2023 - 06:43DROPS Design a répondu:
Dear Nora, yes, you knit 1 stitch in the front loop and 1 stitch in the back loop. And yes, you will have 2 new stitches for every marker (As shown in the RAGLAN BODY tip, you inc 2 sts on each marker). Happy knitting!
16.10.2023 - 00:28
![]() Jasmine L Copeland a écrit:
Jasmine L Copeland a écrit:
Hi it is unclear to me when to do inc 1 or inc 2 for the raglan body. I am knitting a small
18.03.2023 - 12:05DROPS Design a répondu:
Dear Jasmine, the first 8 times (rounds) that you increase on the body, you will increase 2 stitches, before the 1st and 3rd markers and after the 2nd and 4th markers (as indicated in RAGLAN BODY). After having worked these increases 8 times, the next time you increase on the body you will increase only 1 stitch at each marker. You will continue with this increase 7 times in total (so 6 more times). Happy knitting!
19.03.2023 - 20:25
![]() Pat Lampron a écrit:
Pat Lampron a écrit:
Now I get it !!! Sorry, really dumb when it comes to math (and I’m knitting???) anyway it finally clicked after reading your explanation several times and the instructions a few dozen!!! One less sweater I have to rip out... thanks so much!!!
15.10.2020 - 18:31
![]() Pat Lampron a écrit:
Pat Lampron a écrit:
In answer to your question I’m working on a large and then will be making a medium...
15.10.2020 - 11:25DROPS Design a répondu:
Dear Mrs Lampron, in size L you cast on 85 sts and increase 21 sts evenly = 106 sts - you then increase for raglan: 2 sts on each sleeve a total of 17 times = 2 x17x2 sleeves = 68 sts inc. Then on body: 4 sts x 12 x 2 (front/back) = 96 sts + 2 sts x 5 x 2 (front/back) = 20 sts = 106+68+96+20=290 sts. Hope this will help you!
15.10.2020 - 11:58
![]() Pat Lampron a écrit:
Pat Lampron a écrit:
I’m working on this pattern and numbers don’t seem to be adding up in regard to the increases - still working on the beginning before putting sleeve stitches on a holder. If I do the increases the number of times listed, the front and backs definitely don’t add up. Can you look at this and give me some clarification?
14.10.2020 - 21:37DROPS Design a répondu:
Dear Mrs Lampron, sure we can explain you, just tell us which size you are working on.
15.10.2020 - 09:04
|
|
Weekend Getaway#weekendgetawaysweater |
|
|
|
|
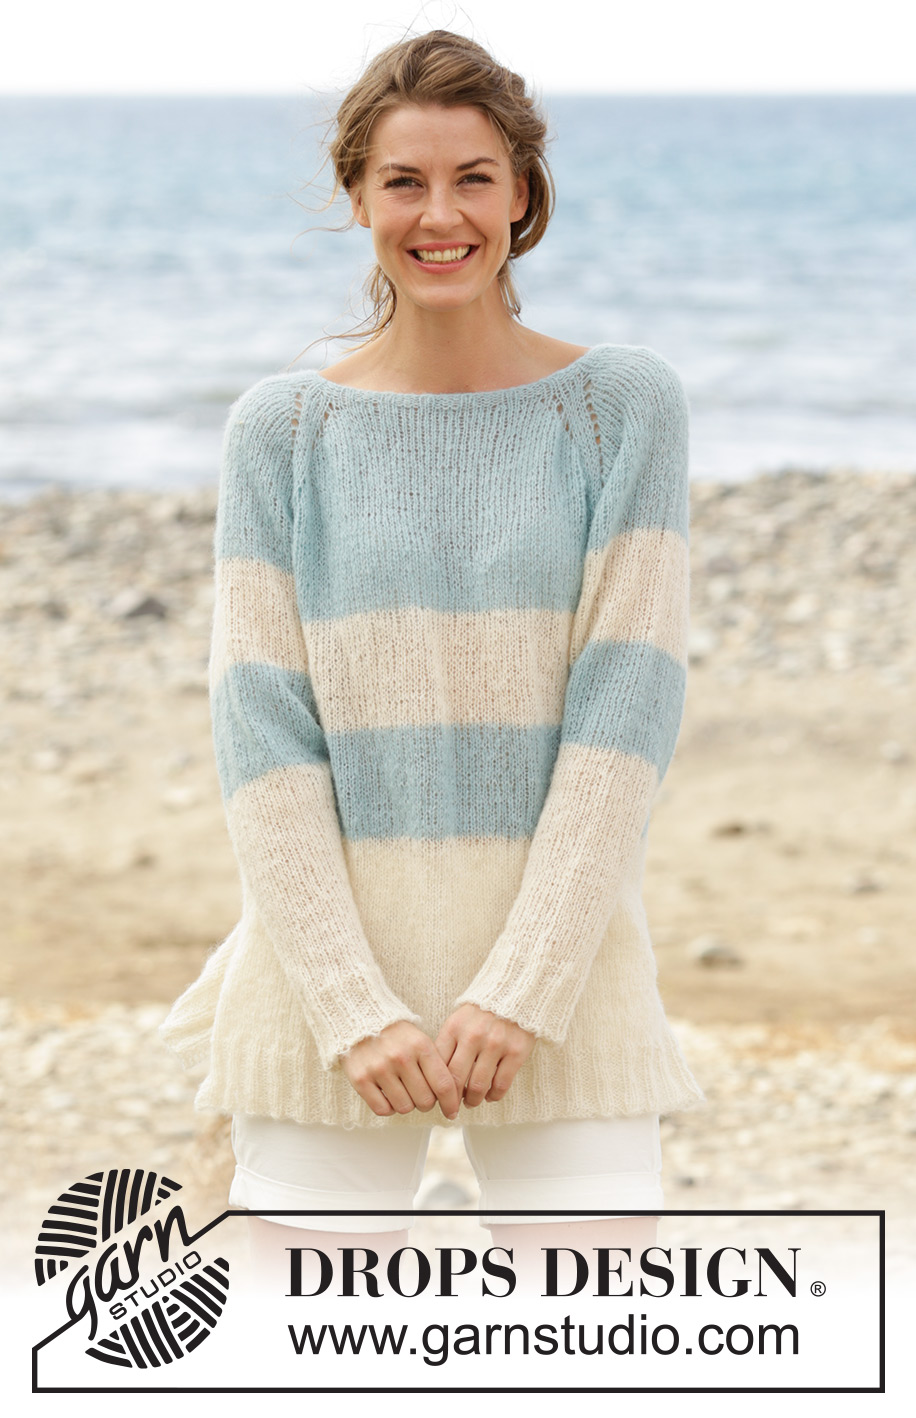
Pull raglan DROPS avec fentes sur les côtés et rayures, tricoté de haut en bas, en ”Brushed Alpaca Silk”. Du S au XXXL.
DROPS 169-7 |
|
|
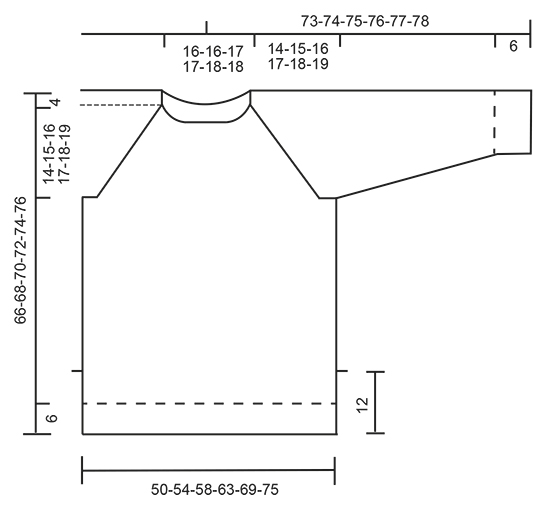
POINT MOUSSE (en rond): 1 côte mousse = 2 tours. Tricoter: * 1 tour end, 1 tour env*, répéter de *-*. POINT MOUSSE (en allers et retours): Tricoter tous les rangs à l'endroit. 1 côte mousse = 2 rangs end. RAYURES: Tricoter les rayures ainsi sur le dos & le devant et sur les manches: Tricoter 9-9-10-10-11-11 cm en naturel, 9-9-10-10-11-11 cm en vert océan clair, et terminer en naturel. RAGLAN DOS & DEVANT: NOTE: Tricoter tous les jetés à l'end au tour suivant, pour créer des jours. Augmenter 2 m ainsi: Avant le 1er et le 3ème marqueur: Tricoter jusqu'à ce qu'il reste 3 m avant le marqueur, tricoter la m suivante 2 fois à l'end, 1 jeté, 2 m end. Après le 2ème et le 4ème marqueur: 2 m end, 1 jeté, tricoter la m suivante 2 fois à l'end. Augmenter ensuite 1 m ainsi: Avant le 1er et le 3ème marqueur: Tricoter jusqu'à ce qu'il reste 2 m avant le marqueur, 1 jeté, 2 m end. Après le 2ème et le 4ème marqueur: 2 m end, 1 jeté. RAGLAN MANCHES: Augmenter 1 m après le 1er et le 3ème marqueur ainsi: 2 m end, 1 jeté. Augmenter 1 m avant le 2ème et le 4ème marqueur ainsi: Tricoter jusqu'à ce qu'il reste 2 m avant le marqueur, 1 jeté, 2 m end. Au tour suivant, tricoter les jetés à l'end pour créer des jours. DIMINUTIONS: Diminuer ainsi avant le marqueur: Tricoter jusqu'à ce qu'il reste 3 m avant le marqueur, 2 m ens à l'end, 1 m end. Diminuer ainsi après le marqueur: 1 m end, glisser 1 m à l'end, 1 m end, passer la m glissée par-dessus la m tricotée ---------------------------------------------------------- PULL: Se tricote en jersey, en rond, de haut en bas jusqu'aux fentes des côtés du pull, puis on divise l'ouvrage et on continue en allers et retours jusqu'à la fin. NOTE: début des tours = milieu dos. EMPIÈCEMENT: Monter 80-80-85-85-90-90 m avec l'aiguille circulaire 4.5 en vert océan clair et tricoter 1 tour end. Tricoter ensuite 4 tours en côtes (= 2 m end/3 m env). Continuer avec l'aiguille circulaire 5 et tricoter 1 tour en jersey, en même temps, répartir 18-20-21-25-24-30 augmentations = 98-100-106-110-114-120 m. Placer maintenant 4 marqueurs ainsi: Tricoter les 15-16-16-16-17-18 premières m (= demi-dos), placer le 1er marqueur, tricoter les 18-18-20-22-22-24 m suivantes (= manche), placer le 2ème marqueur, tricoter les 31-32-33-33-35-36 m suivantes (= devant), placer le 3ème marqueur, tricoter les 18-18-20-22-22-24 m suivantes (= manche), placer le 4ème marqueur, tricoter les 16-16-17-17-18-18 m restantes (= demi-dos). Au tour suivant, commencer les augmentations pour le raglan. NOTE: les augmentations du raglan du dos & du devant sont différentes de celles des manches - VOIR RAGLAN DOS & DEVANT et RAGLAN MANCHES. Augmenter ainsi: Tricoter jusqu'à ce qu'il reste 3 m avant le 1er marqueur, tricoter la m suivante 2 fois à l'end, 1 jeté, 4 m end (le marqueur se trouve entre ces mailles), 1 jeté, tricoter jusqu'à ce qu'il reste 2 m avant le 2ème marqueur, 1 jeté, 4 m end (le marqueur se trouve entre ces mailles), 1 jeté, tricoter la m suivante 2 fois à l'end, tricoter jusqu'à ce qu'il reste 3 m avant le 3ème marqueur, tricoter la m suivante 2 fois à l'end, 1 jeté, 4 m end (le marqueur se trouve entre ces mailles), 1 jeté, tricoter jusqu'à 2 m avant le 4ème marqueur, 1 jeté, 4 m end (le marqueur se trouve entre ces mailles), 1 jeté, tricoter la m suivante 2 fois à l'end, tricoter les mailles restantes du tour. PENSER À BIEN CONSERVER LA MÊME TENSION QUE POUR L'ÉCHANTILLON! Répéter ces augmentations tous les 2 tours ainsi: Manches: encore 14-15-16-17-19-20 fois (= 15-16-17-18-20-21 fois au total), Dos & devant: augmenter encore 7-9-11-14-16-20 fois 2 m (= 8-10-12-15-17-21 fois au total), et augmenter ensuite 7-6-5-3-3-0 fois 1 m. Quand toutes les augmentations sont faites, on a 250-268-290-314-342-372 m et l'ouvrage mesure 14-15-16-17-18-19 cm à partir de l'encolure au milieu devant. Tricoter maintenant ainsi: Tricoter les 38-42-45-49-54-60 premières m (= demi-dos) glisser les 48-50-54-58-62-66 m suivantes sur un arrêt de mailles (= manche), monter 8 m sous la manche, tricoter les 77-84-91-99-109-120 m suivantes (= devant), glisser les 48-50-54-58-62-66 m suivantes sur un arrêt de mailles (= manche), monter 8 m sous la manche, tricoter les 39-42-46-50-55-60 m restantes (= demi-dos). MESURER DÉSORMAIS À PARTIR D'ICI. DOS & DEVANT: On a maintenant 170-184-198-214-234-256 m. Continuer en rond en jersey et tricoter les RAYURES - voir ci-dessus. À 35-36-37-38-39-40 cm, tricoter ainsi: 39-43-46-50-55-61 m jersey, 6 m POINT MOUSSE - voir ci-dessus, 79-86-93-101-111-122 m jersey, 6 m point mousse, 40-43-47-51-56-61 m jersey. Continuer ainsi jusqu'à ce que 2 côtes mousse aient été tricotées au-dessus des 6 m de chaque côté (= au-dessus des fentes). Diviser maintenant l'ouvrage pour le devant et le dos ainsi: Tricoter les 42-46-49-53-58-64 premières m comme avant (c'est-à-dire en jersey avec 3 m point mousse sur le côté), tourner et tricoter le rang retour sur les 85-92-99-107-117-128 m (tricoter les 3 premières et les 3 dernières au point mousse) = dos. Glisser les 85-92-99-107-117-128 m restantes sur un arrêt de mailles pour le devant. Tricoter les mailles sur l'aiguille en allers et retours jusqu'à ce que l'ouvrage mesure 42-43-44-48-46-47 cm. Au rang suivant sur l'endroit, continuer avec l'aiguille circulaire 4,5 en même temps, répartir 13-16-19-21-21-25 augmentations (mais pas au-dessus des 3 m de chaque côté) = 98-108-118-128-138-153 m. Tricoter 1 rang sur l'envers comme avant, puis continuer en côtes (2 m end/3 m env) avec 3 m point mousse de chaque côté. NOTE: Commencer et terminer les côtes par 2 m end entre les 3 m point mousse de chaque côté. Quand les côtes mesurent 6 cm, rabattre les mailles comme elles se présentent. L'ouvrage mesure 66-68-70-72-74-76 de hauteur totale depuis l'épaule. Reprendre les mailles en attente et tricoter comme pour le dos. MANCHES: Se tricotent en jersey, en rond, sur aiguilles doubles pointes. On a 48-50-54-58-62-66 m pour chaque manche. Reprendre les mailles en attente sur les aiguilles doubles pointes 5 et monter 8 m sous la manche = 56-58-62-66-70-74 m. Tricoter en jersey en suivant les rayures comme pour le dos et le devant, EN MÊME TEMPS, placer un marqueur au milieu des nouvelles m sous la manche (c'est-à-dire 4 nouvelles m de chaque côté du marqueur). MESURER DÉSORMAIS À PARTIR D'ICI. À 4 cm, diminuer 1 m de chaque côté du marqueur - VOIR DIMINUTIONS. Répéter ces diminutions encore 10-10-12-13-14-15 fois tous les 4-4-3-3-2½-2½ cm environ = 34-36-36-38-40-42 m. Quand la manche mesure 45-45-45-45-44-44 cm (NOTE: plus court dans les grandes tailles, car l'empiècement est plus long), continuer avec les aiguilles doubles pointes 4.5 et répartir 6-4-9-7-5-8 augmentations au tour suivant = 40-40-45-45-45-50 m. Tricoter en côtes 2 m end/3 m env pendant 6 cm. Quand la manche mesure 51-51-51-51-50-50 cm, rabattre les mailles comme elles se présentent. Tricoter une autre manche identique. ASSEMBLAGE: Fermer l'ouverture sous les manches par une couture. |
|
 |
|
Vous avez terminé ce modèle?Alors taguez vos photos avec #dropspattern #weekendgetawaysweater ou bien présentez-les dans la galerie #dropsfan Vous avez besoin d'aide pour ce modèle ?Vous trouverez 27 tutoriels vidéo, une rubrique commentaires/questions et plus encore en vous rendant sur la page du modèle sur garnstudio.com © 1982-2026 DROPS Design A/S. Tous droits réservés. Ce document, y compris ces sous-sections, est protégé par les droits d'auteur (copyright). Apprenez-en davantage sur ce que vous pouvez faire avec nos modèles en bas de chacune des pages de notre site. |


Avec plus de 40 ans dans la conception de modèles tricot et crochet, DROPS Design offre l'une des plus vastes collections de modèles gratuits sur internet - traduits dans 17 langues. À ce jour, on compte 324 catalogues et 12290 modèles en français.
Nous nous efforçons de vous apporter le meilleur de ce que le tricot et le crochet peuvent vous offrir, inspiration et conseils mais également des fils de haute qualité à des prix incroyables! Vous souhaiteriez utiliser nos modèles autrement que pour un usage personnel? Vous pouvez lire ce que vous êtes autorisés à faire dans le Copyright en bas de page de chacun de nos modèles. Bon tricot!
Poster un commentaire sur le modèle DROPS 169-7
Nous aimerions connaître votre avis sur ce modèle !
Si vous souhaitez poser une question, merci de bien vouloir vérifier que vous avez choisi la bonne catégorie dans le formulaire ci-dessous afin d'accélérer la réponse. Les champs obligatoires sont indiqués par une *.