
Popular categories
Looking for a yarn?


Comments / Questions (11)
![]() Sonja wrote:
Sonja wrote:
Guten Tag, sind beim Stirnband alle Reihen gezeichnet oder nur die Hinreihen ? Vielen Dank für ihre Antwort
09.10.2024 - 22:45DROPS Design answered:
Liebe Sonja, alle Reihen sind in den Diagrammen gezeichnet, die Rückreihen lesen Sie links nach rechts wie unter die Zeichenerklärung (siehe 1. und 2. Symbol "bei den Rückreihen"). Viel Spaß beim Stricken!
10.10.2024 - 09:39
![]() Hampus wrote:
Hampus wrote:
Hej! Jag är lite förvirrad angående tummens placering på vanten (jag stickar storlek M/L). I beskrivningen uppfattar jag det som att varvets början förskjuts med två maskor till vänster. När det sedan är dags att öka för tummen så görs det på sidorna av den 29:e maskan. Tummen hamnar då 4 maskor till vänster om mönstret. På bilden ser det ut att vara flera maskor emellan, och jag upplever att tummen bör vara längre bak, mot handflata). Har jag gjort något fel?
20.11.2021 - 22:16
![]() Heidi wrote:
Heidi wrote:
Hei! Jeg slet litt med å forstå fellingen på vottene. Skal jeg felle alle fire pinnene på samme punkt eller felles innsiden av votten og utsiden av votten uavhengig av hverandre?
24.10.2021 - 21:35DROPS Design answered:
Hei Heidi, Du feller etter 1. merket og før 2. merket, slik at fellingene er på innsiden av hånda, ikke på toppen. Fellingen skjer på samme omgangen på begge sider, og du feller 2. hver omgang x 3 og hver omgang x 5. Håper dette hjelper og god fornøyelse!
25.10.2021 - 08:54
![]() Judit wrote:
Judit wrote:
Grazie per la vostra veloce risposta! Infatti è una treccia, leggendo il diagramma ho visto male il simbolino.
18.04.2021 - 20:58
![]() Judit wrote:
Judit wrote:
Buonasera, avrei bisogno di un chiarimento riguardo la fascia per la testa che ho appena iniziato. Seguendo il diagramma A.1 indica le diminuzioni di 2m al settimo ferro. Dopo come si torna ad avere di nuovo 32m sul ferro? Dovrei fare gli aumenti all'ottavo ferro? Non so come devo continuare:( grazie per il vostro aiuto!!!
18.04.2021 - 19:53DROPS Design answered:
Buonasera Judit, il simbolo a montagna sul 7° ferro si lavora in questo modo: trasferire 2 maglie sul ferro ausiliario davanti al lavoro, 2 maglie diritto, 2 maglie diritto dal ferro ausiliario. Non c'è nessun aumento, è una treccia. Buon lavoro!
18.04.2021 - 20:20
![]() Krabbendam wrote:
Krabbendam wrote:
Bonjour Concernant les augmentations pour le pouce des moufles vous dîtes de marquer les 25ième et 29ième mailles et augmenter une maille de chaque côté de ces mailles marquées. Ça fait une augmentation de 4 mailles et non de 2 ??????
12.03.2021 - 16:41DROPS Design answered:
Bonjour Mme Krabbendam, la maille du pouce est soit la 25ème maille (1ère taille) soit la 29ème taille (2ème taille), on ne va augmenter que 2 mailles à chaque fois - cf AUGMENTATIONS-2. Bon tricot!
15.03.2021 - 07:58
![]() Christel wrote:
Christel wrote:
Bonjour , Je suis au niveau du bandeau,et dès le début je ne comprends pas. Quand on monte les mailles normalement le 1 rang c’est sur l’endroit. Et là vous dites envers sur l’envers. Les rangs sont donc inversés ?
10.12.2020 - 13:26DROPS Design answered:
Bonjour Christel, effectivement, dans ce modèle (et d'autres parfois), le 1er rang va être l'envers du tricot, on va donc le tricoter ici en mailles envers et continuer ensuite en tricotant le diagramme A.1 = le 1er rang = sur l'endroit. Bon tricot!
10.12.2020 - 14:03
![]() Kathy wrote:
Kathy wrote:
This is a question, and a comment I am afraid. I absolutely love your patterns! This warmer set is so striking. Sadly enough, I have a learning disability, and I am unable to use charts. Do you ever offer patterns with line by line directions as well as charts?
01.11.2020 - 16:20DROPS Design answered:
Dear Kathy, thank you very much for your comment -our patterns are most of the time only with diagram, but you can get helped from this lesson. Hope this will help you to understand how to read knitted diagrams. Happy knitting!
02.11.2020 - 09:42
![]() Sarah wrote:
Sarah wrote:
Hello, I have 2 questions about raglan increases on neckwarmer- I did the 8 increases on round 2, but then when I get to round 4, I am confused, where the increases go. Do I do the new increase of round 4, before the increase made in row 2, then A2, then have increase in row 2, then 2nd new increase of round 4? Also there are 8 increases made on each round, can you tell which are rib and which are stockinette, i.e is 1st stockinette, 2nd rib etc. Thanks
19.10.2020 - 14:32DROPS Design answered:
Dear Sarah, the new stitches increased for raglan are worked either in stocking stitch (= front and back piece) and the new stitches on shoulders are worked in rib and you will increase on each side of each A.2, this means you will increase on every other round before the first stitch in A.2 and after the last st in A.2. The new stitches on shoulders should be worked in rib: if rib starts with K2, purl first 2 inc (= rib will start with P2, K2) then work next 2 inc knit (to get K2, P2, K2 again) and so on. At the end of "sleeve", continue in rib the same way. Happy knitting!
19.10.2020 - 16:10
![]() Lisbeth Erlandsson wrote:
Lisbeth Erlandsson wrote:
Jättefint set kommer absolut att göra detta.
04.06.2020 - 20:06
|
|||||||||||||||||||||||||||||||
Peppermint Twist#pepperminttwistset |
|||||||||||||||||||||||||||||||
 |
 |
||||||||||||||||||||||||||||||
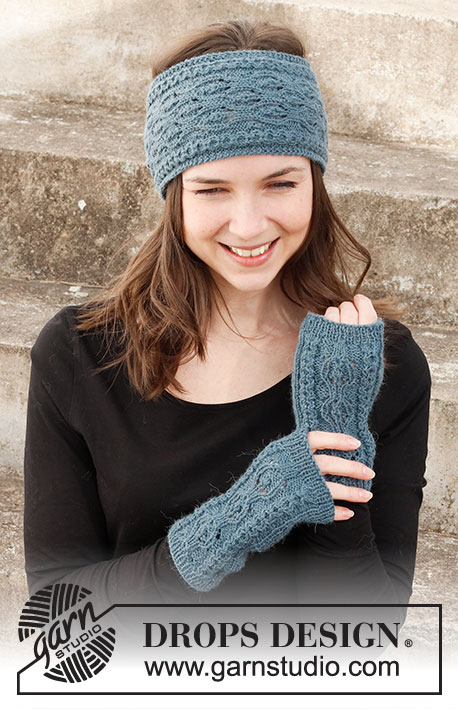
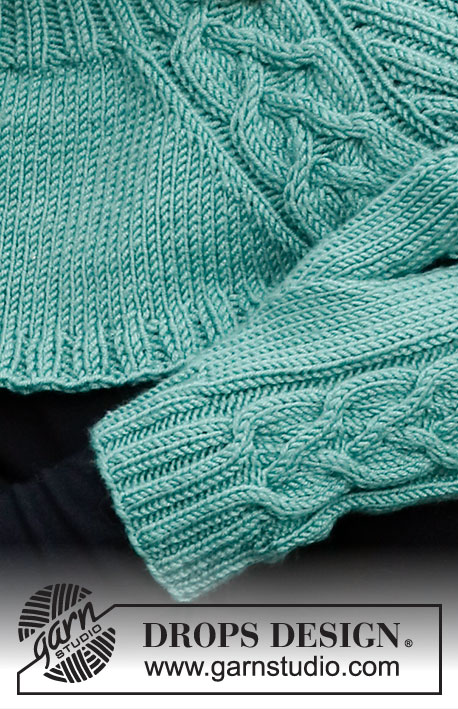
Knitted head band, neck warmer and mittens in DROPS Merino Extra Fine. Piece is knitted with cables.
DROPS 214-35 |
|||||||||||||||||||||||||||||||
|
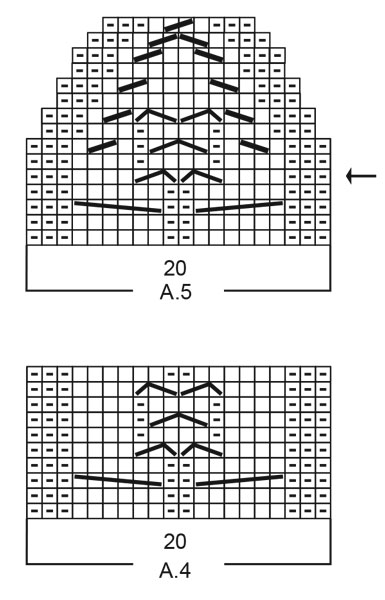
------------------------------------------------------- EXPLANATION FOR THE PATTERN: ------------------------------------------------------- GARTER STITCH (back and forth): Knit all rows. 1 ridge vertically = knit 2 rows. PATTERN: Head band: See diagram A.1. Neck warmer: See diagrams A.2 and A.3 Mittens: See diagrams A.4 and A.5. Diagrams show all rows in pattern seen from the right side. INCREASE TIP-1 (evenly): To calculate how to increase evenly, use the total number of stitches on row (e.g. 124 stitches) and divide stitches by number of increases to be done (e.g. 28) = 4.4. In this example increase by making 1 yarn over after alternately approx. every 4th and 5th stitch. On next row work yarn overs twisted to avoid holes. INCREASE TIP-2 (applies to mittens): Work until stitch with marker, make 1 yarn over, knit 1 (= stitch with marker), make 1 yarn over (= 2 stitches increased). On next round knit yarn overs twisted to avoid holes. Work next increase as follows: Work until 1 stitch remains before stitch with marker, make 1 yarn over, knit 3, make 1 yarn over (= 2 stitches increased). Continue increase like this every other round, i.e. always increase on the outside of the increased stitches. DECREASE TIP (applies to mittens): Decrease inside palm as follows: Work stocking stitch and pattern as before until first marker, knit 1, slip 1 stitch knitwise, knit 1, pass slipped stitch over, work in stocking stitch until 3 stitches remain before next marker thread, knit 2 together, knit 1 (= 2 stitches decreased). RAGLAN: Increase 1 stitch on each side of every A.2 by making 1 yarn over (= 8 stitches increased on round). On next round work yarn overs twisted to avoid holes. Work the new stitches in rib (= knit 2/purl 2) on shoulders and work in stocking stitch on front and back piece. ------------------------------------------------------- START THE PIECE HERE: ------------------------------------------------------- HEAD BAND - SHORT OVERVIEW OF THE PIECE: Work back and forth with circular needle and sew together mid back. HEAD BAND: Cast on 32 stitches on circular needle size 4 mm with Merino Extra Fine. Purl 1 row from wrong side. Then work pattern A.1 over all stitches on needle. REMEMBER THE KNITTING TENSION! Repeat diagram until head band measures 49 cm - or desired length, and adjust to finish after a whole repetition vertically. Cast off stitches with knit over knit and purl over purl. Sew together head band mid back with grafting/kitchener stitches inside cast-on and cast-off edge. ------------------------------------------------------- NECK WARMER - SHORT SUMMARY OF PIECE: Worked in the round on circular needle, top down. NECK WARMER: Cast on 124-128 stitches on circular needle size 4 mm with Merino Extra Fine. Work rib (knit 2/purl 2) in the round for 7 cm. Knit 1 round while increasing 28-32 stitches evenly - read INCREASE TIP-1 = 152-160 stitches. Knit 1 round. Knit 1 and insert a marker thread here (= in the middle of 2 knit stitches). This is now the beginning of round. Now work pattern as follows: Knit 11-13 (= approx. half back piece), A.2 over the next 20 stitches (= in transition between back piece and right shoulder), work (purl 2/knit 2) over the next 12 stitches, purl 2 (= right shoulder), A.2 over the next 20 stitches (= in transition between right shoulder and front piece), knit the next 22-26 (= front piece), A.2 over the next 20 stitches (= in transition between front piece and left shoulder), work (purl 2/knit 2) over the next 12 stitches, purl 2 (= left shoulder), A.2 over the next 20 stitches (= in transition between left shoulder and back piece), knit the next 11-13 (= approx. half back piece). REMEMBER THE KNITTING TENSION! Continue pattern in the round like this, and on 2nd round in pattern begin increase for RAGLAN – read explanation above. Increase like this every other round 16-20 times in total = 280-320 stitches. In size S/M A.2 is worked 3 times vertically + the first 2 rounds in A.2 (= 32 rounds with pattern). Continue as explained below. In size M/L A.2 is worked 4 times vertically. Work 2 more rounds with knit over knit and purl over purl (= 42 rounds with pattern). Continue as explained below. Both sizes: Work next round as follows: Knit the first 27-33 (i.e. until the first repetition of A.2). Insert 1 marker here. This is now the beginning of round. Work A.3 over A.2, work rib (= purl 2/knit 2) over the next 44-52 stitches, purl 2, A.3 over A.2, knit 1, * make 1 yarn over, purl 1, knit 2 *, work from *-* 17-21 times in total (= over 51-63 stitches), make 1 yarn over, purl 1, knit 1. Repeat 1 more time on round = 316-364 stitches. Work next round as follows: Work knit over knit and purl over purl over the first 86-94 stitches, knit 1, * purl yarn over twisted, purl 1, knit 2 *, work from *-* 17-21 times in total, purl yarn over twisted, purl 1, knit 1. Repeat 1 more time on round. Continue in the round with knit over knit and purl over purl until 6 rounds rib have been worked. Cast off stitches with knit over knit and purl over purl. Cut and fasten the yarn. ------------------------------------------------------- MITTENS - SHORT OVERVIEW OF THE PIECE: Worked in the round on double pointed needles. RIGHT MITTEN: Cast on 44-48 stitches on double pointed needles size 3 mm with Merino Extra Fine. Work rib (knit 2/purl 2) in the round for 4-5 cm. Switch to double pointed needles size 3.5 mm. Work next round as follows: Knit 0-2, insert a marker thread here (= beginning of round), knit the next 2-4, make 1 yarn over, work knit over knit and purl over purl over the next 18 stitches, make 1 yarn over, knit the rest of round = 46-50 stitches. Now work pattern as follows: Knit 2-4, A.4 over the next 20 stitches (purl yarn overs from previous round twisted to avoid holes), knit the rest of the round. Continue pattern in the round like this. REMEMBER THE KNITTING TENSION! When piece measures approx. 6-7 cm, insert 1 marker in the 25th-29th stitch on round (= thumb stitch). Now increase for thumb gusset by increasing 1 stitch on each side of stitch with marker - read INCREASE TIP-2(= 2 stitches increased). Continue increase for thumb gusset every other round 4-5 more times (= 5-6 times in total)= 56-62 stitches. Continue to work without increase until piece measures 9-11 cm. On next round slip the next 11-13 thumb gusset stitches on a stitch holder, continue in the round with pattern and in stocking and at the same time cast on 1 new stitch on needle over stitches on stitch holder = 46-50 stitches. Then work until A.4 has been worked 4 times vertically. Piece should now measure approx. 17-18 cm (approx. 5 cm remain until finished measurements, try the mitten on and work to desired length). Insert 1 marker thread in each side so that there are 1-2 knit stitches between marker thread stitch and A.4 in each side. There are 24-26 knit stitches between marker threads inside mitten. Now work A.5 over A.4, and when you have worked up to round with arrow in diagram, continue pattern as before and begin decrease – read DECREASE TIP. Decrease like this every other round 3 times and every round 5 times. When decrease is done and A.5 has been worked vertically, 19-23 stitches remain on round. Knit together 2 by 2 until 5-6 stitches remain on round. Cut the yarn and pull it through the remaining stitches, tighten together and fasten. Mitten measures approx. 22-23 cm from top and down. THUMB: Slip the 11-13 thumb gusset stitches from stitch holder back on double pointed needles size 3.5 mm and pick in addition up 4-3 stitches behind thumb = 15-16 stitches. Work in stocking stitch in the round until the thumb measures 5-5½ cm (approx. ½ cm remain until finished measurements, try the mitten on and work to desired length). Knit stitches together 2 by 2 until 4 stitches remain on round. Cut the yarn and pull it through the remaining stitches, tighten together and fasten. LEFT MITTEN: Cast on 44-48 stitches on double pointed needles size 3 mm with Merino Extra Fine. Work rib (knit 2/purl 2) in the round for 4-5 cm. Switch to double pointed needles size 3.5 mm. Work next round as follows: Knit 0-2, insert a marker thread here (= beginning of round), knit the next 2-4, make 1 yarn over, work knit over knit and purl over purl over the next 18 stitches, make 1 yarn over, knit the rest of round = 46-50 stitches. Now work pattern as follows: Knit 2-4, A.4 over the next 20 stitches (purl yarn overs from previous round twisted to avoid holes), knit the rest of the round. Continue pattern in the round like this. When piece measures 6-7 cm, insert 1 marker in the last stitch on round (= thumb stitch). Now increase for thumb gusset by increasing 1 stitch on each side of stitch with marker - read INCREASE TIP (= 2 stitches increased). Continue increase for thumb gusset every other round 4-5 more times (= 5-6 times in total)= 56-62 stitches. Continue to work without increase until piece measures 9-11 cm. On next round slip the next 11-13 thumb gusset stitches on a stitch holder, continue in the round with pattern and in stocking and at the same time cast on 1 new stitch on needle over stitches on stitch holder = 46-50 stitches. Then work until A.4 has been worked 4 times vertically. Piece should now measure approx. 17-18 cm (approx. 5 cm remain until finished measurements, try the mitten on and work to desired length). Insert 1 marker thread in each side so that there are 1-2 knit stitches between marker thread stitch and A.4 in each side. There are 24-26 knit stitches between marker threads inside mitten. Now work A.5 over A.4, and when you have worked up to round with arrow in diagram, continue pattern as before and begin decrease – remember DECREASE TIP. Decrease like this every other round 3 times and every round 5 times. When decrease is done and A.5 has been worked vertically, 19-23 stitches remain on round. Knit stitches together 2 by 2 until 5-6 stitches remain on round. Cut the yarn and pull it through the remaining stitches, tighten together and fasten. Mitten measures approx. 22-23 cm from top and down. Work thumb the same way as on right mitten. |
|||||||||||||||||||||||||||||||
Diagram explanations |
|||||||||||||||||||||||||||||||
|
|||||||||||||||||||||||||||||||

|
|||||||||||||||||||||||||||||||
|
|||||||||||||||||||||||||||||||
Have you finished this pattern?Tag your pictures with #dropspattern #pepperminttwistset or submit them to the #dropsfan gallery. Do you need help with this pattern?You'll find 19 tutorial videos, a Comments/Questions area and more by visiting the pattern on garnstudio.com. © 1982-2025 DROPS Design A/S. We reserve all rights. This document, including all its sub-sections, has copyrights. Read more about what you can do with our patterns at the bottom of each pattern on our site. |
|||||||||||||||||||||||||||||||


With over 40 years in knitting and crochet design, DROPS Design offers one of the most extensive collections of free patterns on the internet - translated to 17 languages. As of today we count 314 catalogues and 11821 patterns translated into English (UK/cm). 11821
We work hard to bring you the best knitting and crochet have to offer, inspiration and advice as well as great quality yarns at incredible prices! Would you like to use our patterns for other than personal use? You can read what you are allowed to do in the Copyright text at the bottom of all our patterns. Happy crafting!
Post a comment to pattern DROPS 214-35
We would love to hear what you have to say about this pattern!
If you want to leave a question, please make sure you select the correct category in the form below, to speed up the answering process. Required fields are marked *.