
Popular categories
Looking for a yarn?


Comments / Questions (77)
![]() Veronica wrote:
Veronica wrote:
Can you verify and answer to my question below? Did I get the measurement wrong or did you?
24.02.2015 - 16:54DROPS Design answered:
Dear Veronica, your question has been forwarded, thank you very much in advance for your patience.
26.02.2015 - 11:16
![]() Dominique wrote:
Dominique wrote:
Bonjour, je ne comprends pas le sens de la phrase : compter à partir du milieu sur le côté pour centrer le motif. Encore une question: faut-il faire les augmentations tous les tours, tous les 2 tours,tous les 4 tours l'une après l'autre ou en même temps? J'espère que je me suis bien fait comprendre. D'avance merci.
14.02.2015 - 17:55DROPS Design answered:
Bonjour Dominique, vous venez de placer 4 fils marqueurs au rang précédent, la maille avec la flèche dans A.2 (=1ère m) doit être la maille avec le fil, pour savoir où commencer le diagramme en fonction de votre nombre de mailles, comptez le nbe de mailles jusqu'au fil et ajustez en fonction: si vous avez par ex 24 m avant le fil, tricotez 2 fois A2 en commençant à la 1ère m, si vous avez 20 m par ex, tricotez 1 fois A.2 + les 8 dernières m de A.2 avant le fil marqueur. Bon tricot!
16.02.2015 - 09:01
![]() Veronica wrote:
Veronica wrote:
Following up with my previous question, your instruction says 7.5inches from cast on. With the cast on and others plus the raglan, it will go over 7.5 inches by at lease 2 inches. Would you please verify it? Thank you,
06.02.2015 - 21:45DROPS Design answered:
Dear Veronica, Piece measures approx. 7½" from cast-on edge at the front, it will be longer at the front because of the elevation. Remember to check your gauge to get the pattern work (28 rows in st st). Happy knitting!
07.02.2015 - 08:56
![]() Veronica wrote:
Veronica wrote:
Working the raglan, do I work all increases, example, 15 every other round and 6 every fourth round which equals 30+24 =54 rounds before seperate the body and sleeves? But then the length will be more than the required. In this case M, at 7.5 inches. Is ththis correct?
31.01.2015 - 14:55DROPS Design answered:
Dear Veronica, that's correct, you will get 54 rounds, ie 19 cm (see measurement chart) = approx. 7.5 inches. Happy knitting!
02.02.2015 - 09:31
![]() Mona wrote:
Mona wrote:
Är det möjligt att få storlek XS av det här mönstret?
20.12.2014 - 14:44DROPS Design answered:
Hej Mona. Det er desvaerre ikke muligt at give dig tilpasning paa mönstret, men du kan pröve at tilpasse det selv med hjaelp fra strikkefastheden. God jul!
23.12.2014 - 16:33
![]() Hanne wrote:
Hanne wrote:
Skal begynne med raglan. Men jeg skjønner ikke økingen. Jeg strikker i str L. På BOLEN: Øk på hver omg totalt 0 ganger, på hver 2.omg totalt 17 ganger og deretter på hver 4.omg totalt 5 ganger (=97 m på bakstk og 97 m på forstk). Hvor skal jeg øke, hvor mange ganger? Skal "på bolen" og "på ermet" strikkes samtidig? Eller er det først "på bolen" ? Trenger å få forklaringen inn med teskje!
19.12.2014 - 20:28DROPS Design answered:
Bolen: I L øger du først på hver 2.omg 17 gange og derefter på hver 4 omg 5 gange. Samtidig som du øger på ærmestykket på hver 2.omg 19 gange og på hver 4.omg 4 gange. Se hvordan du gør under ØKETIPS! God fornøjelse!
05.06.2015 - 12:14
![]() Hanne wrote:
Hanne wrote:
Skal begynne med raglan. Men jeg skjønner ikke økingen. Jeg strikker i str L. På BOLEN: Øk på hver omg totalt 0 ganger, på hver 2.omg totalt 17 ganger og deretter på hver 4.omg totalt 5 ganger (=97 m på bakstk og 97 m på forstk). Hvor skal jeg øke, hvor mange ganger? Skal "på bolen" og "på ermet" strikkes samtidig? Eller er det først "på bolen" ? Trenger å få forklaringen inn med teskje!
19.12.2014 - 20:28
![]() Katharina Vieler wrote:
Katharina Vieler wrote:
Bei der letzten Zunahme vor dem Bündchen sollen 8 M zugenommen werden ( "In der nächsten Rd 8 M für alle Größen gleichmäßig verteilt zunehmen (= 198-214-230-250-278-302 M). ") Bei diesen Maschenanzahlen geht dann aber das Rippenmuster (2 re 2 li) in der Runde nicht auf (=es fängt mit 2 re an und hört mit 2 re auf). Ist das beabsichtigt?
09.12.2014 - 08:10DROPS Design answered:
Sie haben Recht, das erscheint mir auch seltsam, Sie stricken ja in Runden und brauchen daher eigentlich eine durch 4 teilbare M-Zahl. Ich werde das Problem an die Designerinnen weiterleiten und bitte um etwas Geduld.
10.12.2014 - 22:32
![]() Anna Rita Migliorelli wrote:
Anna Rita Migliorelli wrote:
Salve, mi piacerebbe molto realizzare questo modello, ma non riesco a capire come posso aumentare e diminuire le maglie rispettando nel contempo il diagramma. Grazie della disponibilità. Buon lavoro!
10.11.2014 - 18:36DROPS Design answered:
Buongiorno Anna Rita. Quando lavora la prima riga del diag.A2, la maglia con il segno sul davanti, dietro e maniche corrisponde alla m con la freccia. In questo modo, procedendo verso i lati riesce ad individuare con quale m del diagramma deve iniziare/finire il motivo sul pezzo che sta lavorando. Ad ogni giro, la m aumentata verrà lavorata come la m che, nel diagramma, precede/segue la prima/ultima m del giro precedente. Le 4 m di ogni raglan vengono lavorate seguendo il diag.A3. Buon lavoro!
11.11.2014 - 14:11
![]() Alessandra Tavernier wrote:
Alessandra Tavernier wrote:
Ik heb nog eens een vraag over de merkdraden en de markeerders. Er zouden volgens de tekst 8 markeerders in moeten komen en 4 merkdraden. Maar als ik dan de uitleg volg hoe ik ze moet plaatsen kom ik uit op 9 markeerders en 3 merkdraden. Wat klopt er dan niet? want de merkdraden zijn belangrijk voor de raglans maar als ze niet kloppen kan ik niet voort met mijn patroon. Klopt het aantal nu niet of klopt de uitleg van het plaatsen niet?
27.10.2014 - 21:51DROPS Design answered:
Hoi Alessandra. Je hebt gelijk, er was een foutje bij het vertalen. De eerste markeerder (van de ronding) moet een markeerdraad zijn. Het is gewijzigd. Bedankt voor het opletten.
28.10.2014 - 13:19
|
|||||||
Silver Dream#silverdreamsweater |
|||||||
 |
 |
||||||
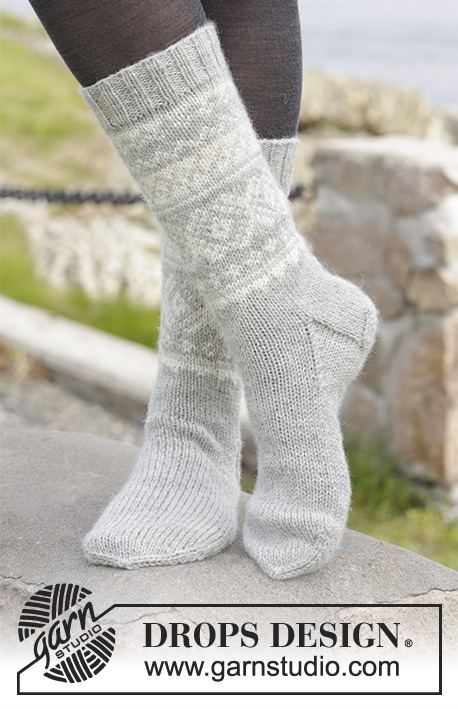
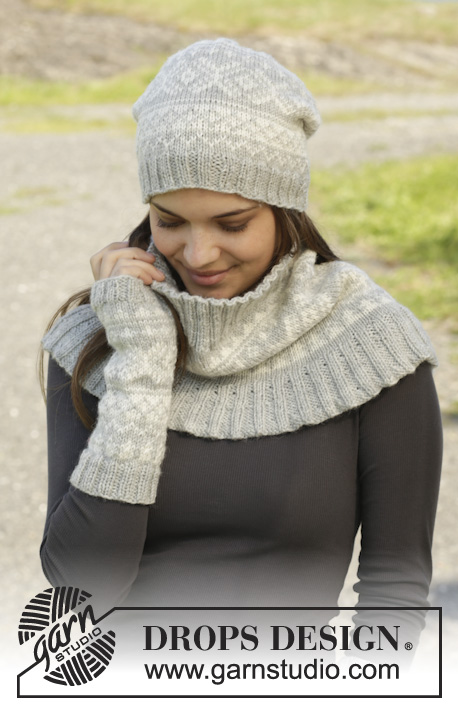
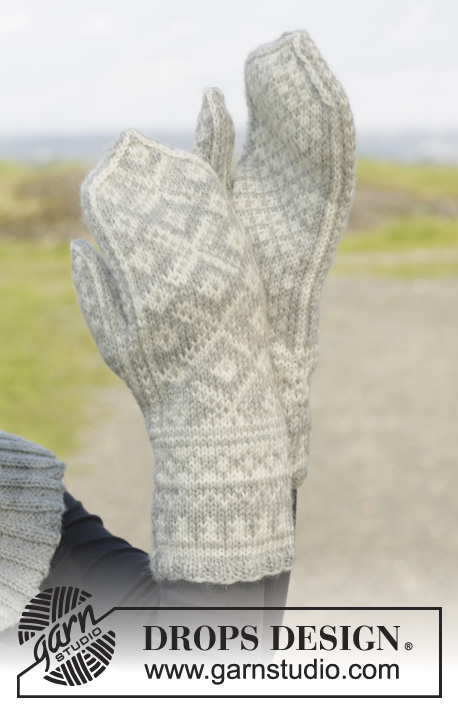
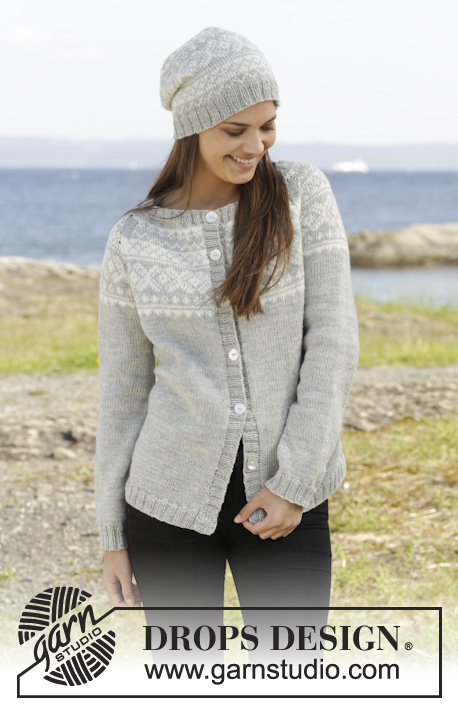
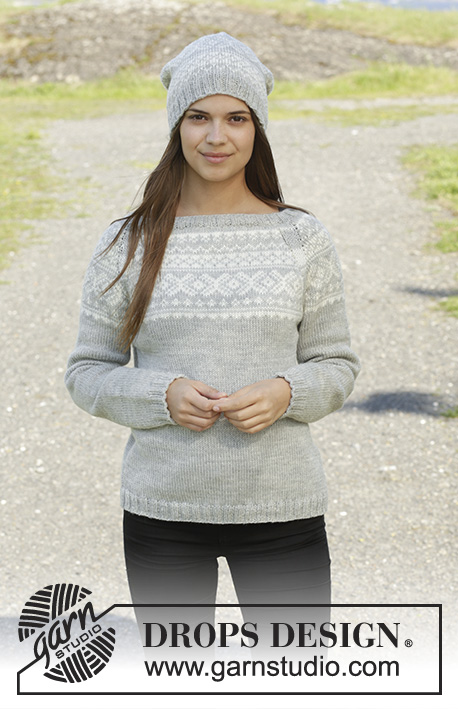
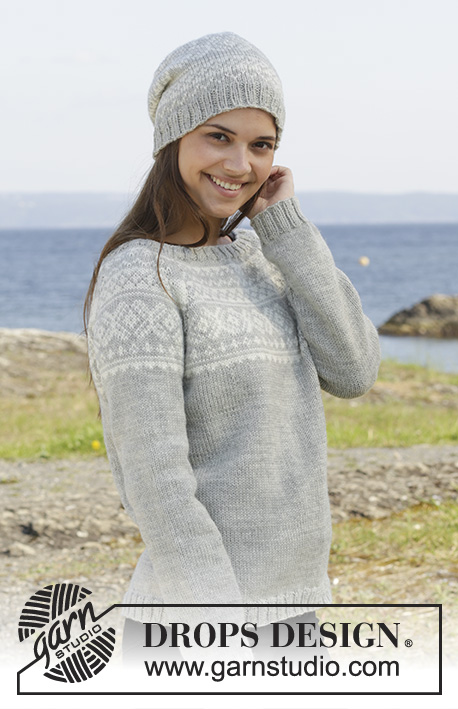
Knitted DROPS jumper and hat with Norwegian pattern in ”Karisma”. Size: S - XXXL.
DROPS 157-2 |
|||||||
|
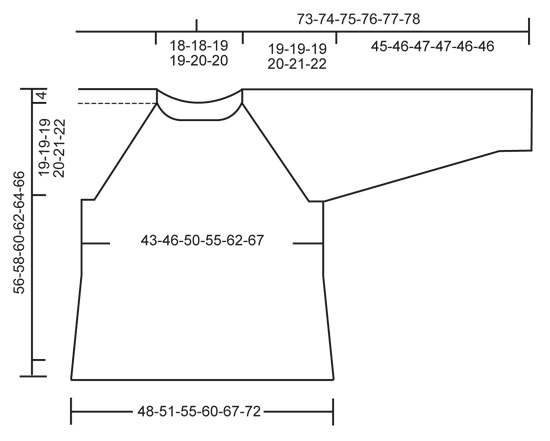
PATTERN: See diagrams A.1-A.3. Work entire pattern from RS in stocking st. INCREASE TIP (applies to raglan): Inc 1 st by making a YO before and after the 4 sts between markers on front piece/back piece and sleeves. K YO twisted on next round. Work the inc sts in the pattern. PATTERN TIP: Diagram A.3 shows how to work the 4 raglan sts to avoid large spaces between sts. After diagram work piece with light pearl grey until finished. ---------------------------------------------------------- JUMPER: Worked in the round on circular needle, top down. Cast on 120-120-124-124-128-128 sts on circular needle size 3.5 mm with light pearl grey. K 1 round. Then work rib (= K 2/P 2). Switch to circular needle size 4 mm when piece measures 2 cm. Then work in stocking st AT THE SAME TIME on first round dec 12-12-12-8-8-8 sts evenly = 108-108-112-116-120-120 sts (this is done to give the garment better shape). Work 1 round. On next round, inc 12-28-36-40-36-52 sts evenly = 120-136-148-156-156-172 sts. REMEMBER THE KNITTING TENSION! Work 1 round and at the same time insert 8 markers and 4 strands in the piece as follows: insert a marker in the first stitch on the round (mid st on back piece). Work the first 21-24-27-28-28-30 sts, insert a marker. Work 4 sts, insert a marker, work 6-7-7-8-8-10 sts, insert a strand in the last st on right needle (= mid st on sleeve). Work 5-6-6-7-7-9 sts, insert a marker. Work 4 sts, insert a marker, work 21-24-27-28-28-30 sts, insert a strand in the last st on right needle (= middle of front piece). Work 20-23-26-27-27-29 sts, insert a marker. Work 4 sts, insert a marker, work 6-7-7-8-8-10 sts, insert a strand in the last st on right needle (= middle of sleeve). Work 5-6-6-7-7-9 sts, insert a marker. Work 4 sts, insert a marker. Work 20-23-26-27-27-29 sts until first marker. READ ALL OF THE FOLLOWING SECTION BEFORE CONTINUING: Now work PATTERN according to diagram A.2 - READ PATTERN TIP! NOTE: St with strand on back piece, front piece and sleeves should fit st with arrow in diagram. Count out towards the side (i.e. the pattern will not fit in transitions between body and sleeves). AT THE SAME TIME inc for raglan in every transition between body and sleeves as follows - READ INCREASE TIP: ON BODY: Inc every round 0-0-0-2-10-14 times in total, every other round 14-15-17-19-20-20 times in total and then every 4th round 6-6-5-4-2-2 times in total (= 81-89-97-105-119-131 sts on back piece and 81-89-97-105-119-131 sts on front piece) ON SLEEVE: Inc every other round 14-15-19-20-25-23 times in total and every 4th round 6-6-4-4-2-4 times in total (= 59-63-67-71-77-81 sts on sleeve). Piece measures approx. 19-19-19-20-21-22 cm from cast-on edge at the front. After all inc for raglan, there are 280-304-328-352-392-424 sts. Work next round as follows: Work the first 41-45-49-53-60-66 sts (= half back piece), slip the next 59-63-67-71-77-81 sts on stitch holder (= sleeve), cast on 8-8-8-10-10-10 new sts, work 81-89-97-105-119-131 sts (= front piece), slip the next 59-63-67-71-77-81 sts on stitch holder (= sleeve), cast on 8-8-8-10-10-10 new sts, work the last 40-44-48-52-59-65 sts (= half back piece) = 178-194-210-230-258-282 sts. Insert 1 marker in the middle of the 8-8-8-10-10-10 new sts under each sleeve. Then work in stocking st until piece measures approx. 36-37-38-39-40-41 cm. Then inc 1 st on each side of 2 sts in each side by making a YO (marker is in the middle of these sts), K YO twisted on next round (= 4 sts inc). Repeat inc every 4-4-4-5-5-5 cm 2 more times (= 3 times in total) = 190-206-222-242-270-294 sts. Work until piece measures 52-54-56-58-60-62 cm. On next round inc 10 sts evenly in all sizes = 200-216-232-252-280-304 sts. Switch to circular needle size 3.5 mm. Work rib = K 2/P 2 until rib measures approx. 4 cm. Cast off with K over K and P over P. SLEEVE: Work piece in the round on circular needle in stocking st. Slip sts from one stitch holder back on circular needle size 4 mm (= 59-63-67-71-77-81 sts). Work in stocking st and cast on 8-8-8-10-10-10 new sts at the end of round = 67-71-75-81-87-91 sts. Insert a marker in the middle of the new sts under the sleeve. When piece measures approx. 3 cm, dec 1 st on each side of the 2 sts mid under sleeve (marker is in the middle of these 2 sts). Switch to double pointed needles when needed. Repeat dec every 3½-3½-3-2½-2-2 cm 8-9-10-12-15-16 more times (= 9-10-11-13-16-17 times in total) = 49-51-53-55-55-57 sts. When piece measures 41-42-43-43-42-42 cm, inc 7-5-7-5-9-7 st evenly = 56-56-60-60-64-64 sts. Switch to double pointed needles size 3.5 mm. Work rib K 2, P 2 until piece measures 45-46-47-47-46-46 cm from where new sts were cast on. Cast off with K over K and P over P. Work the other sleeve the same way. ASSEMBLY: Sew the holes under the sleeves. Fasten the yarn. ---------------------------------------------------------- HAT: Worked in the round on circular needle, switch to double pointed needles when needed. Cast on 116 sts with light pearl grey on circular needle size 3.5 mm. Work rib = K 2/P 2 until piece measures approx. 4 cm. Switch to circular needle size 4 mm. K 1 round with pearl grey while AT THE SAME TIME dec 8 sts evenly = 108 sts. Then work pattern according to diagram A.1 (= 9 repetitions on round). REMEMBER THE KNITTING TENSION! When A.1 has been worked 1 time vertically, continue with light pearl grey and stocking st. Work 1 round AT THE SAME TIME insert 9 markers in the hat with 12 sts between every marker. On next round, dec 1 st after every marker by K 2 tog (= 9 sts dec). Repeat dec every other round 10 times in total = 18 sts. On next round K tog all sts 2 by 2 = 9 sts. Cut the yarn and pull it through the remaining sts, tighten tog and fasten. The hat measures approx. 25 cm vertically. |
|||||||
Diagram explanations |
|||||||
|
|||||||
 |
|||||||
 |
|||||||
Have you finished this pattern?Tag your pictures with #dropspattern #silverdreamsweater or submit them to the #dropsfan gallery. Do you need help with this pattern?You'll find 24 tutorial videos, a Comments/Questions area and more by visiting the pattern on garnstudio.com. © 1982-2026 DROPS Design A/S. We reserve all rights. This document, including all its sub-sections, has copyrights. Read more about what you can do with our patterns at the bottom of each pattern on our site. |
|||||||


With over 40 years in knitting and crochet design, DROPS Design offers one of the most extensive collections of free patterns on the internet - translated to 17 languages. As of today we count 324 catalogues and 12267 patterns translated into English (UK/cm). 12267
We work hard to bring you the best knitting and crochet have to offer, inspiration and advice as well as great quality yarns at incredible prices! Would you like to use our patterns for other than personal use? You can read what you are allowed to do in the Copyright text at the bottom of all our patterns. Happy crafting!
Post a comment to pattern DROPS 157-2
We would love to hear what you have to say about this pattern!
If you want to leave a question, please make sure you select the correct category in the form below, to speed up the answering process. Required fields are marked *.