
Popular categories
Looking for a yarn?


Comments / Questions (52)
![]() Eli Orset wrote:
Eli Orset wrote:
Hei! Finnes denne oppskriften til herre M?
13.11.2019 - 12:51DROPS Design answered:
Hei Eli. Dette mønsteret finnes dessverre ikke til herre, men vi har mange mønstre til herregensere med lignende sjalkrage, for eksempel: DROPS 0-1159 God fornøyelse!
13.11.2019 - 15:50
![]() Kim Tchon wrote:
Kim Tchon wrote:
Increasing at the start of the sweater, how many rows between inc?
24.10.2019 - 17:26DROPS Design answered:
Dear Mrs Tchon, first increase is done when piece measures 6 or 7 cm = 2½" or2 3/4", (see size), and you repeat them every 7-7½-8-9-4½ cm = 2 3/4"-2 7/8"-3 1/8"-3½", ie measure in cm and do not count in rows to get the increased worked evenly spaced as in pattern. Happy knitting!
25.10.2019 - 08:57
![]() Julia Ines wrote:
Julia Ines wrote:
Hola, estoy haciendo la talla 12, mi problema es entender lo que escriben en el patrón en lo que se refiere a esto : En cada lado de cada marcapuntos. Repetir los aum a cada 7-7½-8-9-4½ cm 2-2-2-2-5 veces más (= un total de 3-3-3-3-6 aum) = 108-120-132-144-156 pts , a que se refiere, si le pongo 6 aumentos no me da la cantidad de 156 p que piden para seguir tejiendo. Espero su respuesta, les estaré muy agradecida por su ayuda. Yo les he escrito anteriormente y les dejé mi e-mail
24.10.2019 - 12:11DROPS Design answered:
Ver la respuesta abajo
27.10.2019 - 18:32
![]() Julia wrote:
Julia wrote:
Quisiera saber como entender o leer las indicaciones. 2 marcapuntos en la pieza; 1 marcapuntos al inicio de la vta y 1 marcapuntos después de 48-54-60-66-66 pts. Ahora aum 1 pt – LEER TIP PARA AUMENTO – en cada lado de cada marcapuntos. Repetir los aum a cada 7-7½-8-9-4½ cm 2-2-2-2-5 veces más (= un total de 3-3-3-3-6 aum) = 108-120-132-144-156 pts – NOTA: Tejer los pts aum en el patrón.
24.10.2019 - 11:51DROPS Design answered:
Hola Julia. En cada vuelta con aumentos aumentamos 4 puntos ( 1 punto a cada lado de cada marcapuntos y hay 2 marcapuntos). Después de completar los aumentos hay 24 puntos aumentados . 132 puntos ( los que teníamos al empezar los aumentos ) + 24 = 156 puntos
27.10.2019 - 18:31
![]() Hanlie wrote:
Hanlie wrote:
Started knitting this pattern for my grandson. I would like to know the following: Does the rib get knitted in the round and when you start pattern do you knit back and forth in pattern?
15.05.2019 - 16:50DROPS Design answered:
Dear Hanlie, you knit rib in the round and continue in the round with pattern as well. Piece is divided and knitted back/forth by the armholes and neckline. Happy knitting!
15.05.2019 - 18:57
![]() Shirley wrote:
Shirley wrote:
I am having a lot a trouble trying to maintain the pattern stitches when adding the increase sts. there's always an area that goes off pattern. I have ripped my work out 4 times, trying to make the increase sts area less noticeable. can you give me any wise words for this issue
07.05.2019 - 17:46DROPS Design answered:
Dear Shirley, when increasing on body, the first stitche increased (at the beg of round) will be now worked as the last stitch in A.1, the 2nd increase (before 2nd marker) will be worked as next stitch folllowing pattern (if the st before inc is the last st in A.1, work the inc as the first st in A.1), after marker work the inc as the st before the first st after marker and work the last inc (before 1st marker) as next st in pattern. Pattern will not match anymore on the sides at marker, but continue working pattern between markers. Happy knitting!
08.05.2019 - 07:16
![]() Shirley wrote:
Shirley wrote:
Thank you soo much for your quick response. That totally makes sense to me now. By the way, I love your designs
01.05.2019 - 13:42
![]() Shirley wrote:
Shirley wrote:
Apparently a diagram is different from a graph, which is what I have done. I am sorry but I am still confused. If the first round is K4 sts, how is the rest of the row worked? 2nd round is K4 sts and than what? 3rd round K1 st and 2 Psts. I guess what I need to know is , how is the rest of the round worked beyond the first 4 sts? Please help me!!
01.05.2019 - 13:27DROPS Design answered:
Hello Shirley. You must repeat diagram on all sts on round. So on 1st, 2nd and 4th round you will knit all sts; on 3rd round you will * knit 1, purl 2* and repeat *-* on all sts . Happy knitting!
01.05.2019 - 13:36
![]() Shirley wrote:
Shirley wrote:
I have knit from diagrams many times, but I just can't figure this one out. The diagram A1 consists only of a block with 4 rows. I read this as knit 1 row - purl2 and knit 1-- than knit 2 rows. This pattern shows a nice texture, but I am having a hard time reading the diagram. Please help
01.05.2019 - 00:30DROPS Design answered:
Dear Shirley, diagrams are to be read from the bottom right corner to the left. So, the first 2 rounds are K4, the third round is K1, P2, and the last round is K4. You have to repeat these rounds upwards. Happy knitting!
01.05.2019 - 09:48
![]() ANNE wrote:
ANNE wrote:
Hi my name is Anne, I would like to knit this sweater for my son. I don\'t understand \"dec all 3 P sts to 2 P (by P 2 tog) = 96-108-120-132-132\", can you help me please.
17.04.2019 - 01:56DROPS Design answered:
Dear Anne, it means that in every place where you have 3 purl stitches, you need to decrease a stitch, by purling 2 stitch together, and then you will have 96-108-120-132-132 stitches in that row (depending what size you are making). I hope this helps. Happy Knitting!
17.04.2019 - 02:27
|
|||||||
Jonathan#jonathansweater |
|||||||
 |
 |
||||||
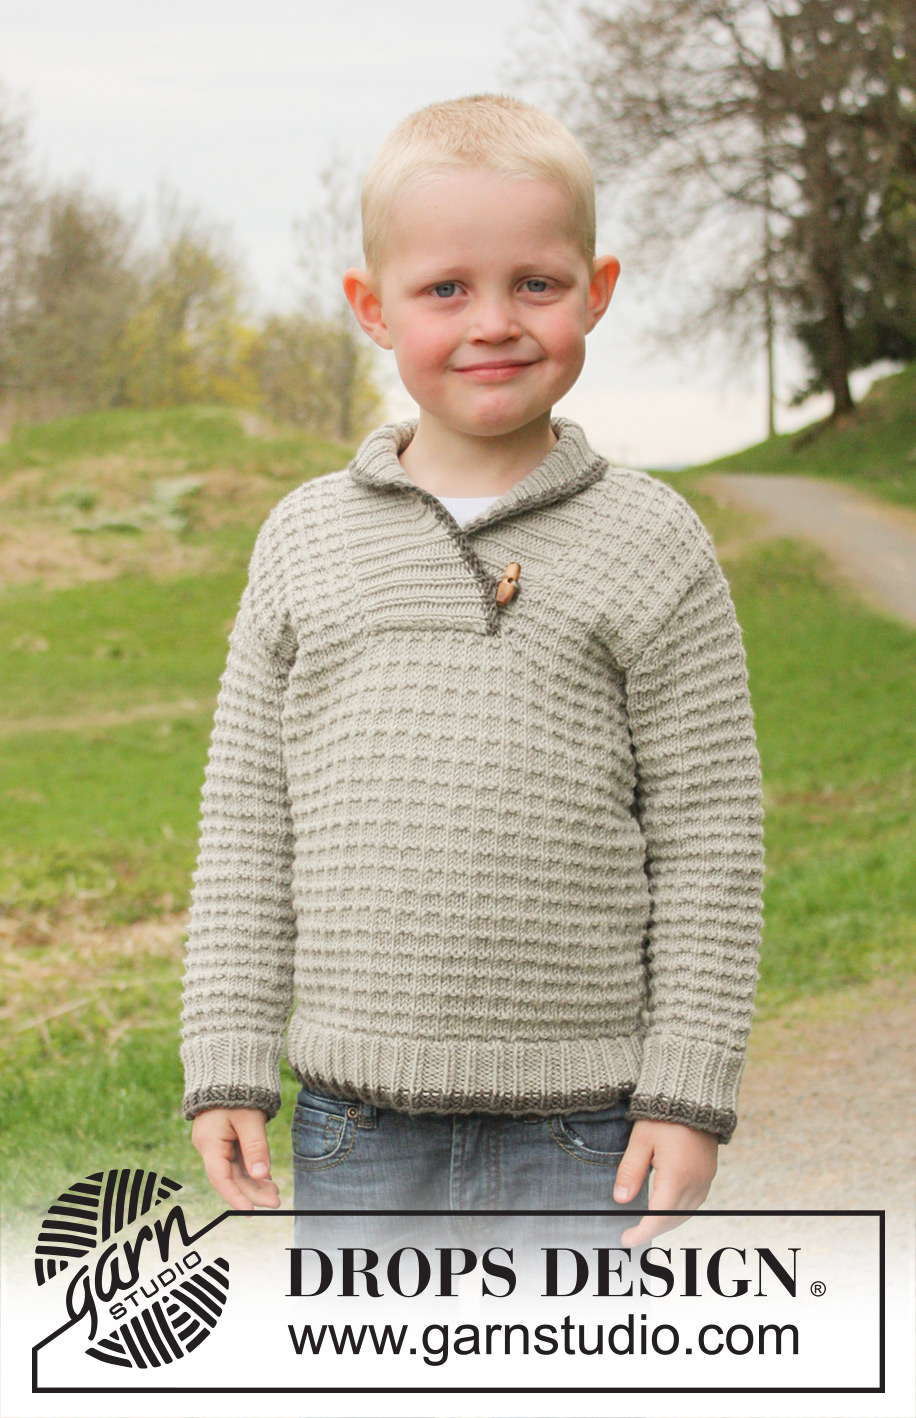
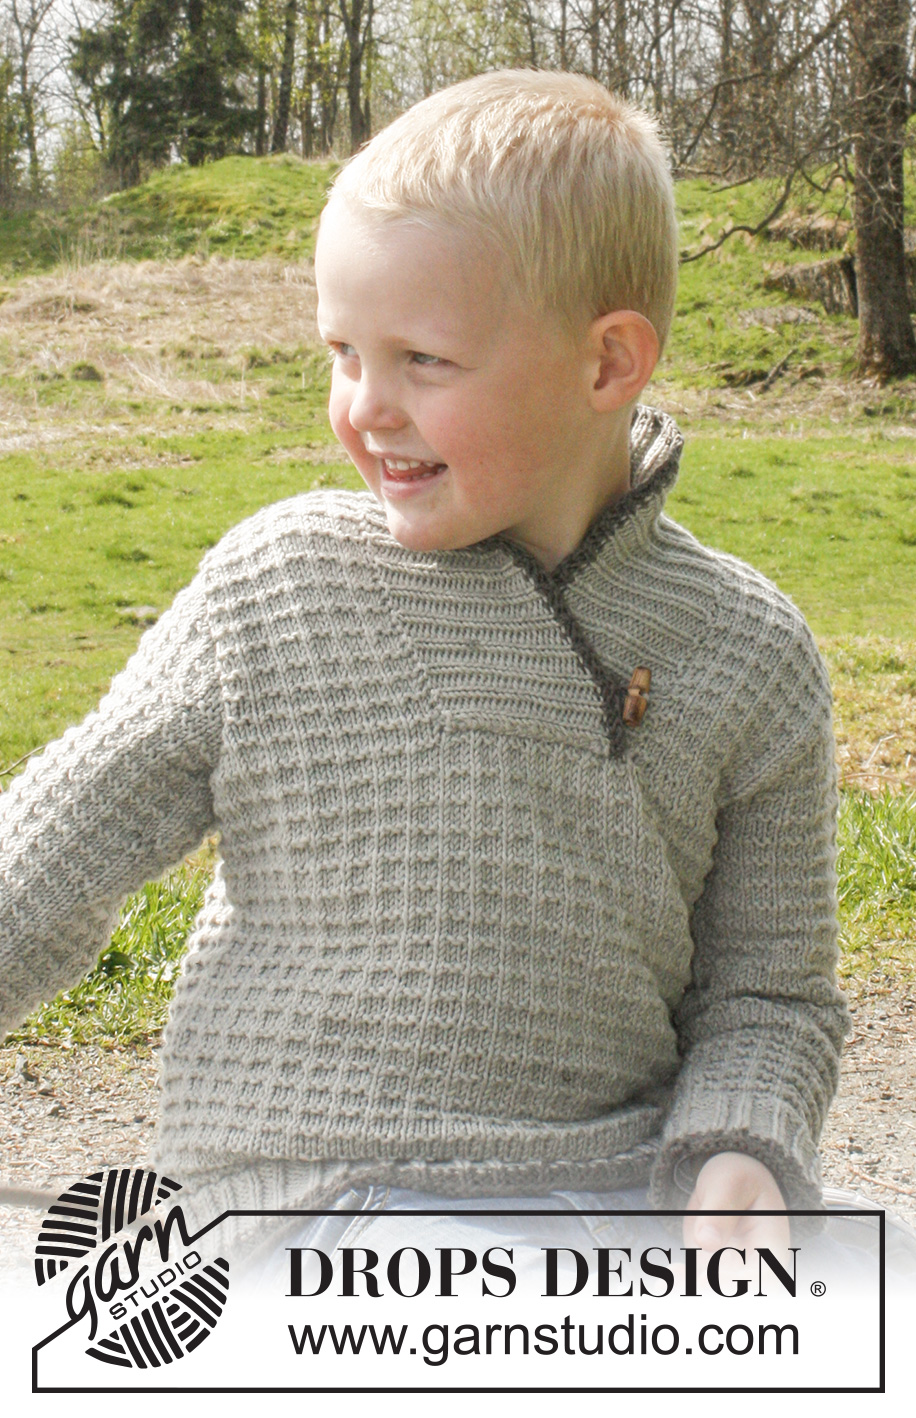
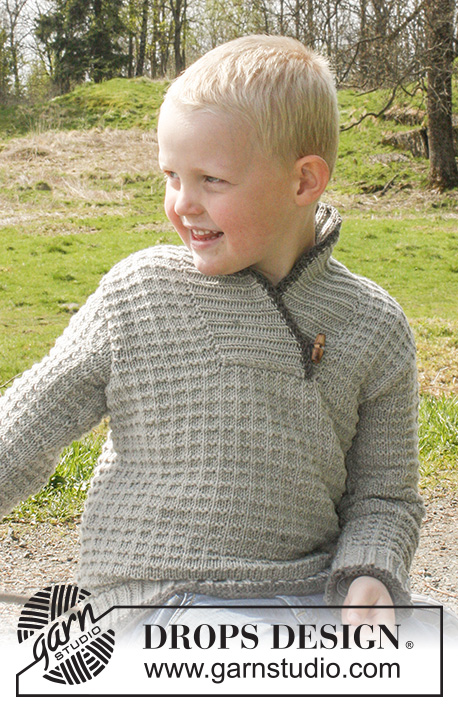
Knitted jumper with textured pattern and shawl collar in DROPS Nepal. Size children 3 to 12 years.
DROPS Children 23-28 |
|||||||
|
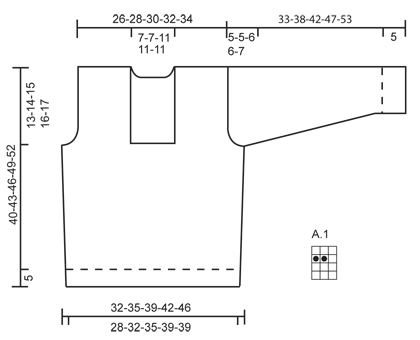
PATTERN: See diagram A.1. Diagram shows pattern from RS. INCREASE TIP: Inc 1 st by working 2 sts in the same st. ---------------------------------------------------------- BODY: Worked in the round on circular needle. Cast on 112-126-140-154-154 sts on circular needle size 4.5 mm with dark grey Nepal. K 1 round. Then work next round as follows: * K 1, P 2, K 1, P 3 *, repeat from *-* the entire round. Continue rib like this. AT THE SAME TIME when 2 rounds in rib have been worked, switch to grey and work with grey until finished measurements. When rib measures 5 cm, dec all 3 P sts to 2 P (by P 2 tog) = 96-108-120-132-132 sts. Switch to circular needle size 5 mm and work pattern A.1. When piece measures 6-6-7-7-7 cm, insert 2 markers in the piece; 1 marker at beg of round and 1 marker after 48-54-60-66-66 sts. Now inc 1 st - READ INCREASE TIP - on each side of every marker. Repeat inc every 7-7½-8-9-4½ cm 2-2-2-2-5 more times (= a total of 3-3-3-3-6 inc) = 108-120-132-144-156 sts - NOTE: Work the inc sts in the pattern. When piece measures 27-29-31-33-35 cm work next row as follows: Cast off 3 sts for armhole, work 18-21-21-24-27 sts in pattern as before (= left front piece), cast off the next 12-12-18-18-18 sts for neck, work 18-21-21-24-27 sts (= right front piece), cast off 6 sts for armhole, work 48-54-60-66-72 sts (= back piece) and cast off the 3 remaining sts for armhole. Finish each part separately. BACK PIECE: = 48-54-60-66-72 sts. Continue back and forth with pattern as before - AT THE SAME TIME cast off for armholes at beg of every row in each side as follows: 2 sts 1-1-1-2-2 times and 1 st 1-1-1-2-2 times = 42-48-54-54-60 sts. Work until piece measures 38-41-44-47-50 cm. Now cast off the middle 10-10-16-16-16 sts for neck and finish each shoulder separately. Continue to cast off 1 st on next row from neck = 15-18-18-18-21 sts remain on the shoulder. Continue until piece measures 40-43-46-49-52 cm and cast off. RIGHT FRONT PIECE: = 18-21-21-24-27 sts. Continue back and forth with pattern as before while AT THE SAME TIME casting off for armhole at beg of every row from the side as on back piece = 15-18-18-18-21 sts. Continue pattern until piece measures 40-43-46-49-52 cm and cast off - NOTE: Cast off on same row in pattern as on back piece. LEFT FRONT PIECE: = 18-21-21-24-27 sts. Work as right front piece but reversed. SLEEVE: Cast on 35-35-42-42-42 sts on double pointed needles size 4.5 mm with dark grey. K 1 round. Then work next round as follows: * K 1, P 2, K 1, P 3 *, repeat from *-* the entire round. Continue rib like this. AT THE SAME TIME when 2 rounds in rib have been worked, switch to grey and work with grey until finished measurements. When rib measures 5 cm, dec all 3 P sts to 2 P sts = 30-30-36-36-36 sts. Switch to double pointed needles size 5 mm and work pattern A.1. When piece measures 6 cm, insert a marker at the beg of round. Now inc 2 sts mid under sleeve (i.e. 1 st on each side of marker), repeat inc every 3½-4½-5-4-4½ cm a total of 6-6-6-9-9 times = 42-42-48-54-54 sts - work the inc sts in pattern. When piece measures 28-33-36-41-46 cm, cast off 6 sts mid under sleeve (i.e. cast off 3 sts on each side of marker) and work the sleeve back and forth on needle until finished measurements. Cast off for sleeve cap at beg of every row in each side as follows: 2 sts 1 time and 1 st 1 time. Then cast off 2 sts at beg of every row in each side until piece measures 32-37-41-46-52 cm, then cast off 3 sts at beg of the next 2 rows. Cast off the remaining sts, piece measures approx. 33-38-42-47-53 cm. ASSEMBLY: Sew the shoulder seams. Sew in sleeves. SHAWL COLLAR: Start mid front on the left side of sts cast off for neck (i.e. on right front piece). Knit up on circular needle size 4.5 mm with grey as follows: 27 to 36 sts up to shoulder, then knit up 15 to 21 sts in the back of neck, and finally 27 to 36 sts down along left side of neck dec = 69 to 93 sts (NOTE: Do not knit up where sts were cast off in front of neck). K 1 row from WS while AT THE SAME TIME inc evenly to 87-93-105-111-111 sts. Then work rib as follows (from RS): 1 edge st which is worked K on all rows, * K 1, P 2 *, repeat from *-* until 2 sts remain, finish with K 1 and 1 edge st which is worked K on all rows. Continue rib like this until collar measures approx. 3-3-5-5-5 cm. Now inc 1 K st in each of the middle 10-12-12-14-14 K sts seen from RS (= back of neck) = 97-105-117-125-125 sts. Work rib until collar measures 6-6-10-10-10 cm. Switch to dark grey and work 2 rows in rib as before, then loosely cast off with K over K and P over P. Fold the collar double (right side over left side) at the bottom of neck opening and fasten neatly with stitches to neck line through both layers - outermost edge st in each side on collar are sewn edge to edge in front loop of outermost st towards cast off edge mid front. BUTTON LOOP: Make one loop as follows: Twist 2 strands of 40 cm in gray and fold them double. Attach the strap about 3 cm up from the neckline (about 1 cm from the edge at center front). Pull the strands through the collar on the right front piece(right after the dark gray edge) and fasten the ends on the back. Sew button onto the collar on the left front piece, about 3 cm up from the neckline. |
|||||||
Diagram explanations |
|||||||
|
|||||||
 |
|||||||
Have you finished this pattern?Tag your pictures with #dropspattern #jonathansweater or submit them to the #dropsfan gallery. Do you need help with this pattern?You'll find 7 tutorial videos, a Comments/Questions area and more by visiting the pattern on garnstudio.com. © 1982-2026 DROPS Design A/S. We reserve all rights. This document, including all its sub-sections, has copyrights. Read more about what you can do with our patterns at the bottom of each pattern on our site. |
|||||||


With over 40 years in knitting and crochet design, DROPS Design offers one of the most extensive collections of free patterns on the internet - translated to 17 languages. As of today we count 324 catalogues and 12267 patterns translated into English (UK/cm). 12267
We work hard to bring you the best knitting and crochet have to offer, inspiration and advice as well as great quality yarns at incredible prices! Would you like to use our patterns for other than personal use? You can read what you are allowed to do in the Copyright text at the bottom of all our patterns. Happy crafting!
Post a comment to pattern DROPS Children 23-28
We would love to hear what you have to say about this pattern!
If you want to leave a question, please make sure you select the correct category in the form below, to speed up the answering process. Required fields are marked *.