
Popular categories
Looking for a yarn?


Comments / Questions (163)
![]() Diane Thibault wrote:
Diane Thibault wrote:
Je me questionne à savoir quand nous avons réuni le deux parties si on dois diminuer après un autre 12 cm. C'est à dire suite à nos 11 cm. déjà fait qui ferais 11 plus 12 avant de commencer à diminuer les côtés. Merci
25.01.2017 - 19:39DROPS Design answered:
Bonjour Mme Thibault, les 12 cm se comptent depuis le rang de montage, soit 1 cm après avoir réuni les 2 pièces. Bon tricot!
01.02.2017 - 11:02
![]() Sylvie wrote:
Sylvie wrote:
Bjr combien de pelote me faut il pour le réaliser en taille s/m et cb1 en gramme svp merci beaucoup
18.01.2017 - 12:56DROPS Design answered:
Bonjour Sylvie, vous trouverez le poids total pour chaque qualité pour votre taille sous l'onglet "Fournitures", retrouvez le poids de chaque qualité sous son nuancier. Bon tricot!
18.01.2017 - 13:52
![]() Marivi wrote:
Marivi wrote:
Hola, tengo dudas con los aumentos para las mangas, pone añadir dos puntos, yo lo hago como si los estuviera montando, pero veo que no me queda bonito el filo, me queda en escalón, y estoy pensando que luego esa parte no va cosida y la veo fea para que se vea, me podéis decir si hay alguna manera que quede bonito? ! otra duda es que si en las 4 vueltas de punto musgo se hace alguna disminución en el centro a cada lado del marcador o es cuando se empieza punto jersey.....Muchas gracias
26.10.2016 - 01:22DROPS Design answered:
Hola Marivi. Las dism comienzan a 3 cm desde el borde inferior, es decir, en la parte de pt jersey. Los 2 pts a cada lado suelen aumentar montando pt nuevos o trabajar 1 lazada antes del último pt y en el último pt trabajar dos pts (primero en el bucle posterior y después en el bucle anterior) . No te olvides de que, al terminar, montamos alli los pts para los puños con Alpaca.
30.10.2016 - 12:06
![]() Monica wrote:
Monica wrote:
Buenos dias, tengo una duda sobre el poncho de esta pagina.Cuando se trabaja en redondo las disminuciones de delante y de atrás se hacen a cada vuelta ? Porque yo así lo he hecho y tengo trabajado mas de un palmo en redondo con disminuciones a cada vuelta.Por favor decirme si lo hago bien. Un saludo
29.09.2016 - 15:24DROPS Design answered:
Hola Monica. Cuando trabajamos de ida y vta las dism se trabajan solo en las filas por el LD, y las filas por el LR se trabajan sin dism. Cuando trabajamos en redondo las dism se trabajan cada 2ª vta (una vuelta con disminuciones y otra sin disminuciones).
07.10.2016 - 16:33
![]() Isabelle wrote:
Isabelle wrote:
Merci pour votre explication Combien dois je avoir de mailles avant de les rassembler ? je fais le modèle taille L/XL
02.09.2016 - 17:35DROPS Design answered:
Bonjour Isabelle, si vous avez bien 20 rangs pour 10 cm, vous diminuez sur 10 cm soit 14 rangs = 7 diminutions x 2 m = 14 diminutions. Vous aviez 180 m + 4 + 40 -14= 210 m environ quand vous mettez le dos en attente. Bon tricot!
05.09.2016 - 08:33
![]() Isabelle wrote:
Isabelle wrote:
Bonjour Pouvez vous m'indiquez combien je dois avoir de maille sur chaque parties avant de les tricoter en rond ? Je ne comprend pas où placer les marqueurs à cette étape . Merci pour votre aide
02.09.2016 - 15:27DROPS Design answered:
Bonjour Isabelle, quand on tricote en rond, on doit avoir un marqueur au début du tour et un autre à la moitié des mailles, c'est-à-dire que ces 2 nouveaux marqueurs "encadrent" les mailles du devant et du dos. Les diminutions de part et d'autre des marqueurs au milieu dos et au milieu devant vont continuer comme avant (= 46-52-58 fois au total depuis le début) et diminuez maintenant en plus à 12-13 cm de hauteur totale de chaque côté des nouveaux marqueurs (au début et à la fin du dos et du devant). Bon tricot!
02.09.2016 - 15:54
![]() Fia wrote:
Fia wrote:
Annsofi 25.08.2016 kl. 09:46: Jag undrar lite om minskningarna Verkar som minskning 1 och 2 har blivit fel Enligt bilden ska det bli som en söm mitt fram Men när man gör minskning 1 blir det inte så Men för man däremot minskning 2 blir det som en söm Vilket är rätt?
25.08.2016 - 10:05DROPS Design answered:
Hej! Du ska minska enligt minskningstips 1 mitt fram och bak, det blir då 2 slätst m mitt fram och bak mellan minskningarna.
04.04.2017 - 16:11
![]() Annsofi wrote:
Annsofi wrote:
Jag undrar lite om minskningarna Verkar som minskning 1 och 2 har blivit fel Enligt bilden ska det bli som en söm mitt fram Men när man gör minskning 1 blir det inte så Men för man däremot minskning 2 blir det som en söm Vilket är rätt?
25.08.2016 - 09:46
![]() Anita Aplin wrote:
Anita Aplin wrote:
I've been knitting for years and this should be a really simple pattern but I've had to unpick about 3 times and the as last resort have looked at the comments Just to make sure that I'm not going completely mad! And there was the answer. The English version of the pattern appears to be written wrong. could you not just amend the pattern so that it is clear on the number of Middle increases you need before you stop and start the other side before you join the 2 sides together.
07.05.2016 - 15:01DROPS Design answered:
Dear Mrs Aplin, the number of middle increases you will make before putting aside and work 2nd piece will depend on your tension in height, you stop when all inc for sleeve edge are done - piece should measure approx. 10-12 cm (see size), then work 2nd piece and then put them tog and continue mid increases. Happy knitting!
09.05.2016 - 11:38
![]() Monica wrote:
Monica wrote:
Ok.Muchas gracias.Entonces las partes de frente y espalda viene haci como disminución dos puntos de derecho y otra vez disminución ?
13.04.2016 - 16:20DROPS Design answered:
Hola Mónica. No me ha quedado clara la pregunta. ¿Podrías concretar?
17.04.2016 - 09:37
|
|
Hometown |
|
 |
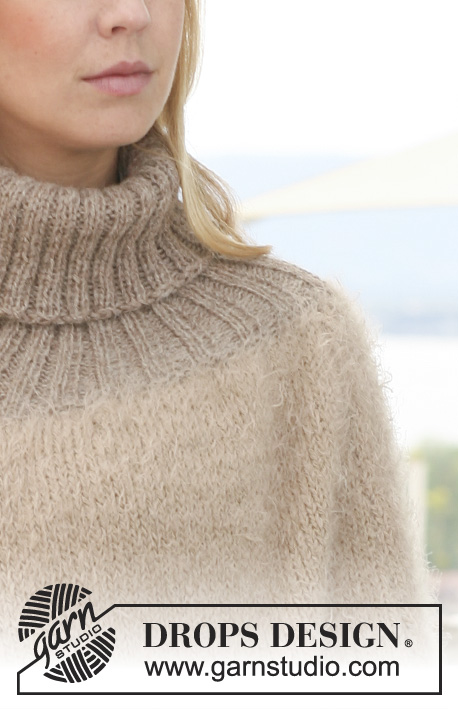 |
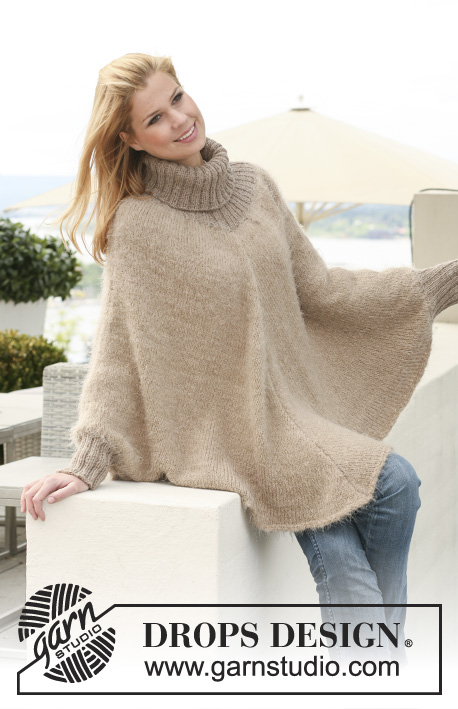
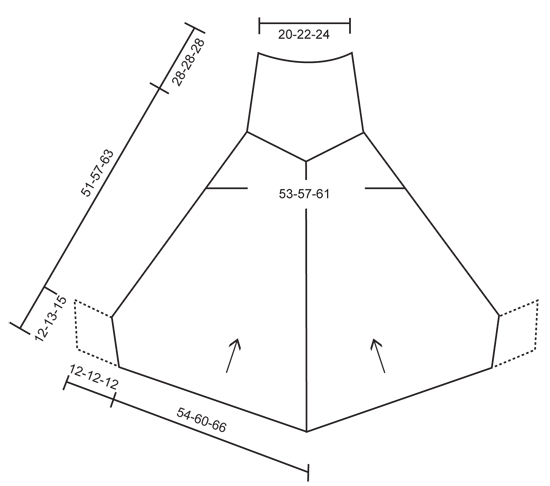
Knitted DROPS poncho in 1 thread ”Symphony”, 1 thread "Melody" or 1 thread "Brushed Alpaca Silk" + 1 thread "Alpaca" with rib in ”Alpaca”. Size S to XXXL.
DROPS 123-28 |
|
|
GARTER ST (back and forth on needle): K all rows. DECREASING TIP 1 (applies to mid front and mid back): Dec from RS each side of 2 sts. Dec as follows 3 sts BEFORE marker: K2 tog, K1. Dec as follows AFTER marker: K1, slip 1 st as if to K, K1, psso. DECREASING TIP 2 (applies to the side): Dec by K2 tog before marker and K2 tog into back of loop after marker. -------------------------------------------------------- PONCHO: Worked in 2 parts, then parts are put tog and piece completed in the round on all sts. Arrows in diagram show the knitting direction. BACK PIECE: Worked back and forth on circular needle from the bottom edge up. Cast on 162-180-198 sts on circular needle size 6 mm with 1 thread Symphony, 1 tread Melody or 1 thread Brushed Alpaca Silk + 1 thread Alpaca. Work 4 rows GARTER ST - see above! Insert a marker in the middle of piece, i.e. after 81-90-99 sts. READ ALL OF THE FOLLOWING SECTION BEFORE CONTINUING: REMEMBER THE KNITTING TENSION! Continue in stocking st, AT THE SAME TIME cast on 2 new sts at the end of the next 2 rows for sleeve edges. Repeat the inc at the end of every row a total of 9-10-11 times each side (= 18-20-22 inc sts for sleeve edge each side). AT THE SAME TIME when piece measures 3 cm dec 1 st each side of marker – See DECREASING TIP 1! Repeat the dec on every row from RS a total of 46-52-58 times, and when all inc for sleeve edges are complete (piece measures approx 10-11-12 cm) finish with 1 row from WS. Put piece aside. FRONT PIECE: Like back piece. PONCHO: Slip all sts on the same circular needle and continue in the round. Insert 1 marker at beg of round and 1 after half the sts (to mark the sides). Continue to dec mid front and mid back as before. AT THE SAME TIME when piece measures 12-12-13 cm dec 1 st each side of marker each side – See DECREASING TIP 2! Repeat the dec at the sides on every 6th round (every 3 cm) a total of 13-15-17 times (= until finished measurements). After all dec are complete there are 160-172-184 sts left on needle. Continue until piece measures 51-57-63 cm. NECK: Change to circular needle size 4 mm and 2 strands Alpaca. K 1 round, AT THE SAME TIME K2 tog across the round = 80-86-92 sts. P 1 round and K 1 round, AT THE SAME TIME inc 20-22-24 sts evenly = 100-108-116 sts. Now continue in rib, K2/P2, on all sts. When rib measures 28 cm cast off LOOSELY with K over K and P over P. SLEEVE EDGES: Worked in the round. Sew the garter st at the bottom of back and front piece tog with a couple of sts each side (sleeve edge now has a circumference of approx 24-26-30 cm). Pick up 44-48-52 sts round sleeve edge on double pointed needles size 4 mm with 2 strands Alpaca. P 1 round and continue in rib, K2/P2, on all sts. When rib measures 12 cm cast off with K over K and P over P. |
|
 |
|
Have you finished this pattern?Tag your pictures with #dropspattern or submit them to the #dropsfan gallery. Do you need help with this pattern?You'll find 18 tutorial videos, a Comments/Questions area and more by visiting the pattern on garnstudio.com. © 1982-2026 DROPS Design A/S. We reserve all rights. This document, including all its sub-sections, has copyrights. Read more about what you can do with our patterns at the bottom of each pattern on our site. |
|


With over 40 years in knitting and crochet design, DROPS Design offers one of the most extensive collections of free patterns on the internet - translated to 17 languages. As of today we count 324 catalogues and 12260 patterns translated into English (UK/cm). 12260
We work hard to bring you the best knitting and crochet have to offer, inspiration and advice as well as great quality yarns at incredible prices! Would you like to use our patterns for other than personal use? You can read what you are allowed to do in the Copyright text at the bottom of all our patterns. Happy crafting!
Post a comment to pattern DROPS 123-28
We would love to hear what you have to say about this pattern!
If you want to leave a question, please make sure you select the correct category in the form below, to speed up the answering process. Required fields are marked *.