
Popular categories
Looking for a yarn?


Comments / Questions (15)
![]() Michèle wrote:
Michèle wrote:
Bonjour, est-il possible de tricoter ce bandeau sur aiguilles droites ? Merci pour votre réponse. Cordialement.
05.01.2022 - 12:59DROPS Design answered:
Bonjour Michèle, vous trouverez ici comment adapter un modèle sur aiguilles droites. bon tricot!
05.01.2022 - 16:49
![]() Outi Vikström wrote:
Outi Vikström wrote:
Hei! Onko mallineuleessa parempi tehdä ylivetokavennus, vai neuloa 2 oikein yhteen? Kummassa parempi lopputulos ulkonäöllisesti?
18.11.2021 - 11:24DROPS Design answered:
Piirroksen mukaisesti neulottaessa kavennus tehdään neulomalla 2 silmukkaa oikein yhteen. Mikäli teet ylivetokavennuksen, kavennus kääntyy toiseen suuntaan.
07.12.2021 - 17:15
![]() Elena wrote:
Elena wrote:
Hello, can I knit this headband using magic loop method? Thank you
27.10.2021 - 20:46DROPS Design answered:
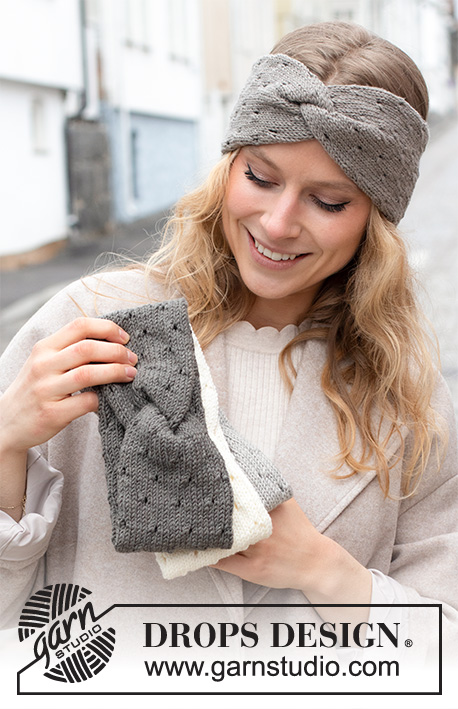
Dear Elena, the headband is knitted as a tube, which you will sew up in a particular way to make it look like there is a cable on the front. For knitting the tube itself, you can use any method for knitting on the round you find comfortable, double pointed needles, shorter circulars, or magic loop as well. Happy Stitching!
28.10.2021 - 11:36
![]() Ruth wrote:
Ruth wrote:
Dear Drops Team, Frau Adler in the comment above was right, diagram A1 is incorrect as the eyelets in rounds 3 and 9 are not properly aligned. Round 9 needs to be changed to k1, k2tog, yo, k3 so the k2tog needs to be shifted by one stitch in your diagram. Hope this helps!
09.09.2021 - 23:10DROPS Design answered:
Dear Ruth, the diagram is the one used for the headband in the picture, but you can of course edit the holes wherever you like them to be. Happy knitting!
15.09.2021 - 12:53
![]() GerlindeAdler wrote:
GerlindeAdler wrote:
In der Anleitung hat sich ein Fehler eingeschlichen. In der Reihe 6 der Anleitung muss die erste Masche eine rechte Masche sein. Dann folgt 2 Maschen zusammenstricken Umschlag usw. So ist das Lochmuster immer mittig versetzt.
31.08.2021 - 13:54DROPS Design answered:
Liebe Frau Adler, ich glaube, ich misverstehe Ihren Kommentar, bei A.1 wird das Lochmuster zuerst bei 3. Runde gestrickt, dann bei 9. Runden. Und die 12 Reihen in A.1 in der Höhe wiederholen, so haben Sie immer 5 Runden glatt rechts zwischen den Lochreihen. Kann es Ihnen helfen?
31.08.2021 - 16:16
|
||||||||||
Jeweled#jeweledheadband |
||||||||||
 |
 |
|||||||||
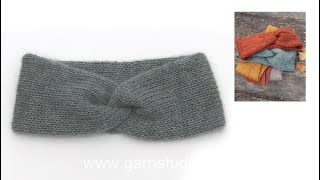
Knitted head-band with cable in DROPS Merino Extra Fine. The piece is worked with lace pattern. Sizes S -M- L.
DROPS 225-1 |
||||||||||
|
------------------------------------------------------- EXPLANATIONS FOR THE PATTERN: ------------------------------------------------------- DIAGRAMS: See diagrams A.1 to A.6. Diagrams A.2 to A.6 are used when assembling the head-band. ------------------------------------------------------- START THE PIECE HERE: ------------------------------------------------------- HEAD-BAND – SHORT OVERVIEW OF THE PIECE: The piece is worked in the round, in a tube, with double pointed needles. The ends are sewn together in such a way as to create a cable mid-front. HEAD-BAND: Cast on 42-48-54 stitches with double pointed needles size 4 mm and DROPS Merino Extra Fine. Work pattern in the round according to diagram A.1 (= 7-8-9 repeats of 6 stitches). Work until the piece measures approx. 49-51-53 cm – adjust so you have worked at least 2 rounds after the previous row of holes. Cast off with knit. ASSEMBLY: The piece is now a tube with open ends. Lay the tube flat – make sure it is not twisted. Sew the ends together on each side, sewing in the outermost loop of the outermost stitch so the seams are flat - see the broken line in diagram A.2. The piece is now a rectangle, fold it double, lengthwise – see diagram A.3. Now the ends of the long sides are placed alternately on top of each other, without twisting the piece - see diagram A.4. The ends are therefore also alternately on top of each other, edge to edge - see diagram A.5. Sew through all the layers as follows: Sew along the broken line in diagram A.6 (over the ends); sew with grafting stitches, 1 stitch in each stitch – it is important you sew through all the layers so the seam is invisible when the piece is turned inside-out. Cut and fasten the strand. Turn the piece inside out so the seam is on the inside. |
||||||||||
Diagram explanations |
||||||||||
|
||||||||||

|
||||||||||

|
||||||||||
Have you finished this pattern?Tag your pictures with #dropspattern #jeweledheadband or submit them to the #dropsfan gallery. Do you need help with this pattern?You'll find 10 tutorial videos, a Comments/Questions area and more by visiting the pattern on garnstudio.com. © 1982-2025 DROPS Design A/S. We reserve all rights. This document, including all its sub-sections, has copyrights. Read more about what you can do with our patterns at the bottom of each pattern on our site. |
||||||||||


With over 40 years in knitting and crochet design, DROPS Design offers one of the most extensive collections of free patterns on the internet - translated to 17 languages. As of today we count 314 catalogues and 11820 patterns translated into English (UK/cm). 11820
We work hard to bring you the best knitting and crochet have to offer, inspiration and advice as well as great quality yarns at incredible prices! Would you like to use our patterns for other than personal use? You can read what you are allowed to do in the Copyright text at the bottom of all our patterns. Happy crafting!
Post a comment to pattern DROPS 225-1
We would love to hear what you have to say about this pattern!
If you want to leave a question, please make sure you select the correct category in the form below, to speed up the answering process. Required fields are marked *.