
Categorie popolari
State cercando un filato?


Commenti / Domande (23)
![]() Giovanna ha scritto:
Giovanna ha scritto:
Buonasera, sto provando a fare il cappello. Mi dice di avviare 99 maglie e di lavorarle Lavorare il motivo in tondo come segue: * 2 maglie insieme a diritto, 1 gettato, passare 1 maglia a rovescio senza lavorarla *, lavorare *-* fino alla fine del giro = 66-72 maglie. Ma alla fine del ferro ii ho sempre 99 maglie e non 72. Cosa sbaglio?
06.12.2024 - 20:29DROPS Design ha risposto:
Buonasera Giovanna, nella lavorazione a coste inglesi i gettati non vengono contati come maglie. Buon lavoro!
07.12.2024 - 18:55
![]() Giovanna ha scritto:
Giovanna ha scritto:
Buonasera, sto provando a fare il cappello. Mi dice di avviare 99 maglie e di lavorarle Lavorare il motivo in tondo come segue: * 2 maglie insieme a diritto, 1 gettato, passare 1 maglia a rovescio senza lavorarla *, lavorare *-* fino alla fine del giro = 66-72 maglie. Ma alla fine del ferro ii ho sempre 99 maglie e non 72. Cosa sbaglio?
29.11.2024 - 17:00DROPS Design ha risposto:
Buonasera Giovanna, i gettati nella lavorazione a coste inglesi non sono inclusi nel conteggio delle maglie. Buon lavoro!
07.12.2024 - 18:55
![]() Doris ha scritto:
Doris ha scritto:
Ich verstehe nicht, wie die angegebene Maschenprobe stimmen kann. 36 Reihen von Drops Air mit der Nadel 5 sollen 10 cm Höhe ergeben. Bei Garngruppe C! Bei der Anleitung für denn Pullover Merry Santas dagegen sollen bei gleicher Wolle und gleicher Nadelstärke 22 Reihen 10 cm ergeben. Das kann ich eher glauben…
18.11.2024 - 22:52DROPS Design ha risposto:
Liebe Doris, beachten Sie, daß die Maschenprobe in Patentmuster und nicht Glattrechts gestrickt ist, dh für Patentmuster braucht man mehr Reihen als fürs Glattrechts; Viel Spaß beim Stricken!
19.11.2024 - 08:10
![]() PJ ha scritto:
PJ ha scritto:
Great, thanks. I'm now getting it (I think) but I'm now getting into issues working A1. I'll have another go but I suspect this may just be too advanced for me.
18.12.2023 - 10:43
![]() PJ ha scritto:
PJ ha scritto:
Like Aruna, I am not understanding the initial decrease. For each set of 3 stitches on the left needle, I am knitting 2 together, making 1 yarn yarn over stitch, and slipping 1 stitch. So continue to have 3 stitches. Pattern suggest this should be a decrease. Your response to Aruna was to 'knitting 2 sts together, YO, slip 1 as if to P' which is the same, i.e., no decrease. How are you making the 'yarn overs belong to the slipped stitch'?
17.12.2023 - 13:14DROPS Design ha risposto:
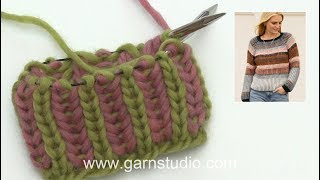
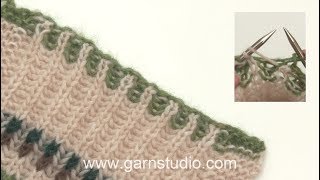
Dear PJ, for the English rib pattern you work 1 stitch with a yarn over. This yarn over is not counted as a stitch, as it is not considered technically an increase. This yarn over will be worked together with a slipped stitch a few rows afterwards. In the pattern stitch counts, the yarn overs in the English rib are therefore not included so, since you have 1 decrease, it will be considered as having decreased 1 stitch. You can read more on the English rib here: https://www.garnstudio.com/lesson.php?id=67&cid=19. Happy knitting!
17.12.2023 - 19:47
![]() Daniela ha scritto:
Daniela ha scritto:
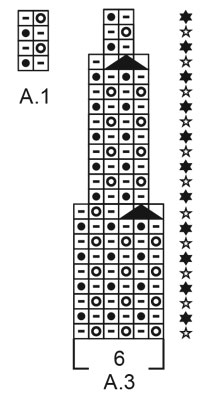
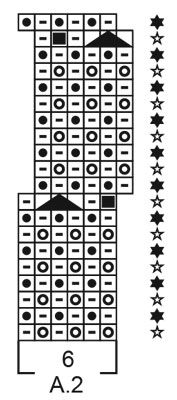
Buongiorno. Per eseguire il cappello dite di seguire il diagramma A1 e A3, ma poi nella descrizione parlate del diagramma A1 e A2! Inoltre cosa significa “ eseguire il diagramma A3 su A2” ?? Grazie
23.09.2023 - 21:21DROPS Design ha risposto:
Buonasera Daniela, nelle indicazioni all'inizio del modello è riportato che per il cappello si devono seguire i diagrammi A.1-A.3, quindi dal diagramma A.1 al diagramma A.3; una volta finito il diagramma A.2 si prosegue con A.3 sulle maglie lavorate in A.2. Buon lavoro!
25.09.2023 - 23:08
![]() Jenni ha scritto:
Jenni ha scritto:
Jeg sliter med råd 9 på A.2: " strikk de neste 3 maskene rett sammen (og kastene some hører til maskene". Om det skal felles 2 masker, strikkes det totalt 3 masker sammen? Er det ikke flere om de kastene som hører til også strikkes sammen?
23.08.2023 - 21:24DROPS Design ha risposto:
Hei Jenni. Om du ser på raden under 1. diagramikon på 9.rad, så ble det strikket slik: lag 1 kast om pinnen, ta 1 maske løs av pinnen som om den skulle strikkes vrang, strikk kastet og den løse masken vrang sammen og lag 1 kast om pinnen, ta 1 maske løs av pinnen som om den skulle strikkes vrang = 3 masker + 2 kast. Når du da skal strikket 1. diagramikon på 9.rad strikkes det slik: 1 maske + kast + 1 maske vrang + 1 maske + 1kast RETT SAMMEN = 2 masker felt. Er usikker på hva du mener med: " Er det ikke flere om de kastene som hører til også strikkes sammen". mvh DROPS Design
28.08.2023 - 13:14
![]() Fransje ha scritto:
Fransje ha scritto:
Wenn ich die Maschenprobe für die Mütze vergleiche mit den Anzahl der Maschen die ich für die Mütze aufsetzen muss, komme ich auf einem Kopfumfang der Mütze von ungefähr 70 cm ( 99:14x10 ). Ist das nicht viel zu weit für eine Kopfumfang von 54/56 cm? Oder mache ich da einen Denkfehler.
04.02.2023 - 14:00DROPS Design ha risposto:
Liebe Fransje, die Mütze beginnt man mit 99 Maschen aber bei der 1. Runde wird man abnehmen: * 2 Maschen rechts zusammenstricken, 1 Umschlag arbeiten, 1 Masche wie zum Linksstricken abheben *, von *-* in der ganzen Runde wiederholen = 66 Maschen - so ist es nur noch ca 47 cm (Muster ist aber elastisch genug um einen Kopf von 54/56 cm zu passen). Viel Spaß beim stricken!
06.02.2023 - 15:24
![]() Irene Motti ha scritto:
Irene Motti ha scritto:
Vielen Dank für dieses hübsche Muster, das sich viel leichter stricken lässt, als man vermutet. Die Mütze sieht so hübsch aus, dass ich direkt eine zweite stricken werde. ;-) Dabei frage ich mich erneut, warum ich nach der Maschenaufnahme direkt 1/3 der Maschen wieder abnehme. Ist es, damit die erste Reihe nicht zu eng ist? Das löse ich eigentlich immer, in dem ich die Maschen auf einer größeren Nadel aufnehme. Dank vorab!
21.05.2022 - 21:00DROPS Design ha risposto:
Liebe Frau Motti, bei dem Bündchen braucht man mehr Maschen in der Breite als wenn man das Patentmuster strickt, deshalbt schlägt man mehr Maschen und dann wird 1/3 der Maschen abgenommen. Viel Spaß beim stricken!
23.05.2022 - 08:06
![]() Audrée ha scritto:
Audrée ha scritto:
Hello! I made several attempts at this pretty neck warmer(set up row)but to no avail. It says: work patt in the round but there is no mention of joining the stitches. I tried both ways, by joining or as if working with straight needles but the problem starts when knitting A1. The working yarn is at the front on the right needle, before the last slipped stitch so how to do a yarn over as specified in the first square? For the set up row, the yarn stays at the front before K2 together? Thanks!
25.01.2022 - 22:51DROPS Design ha risposto:
Dear Audree, the neckwarmer is worked in the round, this means after you have cast on the stitches you have to join and work in the round as explained on 1st round, then work A.1 over all stitches (in the round, read all rows from the right towards the left). When working the 1st round, work *K2 tog, place yarn at the front, slip 1 as if to P*, when working the next K2 tog, the yarn will automatically "cover" the slipped stitch. See the video to English Rib in the round with 2 colours. Happy knitting!
26.01.2022 - 08:57
|
||||||||||||||||||||||
Catching a Mermaid#catchingamermaidset |
||||||||||||||||||||||
 |
 |
|||||||||||||||||||||
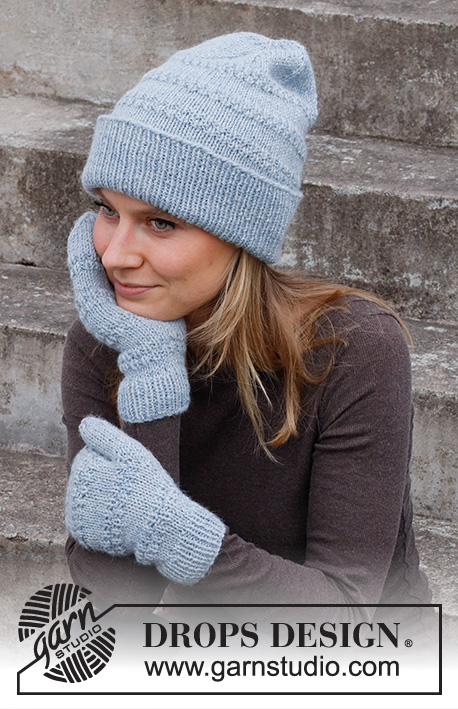
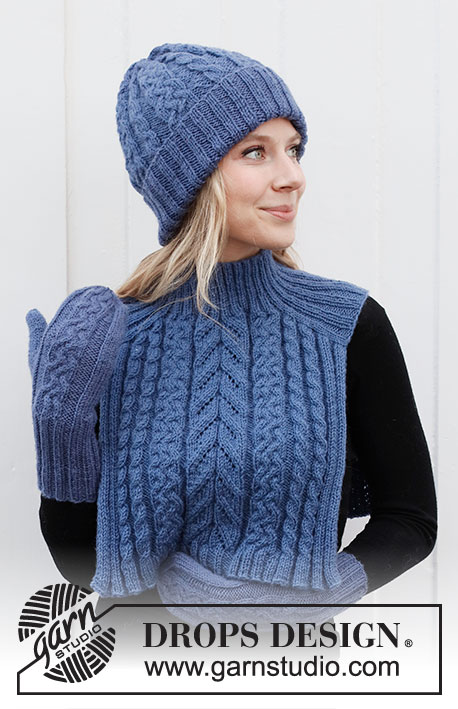
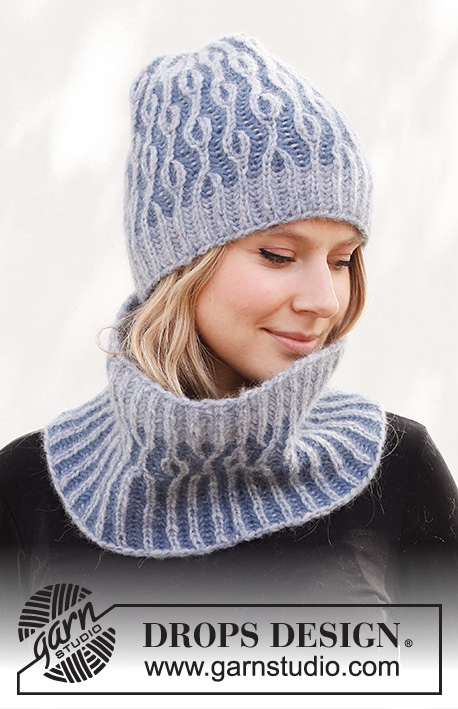
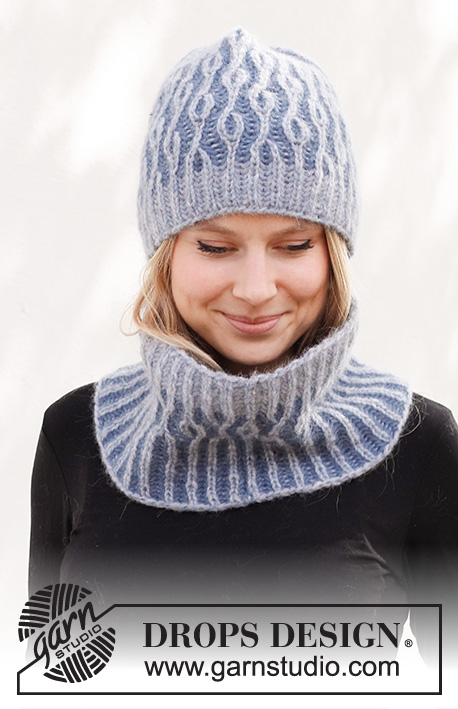
Cappello e scaldacollo lavorati ai ferri in DROPS Air. Lavorato a coste inglesi a 2 colori.
DROPS 214-26 |
||||||||||||||||||||||
|
------------------------------------------------------- TECNICHE IMPIEGATE: ------------------------------------------------------- MOTIVO: Cappello: Vedere i diagrammi A.1 - A.3. Scaldacollo: Vedere i diagrammi A.1 e A.2. ------------------------------------------------------- INIZIO DEL LAVORO: ------------------------------------------------------- CAPPELLO – BREVE RIASSUNTO DEL LAVORO: Lavorato in tondo con i ferri circolari corti. Passare ai ferri a doppia punta quando necessario. CAPPELLO: Avviare 99-108 maglie con i ferri circolari n° 5 mm e nebbia. Lavorare il motivo in tondo come segue: * 2 maglie insieme a diritto, 1 gettato, passare 1 maglia a rovescio senza lavorarla *, lavorare *-* fino alla fine del giro = 66-72 maglie. Ora lavorare A.1 su tutte le maglie. FARE ATTENZIONE ALLA TENSIONE DEL LAVORO! Quando il lavoro misura 4-5 cm, continuare a coste inglesi a 2 colori e il motivo come mostrato in A.2. Alla fine di A.2, ripetere tutto il diagramma un’altra volta in altezza, poi lavorare i primi 10 ferri un’altra volta. Il lavoro misura circa 18-19 cm. Lavorare A.3 su A.2. Alla fine di A.3 ci sono 22-24 maglie sul giro. Lavorare tutte le maglie insieme 2 a 2 a diritto = 11-12 maglie. Tagliare il filo e farlo passare attraverso le maglie rimaste, tirare e affrancare bene. IL cappello misura circa 24-25 cm dall’alto in basso. ------------------------------------------------------- SCALDACOLLO – BREVE RIASSUNTO DEL LAVORO: Lavorato in tondo con i ferri circolari. SCALDACOLLO: Avviare 99-108 maglie con i ferri circolari n° 6 mm e nebbia. Lavorare il motivo in tondo come segue: * 2 maglie insieme a diritto, 1 gettato, passare 1 maglia a rovescio senza lavorarla *, lavorare *-* fino alla fine del giro = 66-72 maglie. Inserire un segnapunti all’inizio del giro. Lavorare A.1 su tutte le maglie. FARE ATTENZIONE ALLA TENSIONE DEL LAVORO! Quando il lavoro misura 4-5 cm, lavorare a coste inglesi a 2 colori e con il motivo come mostrato in A.2 su tutte le maglie. Alla fine di A.2, lavorare i primi 2 ferri del diagramma fino a quando lo scaldacollo misura 18-22 cm. Intrecciare con diritto su diritto e rovescio su rovescio; per evitare che il bordo di chiusura risulti troppo tirato, intrecciare i gettati come maglie normali. |
||||||||||||||||||||||
Spiegazioni del diagramma |
||||||||||||||||||||||
|
||||||||||||||||||||||
 |
||||||||||||||||||||||
 |
||||||||||||||||||||||
Avete terminato questo modello?Allora taggate le vostre foto con #dropspattern #catchingamermaidset o inviatele alla #dropsfan gallery. Avete bisogno di aiuto con questo modello?Troverete 10 video tutorial, una sezione per i commenti/domande e molto altro guardando il modello su www.garnstudio.com © 1982-2026 DROPS Design A/S. Ci riserviamo tutti i diritti. Questo documento, compreso tutte le sue sotto-sezioni, è protetto dalle leggi sul copyright. Potete leggere quello che potete fare con i nostri modelli alla fine di ogni modello sul nostro sito. |
||||||||||||||||||||||


Con oltre 40 anni di esperienza nel design di modelli di maglia e uncinetto, DROPS Design offre la più estesa collezione di modelli gratuiti su internet - tradotti in 17 lingue. Ad oggi vi possiamo fornire 324 cataloghi e 12290 modelli - 9561 dei quali sono tradotti in Italiano.
Ci stiamo impegnando molto per darvi il meglio che vi possiamo offrire in termini di maglia e uncinetto, ispirazioni e consigli così come filati di grande qualità ad un prezzo incredibile! Volete utilizzare i nostri modelli per qualcosa d'altro oltre al vostro uso personale? Potete leggere tutto ciò che è consentito nel testo sul Copyright in basso su tutte le pagine dei nostri modelli. Buon lavoro!
Lasciare un commento sul modello DROPS 214-26
Noi saremmo felici di ricevere i tuoi commenti e opinioni su questo modello!
Se vuoi fare una domanda, fai per favore attenzione a selezionare la categoria corretta nella casella qui sotto per velocizzare il processo di risposta. I campi richiesti sono indicati da *.