
Categorie popolari
State cercando un filato?


Commenti / Domande (31)
![]() Netty Vogel ha scritto:
Netty Vogel ha scritto:
Goedemiddag , Een vraag over patroon nr ..me 062-bn ,het blauwe meisjesvest in ribbelsteek met kabel. Bij de pas, laatste regel: Brei 1 naald aan de verkeerde kant. Moet er bij deze naalden aan de verkeerde kant ook A1 en A2 toegepast worden met de kabelnaald? Of brei ik alleen deze 6 steken in averecht. En moet ik de meerderingen voor de raglan zelf uitrekenen , omdat ik hiervoor geen telpatroon zie. Met vriendelijke groet, Netty Vogel
16.03.2022 - 15:44DROPS Design ha risposto:
Dag Netty,
Als je aan de verkeerde kant breit, brei je inderdaad de 6 steken van A.1 of A.2 averecht. In de beschrijving staat dat je 1 naald aan de verkeerde kant moet breien. Dit is omdat je dan je de volgende naald, waarbij je begint met meerderen voor de raglan, aan de goede kant moet breien.
18.03.2022 - 08:56
![]() Anne Dickson ha scritto:
Anne Dickson ha scritto:
Hi there! Buttonholes-it says that buttonholes are worked on the right side, right band. But if they’re done at the end of the row as the instructions suggest (‘Work from the right side when there are 3 stitches left on the row as follows: Make 1 yarn over, k it two together and knit the last stitch’.) Surely this would mean that the buttonhole would be on the left band?Can you help, please?
08.12.2021 - 18:49DROPS Design ha risposto:
Dear Mrs Dickson, the jacket is worked from the top down, this means from RS you start with left front piece and end with right front piece, the buttonholes will be worked at the end of a row from right side. Happy knitting!
09.12.2021 - 07:24
![]() Alice ha scritto:
Alice ha scritto:
When you are doing the increases for Raglan, do you have to move along where you will do the increase? I.e., for a 3/4 size, it says the front left is 13 stitches. I then increase. Does that mean I then knit 14 stitches for the next round? Another example: between A1 and A2, I'm to knit 8 stitches initially. Does this increase 2 after each increase? Thank you.
30.09.2021 - 11:25DROPS Design ha risposto:
Dear Alice, yes. You should move the markers in each row, and then you will see that the number od stitches on each "piece" grows, and ypu go ahead with the yoke. The two frins by 1 stitch, the sleeves and the back by two stitch in each round with increases. Happy Stitching!
30.09.2021 - 16:02
![]() A Kar ha scritto:
A Kar ha scritto:
When casting on could you please explain what is meant by “(including 4 band stitches on each side towards mid front)”. Thank you.
29.09.2021 - 03:59DROPS Design ha risposto:
Dear A Kar, it means that you don't need to add the band stitches, that they're already included in the amount of stitches. Happy knitting!
03.10.2021 - 23:13
![]() Caroline Beidelman ha scritto:
Caroline Beidelman ha scritto:
I am having difficulty understanding the increases & cable directions (and I am an experienced knitter!) For the increase to Raglan, I understand the increases. However, I cannot figure out if the cables A1 and A2are supposed to be at a slant, as they appear on the picture, thus offset; or are they supposed to be even from one row to the other, The tutorials do not explain that.
28.08.2021 - 03:26DROPS Design ha risposto:
Dear Caroline, the cables themselves are actually straight, they apper slant only, becase there are increases for shaping the raglans before and after the cables. Happy Stitching!
28.08.2021 - 05:05
![]() Anna Maria Vitulano ha scritto:
Anna Maria Vitulano ha scritto:
Ciao. Vorrei farlo per un maschietto. È adatto secondo voi? Grazie 🤗
17.08.2021 - 09:00DROPS Design ha risposto:
Buongiorno Anna Maria, questo modello è stato progettato per bambine, ma se preferisce può adattarlo anche a un maschietto. Ci sono tanti altri modelli di cardigan da bambino: abbiamo pubblicato un nuovo catalogo proprio oggi!Buon lavoro!
17.08.2021 - 11:00
![]() Marlies Hoffmann ha scritto:
Marlies Hoffmann ha scritto:
Guten Morgen,bei der Passe heißt es "Nach allen Raglanzunahmen hat die Arbeit eine Länge von ca. 11-12 (13-14-15-16) cm ab dem Anschlagrand. " In der Zeichnung sind für die Halsblende jedoch noch 3 cm zusätzlich angegeben, die ich mit zwei Krausripen unmöglich erreichen kann. Ich stricke in Gr. 98/104 und müßte demnach eine Länge von 14+3 cm = 17 cm ab Anschlagrand haben. Oder sehe ich das falsch? Gruß, Marlies Hoffmann
29.07.2021 - 07:58DROPS Design ha risposto:
Guten Morgen Frau Hoffmann, bei der Maßskizze gelten die 3 cm oben für den Schulter, dh die Passe muss ca 11-12 (13-14-15-16) cm ab dem Anschlagrand aber wenn Sie die Arbeit wie bei der Skizze messen, dann sind es 3 cm mehr für den Schulter = 13-15 (16-17-18-19) cm vom Schulter. Viel Spaß beim stricken!
29.07.2021 - 09:18
![]() Tina Grajek ha scritto:
Tina Grajek ha scritto:
Nein, dann stimmt das bei mir nicht. Etwa 30 Reihen statt 42 ergeben bei mir 10 cm kraus rechts. Schade, dass das nicht in der Maschenprobe erwähnt wird. Wie rette ich jetzt mein Projekt am besten innerhalb der nächsten 4 cm? aktuell liegen 172 Macshen auf meinen Nadeln. Wenn ich wie bisher weiter stricke habe ich bei 15 vcm etwa 196M auf der Nadel. Ich würde dann die fehlenden 40M zusätzlich zum Raglan gleichmäßig verteilt in jeder 2.R zunehmen? Also 6/7 pro R.?
26.04.2021 - 09:21DROPS Design ha risposto:
Liebe Frau Grajek, am besten versuchen Sie die richtige Maschenprobe in der Höhe zu haben, Sie müssen hier 21 M x 28 Reihe glatt rechts bzw 42 Reihe kraus rechts = 10 x 10 cm haben - hier lesen Sie mehr über Maschenprobe. Viel Spaß beim stricken!
26.04.2021 - 09:43
![]() Tina Grajek ha scritto:
Tina Grajek ha scritto:
Ich habe nach der 5. Raglanzunahme in jeder vierten Reihe bereits eine Höhe des Strickstücks von 11 cm. Es müssten also etwa noch 32 Reihen gestrickt werden um auf 236 Maschen (Größe 110/116) zu kommen. 32 Reihen umfassen etwa 10 cm. Wie komme ich nun am ehesten auf die benötigte Maschenanzahl innerhalb von 4 cm? In jeder 2. Reihe zusätzlich zu den Raglanzunahmen innerhalb der Reihe gleichmäßig verteilt zunehmen? In der Maschenprobe wird auch nur von glatt rechts gesprochen.
25.04.2021 - 22:13DROPS Design ha risposto:
Liebe Frau Grajek, stimmt Ihre Maschenprobe? Sie sollen 28 Reihen glatt rechts oder 42 Reihen kraus rechts gestrickt = 10 cm, so bekommen Sie die 10+(13x4)=62 Reihen = ca 15cm. Viel Spaß beim stricken!
26.04.2021 - 08:32
![]() Laura Rocha ha scritto:
Laura Rocha ha scritto:
Buenas tardes, en el diagrama muestran sobre el hombro un rectángulo que mide 3, a qué medida corresponde? Es parte del cuello? Gracias
22.04.2021 - 18:44DROPS Design ha risposto:
Hola Laura. Los 3 cm se corresponden a la parte de la manga en el cuello.
24.04.2021 - 19:33
|
||||||||||
Autumn Smiles Cardigan#autumnsmilescardiganjacket |
||||||||||
 |
 |
|||||||||
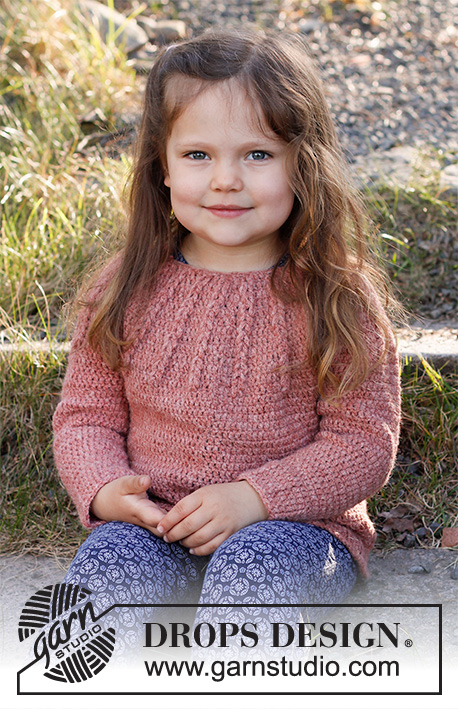
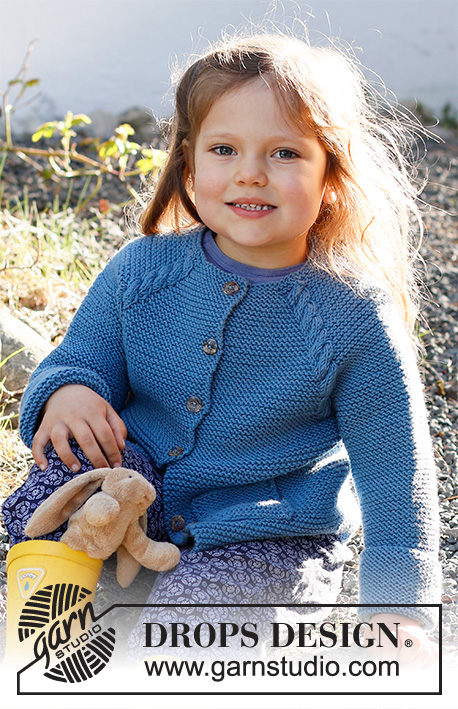
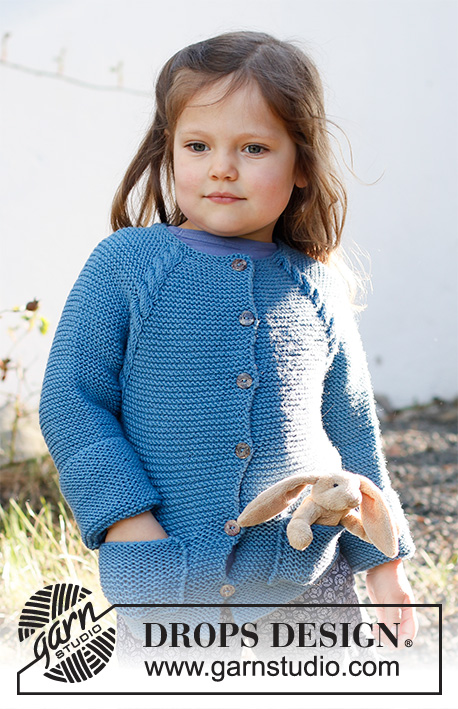
Cardigan lavorato ai ferri per neonati e bambini in DROPS Merino Extra Fine. Lavorato dall’alto in basso con raglan, maglia legaccio, trecce e tasche. Taglie: 6 mesi - 8 anni.
DROPS Children 37-15 |
||||||||||
|
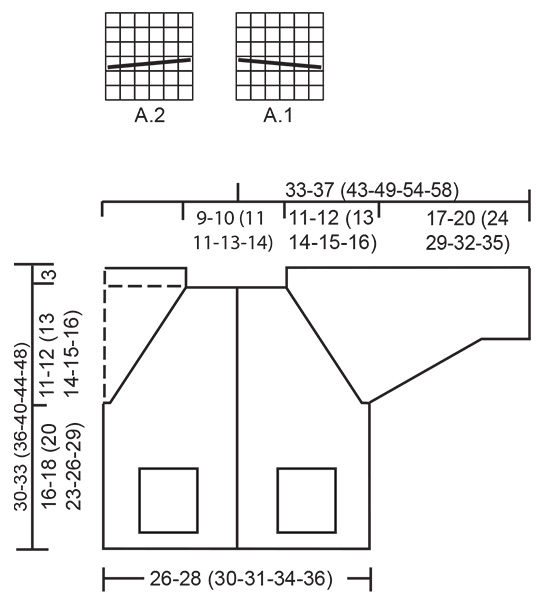
------------------------------------------------------- TECNICHE IMPIEGATE: ------------------------------------------------------- COSTA/MAGLIA LEGACCIO (avanti e indietro): Lavorare tutti i ferri a diritto. 1 costa in altezza = 2 ferri diritto. ASOLE: Lavorare le asole sul bordo destro (con il capo indossato). Lavorare dal diritto del lavoro quando mancano 3 maglie come segue: fare 1 gettato, lavorare 2 maglie insieme a diritto e lavorare l’ultima maglia a diritto. Sul ferro successivo (rovescio del lavoro) lavorare i gettati a diritto per creare buchi. Lavorare la 1° asola quando il collo misura 1½-2 cm. Poi lavorare le altre 4-5 (5-5-6-6) asole a circa 5-4½ (5-5½-5½-6) cm tra ognuna. MOTIVO: Vedere i diagrammi A.1 e A.2. I diagrammi mostrano tutti i ferri del motivo visto dal diritto del lavoro. RAGLAN: Lavorare tutti gli aumenti dal diritto del lavoro! Aumentare 1 maglia a ogni lato di ogni A.1 e A.2 (= 8 aumenti sul ferro). Aumentare 1 maglia facendo 1 gettato. Sul ferro successivo lavorare il gettato a diritto ritorto per evitare buchi. SUGGERIMENTO PER LE DIMINUZIONI (applicato alle maniche): Lavorare tutte le diminuzioni dal diritto del lavoro! Diminuire 1 maglia a ogni lato del segnapunti come segue: Lavorare 1 maglia a maglia legaccio, passare 1 maglia a diritto senza lavorarla, 1 maglia diritto, accavallare la maglia passata sopra quella appena lavorata (= 1 diminuzione), lavorare a maglia legaccio fino a quando rimangono 3 maglie, 2 maglie insieme a diritto (= 1 diminuzione) e finire con 1 maglia a maglia legaccio (= un totale di 2 diminuzioni). SUGGERIMENTO PER LA CHIUSURA: Per evitare che il bordo di chiusura sia tirato potete intrecciare con un ferro di una misura più grande. Se il bordo risulta ancora tirato, fare 1 gettato dopo circa 4 maglie durante la chiusura e intrecciare i gettati come maglie normali. ------------------------------------------------------- INIZIO DEL LAVORO: ------------------------------------------------------- CARDIGAN – BREVE RIASSUNTO DEL LAVORO: Lavorare il cardigan dall’alto in basso, in piano con i ferri circolari e dal centro davanti. Lavorare le maniche in piano con i ferri circolari, poi cucirli alla fine. Lavorare le tasche in piano con i ferri circolari e cucite al cardigan. COLLO: Avviare 68-72 (80-80-88-92) maglie (comprese 4 maglie per il bordo a ogni lato verso il centro davanti) con i ferri circolari n° 4 mm e Merino Extra Fine. Lavorare 2 COSTE – leggere la descrizione sopra e aumentare 4 maglie in modo uniforme sull’ultimo ferro = 72-76 (84-84-92-96) maglie. SPRONE: Lavorare il ferro successivo come segue dal diritto del lavoro – ricordarsi delle ASOLE sul bordo destro – leggere la descrizione sopra: Lavorare 10-11 (13-13-15-16) maglie a maglia legaccio (= davanti sinistro), A.1 (= 6 maglie), 8 maglie a maglia legaccio, A.2 (= 6 maglie) (= manica sinistra), 12-14 (18-18-22-24) maglie a maglia legaccio (= dietro), A.1 sulle 6 maglie successive, 8 maglie a maglia legaccio, A.2 sulle 6 maglie successive (= manica destra), 10-11 (13-13-15-16) maglie a maglia legaccio (= davanti destro). Lavorare 1 ferro dal rovescio del lavoro. Aumentare per il RAGLAN – leggere la descrizione sopra – a ogni lato di ogni A.1 e A.2 come segue: Aumentare ogni 2° ferro per un totale di 5 volte, poi ogni 4 ferri per un totale di 9-10 (11-12-13-14) volte = 184-196 (212-220-236-248) maglie. FARE ATTENZIONE ALLA TENSIONE DEL LAVORO! Alla fine degli aumenti per il raglan, il lavoro misura circa 11-12 (13-14-15-16) cm dal bordo di avvio. Se necessario, continuare a lavorare con maglia legaccio e trecce ma senza ulteriori aumenti fino a quando il lavoro misura 11-12 (13-14-15-16) cm. Sul ferro successivo dividere il lavoro per il corpo e le maniche come segue: Lavorare 28-30 (33-34-37-39) maglie a maglia legaccio (= davanti), mettere le 40-42 (44-46-48-50) maglie successive in sospeso per la manica, avviare 6 nuove maglie sotto la manica, lavorare 48-52 (58-60-66-70) maglie a maglia legaccio (= dietro), mettere le 40-42 (44-46-48-50) maglie successive in sospeso per la manica, avviare 6 nuove maglie sotto la manica, lavorare 28-30 (33-34-37-39) maglie a maglia legaccio (= davanti). CORPO: = 116-124 (136-140-152-160) maglie. Lavorare a maglia legaccio fino a quando il lavoro misura 16-18 (20-23-26-29) cm dal punto di divisione tra il corpo e le maniche. Intrecciare – leggere il SUGGERIMENTO PER LA CHIUSURA. MANICA: Riportare le 40-42 (44-46-48-50) maglie in sospeso a un lato del lavoro sui ferri circolari n° 4 mm. Avviare 4 maglie alla fine dei 2 ferri successivi (= 4 nuove maglie a ogni lato del lavoro) = 48-50 (52-54-56-58) maglie (compresa 1 maglia di vivagno a ogni lato). Lavorare a maglia legaccio in piano. Quando il lavoro misura 2 cm dalla divisione, diminuire 1 maglia a ogni lato del lavoro – leggere il SUGGERIMENTO PER LE DIMINUZIONI. Diminuire in questo modo ogni 8°-10° (12°-14°-14°-14°) ferri per un totale di 7-7 (7-7-8-8) volte = 34-36 (38-40-40-42) maglie. Continuare a maglia legaccio fino a quando la manica misura 17-20 (24-29-32-35) cm dalla divisione. Intrecciare. Lavorare l’altra manica nello stesso modo. TASCA: Avviare 14-14 (16-16-18-18) maglie con i ferri circolari n° 4 mm e Merino Extra Fine. Lavorare a maglia legaccio in piano fino a quando il lavoro misura 7-7 (8-8-9-9) cm. Intrecciare. Lavorare un’altra tasca nello stesso modo. CONFEZIONE: Cucire le maniche all’interno della maglia di vivagno. Cucire le aperture sotto le maniche. Attaccare i bottoni sul bordo sinistro. Attaccare le tasche, circa 3-3 (3-4-4-4) cm sopra il bordo inferiore e al centro di ogni davanti. |
||||||||||
Spiegazioni del diagramma |
||||||||||
|
||||||||||
 |
||||||||||
Avete terminato questo modello?Allora taggate le vostre foto con #dropspattern #autumnsmilescardiganjacket o inviatele alla #dropsfan gallery. Avete bisogno di aiuto con questo modello?Troverete 26 video tutorial, una sezione per i commenti/domande e molto altro guardando il modello su www.garnstudio.com © 1982-2026 DROPS Design A/S. Ci riserviamo tutti i diritti. Questo documento, compreso tutte le sue sotto-sezioni, è protetto dalle leggi sul copyright. Potete leggere quello che potete fare con i nostri modelli alla fine di ogni modello sul nostro sito. |
||||||||||


Con oltre 40 anni di esperienza nel design di modelli di maglia e uncinetto, DROPS Design offre la più estesa collezione di modelli gratuiti su internet - tradotti in 17 lingue. Ad oggi vi possiamo fornire 324 cataloghi e 12290 modelli - 9561 dei quali sono tradotti in Italiano.
Ci stiamo impegnando molto per darvi il meglio che vi possiamo offrire in termini di maglia e uncinetto, ispirazioni e consigli così come filati di grande qualità ad un prezzo incredibile! Volete utilizzare i nostri modelli per qualcosa d'altro oltre al vostro uso personale? Potete leggere tutto ciò che è consentito nel testo sul Copyright in basso su tutte le pagine dei nostri modelli. Buon lavoro!
Lasciare un commento sul modello DROPS Children 37-15
Noi saremmo felici di ricevere i tuoi commenti e opinioni su questo modello!
Se vuoi fare una domanda, fai per favore attenzione a selezionare la categoria corretta nella casella qui sotto per velocizzare il processo di risposta. I campi richiesti sono indicati da *.