
Categorie popolari
State cercando un filato?


Commenti / Domande (152)
![]() Anna ha scritto:
Anna ha scritto:
Sul dietro come si intrecciano per gli scalfi le 12 maglie? Non riesco a capire la spiegazione. Chiedo scusa
12.12.2025 - 16:57DROPS Design ha risposto:
Buonasera Anna, deve intrecciare all'inizio di ogni lato il numero di maglie indicato per la sua taglia. Buon lavoro!
12.12.2025 - 22:22
![]() Patricia ha scritto:
Patricia ha scritto:
Hallo, Wil weer beginnen met breien. Bij de patronen staat steeds rondbreinaald kan je dan ook gewone breinaalden gebruiken? Ik heb nog nooit met rondbreinaalden gewerkt. BVD
09.12.2025 - 23:18DROPS Design ha risposto:
Dag Patricia,
Om een patroon aan te passen om op rechte naalden te breien hebben we een instructie gemaakt. Deze vind je hier. Dit is helaas niet voor alle patronen geschikt, bijvoorbeeld voor patronen met een ronde pas.
10.12.2025 - 16:10
![]() Helen ha scritto:
Helen ha scritto:
Why does the pattern say to cast off the middle stitches to make the neck on the back, but to put them on a thread to pick up later for the front? Wouldn't it be possible to put both sides on a thread and pick them up all up when you cast on the neck (including the cast off decreases too)?
17.11.2025 - 14:36DROPS Design ha risposto:
Hi Helen, You can of course place the stitches for the back neckline on a stitch holder rather than casting them off if you wish. Regards, Drops Team.
18.11.2025 - 06:53
![]() Andrea Rothfuß ha scritto:
Andrea Rothfuß ha scritto:
Habe den Pullover genau wie in der Beschreibung mit der Wolle und den Nadeln in Größe S gestrickt. Die 300 g haben nicht gereicht. Für da Halsbündchen musste ich ein Knäul nachbestellen und hab davon noch 20 g verbraucht Die Anleitung ist gut verständlich.
30.10.2025 - 19:23DROPS Design ha risposto:
Liebe Andrea, das ist natürlich ärgerlich, dass Sie Garn nachkaufen mussten. Haben Sie denn die Maße und die Maschenprobe genau eingehalten? Vielen Dank jedenfalls für Ihr Lob! :-)
30.10.2025 - 22:49
![]() Nathasja ha scritto:
Nathasja ha scritto:
Når man har lukket af til ærmerne - skal man så fortsat strikke 1 kantmaske i retstrik eller skal man strikke rent glatstrik uden kantmasken?
13.10.2025 - 23:52DROPS Design ha risposto:
Hej Nathasja. Du fortsätter att sticka 1 kantmaske. Mvh DROPS Design
14.10.2025 - 07:28
![]() Nathasja ha scritto:
Nathasja ha scritto:
Når man skal strikke forstykket står der bare at man skal gøre det på samme måde som bagstykket indtil man når 60 cm. Vil det sige at man også skal lukke af til ærmerne ved samme afstand som på bagstykket?
08.10.2025 - 12:04DROPS Design ha risposto:
Hej Nathasja. Ja det stämmer. Mvh DROPS Design
09.10.2025 - 06:55
![]() Jeanette ha scritto:
Jeanette ha scritto:
Ikke en veldig god oppskrift for større størrelse dessverre. Strikket denne i en størrelse større enn hva størrelseguiden anbefalte for å få den litt løs og god, men den er tettsittende med for korte ermer. Må gjøre ganske mange justeringer før den kan sys sammen å brukes. (Strikkefastheten er overholdt.)
22.09.2025 - 19:54
![]() Mary-Ann Edsbäcker ha scritto:
Mary-Ann Edsbäcker ha scritto:
1)Hur syr man i ärmarna när sidsömmarna inte är ihopsydda först? 2) De 8 cm , när syr man ihop dem? Förstår inte vad sprund innebär.
17.09.2025 - 22:46DROPS Design ha risposto:
Hei Mary-Ann. Ermtoppen (de siste cm) er strikket frem og tilbake, legg da øverste del av ermtoppen mot erm åpningen og sy ermet i. Deretter sys sidesømmen, start med "hullet" under ermet og sy sidesømmen (innenfor 1 kantmaske) til det gjenstår 8 cm. Gjør dette på begge sider og du får en splitt i hver side å genseren. mvh DROPS Design
06.10.2025 - 09:19
![]() Ingela ha scritto:
Ingela ha scritto:
Kan man sticka ärmarna på vanliga stickor och sy ihop dem sedan? Jag får inte till det med övningarna. Det blir stora hål.
17.09.2025 - 13:26DROPS Design ha risposto:
Hi Ingela, you can if it is easier for you. Happy knitting!
17.09.2025 - 13:37
![]() Sarah ha scritto:
Sarah ha scritto:
Hi, I'm starting on the back piece - it's unclear which bit you continue doing for 8cm. I've cast on, then done a purl row, then done 2 knit stitches knit 1 purl 1 knit 1 and 2 knit stitches. When I go to do the next row doing the 2 knit stitches knit 1 purl 1 knit 1 and knit 2 stitched, the purl and knit stitches don't match up with the last row so wouldn't make ribbing. Is this correct? Or should I be purling every other row too? Thanks
12.09.2025 - 22:47DROPS Design ha risposto:
Hi, the rib has 8 cm in hight. Purl 1 row from the wrong side. Then work as follows – from the right side: 2 edge stitches in GARTER STITCH – see description above, *knit 1, purl 1 *, work from *-* until there are 3 stitches left, knit 1 and 2 edge stitches in garter stitch. Next row (wrong side): 2 edge stitches in garter stitch, *purl 1, knit 1 *, work from *-* until there are 3 stitches left, purl 1 and 2 edge stitches in garter stitch. Happy knitting!
18.09.2025 - 23:24
|
|
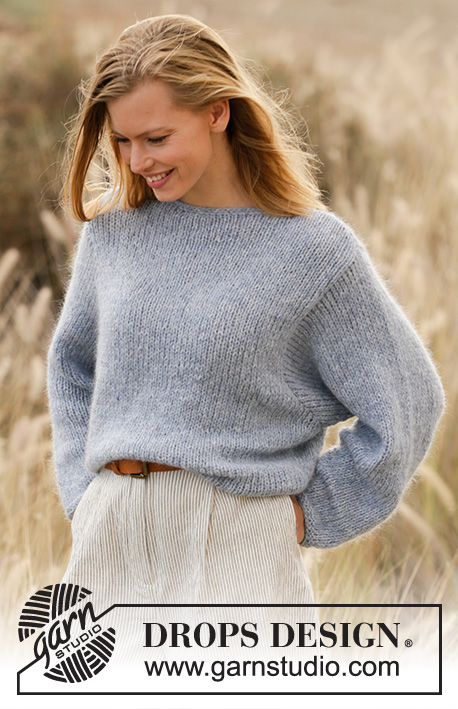
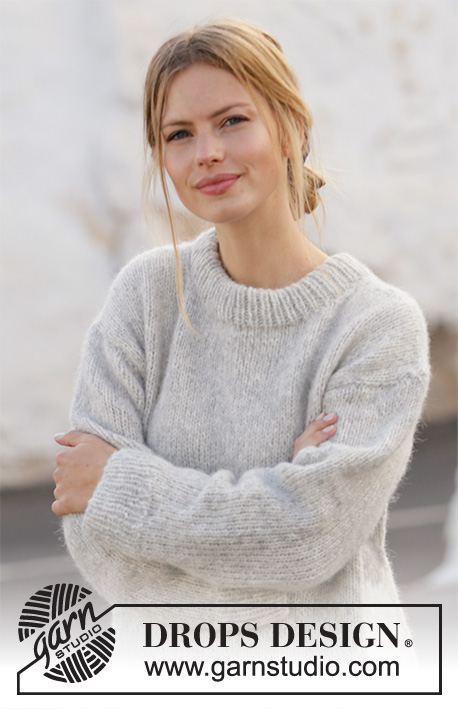
Grey Pearl#greypearlsweater |
|
 |
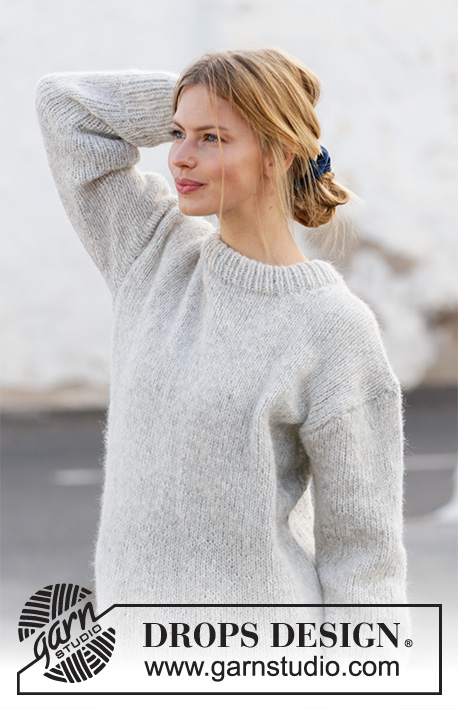 |
Maglione ai ferri in DROPS Air. Taglie: Dalla S alla XXXL.
DROPS 210-36 |
|
|
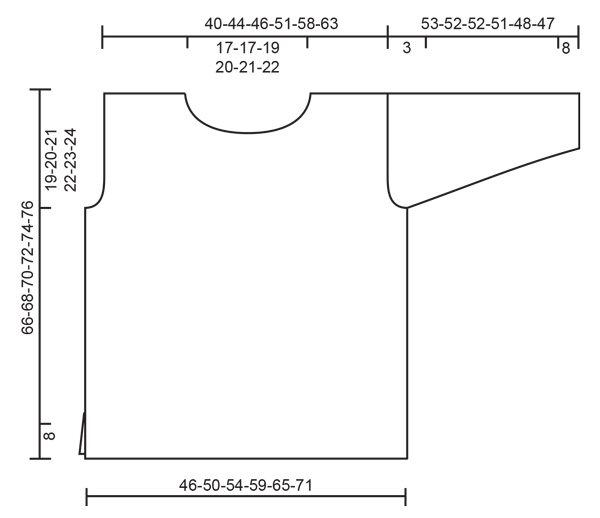
------------------------------------------------------- TECNICHE IMPIEGATE: ------------------------------------------------------- COSTA A LEGACCIO/PUNTO LEGACCIO (avanti e indietro sui ferri): Lavorare tutti i ferri a diritto. 1 costa a legaccio in altezza = lavorare 2 ferri a diritto. SUGGERIMENTO PER LE DIMINUZIONI (a intervalli regolari): Per calcolare ogni quante maglie diminuire, dividere il numero complessivo delle maglie (p.es: 89 maglie) per il numero di diminuzioni da fare (p.es 13) = 6,8. Quindi, in questo esempio, per diminuire, lavorare insieme a diritto alternativamente ogni 5a e 6a maglia e ogni 6a e 7a maglia (circa). SUGGERIMENTO PER GLI AUMENTI (per le maniche): Iniziare 1 maglia prima del segno, fare 1 maglia gettata, lavorare 2 maglie (il segno si trova al centro di queste 2 maglie), 1 maglia gettata. Al giro successivo, lavorare le maglie gettate a diritto ritorto per evitare i buchi. ------------------------------------------------------- IL LAVORO INIZIA QUI: ------------------------------------------------------- MAGLIONE – BREVI INDICAZIONI PER IL LAVORO: Si lavora avanti e indietro in 2 parti cucite tra loro alla fine. Lavorare le maniche in tondo con i ferri a doppia punta/ ferri circolari corti. DIETRO: Avviare 89-97-103-113-125-137 maglie con i ferri circolari n° 4,5 ed il filato Air. Lavorare 1 ferro a rovescio sul rovescio del lavoro Proseguire come segue – sul diritto del lavoro: 2 maglie vivagno a PUNTO LEGACCIO – vedere le spiegazioni sopra, *1 maglia diritto, 1 maglia rovescio *, ripetere da *-* finché non rimangono 3 maglie, 1 maglia diritto e 2 maglie vivagno a punto legaccio. Proseguire in questo modo finché il lavoro non misura 8 cm. Passare ai ferri circolari n° 5,5; lavorare 1 ferro a diritto sul diritto del lavoro e durante questo ferro diminuire 13-15-15-17-19-21 maglie a intervalli regolari – vedere il SUGGERIMENTO PER LE DIMINUZIONI = 76-82-88-96-106-116 maglie. Proseguire a maglia rasata e con 1 maglia vivagno a punto legaccio da ciascun lato. Quando il lavoro misura 47-48-49-50-51-52 cm, intrecciare per gli scalfi da entrambi i lati, all’inizio di ogni ferro, come segue: Intrecciare 3 maglie 1-1-1-1-1-1 volta, 2 maglie 1-1-1-1-1-1 volta e 1 maglia 1-1-2-2-2-3 volte = 64-70-74-82-92-100 maglie. Proseguire a maglia rasata finché il lavoro non misura 64-66-68-70-72-74 cm. Intrecciare ora le 26-26-28-30-32-34 maglie centrali per lo scollo e finire ogni spalla separatamente. All’inizio del ferro successivo, intrecciare per lo scollo come segue: 1 maglia 1 volta = 18-21-22-25-29-32 maglie per la spalla. Continuare finché il lavoro non misura 66-68-70-72-74-76 cm; intrecciare le maglie. Lavorare l’altra spalla in modo uguale. DAVANTI: Avviare le maglie e lavorare come indicato per il dietro finché il lavoro non misura 60-62-64-66-68-70 cm. Mettere ora in attesa su un ferma maglie le 20-20-22-24-26-28 maglie centrali per lo scollo e finire ogni spalla separatamente. Intrecciare poi all’inizio di ogni ferro con inizio dallo scollo, come segue: 2 maglie 1 volta e 1 maglia 2 volte = per la spalla rimangono 18-21-22-25-29-32 maglie. Proseguire finché il lavoro non misura 66-68-70-72-74-76 cm. Intrecciare le maglie. Lavorare l’altra spalla in modo uguale. MANICHE: Lavorare le maniche dal basso verso l’alto, in tondo, con i ferri a doppia punta/ ferri circolari corti. Dividere il lavoro e lavorare l’arrotondamento della manica avanti e indietro. Avviare 46-48-50-52-52-56 maglie con i ferri a doppia punta n° 4,5 ed il filato Air. Lavorare 1 giro a diritto. Proseguire a coste (1 maglia diritto / 1 maglia rovescio) per 8 cm. Passare ai ferri a doppia punta n° 5,5 e proseguire a maglia rasata. Durante il primo giro, diminuire 8-8-8-8-8-10 maglie a intervalli regolari = 38-40-42-44-44-46 maglie. Inserire un segno all’inizio del giro = centro, sotto la manica. Proseguire a maglia rasata e, ALLO STESSO TEMPO, quando il lavoro misura 10-10-10-10-12-12 cm, aumentare 1 maglia da ciascun lato del segno – vedere il SUGGERIMENTO PER GLI AUMENTI. Al giro successivo, lavorare le maglie gettate ritorte per evitare buchi. Aumentare in questo modo ogni 3½-3½-3-3-2-2 cm in tutto 11-12-13-13-15-15 volte = 60-64-68-70-74-76 maglie. Quando la manica misura 50-49-49-48-45-44 cm, intrecciare 3 maglie da ciascun lato del segno (=intrecciare quindi 6 maglie al centro sotto la manica); proseguire avanti e indietro. Intrecciare per l’arrotondamento della manica all’inizio di ogni ferro da ciascun lato, come segue: 2 maglie 1 volta, 3 maglie 1 volta, poi intrecciare le rimanenti maglie. Lavorare l’altra manica in modo uguale. CONFEZIONE: Cucire le spalle. Montare le maniche e cucire i lati all’interno di 1 maglia vivagno e finché non rimangono 8 cm nella parte in basso = spacco laterale. COLLO: Riprendere circa 92-106 maglie intorno allo scollo (comprese le maglie messe in attesa sul ferma maglie; il numero delle maglie riprese deve essere divisibile per 2) con i ferri circolari n° 4,5 mm. Lavorare a coste (1 maglia diritto / 1 maglia rovescio) per 9 cm. Chiudere le maglie. Piegare le coste sul rovescio del lavoro e cucire – assicurarsi che la cucitura sia elastica per evitare che il collo sia troppo stretto e che si inclini. |
|
 |
|
Avete terminato questo modello?Allora taggate le vostre foto con #dropspattern #greypearlsweater o inviatele alla #dropsfan gallery. Avete bisogno di aiuto con questo modello?Troverete 30 video tutorial, una sezione per i commenti/domande e molto altro guardando il modello su www.garnstudio.com © 1982-2026 DROPS Design A/S. Ci riserviamo tutti i diritti. Questo documento, compreso tutte le sue sotto-sezioni, è protetto dalle leggi sul copyright. Potete leggere quello che potete fare con i nostri modelli alla fine di ogni modello sul nostro sito. |
|


Con oltre 40 anni di esperienza nel design di modelli di maglia e uncinetto, DROPS Design offre la più estesa collezione di modelli gratuiti su internet - tradotti in 17 lingue. Ad oggi vi possiamo fornire 325 cataloghi e 12298 modelli - 9569 dei quali sono tradotti in Italiano.
Ci stiamo impegnando molto per darvi il meglio che vi possiamo offrire in termini di maglia e uncinetto, ispirazioni e consigli così come filati di grande qualità ad un prezzo incredibile! Volete utilizzare i nostri modelli per qualcosa d'altro oltre al vostro uso personale? Potete leggere tutto ciò che è consentito nel testo sul Copyright in basso su tutte le pagine dei nostri modelli. Buon lavoro!
Lasciare un commento sul modello DROPS 210-36
Noi saremmo felici di ricevere i tuoi commenti e opinioni su questo modello!
Se vuoi fare una domanda, fai per favore attenzione a selezionare la categoria corretta nella casella qui sotto per velocizzare il processo di risposta. I campi richiesti sono indicati da *.