
Categorie popolari
State cercando un filato?


Commenti / Domande (20)
![]() Angela Christl ha scritto:
Angela Christl ha scritto:
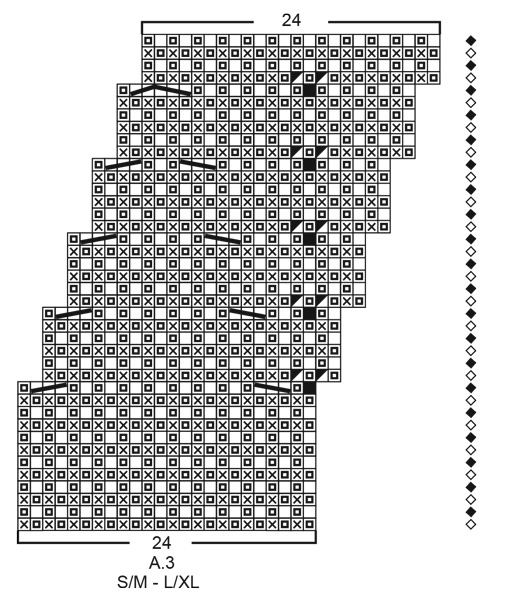
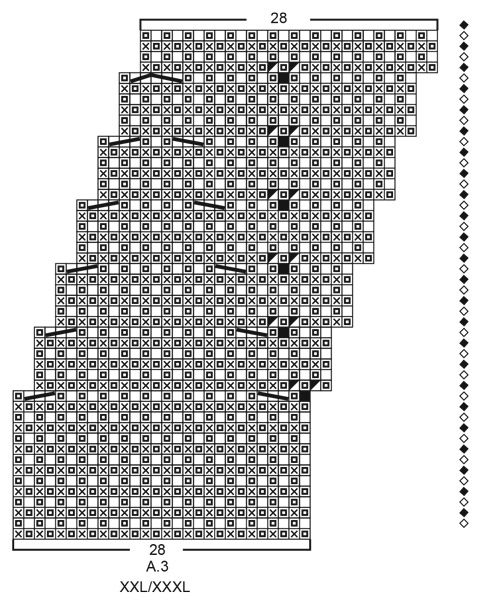
Vielen Dank für all die tollen Strickmuster. Meine Frage zum Strickteil A3: Müssten die Maschen oberhalb der 5-fach-Masche nicht gleich gestrickt werden wie im A2? Nämlich: „abheben/1 linke Masche/abheben/1 linke Masche/abheben“. Vielen Dank für Ihre Rückmeldung.
03.03.2025 - 07:29DROPS Design ha risposto:
Liebe Frau Christi, ja genau, da die Masche nicht links zusammen mit dem Umschlag gestrickt werden kann, wird diese Masche bzw den Umschlag links gestrickt. Viel Spaß beim Stricken!
03.03.2025 - 11:13
![]() Marie Grönning ha scritto:
Marie Grönning ha scritto:
Jag har 200g DROPS Merino Extra Fine uni colour 09, mörk brun kvar efter ett felköp. Tänkte sticka kjolen och önskar mej tips på färgkombinationer som passar med den mörkbruna jag redan har. På förhand tack!
02.11.2024 - 12:52DROPS Design ha risposto:
Hei Maria. Fargevalg er ganske personlig, så det er vaskelig å gi et 100% riktig svar. Farge 09 mørk brun vil kunne passe veldig mange av våre andre farger, så det kommer jo an på hva du liker. Personlig syns jeg mørk brun går det det meste, alt fra rosa, rød/burgunder til lilla, blå og grønn. Tenkt på hva du liker, hva vil du bruke skjørtet sammen med (veske, sko, jakke osv). mvh DROPS Design
04.11.2024 - 09:01
![]() Margaret Emms ha scritto:
Margaret Emms ha scritto:
Your answer to Mrs Hurleu on 22.01.20 doesn't really help. I am wondering the same - is there a mistake in A3 on the row above the black square increase? Are the 2 stitches each side just purled as on A2 and A4? Perhaps you could clarify.
01.11.2023 - 15:16DROPS Design ha risposto:
Dear Mrs Emms, when you work the black square in A.3 you will increase the number of stitches, reason why the diagram has then more stitches on the right side of diagram (we don't have other way to draw such a diagram); the new stitches will then be worked in English rib just as before. Just follow the diagram, after the first repeat you will see on the needle that it will look as on diagram. Happy knitting!
02.11.2023 - 17:19
![]() Marion ha scritto:
Marion ha scritto:
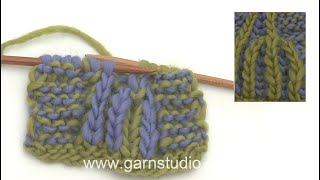
Hallo, zu der nach rechts geneigten Abnahme von zwei Maschen ist in der Anleitung angegeben, dass alle Maschen einfach rechts zusammenzustricken sind. Jedoch im Videotutorial -wie man zwei Maschen im Vollpatent nach links und rechts geneigt abnimmt- ist die nach rechts geneigte Abnahme anders erklärt. Sind beide Optionen gleichwertig?
21.03.2023 - 10:42DROPS Design ha risposto:
Liebe Marion, beide Methode können benutzt werden, solange die Abnahme links oder rechts geneigt sind - am besten stricken Sie eine Maschenprobe so wissen Sie, wie Sie am besten diese Maschen stricken sollen (ich würde aber immer die Anleitung folgen). Viel Spaß beim stricken!
21.03.2023 - 11:14
![]() Marion ha scritto:
Marion ha scritto:
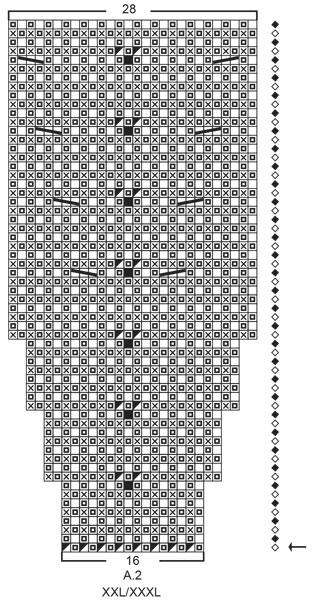
Wie ist das Diagramm zu verstehen? Wie muss bei A. 2 zugenommen werden und warum ist das Diagramm A. 3 nach rechts versetzt?
13.03.2023 - 20:12
![]() Marion ha scritto:
Marion ha scritto:
Wie ist das Diagramm zu verstehen? Wie muss bei A. 2 zugenommen werden und warum ist das Diagramm A. 3 nach rechts versetzt?
13.03.2023 - 20:12DROPS Design ha risposto:
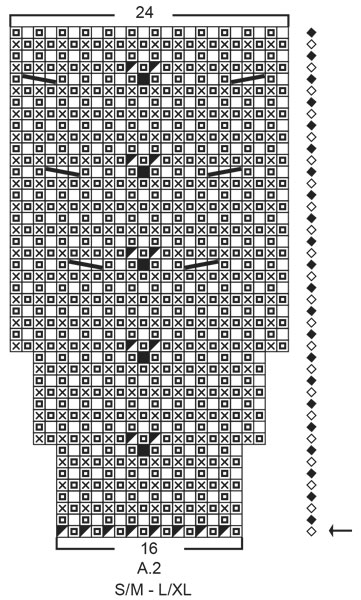
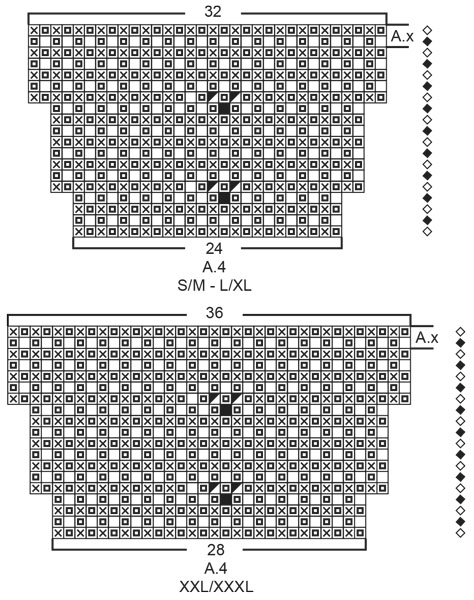
Liebe Marion, zuerst stricken Sie A.2 in der Runde, dann wenn A.2 fertig ist (= die 1. Hälfte von den ersten Blättern)stricken Sie A.3 (= die 2. Hälften von den ersten Blättern + die nächsten Zunahmen zwischen den Blättern - wegen Zunahmen und Abnahmen sieht es so versetzt aus). Nach A.3 stricken Sie dann A.4 (die letzten Zunahmen) und dann nur Patentmuster. Viel Spaß beim stricken!
14.03.2023 - 09:35
![]() Zana ha scritto:
Zana ha scritto:
Beautiful. I would like to see the diagram, so I can create something else using this pattern working on the flat.. Thank you.
01.10.2022 - 14:10
![]() Danielle Krijnen ha scritto:
Danielle Krijnen ha scritto:
Superleuk rokje, maar als ik aan A2 begin, wordt er geschreven dat je eerst 1 omslag doet (van voor naar achter? Of achter naar voor?) en dan 1 steek averechts afhaalt. Ik heb nu 98 steken en moet uitkomen op 144 steken. Ik begrijp niet hoe? De omslagen moeten dan volgens mij wel in de andere kleur? Want als je 98 steken hebt met om en om een omslag kom je op het dubbele uit.......
22.10.2020 - 15:59DROPS Design ha risposto:
Dag Danielle,
De omslag (van voor naar achteren) en de afgehaalde steek horen bij elkaar en vormen samen de steek met het open vierkantje. De volgende steek brei je averecht, dan weer 1 omslag + 1 averecht, enzovoort. Op die manier kom je dan op 144 steken. Voor de kleinste maat heb je trouwens 96 steken op de naald en niet 98 steken.
25.10.2020 - 19:43
![]() Stef Hurleu ha scritto:
Stef Hurleu ha scritto:
Good morning Is an error occurring in A3 ? following each row that has worked 5 stitches and the left/right decreases - for example the row (15) - should it not include the symbols to allow 2 simple purl stitches for each previous work 5 stitch in addition that accompany the 3 slipped yarn overs rather than only the ‘make 1yarn over ; slip 1 stitch purl wise’ and ‘purl yarn over and purl stitch together? Then row 16 can be the knit yarn over and knit stich
21.01.2020 - 17:12DROPS Design ha risposto:
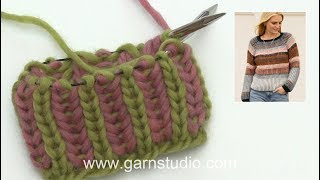
Dear Mrs Hurleu, we choose to keep the symbols from the English rib, but after an increaesing row you will work the new stitches in English rib as if they were a yarn over but without the yarn over - this video might help you. Happy knitting!
22.01.2020 - 08:02
![]() Blondel ha scritto:
Blondel ha scritto:
Du plus bel effet pour de jolies jambes ! j adore
24.09.2019 - 13:45
|
|||||||||||||||||||||||||||||||||||||
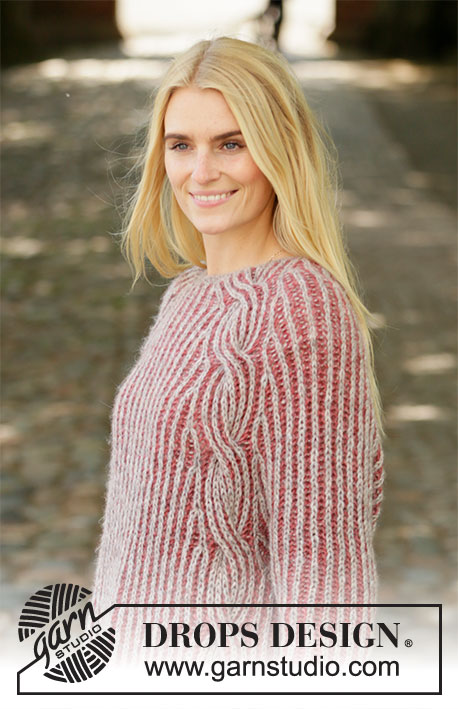
Finally The Weekend#finallytheweekendskirt |
|||||||||||||||||||||||||||||||||||||
 |
 |
||||||||||||||||||||||||||||||||||||
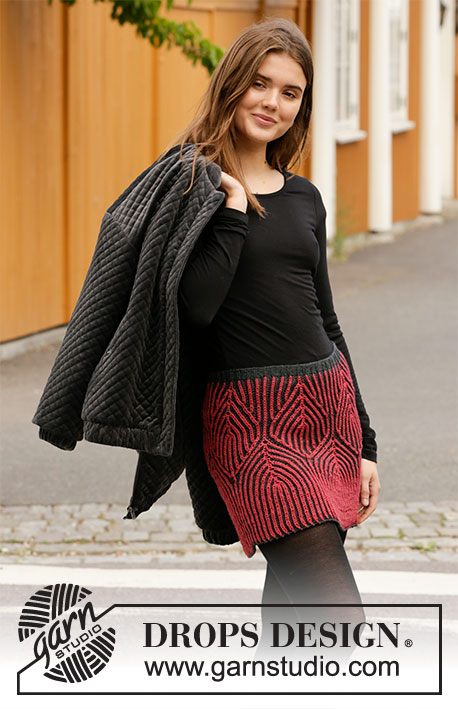
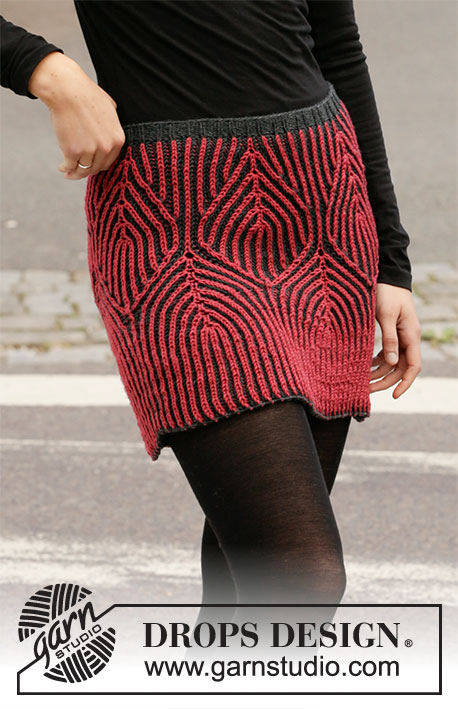
Gonna lavorata ai ferri a coste inglesi a 2 colori con motivo a foglie. Lavorata in DROPS Merino Extra Fine. Taglie: S - XXXL
DROPS 206-24 |
|||||||||||||||||||||||||||||||||||||
|
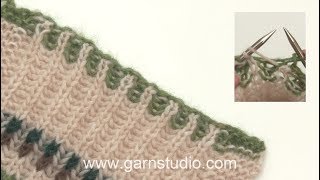
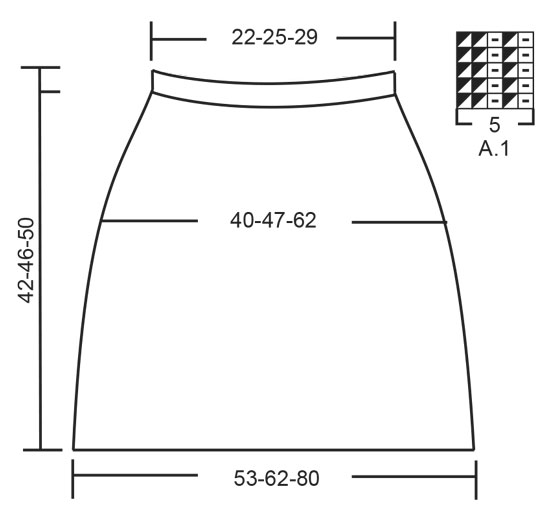
---------------------------------------------------------- TECNICHE IMPIEGATE: ---------------------------------------------------------- COSTE: Vedere il diagramma A.1. SUGGERIMENTO PER LE DIMINUZIONI: Diminuire 2 maglie rovescio a 1 maglia rovescio lavorando 2 maglie insieme a rovescio. MOTIVO A FOGLIE A COSTE INGLESI CON 2 COLORI (lavorato in tondo): Vedere i diagrammi A.2 - A.4. Per ottenere l’effetto con 2 colori lavorare a strisce in modo alternato con 1 giro grigio scuro e 1 giro rosa scuro. Iniziare A.2, A.3 e A.4 su un giro con il giro grigio scuro come spiegato nel motivo e ogni volta che si lavorano gli aumenti o diminuzioni in A.2, A.3 e A.4, questo viene fatto su un giro con il rosa scuro. SUGGERIMENTO PER IL LAVORO: Tutti i numeri delle maglie durante la lavorazione a coste inglesi sono senza gettati, perchè i gettati appartengono alla maglia diritto e vengono conteggiati come una maglia unica. SUGGERIMENTO PER LE MISURE: Dal momento che il capo si espande durante l’uso, potrebbe essere una buona idea allargare il capo in larghezza durante le misurazioni della lunghezza, per evitare che la gonna risulti troppo corta. ---------------------------------------------------------- INIZIO DEL LAVORO: ---------------------------------------------------------- GONNA – BREVE RIASSUNTO DEL LAVORO: Lavorata in tondo con i ferri circolari corti, dall’alto in basso, passare ai ferri circolari più lunghi quando necessario. GONNA: Avviare 120-140-160 maglie con i ferri circolari corti n° 3 mm con grigio scuro. Lavorare 1 giro diritto. Poi lavorare A.1 in tondo (= 24-28-32 ripetizioni di 5 maglie). Quando le coste misurano 3-4-4 cm, diminuire tutte le 2 maglie rovescio a 1 maglia rovescio – leggere il SUGGERIMENTO PER LE DIMINUZIONI = 96-112-128 maglie. Passare ai ferri circolari n° 3,5 mm. Leggere MOTIVO MOTIVO A FOGLIE A COSTE INGLESI CON 2 COLORI e lavorare A.2 in tondo (= 6-7-8 ripetizioni di 16 maglie). FARE ATTENZIONE ALLA TENSIONE DEL LAVORO e leggere il SUGGERIMENTO PER IL LAVORO. Alla fine di A.2, ci sono 144-168-224 maglie sul ferro. Lavorare A.3 in tondo (= 6-7-8 ripetizioni di 24-24-28 maglie). Alla fine di A.3, lavorare A.4 in tondo (= 6-7-8 ripetizioni di 24-24-28 maglie). Alla fine di A.4, ci sono 192-224-288 maglie sul ferro. Poi lavorare A.x in A.4 in tondo fino a quando il lavoro misura circa 42-46-50 cm dal bordo di avvio – leggere il SUGGERIMENTO PER LE MISURAZIONI, provare la gonna e lavorare fino alla lunghezza desiderata. Intrecciare senza stringere le maglie con diritto sui gettati e sulle maglie gettate e rovescio su rovescio - NOTA: Fare 1 gettato dopo circa ogni 6° maglia durante la chiusura (intrecciare i gettati come maglie normali) per rendere il bordo di chiusura più elastico. Iniziare a lato o al centro dietro e far passare un elastico sottile o un elastico rotondo dentro e fuori nelle coste sulla vita, fare un nodo. |
|||||||||||||||||||||||||||||||||||||
Spiegazioni del diagramma |
|||||||||||||||||||||||||||||||||||||
|
|||||||||||||||||||||||||||||||||||||
 |
|||||||||||||||||||||||||||||||||||||
 |
|||||||||||||||||||||||||||||||||||||
 |
|||||||||||||||||||||||||||||||||||||
 |
|||||||||||||||||||||||||||||||||||||
 |
|||||||||||||||||||||||||||||||||||||
 |
|||||||||||||||||||||||||||||||||||||
Avete terminato questo modello?Allora taggate le vostre foto con #dropspattern #finallytheweekendskirt o inviatele alla #dropsfan gallery. Avete bisogno di aiuto con questo modello?Troverete 15 video tutorial, una sezione per i commenti/domande e molto altro guardando il modello su www.garnstudio.com © 1982-2026 DROPS Design A/S. Ci riserviamo tutti i diritti. Questo documento, compreso tutte le sue sotto-sezioni, è protetto dalle leggi sul copyright. Potete leggere quello che potete fare con i nostri modelli alla fine di ogni modello sul nostro sito. |
|||||||||||||||||||||||||||||||||||||


Con oltre 40 anni di esperienza nel design di modelli di maglia e uncinetto, DROPS Design offre la più estesa collezione di modelli gratuiti su internet - tradotti in 17 lingue. Ad oggi vi possiamo fornire 324 cataloghi e 12290 modelli - 9561 dei quali sono tradotti in Italiano.
Ci stiamo impegnando molto per darvi il meglio che vi possiamo offrire in termini di maglia e uncinetto, ispirazioni e consigli così come filati di grande qualità ad un prezzo incredibile! Volete utilizzare i nostri modelli per qualcosa d'altro oltre al vostro uso personale? Potete leggere tutto ciò che è consentito nel testo sul Copyright in basso su tutte le pagine dei nostri modelli. Buon lavoro!
Lasciare un commento sul modello DROPS 206-24
Noi saremmo felici di ricevere i tuoi commenti e opinioni su questo modello!
Se vuoi fare una domanda, fai per favore attenzione a selezionare la categoria corretta nella casella qui sotto per velocizzare il processo di risposta. I campi richiesti sono indicati da *.