
Categorie popolari
State cercando un filato?


Commenti / Domande (14)
![]() Anna ha scritto:
Anna ha scritto:
Ich habe einen Absatz überlesen, als ich die Anleitung auf dem Handy durchgescrollt habe! So erklärt sich das Problem, das ich mit der Abnahme hatte! Das ist mir ja nun peinlich... Vielen Dank trotzdem für die Möglichkeit, hier Fragen zu den Anleitungen zu stellen.
01.01.2026 - 19:12
![]() Anna ha scritto:
Anna ha scritto:
Ich komme leider am Ende des Vollpatent-Teils nicht weiter. Egal, was ich versuche: Ich komme beim Folgen der Anleitung bei der Abnahme nicht auf die gewünschten 80M. Wenn ich 3M zusammenstricke, ende ich bei deutlich mehr als 80M. Zählen die noch auf der Nadel befindlichen Umschläge aus der letzten Patentrunde als Maschen im Sinne der Abnahme oder nicht? Muss ich also ggf. 5M zusammenstricken? Liegt da mein Denkfehler?
01.01.2026 - 19:02
![]() John Bland ha scritto:
John Bland ha scritto:
It seems more natural to use an odd number of stitches when doing the English Rib as then you don't do two stitches the same at the start/end of the round. Why use an even number of stitches?
10.07.2022 - 09:06DROPS Design ha risposto:
Dear Mrs Bland, the hat is worked in the round, so that you need an even number of stitches to get the pattern fit in the round. This video might help you to understand how to work English Rib in the round. Happy knitting!
11.07.2022 - 08:37
![]() John Bland ha scritto:
John Bland ha scritto:
I knit English style (yarn in right hand) and it took my quite a bit to work out how to knit English rib this way. I share it here in case anyone else would benefit. The rows are: - Knit Row -- *Yarn to front; Slip 1; Knit 1 with yarn in front* repeat Pearl Row -- *(Yarn in front) Slip 1; Yarn over; Pearl 1 Experts might want to double check this
10.07.2022 - 09:03
![]() Diana Parkhomovskaya ha scritto:
Diana Parkhomovskaya ha scritto:
My daughter-in-law really likes the picture of your beret, but the yarn she likes is a bit thicker, medium, US 4 (lion brand Heartland). Would you be able recommend for needle sizes and initial number of stitches (size small) to adjust for thicker yarn? Thank you
23.01.2022 - 23:48DROPS Design ha risposto:
Dear Diana, please understand that our patterns are made available to support DROPS yarns. Therefore we cannot help you with other brands' yarns.
24.01.2022 - 00:36
![]() Karen Haag ha scritto:
Karen Haag ha scritto:
I tried to make this beret and gave up. But I really wanted to make it and am trying again. But I’ve figured out the problem or what I think might be the problem. The instructions in the pattern for the English Rib do not match what is written in your tutorial for English rib. In the pattern, row 2 says to purl the yo and slipped st together. In your tutorial row 2 says to knit them together. The US needle equivalent to 3 mm is a 2 the pattern says 2,5:
18.01.2022 - 22:10DROPS Design ha risposto:
Dear Mrs Haag, English rib in the round are worked the same way in the pattern and in the video, you first work round 1 to 3 then repeat only round 2, but the video starts with (make 1 yarn over, slip 1 then work Knit 1) while the pattern starts with (Knit 1, make 1 yarn over, slip 1), but then you work the stitches the same way. Hope it will help, happy knitting!
19.01.2022 - 09:06
![]() Tawni ha scritto:
Tawni ha scritto:
So i dont have cable needles or double pointed needles for this i only have straight needles. Also my needle sizes are 8 & 11 can this still be done on straight needles?
29.11.2020 - 03:17DROPS Design ha risposto:
Dear Tawni, you can't work this hat with straight needles, since you need to work in the round. You need to use either circular needles or double pointed needles. Also, to work with that thickness of yarn you'd need the sizes indicated in the pattern. Happy knitting!
29.11.2020 - 18:35
![]() Susan Berlin ha scritto:
Susan Berlin ha scritto:
I am knitting the Lagoon Beret pattern. In part, the instructions say "When hat measures 16-18 cm = 6 1/4”-7” but it's not clear whether you measure from the beginning of the knitting, or from above the K1P1 brim. Could you please clarify? Thank you!
16.05.2020 - 14:48DROPS Design ha risposto:
Dear Susan, the measurement is for whole garment, so from the beginning. Happy knitting!
17.05.2020 - 16:27
![]() Yveline Candau ha scritto:
Yveline Candau ha scritto:
Bonjour à part les augmentations à 3cm du bord n y a t il pas d autres augmentations cela me parait impossible vu l ampleur du modèle
14.03.2020 - 16:31DROPS Design ha risposto:
Bonjour Mme Candeau, c'est pourtant cette différence + la largeur des côtes anglaises qui vont donner l'ampleur du béret, on va ainsi augmenter 20 ou 22 m après les côtes 1/1 et continuer ensuite en côtes anglaises jusqu'à 16-18 cm de hauteur totale. Pensez à bien vérifier votre tension (= échantillon) - plus d'infos ici. Bon tricot!
16.03.2020 - 09:46
![]() Evelin ha scritto:
Evelin ha scritto:
Hola, hay patrón del chal o bufanda que lleva la muchacha en sus hombros?
15.10.2019 - 14:56DROPS Design ha risposto:
Hola Evelin. Este modelo no está en esta colección. Puede ser que vaya a estar publicado como extras. Sigue las noticias de Drops en Facebook o Instagram.
17.10.2019 - 19:27
|
|
Lagoon Beret#lagoonberet |
|
|
|
|
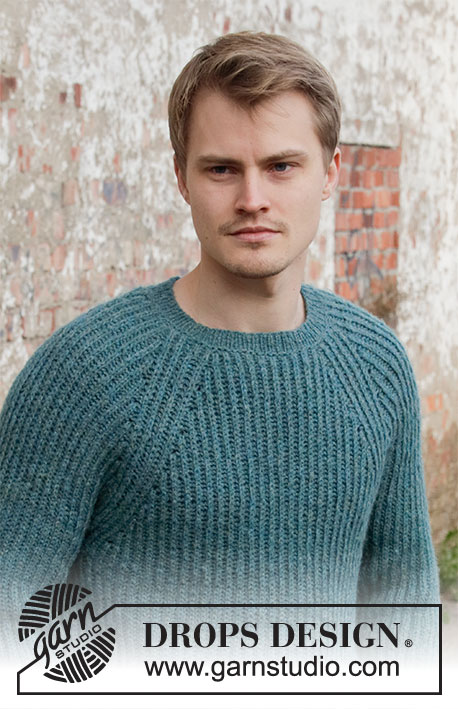
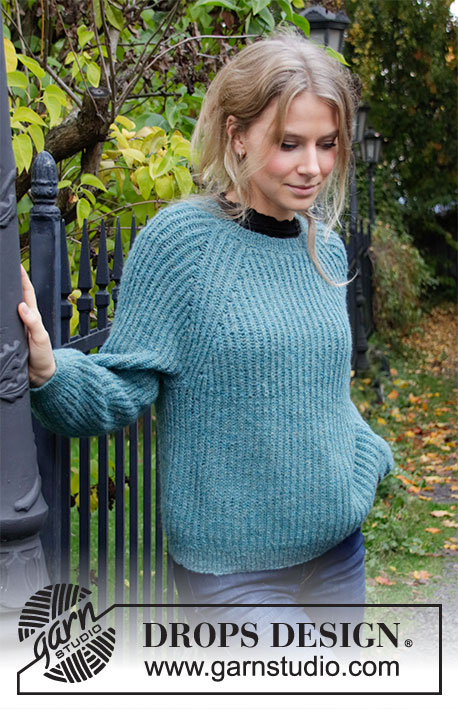
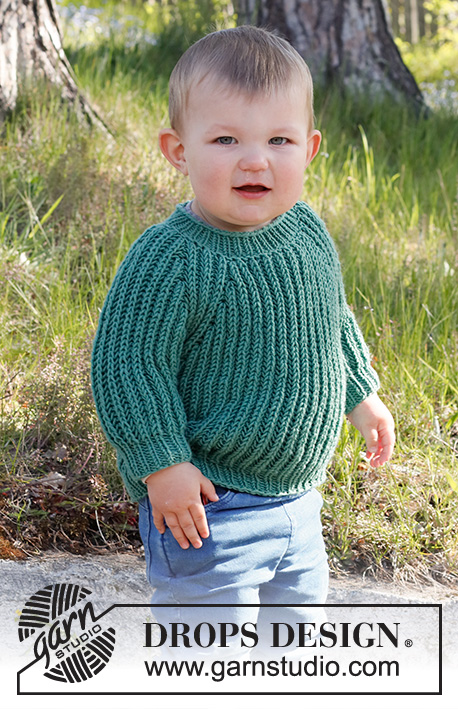
Basco ai ferri a coste inglesi in DROPS Sky.
DROPS 204-17 |
|
|
---------------------------------------------------------- TECNICHE IMPIEGATE: ---------------------------------------------------------- SUGGERIMENTO PER GLI AUMENTI: Per calcolare ogni quante maglie aumentare, dividere il numero complessivo delle maglie sul giro (p.es: 100 maglie) per il numero di aumenti da fare (p.es 20) = 5. Quindi, in questo esempio, per aumentare sollevare il filo tra le 2 maglie e lavorarlo ritorto per evitare buchi. Aumentare in questo modo dopo ogni 5 maglie. COSTE INGLESI: GIRO 1: * 1 maglia diritto, 1 maglia gettata, passare 1 maglia a rovescio *, ripetere da *-* su tutto il giro. GIRO 2: * 1 maglia gettata, passare 1 maglia a rovescio, lavorare insieme a rovescio la maglia gettata e la maglia passata *, ripetere da *-* su tutto il giro. GIRO 3: * lavorare insieme a diritto la maglia gettata e la maglia passata , 1 maglia gettata, passare 1 maglia a rovescio*, ripetere da *-* su tutto il giro. Ripetere i giri 2 e 3. ---------------------------------------------------------- IL LAVORO INIZIA QUI: ---------------------------------------------------------- BASCO - BREVI INDICAZIONI PER IL LAVORO: Si lavora in tondo con i ferri circolari . Passare ai ferri a doppia punta quando necessario. BASCO: Avviare 100-104 maglie con i ferri circolari n° 3 ed il filato Sky. Lavorare 1 giro a diritto. Proseguire a coste = 1 maglia diritto /1 maglia rovescio per 3 cm. Lavorare 1 giro a diritto e, durante questo giro, aumentare 20-22 maglie a intervalli regolari - vedere il SUGGERIMENTO PER GLI AUMENTI = 120-126 maglie. Passare ai ferri circolari n° 4,5. Proseguire a COSTE INGLESI - vedere le spiegazioni sopra . RICORDARSI DI MANTENERE LA CORRETTA TENSIONE DEL LAVORO! Quando il basco misura 16-18 cm - assicurarsi di finire dopo un giro 2 delle coste inglesi, passare ai ferri circolari n° 3. Lavorare il giro successivo come segue: * lavorare insieme a diritto la maglia gettata e la maglia passata, 1 maglia rovescio *, ripetere da *-* su tutto il giro. Le maglie gettate sono state ora lavorate insieme alla loro maglia e ci sono 120-126 maglie sul giro. Proseguire a coste = 1 maglia diritto /1 maglia rovescio per 3 cm. Diminuire ora a seconda della taglia, come segue: TAGLIE S-M: GIRO 1: * 1 maglia diritto, 1 maglia rovescio, lavorare insieme a diritto le 3 maglie successive (= 2 maglie diminuite), 1 maglia rovescio *, ripetere da *-* su tutto il giro (= 40 maglie diminuite) = 80 maglie. GIRI 2- 4: Lavorare a diritto le maglie diritto e a rovescio le maglie a rovescio . GIRO 5: * 1 maglia diritto, 1 maglia rovescio, lavorare insieme a diritto le 3 maglie successive (= 2 maglie diminuite), 1 maglia rovescio, 1 maglia diritto, 1 maglia rovescio *, ripetere da *-* su tutto il giro (= 20 maglie diminuite) = 60 maglie. GIRI 6- 8: Lavorare a diritto le maglie diritto e a rovescio le maglie a rovescio. GIRO 9: * 1 maglia diritto, 1 maglia rovescio, lavorare insieme a diritto le 3 maglie successive (= 2 maglie diminuite), 1 maglia rovescio *, ripetere da *-* su tutto il giro (= 20 maglie diminuite) = 40 maglie. TAGLIE M/L: GIRO 1: * 1 maglia diritto, 1 maglia rovescio, lavorare insieme a diritto le 3 maglie successive (= 2 maglie diminuite), 1 maglia rovescio *, ripetere da *-* su tutto il giro (= 42 maglie diminuite) = 84 maglie. GIRI 2- 4: Lavorare a diritto le maglie diritto e a rovescio le maglie a rovescio. GIRO 5: * 1 maglia diritto, 1 maglia rovescio, lavorare insieme a diritto le 3 maglie successive (= 2 maglie diminuite), 1 maglia rovescio *, ripetere da *-* su tutto il giro (= 28 maglie diminuite) = 56 maglie. GIRI 6- 8: Lavorare a diritto le maglie diritto e a rovescio le maglie a rovescio. GIRO 9: * 1 maglia diritto, 1 maglia rovescio, lavorare insieme a diritto le 3 maglie successive (= 2 maglie diminuite), 1 maglia rovescio, 1 maglia diritto, 1 maglia rovescio *, ripetere da *-* su tutto il giro (= 14 maglie diminuite) = 42 maglie. PER TUTTE LE TAGLIE: GIRO 10: Lavorare a diritto le maglie diritto e a rovescio le maglie a rovescio. GIRO 11: Lavorare tutte le maglie insieme a 2 a 2 a diritto = 20-21 maglie. Tagliare il filo e passarlo attraverso le rimanenti maglie, stringere e fermare il filo. Il basco misura circa 22-24 cm. |
|
Avete terminato questo modello?Allora taggate le vostre foto con #dropspattern #lagoonberet o inviatele alla #dropsfan gallery. Avete bisogno di aiuto con questo modello?Troverete 13 video tutorial, una sezione per i commenti/domande e molto altro guardando il modello su www.garnstudio.com © 1982-2026 DROPS Design A/S. Ci riserviamo tutti i diritti. Questo documento, compreso tutte le sue sotto-sezioni, è protetto dalle leggi sul copyright. Potete leggere quello che potete fare con i nostri modelli alla fine di ogni modello sul nostro sito. |


Con oltre 40 anni di esperienza nel design di modelli di maglia e uncinetto, DROPS Design offre la più estesa collezione di modelli gratuiti su internet - tradotti in 17 lingue. Ad oggi vi possiamo fornire 324 cataloghi e 12290 modelli - 9561 dei quali sono tradotti in Italiano.
Ci stiamo impegnando molto per darvi il meglio che vi possiamo offrire in termini di maglia e uncinetto, ispirazioni e consigli così come filati di grande qualità ad un prezzo incredibile! Volete utilizzare i nostri modelli per qualcosa d'altro oltre al vostro uso personale? Potete leggere tutto ciò che è consentito nel testo sul Copyright in basso su tutte le pagine dei nostri modelli. Buon lavoro!
Lasciare un commento sul modello DROPS 204-17
Noi saremmo felici di ricevere i tuoi commenti e opinioni su questo modello!
Se vuoi fare una domanda, fai per favore attenzione a selezionare la categoria corretta nella casella qui sotto per velocizzare il processo di risposta. I campi richiesti sono indicati da *.