
Categorie popolari
State cercando un filato?


Commenti / Domande (26)
![]() Lenie ha scritto:
Lenie ha scritto:
Ik ben bezig met het afkanten in het achterpand voor de armsgaten. Volgens mij klopt het aantal steken niet dat je overhoudt na het afkanten. Bij de grootste maat moet je voor het afkanten 62 steken hebben en na het afkanten 54. Volgens mij staat er dat je in totaal 18 steken af moet kanten. Ik kom dan uit op 44 steken. Wat doe ik fout?
10.08.2025 - 14:25DROPS Design ha risposto:
Dag Lenie,
Je kant 1 keer 2 steken af en dan 2 keer 1 steek en dit doe je aan beide zijkanten. Hiermee heb je in totaal 8 steken afgekant. 62-8=54, dus dat zou moeten kloppen.
18.08.2025 - 20:46
![]() Ida ha scritto:
Ida ha scritto:
Hej Drops Kan jeg strikke opskriften i to tråde fra garngruppe A, fx Alpaca/Baby Merino og Kid-Silk - eller måske Brushed Alpaca Silk, som ser virkelig lækker ud? Jeg vil gerne have lidt meleret effekt og det lidt lodne samtidig med et fastere garn end Air.
28.01.2025 - 10:13DROPS Design ha risposto:
Hej Ida. Ja du kan sticka denna opskrift enten med en tråd från ett garn i garngrupp C eller 2 trådar från ett garn i garngrupp A. Se bara till att du får den stickfasthet som uppges i opskriften. Mvh DROPS Design
28.01.2025 - 14:07
![]() Megan ha scritto:
Megan ha scritto:
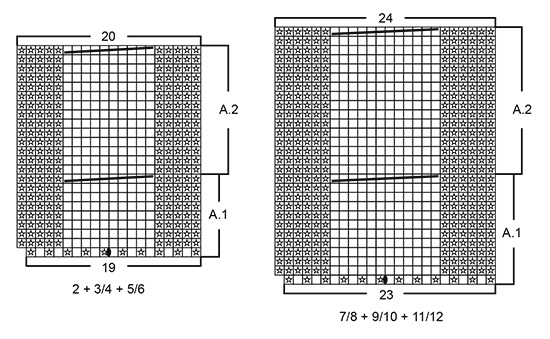
Hi, Is this a pattern that works from bottom up? And under the section Body, I don't understand what "work A.1 (choose diagram for your size = 19-19-19-23-23-23 stitches increased to 20-20-20-24-24-24 stitches on the first round) refers to." My understanding is this is the first round. Do you increase the extra stitch using the M1 technique? Or you simply work A.1 on 20 stitches instead of 19? Thank you.
30.07.2024 - 08:52DROPS Design ha risposto:
Dear Megan, the pattern is worked from bottom up, read diagram also from bottom up, and on the first row in A.1 you will increase 1 stitch making 1 yarn over (see 3rd symbol under diagram text), so that you work 19 sts increasing 1 stitch to get 20 sts. Happy knitting!
31.07.2024 - 07:13
![]() Cecilia ha scritto:
Cecilia ha scritto:
Gentili buongiorno, Ho iniziato il vostro modello ISAK però quello che vedo dalla foto non sembrano coste 1:1 potete cortesemente confermarmi? Ringrazio 🙏
20.07.2024 - 16:42DROPS Design ha risposto:
Buonasera Cecilia, al momento non ci sono correzioni per il modello. Buon lavoro!
20.07.2024 - 22:31
![]() Darlene Cossarini ha scritto:
Darlene Cossarini ha scritto:
Thank you for your response to my first question. It worked. But now, I do not understand this instruction, "On the next row knit together the 10-10-10-12-12-12 stitches over the cable mid front, 2 and 2 (= 5-5-5-6-6-6 stitches decreased). This is from the instructions for the front. Please explain. I have tried to figure it out on my own, but have no idea.
13.10.2022 - 07:59DROPS Design ha risposto:
Dear Mrs Cossarini, you need more stitches for the cable than for stocking stitch, so that you need to decrease the number of stitches in the cable to avoid the neck loosing its shape (become wider than expected), you have then to work K2 tog a total of 5 or 6 times accross the knitted stitches in the diagram to decrease 5 or 6 stitches. Happy knitting!
13.10.2022 - 09:33
![]() Darlene Cossarini ha scritto:
Darlene Cossarini ha scritto:
This is my first time knitting a sweater in the round. I have completed the main part of the body and do not quite understand how to do the dividing row between front and back. Is there a video I can watch or an explanation I can read. I love the pattern so far, and the sweater is turning out beautifully. thank you.
09.10.2022 - 07:09DROPS Design ha risposto:
Dear Darlene, you should have a marker inserted in each side. Cast off 3 stitches on each side of each marker (6 in total for each armhole). For example, from the beginning on the row on one side, cast off 3 stitches, work according to the pattern until 3 stitches remain before the next marker, cast off the next 6 stitches (the marker should be in the middle of these stitches; remove the marker). Work according to the pattern until 3 stitches remain in the round and cast off these 3 stitches. Now cut the thread and work the stitches on the front and the back separately. Happy knitting!
09.10.2022 - 20:04
![]() Lene Holmlund ha scritto:
Lene Holmlund ha scritto:
Jeg strikker 7/8 år. Ved 32 cm tager jeg ind til ærmegab. Skal så strikke helt til 46 cm. Bliver det ikke et kæmpe ærmegab?
19.09.2022 - 15:28DROPS Design ha risposto:
Hej Lene, ærmegabet skal strikkes til du har 48 cm = 16 cm, se også måleskitsen nederst i opskriften :)
20.09.2022 - 14:43
![]() Francoise ha scritto:
Francoise ha scritto:
Est il nécessaire de faire ces augmentations et diminutions au premier rang ne peut on pas tricoter tout droit ? Merci de votre réponse et bravo pour vos modèle
29.01.2022 - 11:34DROPS Design ha risposto:
Bonjour Françoise et merci, ces diminutions et augmentations sont effectivement indispensables pour bien conserver la bonne largeur (le nombre de mailles en côtes, torsades et jersey n'est pas le même pour la même largeur car les côtes et les torsades resserrent l'ouvrage). Bon tricot!
31.01.2022 - 08:48
![]() Mary Jane Kimball ha scritto:
Mary Jane Kimball ha scritto:
I am knitting Drops 30-13. I do not understand the instruction or reason for YO between stitch 12 and 13 on the diagram . Is this an increase? Why is there a YO in the middle of the cable? This would increase the stitch count from 24 to 25 for the center cable. Please clarify.
16.02.2021 - 17:55DROPS Design ha risposto:
Hi Mary Jane, The yarn over is on the last row of the rib, so will not affect the cabling. The extra stitch means there is now an even number of stocking stitches on each side of the cable. Happy knitting!
17.02.2021 - 07:41
![]() Mary Baldwin ha scritto:
Mary Baldwin ha scritto:
Can you please indicate how MUCH yarn is needed for this project? If it is here, I missed it.
15.11.2020 - 17:14DROPS Design ha risposto:
Dear Mrs Baldwin, you will find requested amount of yarn for each size at the beginning of the pattern, ie in the header, together with the sizes and the needle size / tension. For ex in size 2 years you need here 150 g DROPS Air / 50 g a ball = 3 balls DROPS Air in the first size / or 300 g DROPS Paris/50 g a ball = 6 balls DROPS Paris in the first size. Happy knitting!
16.11.2020 - 09:10
|
||||||||||||||||
Isak#isaksweater |
||||||||||||||||
|
|
||||||||||||||||
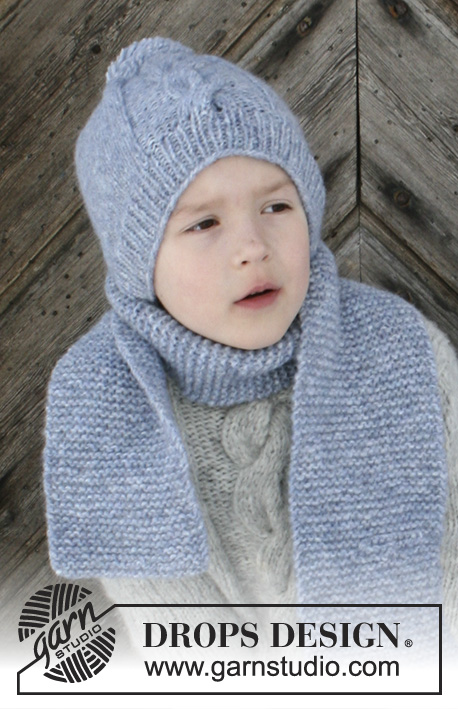
Maglione ai ferri con trecce, per bambini in DROPS Air o DROPS Paris. Taglie: Da 2 a 12 anni.
DROPS Children 30-13 |
||||||||||||||||
|
INFORMAZIONI GENERALI: SUGGERIMENTO PER LE DIMINUZIONI: Per calcolare ogni quante maglie diminuire, dividere il numero complessivo delle maglie su cui diminuire (p.es: 25 maglie) per il numero di diminuzioni da fare (p.es 5) = 5. Quindi, in questo caso, bisogna lavorare insieme a diritto ogni 4a e 5a maglia. MOTIVO: Vedere i diagrammi A.1 e A.2. Seguire il diagramma corrispondente alla propria taglia. I diagrammi mostrano tutti i ferri del motivo visti sul diritto del lavoro. SUGGERIMENTO PER GLI AUMENTI (al centro, sotto la manica): Iniziare 1 maglia dopo il segno, 1 maglia gettata, lavorare finché non rimane 1 maglia, 1 maglia gettata e 1 maglia diritto (= 2 maglie aumentate). Sul giro successivo lavorare le maglie gettate a diritto ritorto per evitare che si formino dei buchi. ---------------------------------------------------------- MAGLIONE: Si lavora in tondo sui ferri circolari fino agli scalfi, poi proseguire il davanti e il dietro separatamente, avanti e indietro. Lavorare le maniche in tondo sui ferri a doppia punta. DAVANTI E DIETRO: Avviare 120-128-136-144-152-160 maglie sui ferri circolari n° 4,5. Lavorare 1 giro a diritto. Proseguire a coste (= 1 maglia diritto / 1 maglia rovescio) per 4 cm. Passare ai ferri circolari n° 5,5. Inserire 1 segno all’inizio del giro (= lato). Lavorare il giro successivo come segue: lavorare le prime 21-23-25-25-27-29 maglia a diritto e, ALLO STESSO TEMPO, diminuire 4 maglie a intervalli regolari su queste maglie – vedere il SUGGERIMENTO PER LE DIMINUZIONI, lavorare il diagramma A.1 (seguire il diagramma corrispondente alla propria taglia = le 19-19-19-23-23-23 maglie diventano 20-20-20-24-24-24 maglie durante il primo giro), lavorare 21-23-25-25-27-29 maglie diritto e, ALLO STESSO TEMPO, diminuire 4 maglie a intervalli regolari su queste maglie, inserire 1 segno (= lato), lavorare le 59-63-67-71-75-79 maglie successive a diritto e diminuire 9-9-9-11-11-11 maglie a intervalli regolari su queste maglie. Ci sono ora 54-58-62-66-70-74 maglie tra i segni per il davanti e 50-54-58-60-64-68 maglie per il dietro = per un totale di 104-112-120-126-134-142 maglie sul ferro. Lavorare il giro successivo come segue: 17-19-21-21-23-25 maglie a maglia rasata, diagramma A.1 (= 20-20-20-24-24-24 maglie), lavorare a maglia rasata fino alla fine del giro. Proseguire seguendo il motivo in questo modo. Dopo aver lavorato il diagramma A.1 1 volta in verticale, lavorare il diagramma A.2 su queste 20-20-20-24-24-24 maglie. Ripetere il diagramma A.2. Quando il lavoro misura 23-26-29-32-35-38 cm, intrecciare 6 maglie da ciascun lato per gli scalfi (intrecciare le 3 maglie che precedono e che seguono ognuno dei due segni). Finire ora il davanti e il dietro separatamente. DIETRO: = 44-48-52-54-58-62 maglie. Lavorare a maglia rasata avanti e indietro e intrecciare per gli scalfi all’inizio di ogni ferro da ciascun lato, come segue: Intrecciare 2 maglie 1 volta da ciascun lato e poi 1 maglia 1-1-2-1-1-2 volte da ciascun lato = 38-42-44-48-52-54 maglie. Quando il lavoro misura 34-38-42-46-50-54 cm intrecciare le 16-18-20-22-22-24 maglie centrali per lo scollo e finire ogni spalla separatamente. Al ferro successivo, intrecciare 1 maglia per lo scollo = per la spalla rimangono 10-11-11-12-14-14 maglie. Continuare finché il lavoro non misura 36-40-44-48-52-56 cm e intrecciare le maglie. Lavorare l’altra spalla in modo uguale. DAVANTI: = 48-52-56-60-64-68 maglie. Proseguire a maglia rasata e con il diagramma A.2 e intrecciare per gli scalfi all’inizio di ogni ferro da ciascun lato, come segue: Intrecciare 2 maglie 1 volta da ciascun lato e poi 1 maglia 1-1-2-1-1-2 volte da ciascun lato = 42-46-48-54-58-60 maglie. Continuare a maglia rasata e con il diagramma A.2 finché il lavoro non misura 31-34-38-41-45-48 cm. Durante il ferro successivo lavorare insieme a 2 a 2 a diritto le 10-10-10-12-12-12 maglie della treccia al centro sul davanti (= 5-5-5-6-6-6 maglie diminuite). Durante il ferro successivo, mettere in attesa su un ferma maglie le 9-11-13-14-14-16 maglie centrali per lo scollo e finire ogni spalla separatamente. Intrecciare per lo scollo, all’inizio di ogni ferro con inizio dallo scollo, come segue: Intrecciare 2 maglie 1 volta e poi 1 maglia 2-2-2-3-3-3 volte = per la spalla rimangono 10-11-11-12-14-14 maglie. Continuare finché il lavoro non misura 36-40-44-48-52-56 cm. Intrecciare le maglie. Lavorare l’altra spalla in modo uguale. MANICHE: Avviare 32-32-34-34-36-36 maglie sui ferri a doppia punta n° 4,5. Lavorare 1 giro a diritto. Proseguire a coste (= 1 maglia diritto / 1 maglia rovescio) per 4 cm. Passare ai ferri a doppia punta n° 5,5. Inserire 1 segno all’inizio del giro (= centro sotto la manica). Lavorare 1 giro a diritto e durante questo giro diminuire 4 maglie a intervalli regolari per tutte le taglie – vedere il SUGGERIMENTO PER LE DIMINUZIONI = 28-28-30-30-32-32 maglie. Proseguire a lavorare a maglia rasata in tondo. Quando il lavoro misura 6 cm, aumentare 2 maglie al centro sotto la manica – vedere il SUGGERIMENTO PER GLI AUMENTI. Aumentare in questo modo ogni 3-3-4-3½-4½-3½ cm per un totale di 6-7-7-8-8-10 volte = 40-42-44-46-48-52 maglie. Quando il lavoro misura 24-28-32-35-39-42 cm, intrecciare 6 maglie al centro sotto la manica (intrecciare le 3 maglie che precedono e che seguono il segno). Passare ai ferri circolari n° 5,5 e lavorare l’arrotondamento della manica avanti e indietro a maglia rasata e, ALLO STESSO TEMPO, intrecciare all’inizio di ogni ferro da ciascun lato come segue: Intrecciare 2 maglie 1-2-2-2-2-3 volte da ciascun lato e poi 1 maglia 1 volta da ciascun lato. Continuare ad intrecciare 2 maglie all’inizio di ogni ferro da ciascun lato finché il lavoro non misura 29-34-38-42-46-50 cm. Intrecciare 3 maglie all’inizio dei 2 ferri successivi e poi intrecciare le rimanenti maglie. La manica misura circa 30-35-39-43-47-51 cm misurata dall’alto verso il basso. Lavorare la seconda manica in modo uguale. CONFEZIONE: Cucire le spalle. Montare le maniche. COLLO: Con i ferri circolari corti n° 4,5 riprendere sul diritto del lavoro circa da 40 a 62 maglie intorno allo scollo (comprese le maglie del davanti messe in attesa sul ferma maglie) iniziando al centro, sul dietro del collo. Lavorare 1 giro a diritto e durante questo giro aumentare a intervalli regolari così da portare il numero delle maglie a 54-64-66-70-70-76 maglie. Proseguire lavorando a coste in tondo (= 1 maglia diritto / 1 maglia a rovescio) per 3 cm. Passare ai ferri circolari n° 5,5 e intrecciare lavorando a diritto le maglie a diritto e a rovescio le maglie a rovescio. |
||||||||||||||||
Spiegazioni del diagramma |
||||||||||||||||
|
||||||||||||||||
 |
||||||||||||||||
 |
||||||||||||||||
Avete terminato questo modello?Allora taggate le vostre foto con #dropspattern #isaksweater o inviatele alla #dropsfan gallery. Avete bisogno di aiuto con questo modello?Troverete 30 video tutorial, una sezione per i commenti/domande e molto altro guardando il modello su www.garnstudio.com © 1982-2026 DROPS Design A/S. Ci riserviamo tutti i diritti. Questo documento, compreso tutte le sue sotto-sezioni, è protetto dalle leggi sul copyright. Potete leggere quello che potete fare con i nostri modelli alla fine di ogni modello sul nostro sito. |
||||||||||||||||


Con oltre 40 anni di esperienza nel design di modelli di maglia e uncinetto, DROPS Design offre la più estesa collezione di modelli gratuiti su internet - tradotti in 17 lingue. Ad oggi vi possiamo fornire 324 cataloghi e 12290 modelli - 9561 dei quali sono tradotti in Italiano.
Ci stiamo impegnando molto per darvi il meglio che vi possiamo offrire in termini di maglia e uncinetto, ispirazioni e consigli così come filati di grande qualità ad un prezzo incredibile! Volete utilizzare i nostri modelli per qualcosa d'altro oltre al vostro uso personale? Potete leggere tutto ciò che è consentito nel testo sul Copyright in basso su tutte le pagine dei nostri modelli. Buon lavoro!
Lasciare un commento sul modello DROPS Children 30-13
Noi saremmo felici di ricevere i tuoi commenti e opinioni su questo modello!
Se vuoi fare una domanda, fai per favore attenzione a selezionare la categoria corretta nella casella qui sotto per velocizzare il processo di risposta. I campi richiesti sono indicati da *.