
Categorie popolari
State cercando un filato?


Commenti / Domande (46)
![]() Larissa ha scritto:
Larissa ha scritto:
Hallo, ich möchte gerne diesen Pullover stricken mit dünnen Fäden, mit Nadel nr. 3. Wie kann ich umrechnen damit mir das Tolles Stück gelingt. Vielen Dank im voraus Larissa
15.03.2020 - 21:12DROPS Design ha risposto:
Liebe Larissa, leider können wir jeder Anleitung nach jedem individuellen Frage anpassen und einzelne Modelle auf individuellen Wunsch hin umrechnen. Wenn sie Hilfe damit brauchen, wenden Sie sich bitte an dem Laden wo Sie die Wolle gekauft haben, dort hilft man Ihnen gerne weiter. Viel Spaß beim stricken!
16.03.2020 - 10:05
![]() Ingrid Goin ha scritto:
Ingrid Goin ha scritto:
Genseren ble nydelig, tusen takk for hjelpa
25.02.2019 - 14:40
![]() Ingrid Goin ha scritto:
Ingrid Goin ha scritto:
Skal armene monteres med vrangen eller retten ut
23.02.2019 - 07:51DROPS Design ha risposto:
Hei Ingrid. Ermene monteres med vrangen ut, som resten av genseren. God fornøyelse
25.02.2019 - 14:30
![]() Ingrid Goin ha scritto:
Ingrid Goin ha scritto:
Skal stripene strikkes lik rillene
11.02.2019 - 12:52DROPS Design ha risposto:
Hej Ingrid, hele plagget strikkes i striper og riller, det vil sige: 2 pinde ret med skogsbærmuffin, 2 pinde ret med atlantis osv. God fornøjelse!
12.02.2019 - 10:12
![]() Kathrin ha scritto:
Kathrin ha scritto:
Ergänzend: "1. TEIL (siehe Zahl in der Maßskizze): 42 M auf Rundnadel Nr. 8 mit waldbeer muffin anschlagen. Kraus rechts str" ihre letzte Antwort besagt, dass im 1. Teil des Vorder- u. Rückenteils (A.1 & A.2) auch in Streifen (mit 2 Farben: 2 R in einer Farbe, dann weitere 2 R in der anderen Farbe) gearbeitet werden soll und nicht wie in der Anleitung Kraus re in einer Farbe. Ist das wirklich so? Wenn ja, bitte die Anleitung anpassen, es ist anders zu verstehen. Danke.
06.02.2019 - 12:47DROPS Design ha risposto:
Liebe Kathrin, Vorderteil wird mit Streifen kraus rechts gestrickt: VORDERTEIL: Das ganze Vorderteil wird in STREIFEN und KRAUS RECHTS gestr (siehe oben)." Streifen sind am Anfang der Anleitung erklärt: STREIFEN: Streifen wie folgt str: * 2 R mit waldbeer muffin, 2 R mit atlantis *, von *-* wdh. Kann das sein, daß ich Ihre Frage misverstehe?
06.02.2019 - 14:10
![]() Kathrin ha scritto:
Kathrin ha scritto:
Bedeutet nach Anleitung im Teil 1 (Diagramm A.1 und A.2), dass nur Kraus rechts gestrickt wird, bis 84 Maschen für Gr. S auf der Stricknadel sind? Ich würde dem Bild nacj eigentlich vermuten, dass bereits im Teil 1 des Vorder- und Rückenteils bereits auch in Dtreifen gestrickt wird. Vielen Dank vorab.
05.02.2019 - 18:10DROPS Design ha risposto:
Liebe Kathrin, ja genau, der ganze Pullover wird mit Streifen (je 2 Reihe in jede Frabe) gestrickt. Vorder- und Rückenteil werden kraus rechts gestrickt (= 1 Krausrippe in jede Farbe) und Ärmel werden auch mit Streifen glatt nach einigen Krausrippen gestrickt. Viel Spaß beim stricken!
06.02.2019 - 07:57
![]() Annette Houlton ha scritto:
Annette Houlton ha scritto:
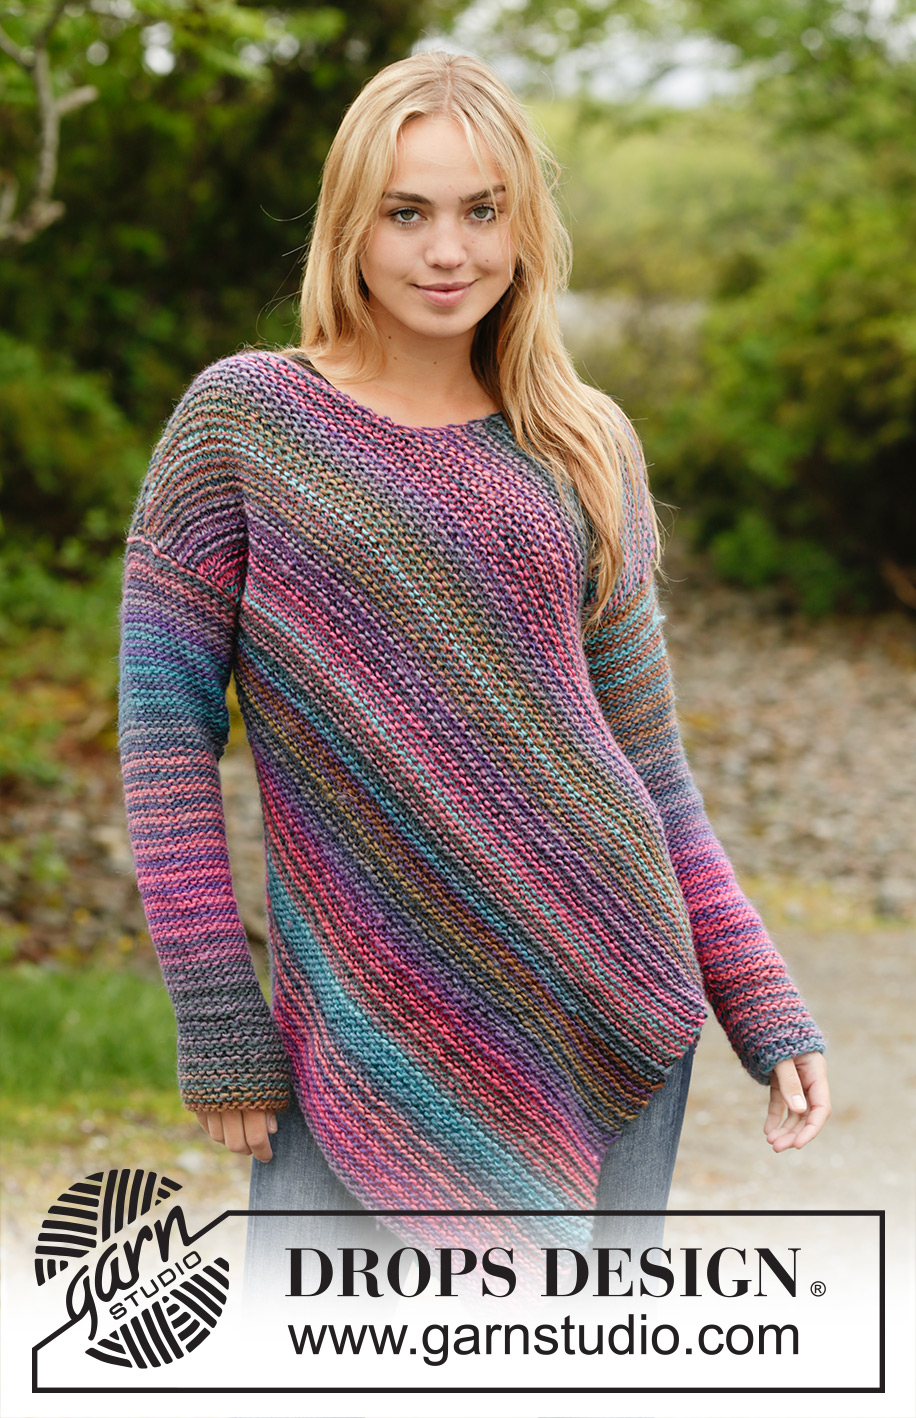
Hello, having trouble working out which size to make, M or L. I don't have a similar drop sleeve sweater I can measure. Please can you tell me what UK dress size the model in the photo is? Also what size sweater is she wearing? The sleeves say start in garter and then change to stockinette. Is this correct please? It looks like garter stitch all the way up in the photo unless the sstokinette side is on the wrong side. Thanks.
23.09.2018 - 15:04DROPS Design ha risposto:
Dear Annette, you can fid the dimensions for the finished items at the schematics at the bottom of the pattern. That might help you decide which size would be right As for teh sleeves, they do start out with garter stitch and coninue as stockinette, but it is used as reverse sockinett, teh knit stitches on the WS and the purl stitches on the right side. Happy knitting.
23.09.2018 - 23:06
![]() Annette Houlton ha scritto:
Annette Houlton ha scritto:
Hello, having trouble working out which size to make, M or L. i don\\\'t have a similar drop sleeve sweater I can measure. Please can you tell me what UK dress size the model in the photo is? Also what size sweater is she wearing? The sleeves say start in garter and then change to stockinette. Is this correct please? It looks like garter stitch ll the way up in the photo unless the knit side is on the wrong side. Thanks.
23.09.2018 - 14:58DROPS Design ha risposto:
Dear Mrs Houlton, you can measure a similar jumper you have and like the shape to compare the measurement in chart. Sleeves are worked with a bottom edge in garter stitch then in stocking st. When sewing pieces together, you have to sew jumper with WS out (see ASSEMBLY). Happy knitting!
24.09.2018 - 10:20
![]() Patricia Venanzi ha scritto:
Patricia Venanzi ha scritto:
I was ready to start this pattern, but when I did my gauges, I have found they vary a lot of yours. In the pattern an 8mm needle is indicated, although the wool band recommends 5mm (always speaking in mm, not US sizes). It's a big difference, have you really used 8mm needles to make your gauge of 13 points by 26 rows? Thank you!
08.02.2018 - 16:07DROPS Design ha risposto:
Dear Mrs Venanzi, yes this pattern has been worked with larger needles than usual, ie size 8 mm. Do not hesitate to adjust needle size so that you get the 13 sts x 26 rows = 10 x 10 cm. Happy knitting!
08.02.2018 - 17:20
![]() Patricia Venanzi ha scritto:
Patricia Venanzi ha scritto:
Ya tengo la lana Big Delight y las ganas de trabajar, solamente tengo una pequeña duda: En el patrón se indica aguja de 8mm, aunque la faja de la lana recomienda de 5mm. Es una gran diferencia... cuál es el tamaño que usaron para hacer la muestra de 13 puntos y 26 filas? Gracias!
07.02.2018 - 19:45DROPS Design ha risposto:
Hola Patricia. La prenda se trabaja con agujas de 8 mm, pero siempre se trata de un tamaño recomendado. Lo importante es trabajar con la tensión de puntos recomendada: 13 pts en 10 cm, (puede ser que necesites agujas de 7 o incluso de 9 mm). Con agujas de 5 mm tenemos en 10 cm 17 puntos normalmente.
08.02.2018 - 20:52
|
|
Sideways Glance#sidewaysglancesweater |
|
 |
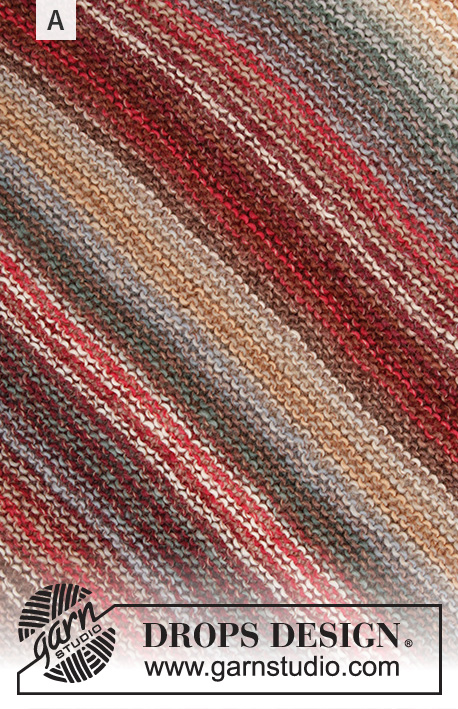 |
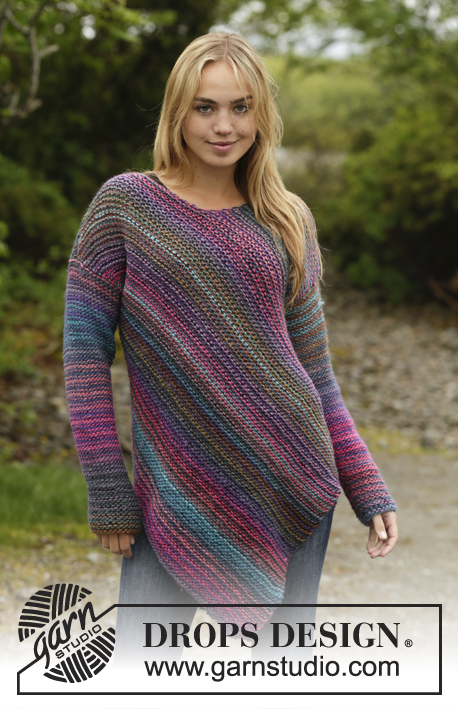
Maglione DROPS lavorato ai ferri da lato a lato a maglia legaccio in ”Big Delight”. Taglie: S - XXXL.
DROPS 172-26 |
|
|
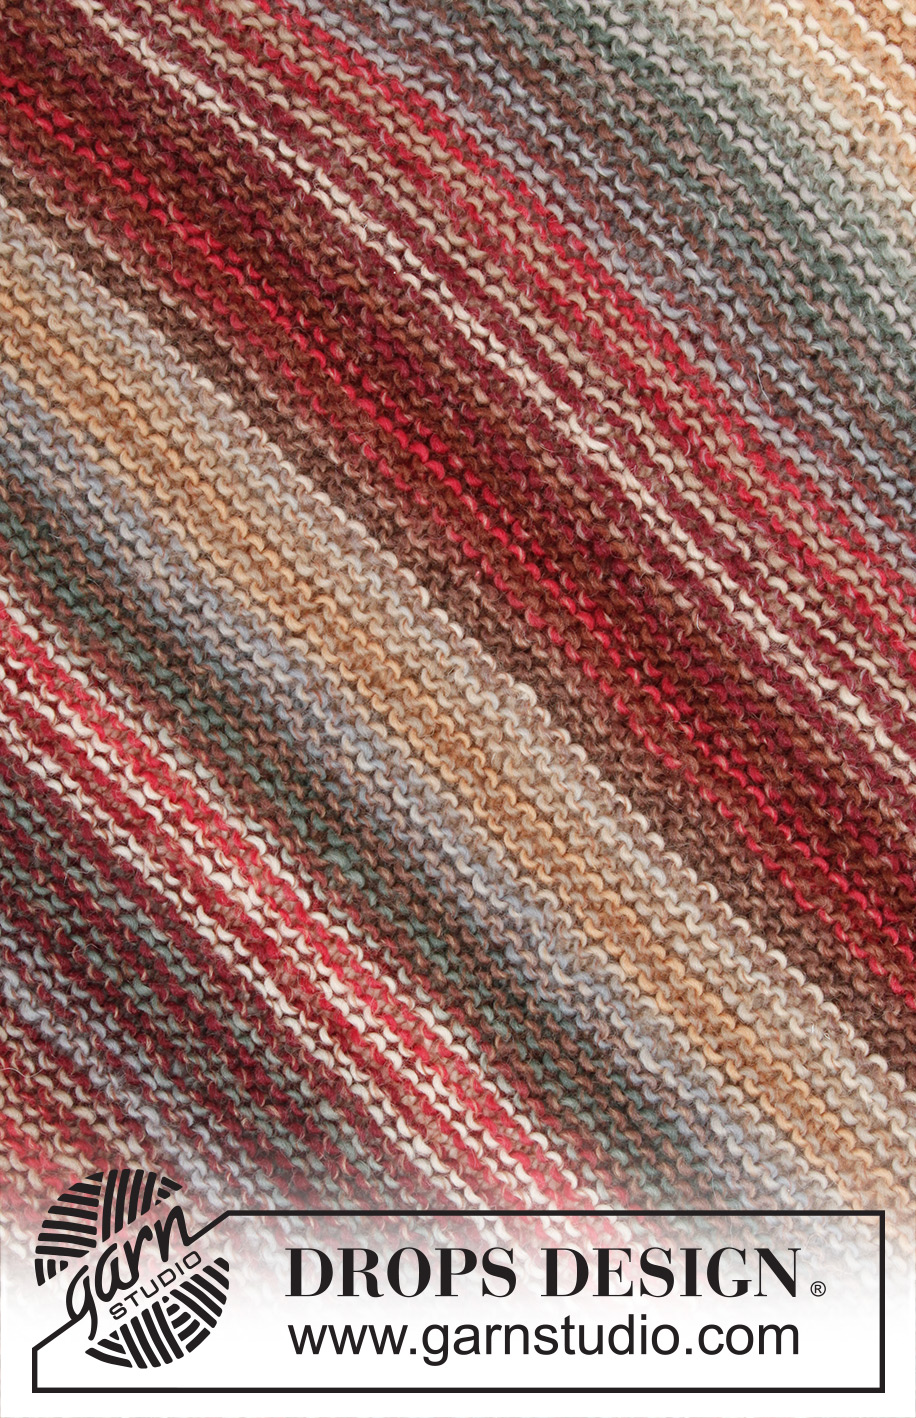
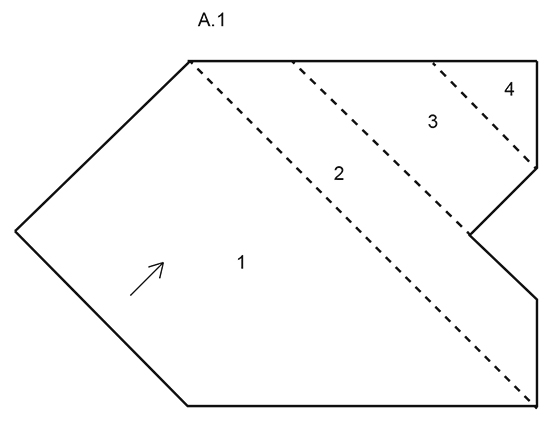
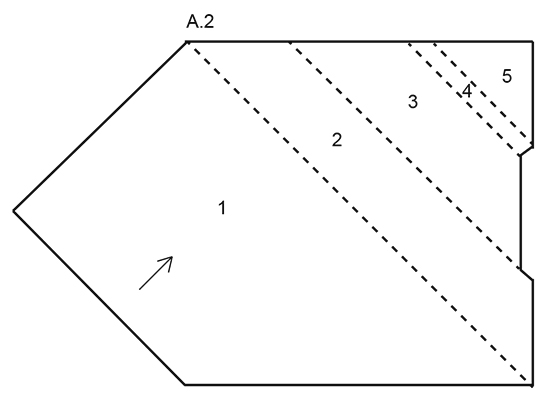
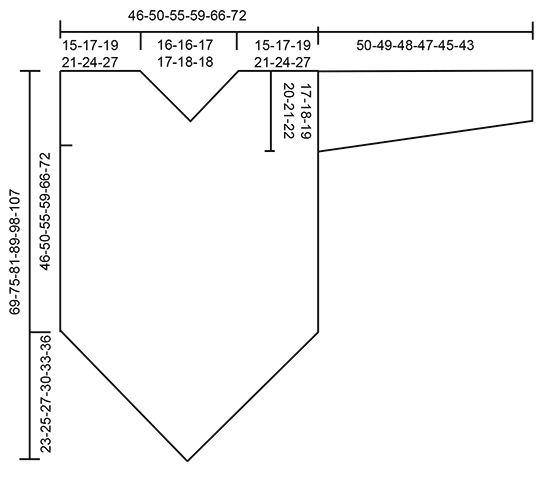
M LEGACCIO (avanti e indietro sui f): Lavorare tutti i f a dir. 1 “costa” a m legaccio = 2 f dir. STRISCE: Lavorare come segue: * 2 f con muffin ai frutti di bosco, 2 f con atlantide *, ripetere *-* ------------------------------------------------------- MAGLIONE: Lavorato in 2 parti, avanti e indietro sui f circolari dal lato alla spalla – vedere lo schema. DAVANTI: Lavorare tutto il capo a STRISCE e MAGLIA LEGACCIO – leggere la spiegazione sopra. Vedere il diagramma A.1. PARTE 1 (vedere il n° sul diagramma): Avviare 42-46-50-54-60-64 m con i f circolari n° 8 mm con muffin ai frutti di bosco. Lavorare a m legaccio, ALLO STESSO TEMPO a f alterni (all’inizio di ogni f dal diritto del lavoro) lavorare 2 m dir nella 1° m. Aumentare in questo modo 42-46-50-54-60-64 volte in totale = 84-92-100-108-120-128 m. FARE ATTENZIONE ALLA TENSIONE DEL LAVORO! PARTE 2: Continuare a m legaccio e strisce, ALLO STESSO TEMPO diminuire 1 m al’inizio di ogni f (dal diritto e dal rovescio del lavoro), diminuire lavorando 2 m insieme a dir. Diminuire in questo modo 14-16-17-19-21-23 volte in totale = 56-60-66-70-78-82 m. PARTE 3: Continuare a m legaccio e strisce, sul 1° f dal diritto del lavoro intrecciare le prime 14-14-16-16-18-18 m (= per il collo) = 42-46-50-54-60-64 m, ALLO STESSO TEMPO diminuire 1 m all’inizio di ogni f dal rovescio del lavoro. Diminuire 14-14-16-16-18-18 volte in totale = 28-32-34-38-42-46 m. PARTE 4: Continuare a m legaccio e strisce, ALLO STESSO TEMPO diminuire 1 m all’inizio di ogni f a ogni lato, diminuire lavorando 2 m insieme a dir. Diminuire 14-16-17-19-21-23 volte in totale = 0 m rimaste sul f. DIETRO: Vedere il diagramma A.2. PARTE 1: Avviare 42-46-50-54-60-64 m con i f circolari n° 8 mm con muffin ai frutti di bosco. Lavorare a m legaccio, ALLO STESSO TEMPO a f alterni (all’inizio di ogni f dal diritto del lavoro) lavorare 2 m dir nella 1° m. Aumentare in questo modo 42-46-50-54-60-64 volte in totale = 84-92-100-108-120-128 m. PARTE 2: Continuare a m legaccio e strisce, ALLO STESSO TEMPO diminuire 1 m all’inizio di ogni f (dal diritto e dal rovescio del lavoro), diminuire lavorando 2 m insieme a dir. Diminuire 14-16-17-19-21-23 volte in totale = 56-60-66-70-78-82 m rimaste sul f. PARTE 3: Continuare a m legaccio e strisce, sul 1° f dal diritto del lavoro intrecciare le prime 4 m (= per il collo) = 52-56-62-66-74-78 m. Continuare a m legaccio e strisce, ALLO STESSO TEMPO diminuire 1 m all’inizio di ogni f a ogni lato, diminuire lavorando 2 m insieme a dir. Diminuire in questo modo 10-10-12-12-14-14 volte in totale = 32-36-38-42-46-50 m. PARTE 4: Continuare a m legaccio e strisce, ALLO STESSO TEMPO diminuire 1 m all’inizio di ogni f dal rovescio del lavoro. Diminuire 4 volte in totale = 28-32-34-38-42-46 m. PARTE 5: Continuare a m legaccio e strisce, ALLO STESSO TEMPO diminuire 1 m all’inizio di ogni f a ogni lato, diminuire lavorando 2 m insieme a dir. Diminuire 14-16-17-19-21-23 volte in totale = 0 m rimaste sul f. MANICA: La manica è lavorata avanti e indietro con i f circolari. Avviare 26-26-28-30-32-34 m con i f circolari n° 8 mm con muffin ai frutti di bosco (compresa 1 m di vivagno a ogni lato). Lavorare 10 coste a M LEGACCO – leggere la spiegazione sopra e a STRISCE – leggere la spiegazione sopra. Alla fine delle coste continuare a m rasata e strisce. Quando il lavoro misura 8 cm, aumentare 1 m a ogni lato ogni 4½-4-3½-3½-3½-3 cm 9-10-11-11-11-12 volte = 44-46-50-52-54-58 m. Intrecciare quando il lavoro misura 50-49-48-47-45-43 cm. Lavorare un’altra manica nello stesso modo. CONFEZIONE: Confezionare il maglione con il rovescio del lavoro verso l’esterno. Cucire le spalle e i margini dei lati ma lasciare 17-18-19-20-21-22 cm in alto a ogni lato (= scalfi). Attaccare le maniche. |
|
 |
|
 |
|
 |
|
Avete terminato questo modello?Allora taggate le vostre foto con #dropspattern #sidewaysglancesweater o inviatele alla #dropsfan gallery. Avete bisogno di aiuto con questo modello?Troverete 18 video tutorial, una sezione per i commenti/domande e molto altro guardando il modello su www.garnstudio.com © 1982-2026 DROPS Design A/S. Ci riserviamo tutti i diritti. Questo documento, compreso tutte le sue sotto-sezioni, è protetto dalle leggi sul copyright. Potete leggere quello che potete fare con i nostri modelli alla fine di ogni modello sul nostro sito. |
|


Con oltre 40 anni di esperienza nel design di modelli di maglia e uncinetto, DROPS Design offre la più estesa collezione di modelli gratuiti su internet - tradotti in 17 lingue. Ad oggi vi possiamo fornire 324 cataloghi e 12291 modelli - 9562 dei quali sono tradotti in Italiano.
Ci stiamo impegnando molto per darvi il meglio che vi possiamo offrire in termini di maglia e uncinetto, ispirazioni e consigli così come filati di grande qualità ad un prezzo incredibile! Volete utilizzare i nostri modelli per qualcosa d'altro oltre al vostro uso personale? Potete leggere tutto ciò che è consentito nel testo sul Copyright in basso su tutte le pagine dei nostri modelli. Buon lavoro!
Lasciare un commento sul modello DROPS 172-26
Noi saremmo felici di ricevere i tuoi commenti e opinioni su questo modello!
Se vuoi fare una domanda, fai per favore attenzione a selezionare la categoria corretta nella casella qui sotto per velocizzare il processo di risposta. I campi richiesti sono indicati da *.