
Categorie popolari
State cercando un filato?


Commenti / Domande (76)
![]() B. De Bruijn ha scritto:
B. De Bruijn ha scritto:
Hallo een vraagje Er staat zet 110 st op. Dat heb ik gedaan en dan staat er dat er een ribbelsteek gedaan moet worden en dan in de laatste pen moet er 127 st op staan hoe doe ik als ik 2 doe kom ik niet uit en met ook niet
21.01.2017 - 21:00DROPS Design ha risposto:
Hoi. Je begint met 110 st en meerdert 17 st gelijkmatig verdeelt in de laatste nld ribbels = 127 st op de nld.
23.01.2017 - 12:03
![]() Pashmina ha scritto:
Pashmina ha scritto:
Really beautiful poncho.
14.01.2017 - 16:49
![]() Kari Venke Tolpinrud ha scritto:
Kari Venke Tolpinrud ha scritto:
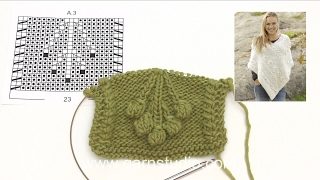
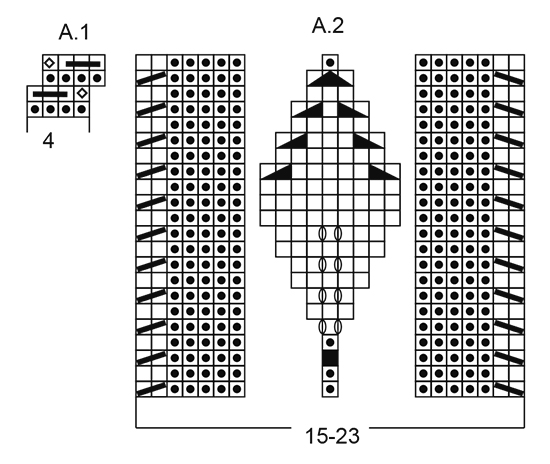
Skjønner ikke A1, skal det vise fire omganger ? Begynner man med 4 vrange på første pinne ?
11.01.2017 - 01:33DROPS Design ha risposto:
Hej Kari. Ja, du starter med vrang, i naeste p strikker du: strikk 3 m i 1 m slik: 1 r, 1 vr, 1 r. og herefter: strikk 3 m vrang sammen. I 3e p igen 4 vr. Grunden til at diagrammet forskyder sig er pga de 3 m i 1 i anden p, men det retter sig op i 4e p naar du strikker omvendt.
11.01.2017 - 10:32
![]() Isabelle Dubé ha scritto:
Isabelle Dubé ha scritto:
Est-il possible de faire ce patron avec la laine Drops Alpaca Air et avec combien de pelottes? J'aimerais le faire avec un seul fil si possible. Merci!
29.12.2016 - 21:15DROPS Design ha risposto:
Bonjour Isabelle. Dans le modèle tu as au total (1 fil d'Alpaca + 1 fil de Brushed Alpaca Silk) l'equivalent du groupe de fils D. La laine Air DROPS appartient au groupe C. Pour voir comment utiliser un fil différent de celui mentionné dans le modèle clique ICI. Bon travail!
29.12.2016 - 22:25
![]() Ina ha scritto:
Ina ha scritto:
Kann ich dieses Modell auch nur 1-fädig mit BabyAlpaka-Garn stricken? Was ist der Vorteil der 2-fädigen Strickweise?
28.12.2016 - 19:48DROPS Design ha risposto:
Liebe Ina, Dieser Poncho ist mit 1 Faden Garngruppe A (= Alpaca) + 1 Faden Garngruppe C (= Brushed Alpaca Silk) gestrickt. Alpaca gehört zur Garngruppe A wie Baby Alpaca Silk - Brushed Alpaca Silk sollen Sie entweder behalten oder dann mit 2 Faden Garngruppe A ersetzen - hier lesen Sie mehr über Alternative. Viel Spaß beim stricken!
29.12.2016 - 15:38
![]() Zaza ha scritto:
Zaza ha scritto:
Bonjour, le modele comporte plusieurs diagrammes qui n'ont pas tous le meme nombre de ligne, j'aimerai savoir comment faites vous pour suivre chaque rang .... merci pour votre réponse et je vous souhaite un joyeux noel zaza
23.12.2016 - 11:33DROPS Design ha risposto:
Bonjour Zaza, les diagrammes vont se tricoter chacun comme indiqué, mais ne se répéteront pas en même temps en hauteur. Quand vous avez terminé un diagramme en hauteur, reprenez-le dès le 1er rang, mais continuez les autres comme avant. Bon tricot!
29.12.2016 - 13:21
![]() Colleen ha scritto:
Colleen ha scritto:
Is this pattern available in a pattern rather than just the charts? It's so beautiful, but I am not chart-savvy.
08.11.2016 - 03:54DROPS Design ha risposto:
Dear Colleen, there are only diagrams to this pattern. Start reading diagrams from the bottom corner on the right side towards the left from RS and read from the left towards the right from WS. Read more about diagrams here. Happy knitting!
08.11.2016 - 09:46
![]() Nigeon Jeanne Marie ha scritto:
Nigeon Jeanne Marie ha scritto:
Merci d'avoir répondu rapidement j'ai commencé le travail, un régal
01.11.2016 - 17:47
![]() Nigeon Jeanne Marie ha scritto:
Nigeon Jeanne Marie ha scritto:
Je viens juste de comprendre qu'il faut lire le diagramme en partant du bas et non du haut comme je le faisais je pense que cela sera beaucoup plus facile
31.10.2016 - 18:59
![]() Nigeon Jeanne Marie ha scritto:
Nigeon Jeanne Marie ha scritto:
Bonjour le diagramme A1 est décalé pour le début seulement? ou pour chaque exécution on fait quand les augmentations du diagramme A2? on passe de 1 maille à 3 ...... merci pour votre réponse
31.10.2016 - 18:00DROPS Design ha risposto:
Bonjour Mme Nigeon, le diagramme A.1 ne se décale pas et se tricote sur les 12-16-20 (cf taille) premières m (après les 2 m point mousse), tricotez ensuite A.2 sur les 15 m suivantes, à partir du rang 5 et jusqu'au rang 11, vous allez augmenter 2 m au milieu de la feuille (= 23 m) puis vous diminuerez 2 m pour la feuille (= 15 m de nouveau). Bon tricot!
01.11.2016 - 12:13
|
|||||||||||||||||||||||||||||||||||||||||||||||||
Snow Beads#snowbeadsponcho |
|||||||||||||||||||||||||||||||||||||||||||||||||
 |
 |
||||||||||||||||||||||||||||||||||||||||||||||||
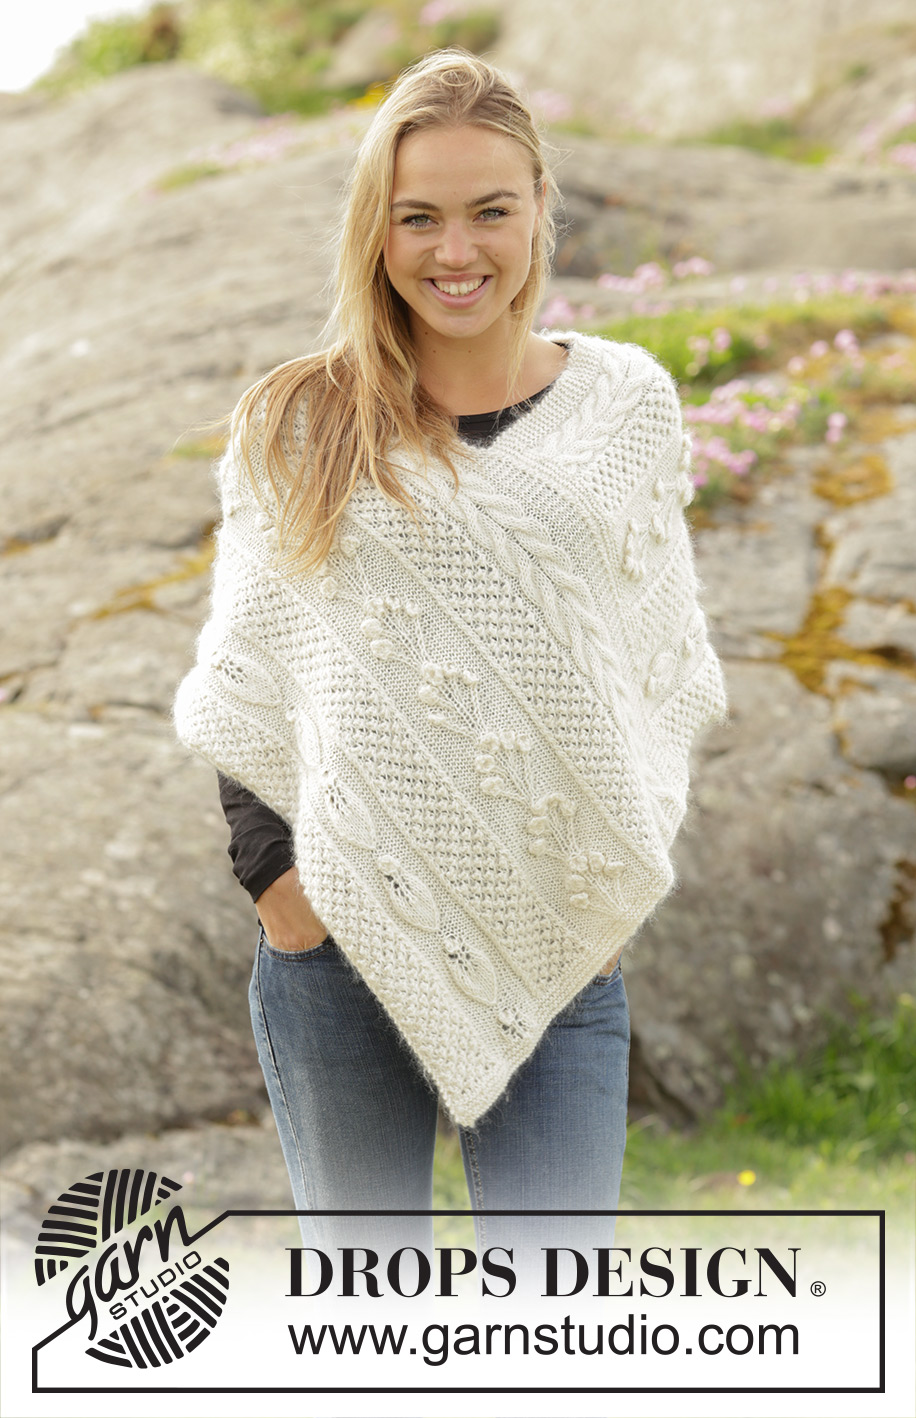
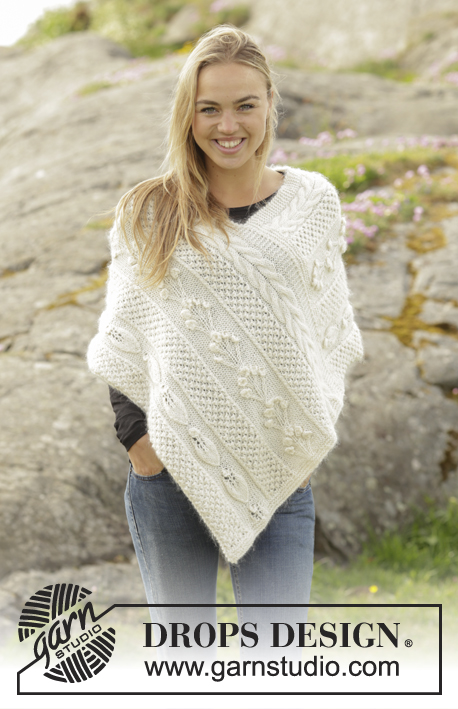
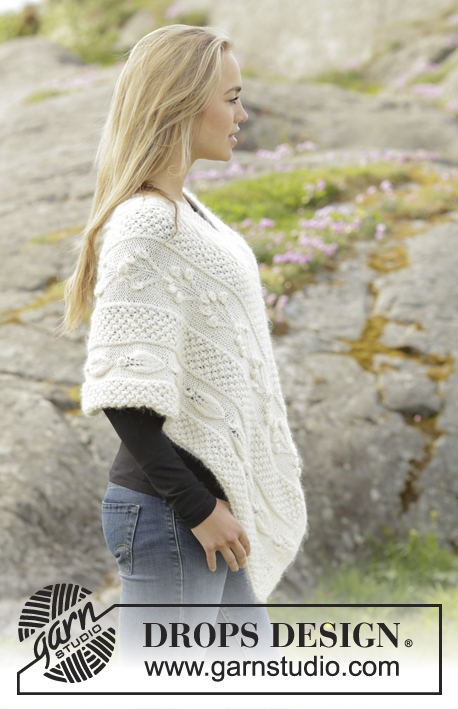
Poncho DROPS ai ferri, con diversi motivi a punto fantasia, in "Alpaca" e "Brushed Alpaca Silk". Taglie: Dalla S alla XXXL.
DROPS 173-12 |
|||||||||||||||||||||||||||||||||||||||||||||||||
|
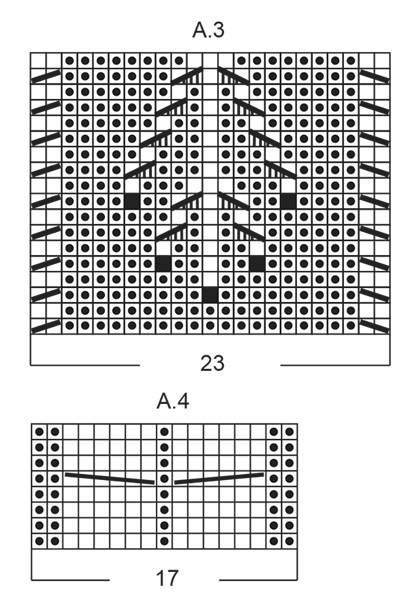
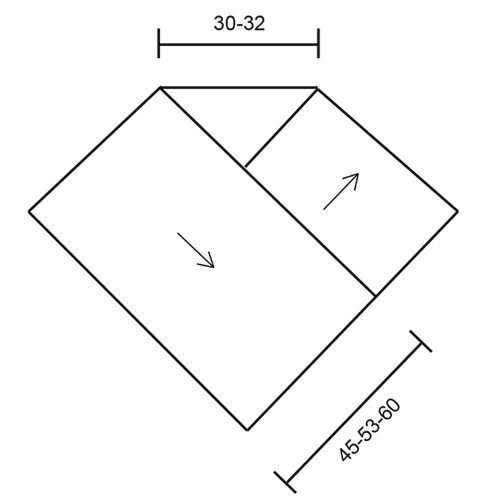
PUNTO LEGACCIO (avanti e indietro): Lavorare tutti i ferri a dir. 1 costa a legaccio = 2 ferri a dir. MOTIVO: Vedere i diagrammi da A.1 a A.4. I diagrammi mostrano 1 ripetizione del motivo vista sul diritto del lavoro; il numero delle m nel diagramma A.2 varia da 15 a 23 m. ---------------------------------------------------------- PONCHO: Si lavora avanti e indietro sui ferri circolari per avere sufficiente spazio per tutte le m. Avviare 82-96-110 m sui ferri circolari n° 4,5 con 1 capo del filato Alpaca + 1 capo del filato Brushed Alpaca Silk. Lavorare 3 coste a PUNTO LEGACCIO - vedere le spiegazioni sopra, ALLO STESSO TEMPO, nel corso dell’ultimo ferro (= sul rovescio del lavoro) aumentare 17 m a intervalli regolari = 99-113-127 m. Nel corso del ferro successivo (= sul diritto del lavoro), lavorare il motivo come segue: 2 m a punto legaccio, diagramma A.1 sulle 12-16-20 m successive, diagramma A.2 (= 15 m), diagramma A.1 sulle 12-16-20 m successive, diagramma A.3 (= 23 m), diagramma A.1 sulle 12-16-20 m successive, diagramma A.4 (= 17 m) e 6-8-10 m a punto legaccio. RICORDARSI DI MANTENERE LA CORRETTA TENSIONE DEL LAVORO ! Proseguire con il motivo in questo modo finché il diagramma A.3 non è stato lavorato 16-17-18 volte in verticale. Il lavoro misura ca.127-135-150 cm (il numero delle m sarà diverso da quello all’inizio dei diagrammi e varierà a seconda della riga del diagramma A.2 che state lavorando). Lavorare 3 coste a legaccio e, ALLO STESSO TEMPO, nel corso del primo ferro, portare il numero delle m a 82-96-110 m. Intrecciare le m e fermare i fili. CONFEZIONE: Mettere uno dei lati lunghi contro uno dei lati corti e cucire (il lato lungo opposto formerà un punta al centro sul davanti). |
|||||||||||||||||||||||||||||||||||||||||||||||||
Spiegazioni del diagramma |
|||||||||||||||||||||||||||||||||||||||||||||||||
|
|||||||||||||||||||||||||||||||||||||||||||||||||
 |
|||||||||||||||||||||||||||||||||||||||||||||||||
 |
|||||||||||||||||||||||||||||||||||||||||||||||||
 |
|||||||||||||||||||||||||||||||||||||||||||||||||
Avete terminato questo modello?Allora taggate le vostre foto con #dropspattern #snowbeadsponcho o inviatele alla #dropsfan gallery. Avete bisogno di aiuto con questo modello?Troverete 24 video tutorial, una sezione per i commenti/domande e molto altro guardando il modello su www.garnstudio.com © 1982-2026 DROPS Design A/S. Ci riserviamo tutti i diritti. Questo documento, compreso tutte le sue sotto-sezioni, è protetto dalle leggi sul copyright. Potete leggere quello che potete fare con i nostri modelli alla fine di ogni modello sul nostro sito. |
|||||||||||||||||||||||||||||||||||||||||||||||||


Con oltre 40 anni di esperienza nel design di modelli di maglia e uncinetto, DROPS Design offre la più estesa collezione di modelli gratuiti su internet - tradotti in 17 lingue. Ad oggi vi possiamo fornire 324 cataloghi e 12290 modelli - 9561 dei quali sono tradotti in Italiano.
Ci stiamo impegnando molto per darvi il meglio che vi possiamo offrire in termini di maglia e uncinetto, ispirazioni e consigli così come filati di grande qualità ad un prezzo incredibile! Volete utilizzare i nostri modelli per qualcosa d'altro oltre al vostro uso personale? Potete leggere tutto ciò che è consentito nel testo sul Copyright in basso su tutte le pagine dei nostri modelli. Buon lavoro!
Lasciare un commento sul modello DROPS 173-12
Noi saremmo felici di ricevere i tuoi commenti e opinioni su questo modello!
Se vuoi fare una domanda, fai per favore attenzione a selezionare la categoria corretta nella casella qui sotto per velocizzare il processo di risposta. I campi richiesti sono indicati da *.