
Categorie popolari
State cercando un filato?


Commenti / Domande (17)
![]() Monica Panera ha scritto:
Monica Panera ha scritto:
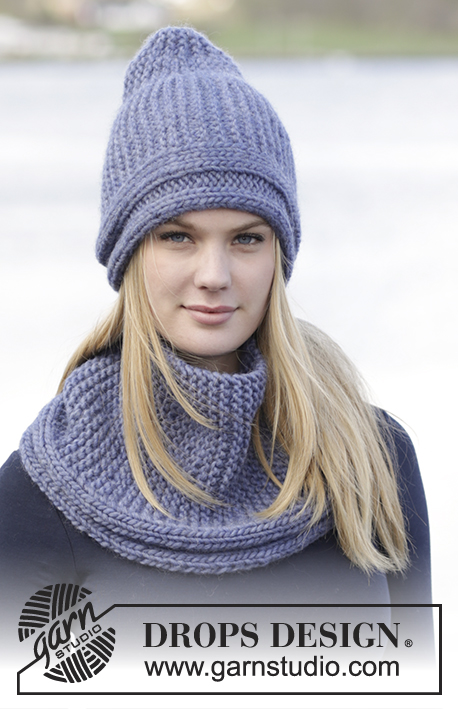
Buongiorno, ho difficoltà a capire lo schema A2 della fascia per capelli che sto facendo Warm Lavender modello:ee-536 Quando nello schema non vi sono quadratini che spiegano il punto da fare ma c'è il vuoto cosa significa? Che il punto è da passare sull'altro ferro senza lavorarlo? Aspetto una vostra gentile risposta.Grazie
12.12.2018 - 16:49DROPS Design ha risposto:
Buongiorno Monica. Trova un vuoto perchè al ferro precedente è stata diminuita una maglia. Quando incontra il vuoto, deve lavorare la maglia come indicato nel quadratino successivo. Quindi per es., alla riga 6 del diagramma A2 (riga lavorata sul rovescio, quindi si legge da sinistra verso destra), lavora: 3 m rovescio, 3 m diritto, 2 maglie rovescio e così via. Buon lavoro!
12.12.2018 - 17:02
![]() Alva ha scritto:
Alva ha scritto:
Hur många masker ska man lägga upp om man har 4mm stickor och garn till stickorna?
23.02.2018 - 21:35DROPS Design ha risposto:
Hei Alva. Oppskriften er skrevet til pinne 7 og Eskimo ... et garn som er tykkere og koster ca 15 kr for 50 gr ... kanske du skulle bytte garn - da blir den myk og fin og du kan bruke oppskriften :) Go Fornøyelse.
24.02.2018 - 09:34
![]() Sandra ha scritto:
Sandra ha scritto:
What is meant by: K YO twisted on next row & P YO twisted on next row?
25.11.2017 - 22:47DROPS Design ha risposto:
Hi Sandra, To avoid a hole after increasing by making a yarn over (YO) you need to work them twisted. Either this will be knitted twisted or purled twisted depending on the pattern. To work twisted you need to insert the needle in the back loop of the stitch, rather than the front. I hope this helps. Happy knitting!
26.11.2017 - 06:49
![]() Sandra ha scritto:
Sandra ha scritto:
Part 2: I am so confused! YouTube person says that when you are reading charts in the round, everything is always read from Right to Left. So what is the right way?
23.11.2017 - 01:03DROPS Design ha risposto:
Dear Sandra, that's right, diagrams will be read here from the right towards the left every round (= you are working here in the round, ie from RS) starting on the bottom corner on the right side. Read more here. Happy knitting!
23.11.2017 - 08:35
![]() Sandra ha scritto:
Sandra ha scritto:
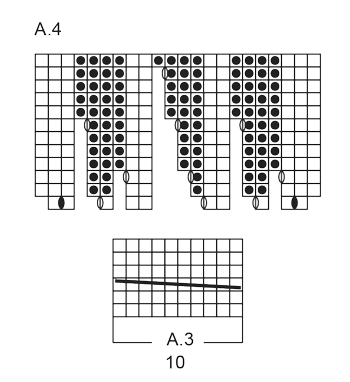
Part 1: A friend of mine read chart A.6 as this: "I'm looking at that exact pattern and this particular chart A6 is just k2tog, yo, k, k. The cable is worked in chart A3. In laments terms this would read: R1: p4, k3, p2, k3 R2: p3, k2, p3, k2tog, yo, k2 R3: p4, k3, p2, k3 R4: p3, k2, p3, k1, k2tog, yo, k1 R5: p4, k3, p2, k3 R6: p3, k2, p3, k2, k2tog, yo R7: p4, k3, p2, k3 R8: p3, k2, p3, k4" Is this correct?
23.11.2017 - 01:02DROPS Design ha risposto:
Dear Sandra, start reading diag. from the bottom corner on the right side towards the left on every round (from RS), so that on row 3 in A.3 work the cable (previous and next rows are K from RS) and work row 3 in A.6 as follows: P3, K2, P3, K2, K2 tog, YO. When diagrams are done in height, repeat from row 1. Happy knitting!
23.11.2017 - 08:33
![]() Sandra ha scritto:
Sandra ha scritto:
Hi again...sorry for bugging you. In chart A6 of the neck warmer pattern - 1 slant from Right to Left over 2 squares then a yarn over is a cable (right?). How does this work? Slip 2 sts onto a cable needle (to the front or back yarn over then yarn over then knit from the cable?
22.11.2017 - 01:33DROPS Design ha risposto:
Dear Sandra, the symbol used in A.6 with a slant line is 3rd symbol under diagram text, ie Knit 2 stitches together (and then make a YO (= 5th symbol) to compensate this dec). Happy knitting!
22.11.2017 - 09:10
![]() Sandra Delamont ha scritto:
Sandra Delamont ha scritto:
I have just finished the headband successfully after numerous attempts. I am very new to knitting and reading charts in patterns - so this is my first. When I look at the picture the neck warmer I see cable patterns. However, when I read the chart and words there is no mention of slipping stitches onto cable needles. What am I missing in the chart/directions? Can you please help me? Thanks. Sandra
11.11.2017 - 20:19DROPS Design ha risposto:
Hi Sandra, The diagram A6 has the cables - just 2 this time (the sloping lines over 2 squares) and A6 is worked after you have worked A5 for 4 cm. You work A6 until the neck warmer measures 20-22 cm and then A5 for another 4 cm. I hope this helps and happy knitting!
12.11.2017 - 06:33
|
|||||||||||||||||||||||||
Warm Lavender |
|||||||||||||||||||||||||
|
|
|||||||||||||||||||||||||
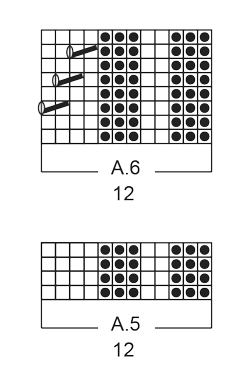
Completo formato da: Fascia per la testa e scalda collo DROPS ai ferri, a coste, in "Snow".
DROPS Extra 0-1234 |
|||||||||||||||||||||||||
|
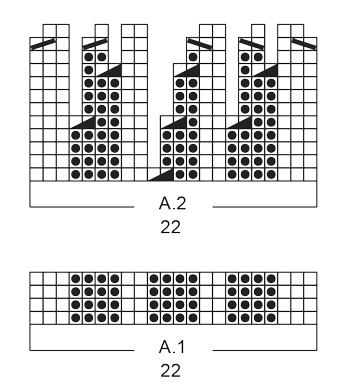
PUNTO LEGACCIO (avanti e indietro sui ferri): Lavorare tutti i ferri a dir. 1 “costa” a legaccio = 2 ferri a dir. MOTIVO: Vedere i diagrammi da A.1 a A.6. I diagrammi mostrano tutti i ferri del motivo visti sul diritto del lavoro. ---------------------------------------------------------- FASCIA PER LA TESTA: Si lavora avanti e indietro sui ferri. Avviare 22 m sui ferri n° 7 con il filato Snow. Lavorare 1 costa a PUNTO LEGACCIO - vedere le spiegazioni sopra. Lavorare ora il diagramma A.1 (= 22 m). RICORDARSI LA TENSIONE DEL LAVORO! Ripetere il diagramma A.1 finché il lavoro non misura 14-15-16 cm (assicurarsi che il ferro successivo sia sul diritto del lavoro). Lavorare il diagramma A.2 sul diagramma A.1. Dopo aver lavorato il diagramma A.2 una volta in verticale, sui ferri ci sono 10 m. Lavorare il diagramma A.3 1 volta in verticale. Lavorare poi il diagramma A.4 sul diagramma A.3. Lavorare le m gettate ritorte seguendo il diagramma. Dopo aver lavorato il diagramma A.4 1 volta in verticale, sui ferri ci sono 22 m. Lavorare il diagramma A.1 finché il lavoro non misura 48-50-52 cm. Lavorare 1 costa a punto legaccio. Intrecciare le m. Cucire insieme il bordo di avvio e quello di chiusura delle m. ---------------------------------------------------------- SCALDA COLLO: Si lavora in tondo sui ferri circolari. Avviare 72-84 m sui ferri circolari n° 8 con il filato Snow. Lavorare il diagramma A.5 (= 12 m) in tutto 6-7 volte in larghezza. Quando il lavoro misura 4 cm, lavorare il diagramma A.6 sul diagramma A.5. RICORDARSI LA TENSIONE DEL LAVORO! Quando il lavoro misura 20-22 cm, assicurarsi di aver completato una intera ripetizione del diagramma A.6, lavorare il diagramma A.5 sul diagramma A.6. Intrecciare le m quando il lavoro misura 24-26 cm. |
|||||||||||||||||||||||||
Spiegazioni del diagramma |
|||||||||||||||||||||||||
|
|||||||||||||||||||||||||
 |
|||||||||||||||||||||||||
 |
|||||||||||||||||||||||||
 |
|||||||||||||||||||||||||
Avete terminato questo modello?Allora taggate le vostre foto con #dropspattern o inviatele alla #dropsfan gallery. Avete bisogno di aiuto con questo modello?Troverete 19 video tutorial, una sezione per i commenti/domande e molto altro guardando il modello su www.garnstudio.com © 1982-2026 DROPS Design A/S. Ci riserviamo tutti i diritti. Questo documento, compreso tutte le sue sotto-sezioni, è protetto dalle leggi sul copyright. Potete leggere quello che potete fare con i nostri modelli alla fine di ogni modello sul nostro sito. |
|||||||||||||||||||||||||


Con oltre 40 anni di esperienza nel design di modelli di maglia e uncinetto, DROPS Design offre la più estesa collezione di modelli gratuiti su internet - tradotti in 17 lingue. Ad oggi vi possiamo fornire 324 cataloghi e 12290 modelli - 9561 dei quali sono tradotti in Italiano.
Ci stiamo impegnando molto per darvi il meglio che vi possiamo offrire in termini di maglia e uncinetto, ispirazioni e consigli così come filati di grande qualità ad un prezzo incredibile! Volete utilizzare i nostri modelli per qualcosa d'altro oltre al vostro uso personale? Potete leggere tutto ciò che è consentito nel testo sul Copyright in basso su tutte le pagine dei nostri modelli. Buon lavoro!
Lasciare un commento sul modello DROPS Extra 0-1234
Noi saremmo felici di ricevere i tuoi commenti e opinioni su questo modello!
Se vuoi fare una domanda, fai per favore attenzione a selezionare la categoria corretta nella casella qui sotto per velocizzare il processo di risposta. I campi richiesti sono indicati da *.