
Categorie popolari
State cercando un filato?


Commenti / Domande (74)
![]() Annick ha scritto:
Annick ha scritto:
Bonjour,es que vos modèles aisance et comprise dans l explication du modèle . merci bonne journée
11.04.2026 - 08:53DROPS Design ha risposto:
Bonjour Annick, découvrez ici comment choisir votre taille et l'aisance souhaitée. Bon tricot!
13.04.2026 - 08:00
![]() Inge ha scritto:
Inge ha scritto:
Jeg påtænker at strikke denne søde bluse. Ifølge opskriften så måler den 68 cm i længden i str. XXXL. Jeg vil gerne have den færdige længde på 72 cm. Hvor mange nøgler garn skal jeg bruge ekstra?
09.09.2025 - 09:28DROPS Design ha risposto:
Hei Inge. Det har vi ingen oversikt over, siden vi ikke har strikket den lengre. Men vil tippe du trenger i underkant av 2 nøster ekstra. mvh DROPS Design
15.09.2025 - 11:55
![]() Mervi Matis-Suominen ha scritto:
Mervi Matis-Suominen ha scritto:
Kysyisin missä napinlävet näkyy puserossa kun ohjeen kuvasta en niitä löydä? Onko niiden tarkoitus olla siis vain koristeena? Kudon melko vähän niin en ehkä vain ymmärrä ohjeen tarkoitusta.
31.03.2025 - 12:06DROPS Design ha risposto:
Hei, napit kiinnitetään takakappaleeseen, eli napitus on keskellä takana.
31.03.2025 - 17:58
![]() Benthe Andersen ha scritto:
Benthe Andersen ha scritto:
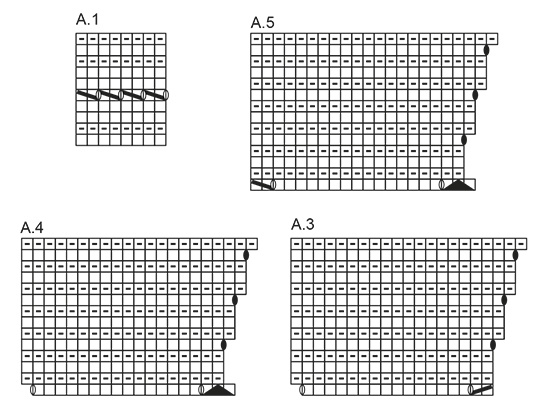
Hej Mener jeg havde skrevet, men kan ikke finde det. Jeg er gået helt i stå. Har strikket A2 færdig, og 263 m, str M. Nu mangler jeg at strikke spidsen af bladrække 2 færdig. Der er 3 m på hvert blad , med et omslag i hver side. Når jeg starter på A3, får jeg en maske i overskud på hver bladspids, da jeg kun skal tage 2 m sammen. Håber på hjælp Vh Benthe
25.02.2025 - 15:13DROPS Design ha risposto:
Hej Benthe, i spidsen af bladet tager du de 3 masker ind til 1 maske (ved at tage 1 maske løst af, strik 2 ret sammen og løft den løse maske over=1 tilbage) med 1 omslag på hver side :)
05.03.2025 - 14:35
![]() Benthe ha scritto:
Benthe ha scritto:
Hej Jeg strikker str m. Har slået 95 m op. Nu er jeg ved enden af p 4 i mønster A1. Jeg ender med 1 løs ret- 1 ret- træk over- slå om. Og nu er der 6 masker tilbage. Der skal kun være 5 m( til kant) Hvad gør jeg med den maske der er i overskud Vh Benthe
15.02.2025 - 16:38DROPS Design ha risposto:
Hej Benthe, den sidste maske strikker du ret - God fornøjelse! :)
18.02.2025 - 11:21
![]() Birgit Clemmensen ha scritto:
Birgit Clemmensen ha scritto:
Arbejdet strikkes oppefra, skal mønstret så også startes oppefra? vh Birgit
08.02.2025 - 14:24DROPS Design ha risposto:
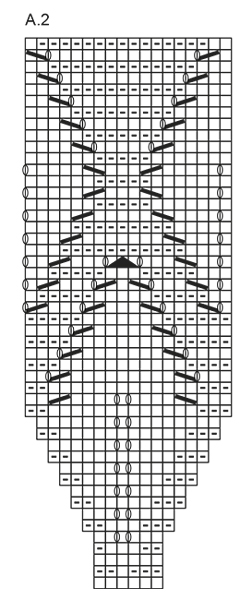
Hej Birgit, du starter mønsteret nederst til højre i diagrammerne :)
12.02.2025 - 11:40
![]() Monica ha scritto:
Monica ha scritto:
Hej Når jeg skal til A3-A5, måler mit arb 35 cm(str m) Kan det være rigtigt Vh Monica
01.05.2024 - 17:40DROPS Design ha risposto:
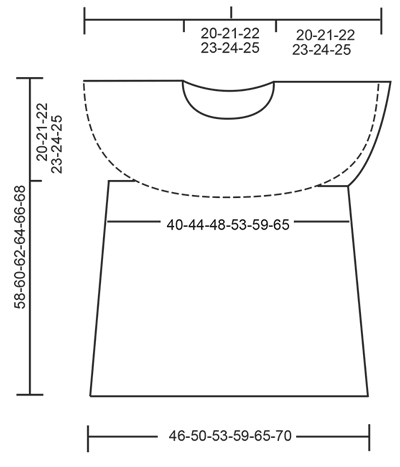
Hej Monica, A.1 og A.2 strikkes over 58 pinde og ifølge opskriften skal du have 35 pinde på 10 cm hvilket betyder at A.1 og A.2 skal måle cm 17 cm i højden. Strikker du med DROPS Muskat? Og har du 35 pinde på 10 cm mønster?
03.05.2024 - 14:29
![]() Caron Donatienne ha scritto:
Caron Donatienne ha scritto:
I also have a problem for choosing the right size… Chest of my body measures 100 cm, this means I should choose a XL??? Never had such big size! What is the positive ease? I am used to Danish patterns. These are so much clearer to follow. Unless you could help me…
26.03.2023 - 16:09DROPS Design ha risposto:
Dear Caron, the measurements indicated in the schematic are the measurements of the garment. So you will work one size or another depending on your desired ease. Since size naming sometimes varies between countries, we recommend using the measurements in the schematic as a guide, instead of the size names at the top of the pattern. Happy knitting!
26.03.2023 - 19:36
![]() Caron Donatienne ha scritto:
Caron Donatienne ha scritto:
Why are you talking from bottom band and bottom holes (at the beginning and even in assembling the model after knitting), since this model is a top and not a cardigan? This is really not clear to me. Even hesitating if I should start knitting your model 🤔(I am an experienced knitter though..😉) tnx for your help 🤗
26.03.2023 - 15:11DROPS Design ha risposto:
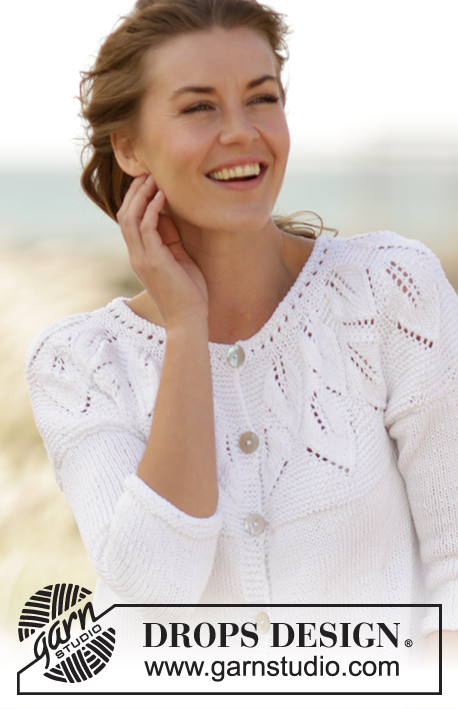
Dear Caron, the bottom band references the band that is under the band with buttonholes, not at the bottom of the garment. Also, the pattern is correct; there are buttons and buttonholes, which are worked at the back (as explained in the summary of the Top at the beginning of the pattern) which isn't seen in the photo of the garment. Happy knitting!
26.03.2023 - 19:35
![]() Riet ha scritto:
Riet ha scritto:
A2 lees ik in de 2e nld van links naar rechts. Als ik dan eindig met de 1e st van A2 krijg ik juist een a-symetrisch resultaat. Begin ik net als in de 1e nld van rechts naar links dan klopt het wel. Aan beide zijden naast de 5 ribbelsteken zijn er dan 3 steken. Wat doe ik verkeerd? Met vr.gr.
03.03.2023 - 15:16
|
||||||||||||||||||||||
Summer Leaves Top#summerleavestop |
||||||||||||||||||||||
|
|
||||||||||||||||||||||
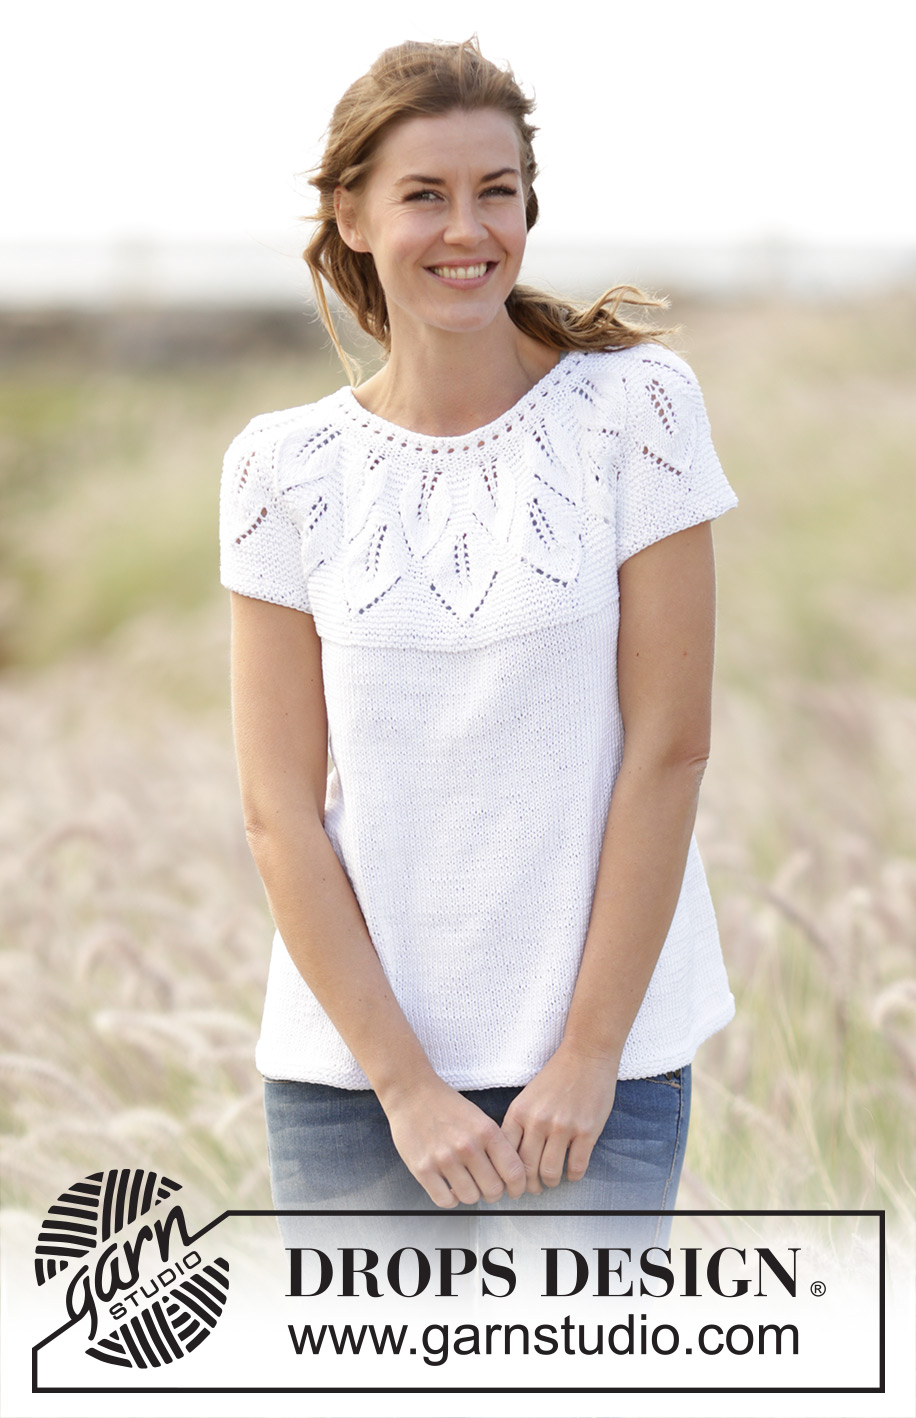
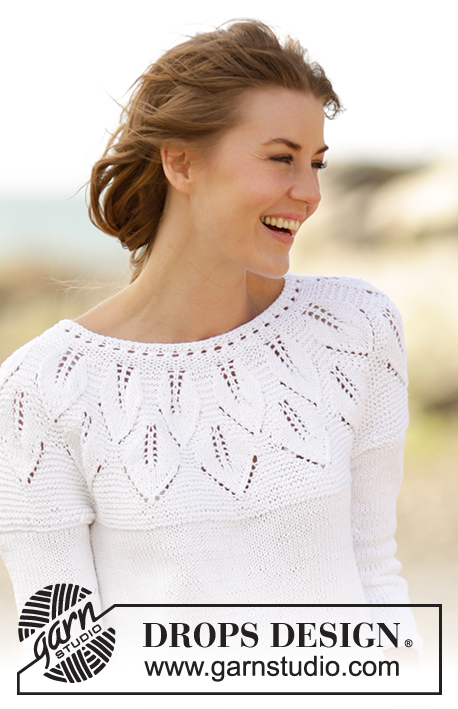
Maglia DROPS lavorata ai ferri con motivo a foglie, “coste” a m legaccio e sprone rotondo, lavorato dall’alto in basso (top down) in ”Muskat”. Taglie: S-XXXL.
DROPS 170-27 |
||||||||||||||||||||||
|
M LEGACCIO (avanti e indietro): Lavorare tutti i f a dir. 1 “costa” a m legaccio = 2 f dir. M LEGACCIO (in tondo): 1 “costa” a m legaccio = 2 giri. * 1 giro dir e 1 giro rov *, ripetere *-*. MOTIVO: Vedere i diagrammi A.1-A.5. I diagrammi mostrano tutti i f del motivo visti dal diritto del lavoro. ASOLE: Diminuire per le asole alla fine del f visto dal diritto del lavoro. Lavorare fino a quando rimangono 4 m. Fare 1 gettato, lavorare insieme a dir le 2 m successive, lavorare le ultime 2 m sul f. Diminuire per le asole quando il lavoro misura (dal bordo di avvio e lungo il bordo): TAGLIA S: 2, 8, 14 e 19 cm TAGLIA M: 2, 8, 14 e 20 cm. TAGLIA L: 2, 8, 14 e 21 cm. TAGLIA XL: 2, 8, 15 e 22 cm. TAGLIA XXL: 2, 9, 16 e 23 cm. TAGLIA XXXL: 2, 9, 16 e 24 cm. ---------------------------------------------------------- MAGLIA: Lavorato dall’alto in basso (top down). Lo sprone è lavorato avanti e indietro sui f circolari con i bottoni sul collo, poi si lavora il corpo in tondo. SPRONE: Avviare 89-95-101-113-125-131 m con i f circolari n° 3,5 mm con Muskat. Intrecciare per le ASOLE al centro dietro – leggere la spiegazione sopra. Lavorare 5 m a M LEGACCIO – leggere la spiegazione sopra (= bordo), A.1 fino a quando rimangono 5 m, 5 m a m legaccio (= bordo). Quando A.1 è stato lavorato 1 volta in verticale, continuare come segue: 5 m a m legaccio, A.2 (= 6 m), ripetere A.2 13-14-15-17-19-20 volte in totale, finire con la 1° m in A.2 (in modo che il motivo sia lo stesso a ogni lato), finire con 5 m a m legaccio. FARE ATTENZIONE ALLA TENSIONE DEL LAVORO! Quando A.2 è stato lavorato 1 volta in verticale, ci sono 245-263-281-317-353-371 m sul f. Poi lavorare come segue: 5 m a m legaccio, A.3 (= 17 m), ripetere A.4 11-12-13-15-17-18 volte, A.5 (= 20 m) e 5 m a m legaccio. Quando A.3-A.5 è stato lavorato 1 volta in verticale, ci sono 284-305-326-368-410-431 m sul f. Continuare a m legaccio fino a quando il lavoro misura 20-21-22-23-24-25 cm, sull’ultimo f dal rovescio del lavoro aggiustare il n° di m a 283-307-331-365-397-429. Continuare a lavorare come segue (dal diritto del lavoro): intrecciare le prime 5 m, lavorare le prime 39-43-47-53-59-65 m (= metà dietro), trasferire le 61-65-69-74-78-82 m successive su un fermamaglie (= manica), avviare 6 nuove m sotto le maniche, lavorare le 78-86-94-106-118-130 m successive (= davanti), trasferire le 61-65-69-74-78-82 m successive su un fermamaglie (= manica), avviare 6 nuove m sotto la manica, lavorare le 39-43-47-53-59-65 m rimaste (= metà dietro). CORPO: Ora ci sono 168-184-200-224-248-272 m per il corpo. Inserire un segnapunti a ogni lato del corpo dove sono state avviate le nuove m sotto la manica (= 3 nuove m a ogni lato del segnapunti). ORA MISURARE IL LAVORO DA QUI. Passare ai f circolari n° 4 mm. Continuare a m rasata, ora lavorare in tondo. Quando il lavoro misura 4 cm, aumentare 1 m a ogni lato di tutti i segnapunti (= 4 aumenti). Ripetere gli aumenti ogni 5-5-5-6-6-6 cm altre 5 volte = 192-208-224-248-272-296 m. Continuare a m rasata fino a quando il lavoro misura 34-35-36-37-38-39 cm, passare ai f circolari n° 3,5 mm e lavorare 3 “coste” a M LEGACCIO – leggere la spiegazione sopra. Intrecciare. Tutto il lavoro misura circa 58-60-62-64-66-68 cm. MANICA: Riportare le m dal fermamaglie sui f a doppia punta n° 3,5 mm (= 61-65-69-74-78-82 m). Riprendere 1 m in ognuna delle 6 m avviate sotto la manica = 67-71-75-80-84-88 m. Lavorare 2 “coste” a M LEGACCIO – leggere la spiegazione sopra, poi intrecciare. CONFEZIONE: Mettere il bordo senza bottoni sotto il bordo con le asole e affrancare i bottoni. Attaccare i bottoni. |
||||||||||||||||||||||
Spiegazioni del diagramma |
||||||||||||||||||||||
|
||||||||||||||||||||||
 |
||||||||||||||||||||||
 |
||||||||||||||||||||||
 |
||||||||||||||||||||||
Avete terminato questo modello?Allora taggate le vostre foto con #dropspattern #summerleavestop o inviatele alla #dropsfan gallery. Avete bisogno di aiuto con questo modello?Troverete 28 video tutorial, una sezione per i commenti/domande e molto altro guardando il modello su www.garnstudio.com © 1982-2026 DROPS Design A/S. Ci riserviamo tutti i diritti. Questo documento, compreso tutte le sue sotto-sezioni, è protetto dalle leggi sul copyright. Potete leggere quello che potete fare con i nostri modelli alla fine di ogni modello sul nostro sito. |
||||||||||||||||||||||


Con oltre 40 anni di esperienza nel design di modelli di maglia e uncinetto, DROPS Design offre la più estesa collezione di modelli gratuiti su internet - tradotti in 17 lingue. Ad oggi vi possiamo fornire 324 cataloghi e 12290 modelli - 9561 dei quali sono tradotti in Italiano.
Ci stiamo impegnando molto per darvi il meglio che vi possiamo offrire in termini di maglia e uncinetto, ispirazioni e consigli così come filati di grande qualità ad un prezzo incredibile! Volete utilizzare i nostri modelli per qualcosa d'altro oltre al vostro uso personale? Potete leggere tutto ciò che è consentito nel testo sul Copyright in basso su tutte le pagine dei nostri modelli. Buon lavoro!
Lasciare un commento sul modello DROPS 170-27
Noi saremmo felici di ricevere i tuoi commenti e opinioni su questo modello!
Se vuoi fare una domanda, fai per favore attenzione a selezionare la categoria corretta nella casella qui sotto per velocizzare il processo di risposta. I campi richiesti sono indicati da *.