
Categorie popolari
State cercando un filato?


Commenti / Domande (10)
![]() LILIANA CHAREYRE ha scritto:
LILIANA CHAREYRE ha scritto:
Bonjour, je m'excuse pour le malentendu, mais je ne suis pas une professionnelle du tricot, et je n'ai jamais tricoté selon un demi-schéma, donc j'ai un peu plus de mal à comprendre vos explications (qui sont vraiment précises), mais Je manque de pratique!Encore une fois, désolé et merci beaucoup.L.
27.06.2023 - 13:15DROPS Design ha risposto:
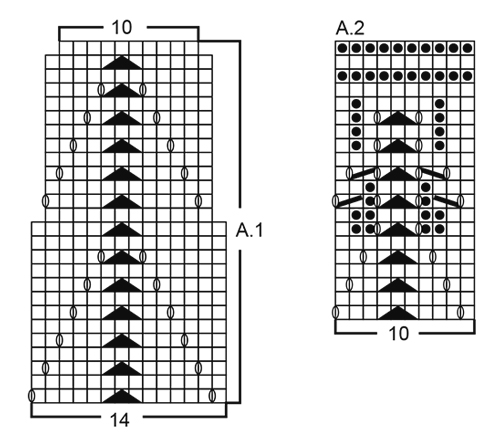
Bonjour Mme Chareyre, aucun souci, avez-vous maintenant compris les diminutions de A.1? Je le refais en français: aux rangs 1, 3, 5, 7, 9 et 11, on diminue 2 mailles au milieu de chaque A.1 et on fait en même temps 2 jetés sur le même rang = le nombre de mailles va rester le même. Au 13ème rang, on diminue les 2 mailles comme avant au milieu de A.1 mais on ne va pas faire de jeté = on diminue ainsi 2 m dans chaque A.1. On continue le point ajouré sur 12 mailles puis on recommence au 25ème rang: on fait bien la diminution mais pas les 2 jetés = il reste 10 mailles dans chaque A.1. Bon tricot!
27.06.2023 - 13:42
![]() LILIANA CHAREYRE ha scritto:
LILIANA CHAREYRE ha scritto:
Hello, I would like to work tricot model number 168-21, but it is not clear to me why in the diagram A1, from the 13th row, the next one starts with 12 wires, and at the end of A1 with 10? Thank you very much, in advance. Lika.
26.06.2023 - 19:32DROPS Design ha risposto:
Dear Mrs Chareyre, see previous answer below :) Let us know if you have any further questions.
27.06.2023 - 08:50
![]() LILIANA CHAREYRE ha scritto:
LILIANA CHAREYRE ha scritto:
Thank you very much for the quick answer, but I still don't understand something, I don't see where A3 is, the diagram shows only A1 and A2, and secondly, to what level we do diminution. Thanks
26.06.2023 - 18:55
![]() LILIANA CHAREYRE ha scritto:
LILIANA CHAREYRE ha scritto:
Thank you very much for the quick answer, but I still don't understand something, I don't see where A3 is, the diagram shows only A1 and A2, and secondly, to what level we do diminution. Thanks
26.06.2023 - 18:24
![]() LILIANA CHAREYRE ha scritto:
LILIANA CHAREYRE ha scritto:
Thank you very much for the quick answer, but I still don't understand something, I don't see where A3 is, the diagram shows only A1 and A2, and secondly, to what level we do diminution. Thanks
26.06.2023 - 18:23DROPS Design ha risposto:
Dear Mrs Chareyre, which pattern are you working on? You were talking about 167-28, the answer was explaining how to work the diagrams for this pattern, are you working 168-21 instead? Then on 13th row you will see that you decrease 2stitches in A.1 but there is no yarn over, this means you will decrease 2stitches in each A.1. Happy knitting!
27.06.2023 - 08:47
![]() CHAREYRE LILIANA ha scritto:
CHAREYRE LILIANA ha scritto:
Hello. I would like to knit a scarf according to the model 167-28, I have never knit according to the diagram, I don't understand when the dimination should be done in the 23 range, it is not visible on the diagram, the second question is for the model 168-21, why in at the beginning of diag.A1 we have 14 mailles, and after 13 lines we have 10, what does that mean, is it dimination. Thank you very much for the answer, and I want to tell you that your models are beautiful. Lika.
26.06.2023 - 12:31DROPS Design ha risposto:
Dear Mrs Chareyre, in this pattern, you will decrease on row 23 in A.1 (2 sts decreased but only 1 YO on this row); in each A.2 (= 4 sts decreased but only 2 yarn overs) and in A.3 (2 sts decreased but only 1 yarn over). Hope it can help.. Happy knitting!
26.06.2023 - 13:22
![]() Loïse Tanguay ha scritto:
Loïse Tanguay ha scritto:
Bonjour, Est-ce que je dois continuer A2 jusqu'à obtenir 99cm de hauteur, c'est-à-dire combien de fois dois-je tricoter A2? Dans A1, est-ce que je dois rabattre des mailles au début et à la fin comme indiqué dans le diagramme? Enfin, comment je fais le drafting si j'ai déjà rabattu les mailles de chacune des pièces? Merci.
24.02.2019 - 04:12DROPS Design ha risposto:
Bonjour Mme Tanguay, une fois que A.1 est fait, vous tricotez A.2 jusqu'à ce que l'ouvrage mesure 99 cm (2ème taille) de hauteur totale depuis le rang de montage - le nombre de motifs en hauteur va dépendre de votre tension, ajustez après un motif complet pour une plus belle finition. Vous pouvez conserver les mailles en attente pour faire un grafting classique ou bien assembler les mailles rabattues ainsi. Bon tricot!
25.02.2019 - 10:08
![]() Karolin ha scritto:
Karolin ha scritto:
Im Diagramm A2 fehlt die oberste Rückreihe, es fehlt eine Reihe linke Maschen
11.02.2018 - 16:41DROPS Design ha risposto:
Liebe Karolin, A.2 ist 20 Reihe, dh die letzte Reihe wird für die Rückseite gestrickt. Viel Spaß beim stricken!
12.02.2018 - 09:41
![]() Patricia ha scritto:
Patricia ha scritto:
Bonjour, La couleur que vous proposez vert / gris foncé est elle exacte car pour ma part elle est plus bleu / gris ?
27.07.2016 - 16:16DROPS Design ha risposto:
Bonjour Patricia, le rendu de la couleur peut varier en fonction de différent critères (écran, etc.), n'hésitez pas à contacter magasin DROPS pour tout conseil sur les couleurs. Bon tricot!
27.07.2016 - 16:37
![]() Martina Nickles ha scritto:
Martina Nickles ha scritto:
Hallo, ich verstehe die Anleitung nicht.mit jedem Musterblock nehme ich 4 Maschen ab, das heißt die Arbeit wird immer schmaler. Dann habe ich am Schluss ein Trapez. Wie geht das mit dem zusammennähen? Auf dem Bild sieht es nur nach einem Teil und nicht nach 2 gestrickten Teilen aus. Das verstehe ich auch nicht. Freue mich auf Ihre Antwort herzliche Grüße Martina Nickles
29.05.2016 - 21:05DROPS Design ha risposto:
Liebe Martina, das Muster A.1 mit den Abnahmen wird nur unten 1 x gestrickt und dann wird A.2 (ohne Abnahmen) weitergestrickt. Der Schal besteht wie beschrieben aus 2 Teilen, die in der Mitte zusammengenhäht werden.
30.05.2016 - 08:09
|
|||||||||||||||||||
Moonlight Passage#moonlightpassagescarf |
|||||||||||||||||||
 |
 |
||||||||||||||||||
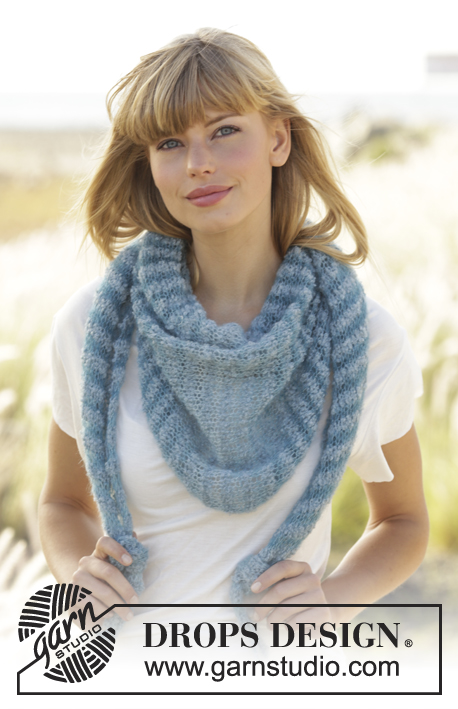
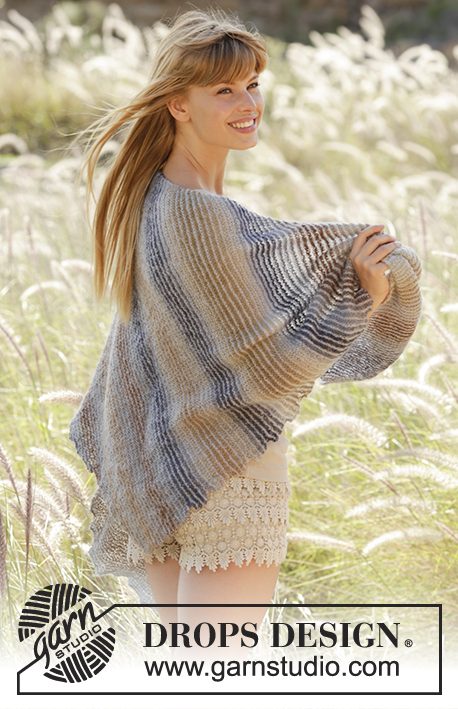
Sciarpa DROPS ai ferri, con motivo traforato e cintura, in "Alpaca".
DROPS 168-21 |
|||||||||||||||||||
|
PUNTO LEGACCIO (avanti e indietro sui ferri): Lavorare tutti i ferri a dir. 1 “costa” a legaccio = 2 ferri a dir. MOTIVO: Vedere i diagrammi A.1 e A.2. I diagrammi mostrano tutti i ferri del motivo, visti sul diritto del lavoro. ---------------------------------------------------------- SCIARPA: Si lavora avanti e indietro sui ferri circolari. Lavorare 2 parti uguali e cucirle insieme al centro - in questo modo la sciarpa è uguale alle due estremità. Avviare, senza stringere troppo il filo, 105-119-133 m sui ferri circolari n° 3,5 con il filato Alpaca. Lavorare 3 coste a PUNTO LEGACCIO - vedere le spiegazioni sopra. Lavorare il ferro successivo come segue, sul diritto del lavoro: 3 m vivagno a punto legaccio, ripetere il diagramma A.1 finché non rimangono 4 m (= 7-8-9 ripetizioni di14 m), lavorare la 1a m del diagramma A.1 e finire con 3 m vivagno a punto legaccio. Proseguire con il motivo in questo modo. Dopo aver lavorato il diagramma A.1 1 volta in verticale, sui ferri rimangono 77-87-97 m e il lavoro misura ca.10 cm. Lavorare il ferro successivo come segue, sul diritto del lavoro: 3 m vivagno a punto legaccio, ripetere il diagramma A.2 finché non rimangono 4 m (= 7-8-9 ripetizioni di 10 m), lavorare la 1a m del diagramma A.2 e finire con 3 m vivagno a punto legaccio. Proseguire con il motivo in questo modo. RICORDARSI LA TENSIONE DEL LAVORO! Quando il lavoro misura 94-99-104 cm, lavorare 1 ferro a dir sul diritto del lavoro e 1 ferro a dir sul rovescio del lavoro; intrecciare ora le m senza stringere troppo il filo lavorando le m a dir sul diritto del lavoro. Lavorare la seconda parte in modo uguale. CONFEZIONE: Cucire le due parti insieme a punto maglia. Inumidire la sciarpa e bloccarla alle misure finali. CINTURA: Tagliare 4 capi del filato lunghi ca. 5,5 metri l’uno, avvolgerli insieme molto stretti finché non oppongono resistenza, piegarli in due in modo che si avvolgano ancora; fare un nodo ad ogni estremità e pareggiare i fili. Mettere la sciarpa morbida intorno alle spalle e legare la cintura in vita – vedere la fotografia. |
|||||||||||||||||||
Spiegazioni del diagramma |
|||||||||||||||||||
|
|||||||||||||||||||
 |
|||||||||||||||||||
Avete terminato questo modello?Allora taggate le vostre foto con #dropspattern #moonlightpassagescarf o inviatele alla #dropsfan gallery. Avete bisogno di aiuto con questo modello?Troverete 19 video tutorial, una sezione per i commenti/domande e molto altro guardando il modello su www.garnstudio.com © 1982-2026 DROPS Design A/S. Ci riserviamo tutti i diritti. Questo documento, compreso tutte le sue sotto-sezioni, è protetto dalle leggi sul copyright. Potete leggere quello che potete fare con i nostri modelli alla fine di ogni modello sul nostro sito. |
|||||||||||||||||||


Con oltre 40 anni di esperienza nel design di modelli di maglia e uncinetto, DROPS Design offre la più estesa collezione di modelli gratuiti su internet - tradotti in 17 lingue. Ad oggi vi possiamo fornire 324 cataloghi e 12290 modelli - 9561 dei quali sono tradotti in Italiano.
Ci stiamo impegnando molto per darvi il meglio che vi possiamo offrire in termini di maglia e uncinetto, ispirazioni e consigli così come filati di grande qualità ad un prezzo incredibile! Volete utilizzare i nostri modelli per qualcosa d'altro oltre al vostro uso personale? Potete leggere tutto ciò che è consentito nel testo sul Copyright in basso su tutte le pagine dei nostri modelli. Buon lavoro!
Lasciare un commento sul modello DROPS 168-21
Noi saremmo felici di ricevere i tuoi commenti e opinioni su questo modello!
Se vuoi fare una domanda, fai per favore attenzione a selezionare la categoria corretta nella casella qui sotto per velocizzare il processo di risposta. I campi richiesti sono indicati da *.