
Categorie popolari
State cercando un filato?


Commenti / Domande (14)
![]() Anja ha scritto:
Anja ha scritto:
Montering: jeg forstår ikke hvad jeg skal efter at have hæklet de midterste trekanter i hver remse sammen - skal de manglende trekanter i remsen blot hæftes/ries på indtil der hækles på skrå? Og hvornår skal remserne hækles sammen? Iøvrigt et smukt tæppe.
04.04.2026 - 16:27DROPS Design ha risposto:
Hej Anja, ja dem rier du på sålænge :)
09.04.2026 - 14:01
![]() Nellie ha scritto:
Nellie ha scritto:
Ik begrijp niet helemaal hoe ik de driehoeken aan elkaar moet maken. Ben begonnen met kleur 5. Dan 4 lossen naar de volgende kleur. Dan kom ik weer onderaan of aan de zijkant. Hoe kan ik dan de instructie 4 keer herhalen? En hoe worden de vier secties uiteindelijk aan elkaar gezet? Het lijjt erg ingewikkeld, maar misschien doe ik iets fout. Graag uw hulp en instructies. Dank u
09.11.2018 - 15:45DROPS Design ha risposto:
Dag Nellie,
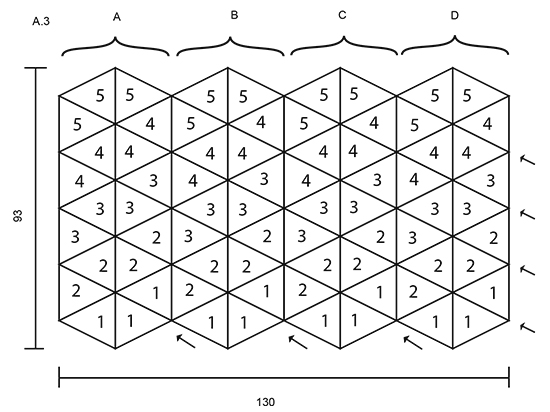
Je begint links bovenaan in het schema en haakt eerst de 2 driehoeken met kleurcombinatie 5 aan elkaar, dan haak je 4 lossen en ga je verder met het aan elkaar haken van de 2 driehoeken met kleurcombinatie 4, dan weer 4 lossen en dan driehoek 3 plus 3, enzovoort.
11.11.2018 - 12:59
![]() Crystal ha scritto:
Crystal ha scritto:
Hi could you help explain the assembly instructions? Do I start with the two color 5 triangles at the very top of column A, or go down the left side of column A and then back up? How do the ch 4’s connect across? Should it be one long seam somehow for all of column A or do you finish and pick up somewhere? I’m having a hard time visualizing the instructions. Thank you for your help!
25.09.2018 - 07:03DROPS Design ha risposto:
Dear Crystal, you first assembly the triangles together top down starting with the 2 triangles colour-5 at the top of each section A then the next 2 triangles colour-4, then the next 2 triangles colour-3 etc. Repeat in each colum B C and D the same way. Then crochet the triangles tog diagonally following the arrows - and then crochet them tog along the last diagonal (from the left twoards the top right). Happy assembly!
25.09.2018 - 10:16
![]() Liz ha scritto:
Liz ha scritto:
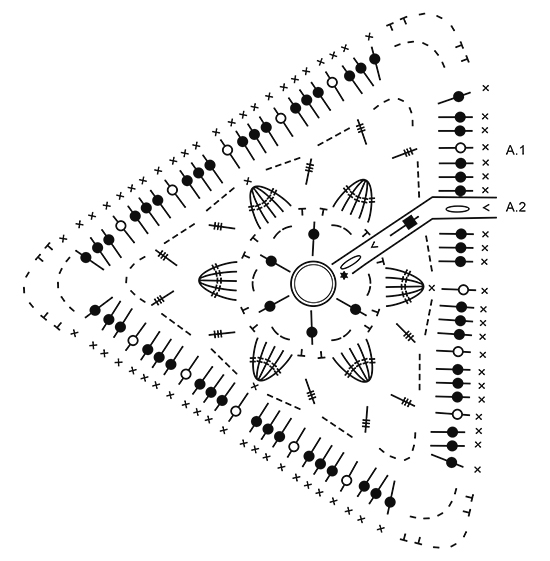
I think there is a mistake in the chart key (Diagram explanations). The explanation shows a symbol with two bars and translates it as "1 triple treble in st" (UK). However, that symbol does not appear in the chart. Instead, in Rnd 3, there is a symbol with 3 bars. This is shown to be "1 triple treble in st" (UK) in the video. The symbol in the key should have three bars, so that it matches the chart. I checked and this inconsistency is also present in the original Norwegian version.
09.06.2018 - 13:10DROPS Design ha risposto:
Dear Liz, thanks for your feedback, diagram key will be edited as soon as possible. Happy crocheting!
11.06.2018 - 08:46
![]() Claudia ha scritto:
Claudia ha scritto:
Fortsetzung: Ich habe jetzt mit 4,5 gehäkelt und mein Dreieck hat natürlich nicht die angegebenen Außenkanten von ca 17 cm, sondern von ca 22cm. Dabei reicht die Wolle nicht und ich müsste nachbestellen, was ich sehr ärgerlich finde. Ich bitte doch sehr, das mal zu überprüfen. Vielen Dank.
27.08.2016 - 19:29
![]() Claudia ha scritto:
Claudia ha scritto:
Die angaben stimmen tatsächlichg nicht. In Ihrr anleitung bei Maschenprobe steht 10x 10 cm = 16 Stb und 9 Reihen, bei Nadel4,5. wenn man das gehäkelt hat, weiß man, dass das nicht stimmt. Auf der Wolle steht 10x10 cm= 17 stiches( nicht Stäbchen!) und 22 Reihen, bei Nadel 5. erstens sind das sehr unterschiedliche Angaben und zweitens haut auch die Angabe auf der Wolle nicht hin.
27.08.2016 - 19:26
![]() Claudia ha scritto:
Claudia ha scritto:
Liebes Team, ich bin ratlos. Bei Stärke 4,5 häkel ich 16 Stb. plus Wendemaschen: das ergibt in der Breite nie und nimmer 10 cm. Es sind 14 cm. Ich häkel normal - nicht extrem locker, probiert es doch bitte aus oder sagt mir, was ich falsch verstanden habe. Ich häkel nicht zum ersten Mal. Vielen Dank für die Antwort im Voraus!
26.08.2016 - 11:05
![]() Claudia ha scritto:
Claudia ha scritto:
An meine Frage schjließt sich dann noch die Frage an, ob beim Zusammenhäkeln die gleiche Nadelstärke benutzt (2,5) wird oder die in der Anleitung angegebene. Und nochmal, ist bei der Maschenprobe die Nadelstärke falsch angegeben, die Maschenzahl oder die cm Zahl? Und reicht bei anderer Nadelstärke denn dann die Wollmenge aus? Hab jetzt schon bestellt und es wäre ärgerlich, wenn ich nachbestellen müsste. Gruß und Danke für Antwort
24.08.2016 - 08:20DROPS Design ha risposto:
Hallo Claudia, es ist weder die Nadelstärke noch die Maschenprobe falsch angegeben, für Paris ist Nadelstärke 4,5 mit 16 Maschen au 10 cm das übliche Mass. Beim Zusammenhäkeln wird die gleiche Nadelstärke benutzt.
25.08.2016 - 18:10
![]() Claudia ha scritto:
Claudia ha scritto:
Liebes Team, in der Anleitung ist Nadelstärke 4,5 angegeben. wenn ich die angegebene Maschenprobe mit 4,5 mache ist das Stück viel zu groß. Bei Nadelstärke 2,5 bekomme ich das 10x10 cm Stück. Wie soll ich mir den eklatanten Unterschied erklären und was ist nun flasch in Euer anleitung, die Nadelstärke oder die Maschenzahl(16 Stb)?
23.08.2016 - 23:46DROPS Design ha risposto:
Antwort siehe oben.
25.08.2016 - 18:10
![]() Natalie ha scritto:
Natalie ha scritto:
I'd like to make this in just two colours, with off-white for the background and joining rows (ie the vanilla lines) and pink for the flowers and borders (mustard in the pattern). How much yarn would I need in each of off-white and pink?
02.02.2016 - 13:49DROPS Design ha risposto:
Dear Natalie, we are not able to adjust all our patterns to each individual request, but your DROPS store may then help you to calculate amount of yarn with the colours you'd like to use. Happy crocheting!
03.02.2016 - 09:01
|
||||||||||||||||||||||||||||||||||||||||
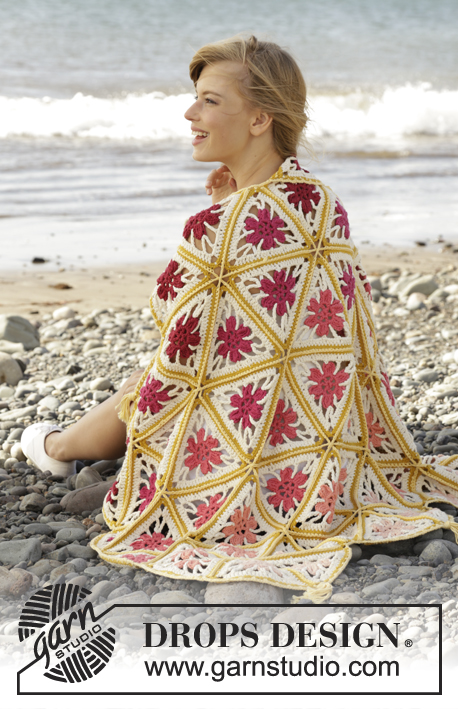
Spring Daze#springdazeblanket |
||||||||||||||||||||||||||||||||||||||||
 |
 |
|||||||||||||||||||||||||||||||||||||||
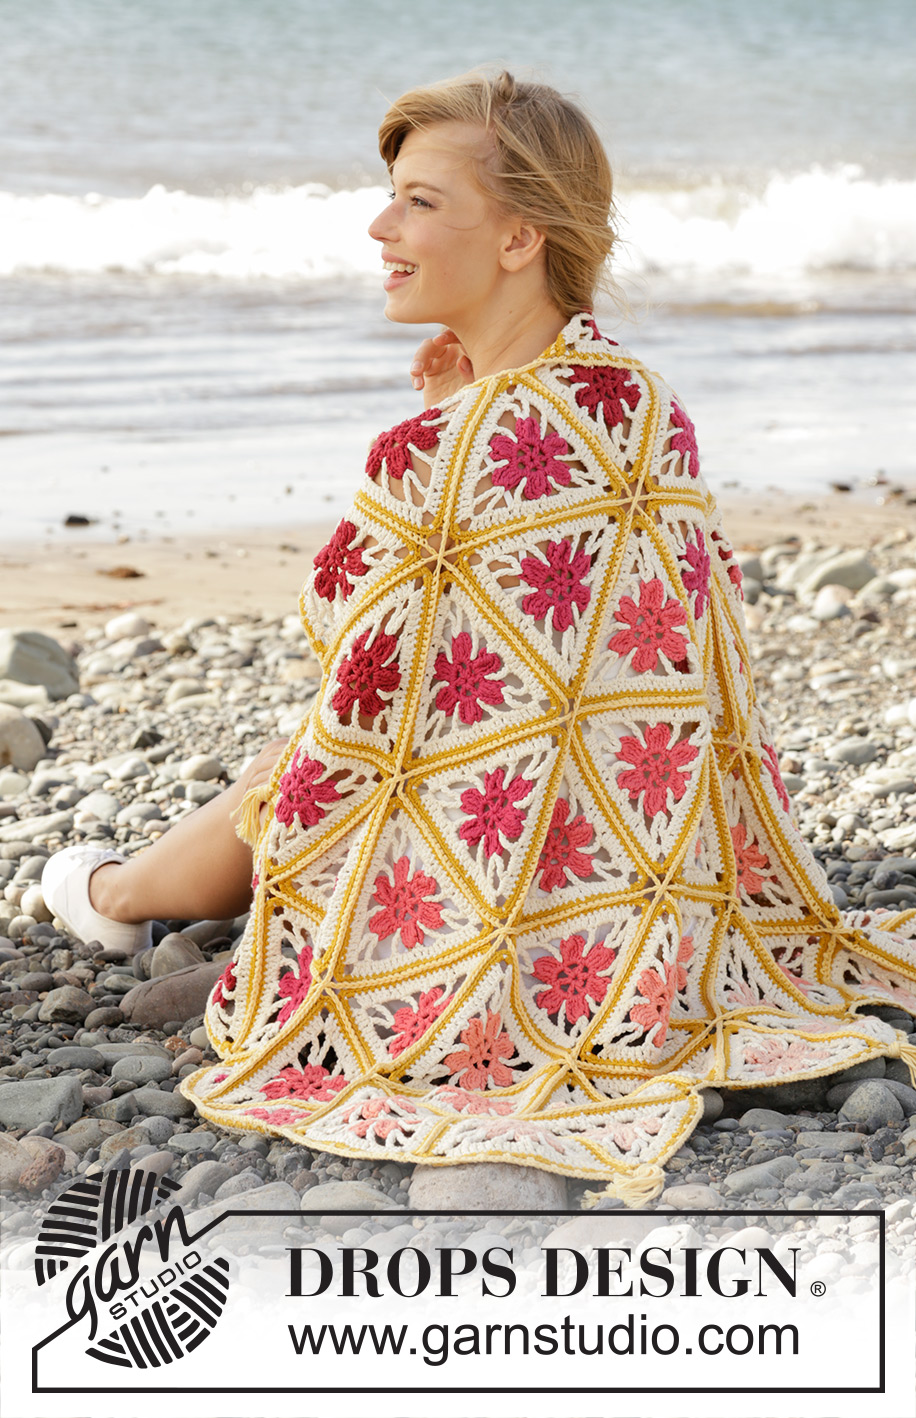
Coperta DROPS lavorata all’uncinetto con triangoli e frange in ”Paris”.
DROPS 170-17 |
||||||||||||||||||||||||||||||||||||||||
|
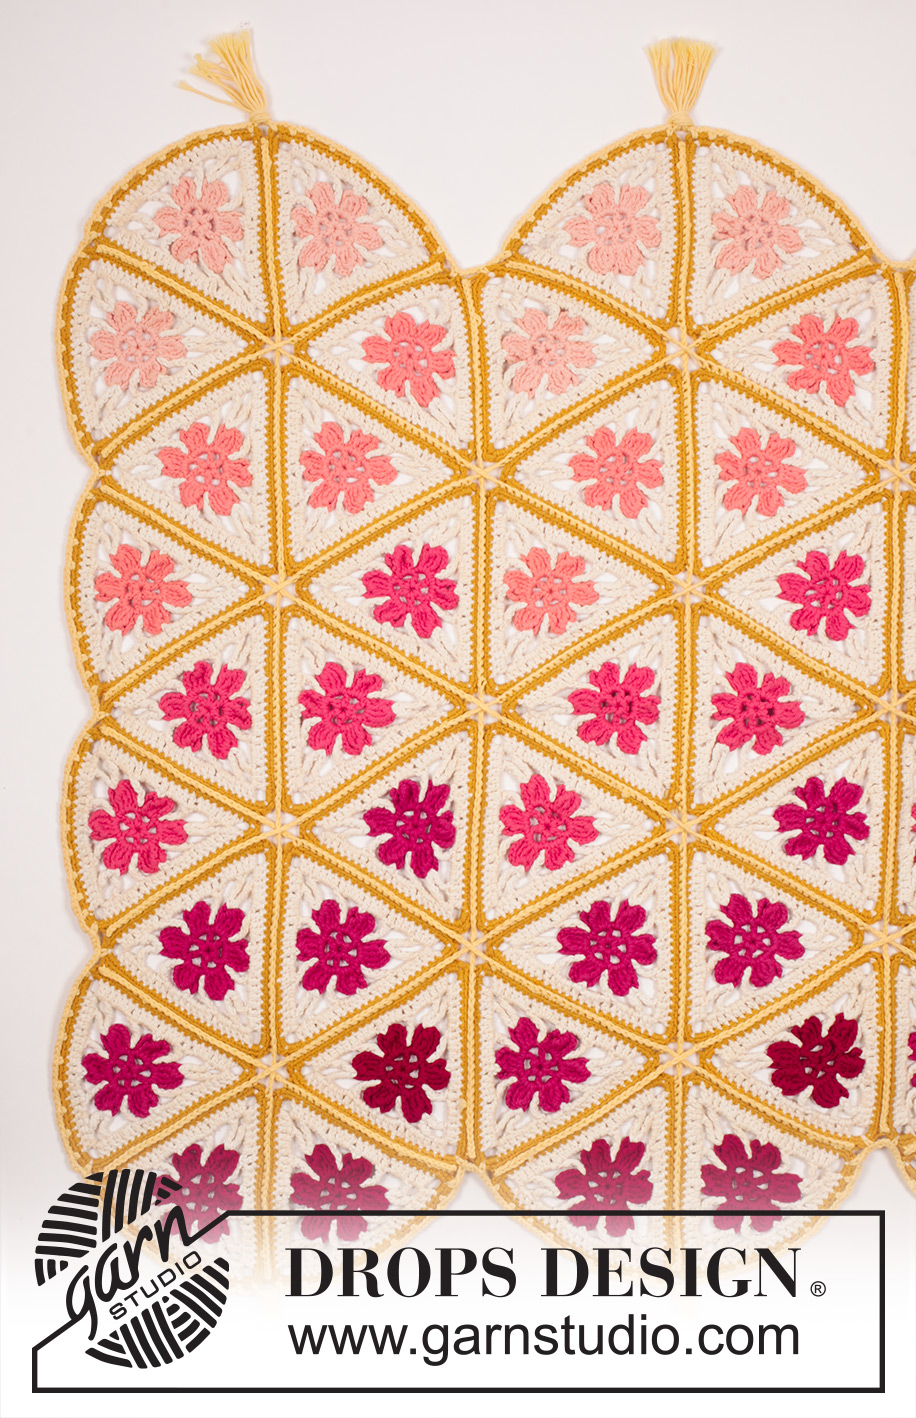
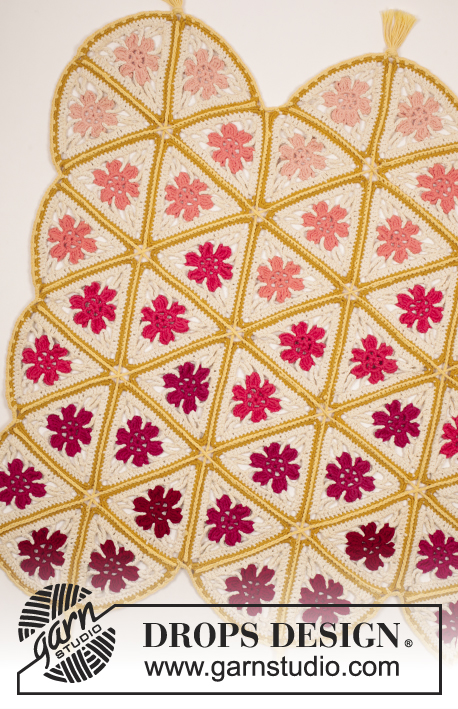
MOTIVO: I diagrammi A.1 e A.2 (A.2 mostra come inizia e finisce A.1). A.3 mostra come sono posizionati i triangoli all’uncinetto per la confezione. ---------------------------------------------------------- TRIANGOLI ALL’UNCINETTO: Lavorare il motivo seguendo il diagramma A.1. A.2 mostra come inizia e finisce il diagramma. Lavorare i triangoli all’uncinetto con ognuno dei 5 colori spiegati sotto. FARE ATTENZIONE ALLA TENSIONE DEL LAVORO! COLORE 1: Lavorare 12 triangoli. Avvio + giro 1 e 2: pesca. Giro 3 e 4: panna. Giro 5: giallo senape. COLORE 2: Lavorare 16 triangoli. Avvio + giro 1 e 2: albicocca. Giro 3 e 4: panna. Giro 5: giallo senape. COLORE 3: Lavorare 16 triangoli. Avvio + giro 1 e 2: corallo. Giro 3 e 4: panna. Giro 5: giallo senape. COLORE 4: Lavorare 16 triangoli. Avvio + giro 1 e 2: erika. Giro 3 e 4: panna. Giro 5: giallo senape. COLORE 5: Lavorare 12 triangoli. Avvio + giro 1 e 2: rosso ruggine. Giro 3 e 4: panna. Giro 5: giallo senape. CONFEZIONE: Posizionare i triangoli come mostrato nel diagramma A.3. I n° 1-5 mostrano dove devono essere i diversi colori. Per prima cosa mettere i triangoli in 4 strisce (vedere le parentesi A, B, C e D) come segue: NOTA: Potrebbe essere opportune affrancare temporaneamente i triangoli con un filo, in modo che non si spostino troppo durante la confezione. Mettere 2 triangoli con il colore 5 con rovescio contro rovescio e lavorarli con il vaniglia con l’uncinetto n° 4,5 mm. * Lavorare 1 m.b attraverso la m.b più esterna in entrambi i triangoli (cioè in entrambi gli strati) in ognuna delle 27 m.b su un lato del triangolo, lavorare 4 cat nel punto di passaggio per i 2 triangoli successivi che vengono lavorati insieme (cioè colore 4) *, ripetere *-* altre 4 volte (ora lavorare sui triangoli con i colori 3, 2 e 1 – vedere il diagramma) ma l’ultima volta finire prima delle 4 cat, chiudere e affrancare. Ripetere nello stesso modo sulle strisce rimaste (parentesi B, C e D). Poi mettere le 4 strisce una vicina all’altra come mostrato in A.3 (affrancare temporaneamente i triangoli come spiegato sotto). Poi lavorare i triangoli nello stesso modo in diagonale lavorando 1 m.b in entrambi i triangoli in ognuna delle 27 m.b a un lato di ogni triangolo. Lavorare 4 cat nel punto di passaggio tra ogni triangolo. Le frecce indicano come la coperta dev’essere lavorata da un lato. Poi lavorare in diagonale nello stesso modo dall’altro lato. Chiudere e affrancare. BORDO: Lavorare 1 bordo con il vaniglia con l’uncinetto n° 4,5 mm attorno alla coperta come segue: iniziare in alto tra 2 triangoli e lavorare (1 m.b, 3 cat, saltare circa 1½ cm). NOTA: lavorare 1 m.b attorno all’arco di cat sul bordo in ogni angolo e lavorare 3 cat nel punto di passaggio tra i 2 triangoli in ogni punta. Nei punti di passaggio tra ognuna delle parentesi A, B, C e D (= dove si incontrano le punte dei 4 triangoli) e nei punti di passaggio tra i triangoli sul lato corto della coperta, lavorare 3 cat e 1 m.b attorno a ognuno degli archi di cat negli angoli. Finire il giro con 3 cat, 1 m.bss nella 1° m.b sul giro. Chiudere e affrancare. FRANGIA: Inserire una frangia grande in ognuna delle 4 punte in ogni lato lungo della coperta. 1 frangia grande = 8 capi di vaniglia di circa 20 cm. Piegare i capi a metà, far passare l’occhiello attraverso l’arco di cat nel bordo più esterno lavorato e far passare le estremità attraverso l’occhiello (in modo che i 16 capi pendano in ogni frangia). |
||||||||||||||||||||||||||||||||||||||||
Spiegazioni del diagramma |
||||||||||||||||||||||||||||||||||||||||
|
||||||||||||||||||||||||||||||||||||||||
 |
||||||||||||||||||||||||||||||||||||||||
 |
||||||||||||||||||||||||||||||||||||||||
Avete terminato questo modello?Allora taggate le vostre foto con #dropspattern #springdazeblanket o inviatele alla #dropsfan gallery. Avete bisogno di aiuto con questo modello?Troverete 11 video tutorial, una sezione per i commenti/domande e molto altro guardando il modello su www.garnstudio.com © 1982-2026 DROPS Design A/S. Ci riserviamo tutti i diritti. Questo documento, compreso tutte le sue sotto-sezioni, è protetto dalle leggi sul copyright. Potete leggere quello che potete fare con i nostri modelli alla fine di ogni modello sul nostro sito. |
||||||||||||||||||||||||||||||||||||||||


Con oltre 40 anni di esperienza nel design di modelli di maglia e uncinetto, DROPS Design offre la più estesa collezione di modelli gratuiti su internet - tradotti in 17 lingue. Ad oggi vi possiamo fornire 324 cataloghi e 12290 modelli - 9561 dei quali sono tradotti in Italiano.
Ci stiamo impegnando molto per darvi il meglio che vi possiamo offrire in termini di maglia e uncinetto, ispirazioni e consigli così come filati di grande qualità ad un prezzo incredibile! Volete utilizzare i nostri modelli per qualcosa d'altro oltre al vostro uso personale? Potete leggere tutto ciò che è consentito nel testo sul Copyright in basso su tutte le pagine dei nostri modelli. Buon lavoro!
Lasciare un commento sul modello DROPS 170-17
Noi saremmo felici di ricevere i tuoi commenti e opinioni su questo modello!
Se vuoi fare una domanda, fai per favore attenzione a selezionare la categoria corretta nella casella qui sotto per velocizzare il processo di risposta. I campi richiesti sono indicati da *.