
Categorie popolari
State cercando un filato?


Commenti / Domande (56)
![]() Patti ha scritto:
Patti ha scritto:
“then work according to A.2 (= 21-22-23 repetitions in width). Fasten off.” Do I finish the entire A2 finishing up to the last row “dc around ch-space row”?
07.01.2025 - 09:57DROPS Design ha risposto:
Dear Patti, yes work A.2 entirely in height, ie including last round. Happy crocheting!
07.01.2025 - 13:35
![]() Patti ha scritto:
Patti ha scritto:
“then work according to A.2 (= 21-22-23 repetitions in width). Fasten off.” Do I finish the entire A2 finishing up to the last row “dc around ch-space row”?
07.01.2025 - 09:56
![]() Patti Urso ha scritto:
Patti Urso ha scritto:
For arms Work * 1 dc + 2 ch in first dc * in 20 dc. Then 26 ch, skip 10-11-12 dc (=1st armhole), Then 1 dc + 2 ch in 36 dc, then 26 ch, and skip 12 dc (=2nd armhole) The hole is too small for 2x size. Any suggestions ? The gage is 13 dc x 8 rows = 4'' x 4'' (10 x 10 cm). 5.5 mm hook. Yarn group C
22.12.2024 - 01:36DROPS Design ha risposto:
Dear Patti, your chain stitches may be a bit tight; try to work them slightly loosely so that the armhole is as big as they can be. Ensure that 1 chain stitch is as long as the width of a dc. So 26 chain stitches should be double the length of the skipped dc stitches. You can add more chain stitches, but ensuring that the pattern can still be maintained (so a set number of stitches depending on those required for the charts. Happy crochetting!
22.12.2024 - 23:48
![]() Patti Urso ha scritto:
Patti Urso ha scritto:
What is tr in picot and how do you crochet this stitch?
10.12.2024 - 10:36DROPS Design ha risposto:
Dear Patti, tr in picot means that you work 1 treble crochet but in the picot stitch of the previous round, which is either the black or the white dot. Happy crochetting!
15.12.2024 - 14:13
![]() Patti Urso ha scritto:
Patti Urso ha scritto:
Still working on this pattern. Now I am here “Work last round in A.1, then work according to A.2 (= 21-22-23 repetitions in width). Fasten off.” I have completed A2 second row. I have counted 30 shells (8 double crochet ) but the pattern says 23 repetition. My question is how many shells should I have for the largest size. I am thinking I should have 23 shells since there are 23 repetitions in this row
10.12.2024 - 10:11DROPS Design ha risposto:
Dear Patti, you should have 23 shells, one in each repeat of A.2. You have the arches on one side and the shell on the other side of the A.2 repeat. So you should have 23 8 double crochet groups. Happy crochetting!
15.12.2024 - 20:28
![]() Patti Urso ha scritto:
Patti Urso ha scritto:
For this part how do you recommend increasing the two stitches per row evenly. “Work 7th round 1-3-5 more times, AT THE SAME TIME inc 2 dc evenly on every row, i.e. two times on every round work as follows: 1 dc + 3 ch + 1 dc + 3 ch in 1 dc = 84-88-92 dc with 3 ch between each.”
22.11.2024 - 05:36DROPS Design ha risposto:
Dear Mrs Urso, on 7th round you work (1 dc in the dc below, 3 chains) and repeat from (to) around; to increase, you will work (1 dc in the dc below, 3 chains, 1 dc in the same dc, 3 chains) = you ave increased 1 chain space. Repeat evenly 2 or 4 more times in the 2 larger sizes. Happy crocheting!
22.11.2024 - 10:01
![]() Patti ha scritto:
Patti ha scritto:
Thank you. This explanation is very helpful.
11.11.2024 - 02:10
![]() Patti ha scritto:
Patti ha scritto:
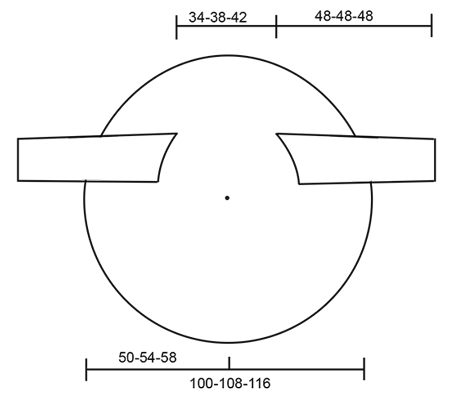
The drawing shows the circle flat. Should the circle jacket be flat too?
09.11.2024 - 09:38DROPS Design ha risposto:
Dear Patti, yes, it should be flat. Happy knitting!
10.11.2024 - 19:21
![]() Patti ha scritto:
Patti ha scritto:
Is 6 round for the largest size?
09.11.2024 - 09:36DROPS Design ha risposto:
Dear Patti, you work Rounds 1 to 8 of A.1 once. Then, you work all rounds of A.2 once. Now work round 5 of A.1 once again and repeat this round 3 times in total for the large size. Work round 6 of A.1 once more, adjusting for the armholes as indicated in the text. Then work round 7 of A.1 and repeat it 6 times in total without increases and 5 times with increases (because you need more increases for the largest version, so you will work less rounds without them but more with them). Then work the last round in A.1 once and work all rounds of A.2 once more. Happy knitting!
10.11.2024 - 19:19
![]() Patti ha scritto:
Patti ha scritto:
Explain this. Then repeat 7th round 8-7-6 times upwards.
05.11.2024 - 08:38DROPS Design ha risposto:
Hi Patti, you have to repeat 7-th round of A.1 diagram in the next 8, 7 or 6 rounds (the number is depending on your size). Hapy crocheting!
05.11.2024 - 09:41
|
||||||||||||||||||||||||||||||||||
Evening Tide#eveningtidejacket |
||||||||||||||||||||||||||||||||||
 |
 |
|||||||||||||||||||||||||||||||||
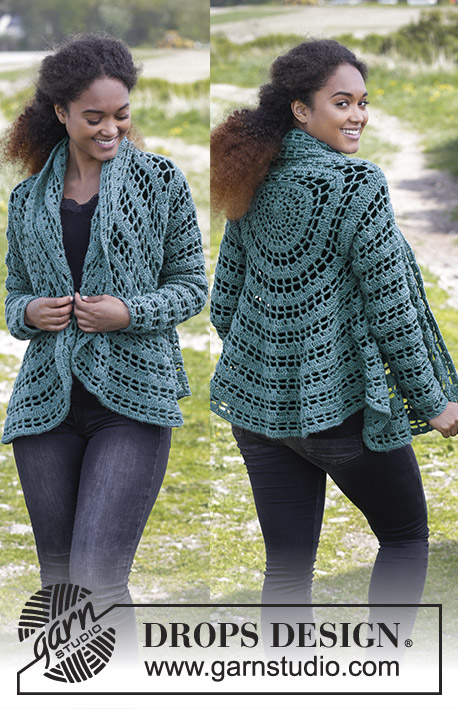
Giacca DROPS all’uncinetto, lavorata in cerchio, in "Big Delight". Taglie: Dalla S alla XXXL.
DROPS 168-27 |
||||||||||||||||||||||||||||||||||
|
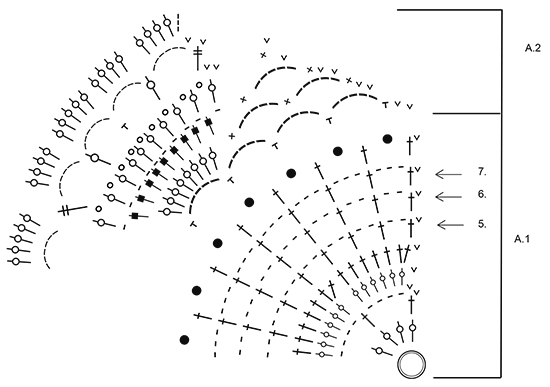
CERCHIO MAGICO: Iniziare con questa tecnica consente di evitare che si formi un buco al centro. Tenere l’estremità del filo con la mano sinistra e fare un anello intorno all’indice sinistro (da sinistra verso destra). Tenere l’anello con il pollice e l’indice della mano sinistra. Far passare l’uncinetto attraverso l’anello, prendere il filo dal gomitolo ed estrarre il filo dall’anello, fare 1 m gettata sull’uncinetto e far passare la m gettata attraverso la m sull’uncinetto = 1 m.b, 3 cat, lavorare poi 15 m.a intorno all’anello e finire con 1 m.bss nella 3a cat = 16 m.a. Proseguire come indicato nelle spiegazioni del modello, e ALLO STESSO TEMPO, tirare l’estremità del filo per stringere l’anello e far sparire il buco. MOTIVO: Vedere i diagrammi A.1 e A.2. INFORMAZIONI PER IL LAVORO: Sostituire la prima m.a all’inizio del giro con 3 cat. Finire il giro con 1 m.bss nella 3a cat dall’inizio del giro. Sostituire la prima m.a.d all’inizio del giro con 4 cat. Finire il giro con 1 m.bss nella 4a cat dall’inizio del giro. ---------------------------------------------------------- GIACCA LAVORATA IN CERCHIO: Con l’uncinetto n° 5,5 ed il filato Big Delight, lavorare un CERCHIO MAGICO – vedere le spiegazioni sopra. Proseguire seguendo il diagramma A.1 - ATTENZIONE: il giro 1 del diagramma A.1 è spiegato nel paragrafo del cerchio magico (sopra), lavorare 4 ripetizioni del diagramma A.1 in larghezza. Le m.bss all’inizio del diagramma A.1 sono lavorate solo all’inizio del giro. VEDERE LE INFORMAZIONI PER IL LAVORO ! RICORDARSI LA TENSIONE DEL LAVORO! Dopo aver lavorato il diagramma A.1, proseguire con il diagramma A.2, lavorare 7 ripetizioni del diagramma A.2 in larghezza; durante l’ultimo giro del diagramma A.2 diminuire 1 m.a = 160 m.a. Proseguire a lavorare seguendo il diagramma A.1, ma iniziare ora dal giro 5 - vedere la freccia nel diagramma. Lavorare 1-2-3 giri come il giro 5 del diagramma A.1 (= 80 m.a + 2 cat). Lavorare ora gli scalfi come segue: Lavorare * 1 m.a + 2 cat nella prima m.a *, ripetere da *-* sulle prime 20 m.a, lavorare 22-24-26 cat, saltare 10-11-12 m.a (=1° scalfo), lavorare * 1 m.a + 2 cat nella m.a successiva *, ripetere da *-* sulle 40-38-36 m.a successive, lavorare 22-24-26 cat, saltare 10-11-12 m.a (=2° scalfo), finire con 1 m.bss all’inizio del giro. Proseguire come indicato per il giro 6 del diagramma, come segue: Lavorare 1 m.a + 2 cat in ogni m.a fino al primo scalfo, * lavorare 1 m.a + 2 cat intorno all’arco di cat *, ripetere da *-* altre 10-11-12 volte, proseguire con 1 m.a + 2 cat fino al 2° scalfo, * 1 m.a + 2 cat intorno all’arco di cat *, ripetere da *-* altre 10-11-12 volte = 82 m.a con 2 cat tra ognuna. Ripetere ora il giro 7 8-7-6 volte. Lavorare il giro 7 altre 1-3-5 volte e, ALLO STESSO TEMPO, aumentare 2 m.a in modo uniforme ad ogni giro, quindi per due volte ad ogni giro lavorare come segue: 1 m.a + 3 cat + 1 m.a + 3 cat in 1 m.a = 84-88-92 m.a con 3 cat tra ognuna. Il lavoro misura ca.80-88-96 cm di diametro (= 40-44-48 cm dal centro). Lavorare l’ultimo giro del diagramma A.1. Proseguire seguendo il diagramma A.2 (= 21-22-23 ripetizioni in larghezza). Tagliare il filo. MANICHE: Lavorare in tondo dall’alto verso il basso, a partire dallo scalfo. Lavorare 1 m.a + 2 cat in ogni m.a saltata per lo scalfo, e 1 m.a + 2 cat nel bordo inferiore di ogni m.a sull’altro lato dello scalfo = 21-23-25 m.a con 2 cat tra ognuna. Inserire un segno al centro, sotto la manica. Proseguire con 1 m.a + 2 cat in ogni m.a. Quando il lavoro misura 4 cm, diminuire 1 m.a + 2 cat al centro, sotto la manica come segue: Lavorare l’ultima m.a prima del segno, ma non fare l’ultima gettata, lavorare la m.a successiva (non lavorare le 2 cat), e all’ultima gettata passare il filo attraverso tutte e 3 le m sull’ uncinetto (= sono state diminuite 1 m.a + 2 cat). Diminuire ogni 5 cm altre 7 volte; diminuire alternando le diminuzioni una volta prima e una volta dopo il segno: = 13-15-17 m.a con 2 cat tra ognuna. Proseguire finché il lavoro non misura 48 cm per tutte le taglie. Tagliare il filo. Lavorare la seconda manica in modo uguale. |
||||||||||||||||||||||||||||||||||
Spiegazioni del diagramma |
||||||||||||||||||||||||||||||||||
|
||||||||||||||||||||||||||||||||||
 |
||||||||||||||||||||||||||||||||||
 |
||||||||||||||||||||||||||||||||||
Avete terminato questo modello?Allora taggate le vostre foto con #dropspattern #eveningtidejacket o inviatele alla #dropsfan gallery. Avete bisogno di aiuto con questo modello?Troverete 8 video tutorial, una sezione per i commenti/domande e molto altro guardando il modello su www.garnstudio.com © 1982-2026 DROPS Design A/S. Ci riserviamo tutti i diritti. Questo documento, compreso tutte le sue sotto-sezioni, è protetto dalle leggi sul copyright. Potete leggere quello che potete fare con i nostri modelli alla fine di ogni modello sul nostro sito. |
||||||||||||||||||||||||||||||||||


Con oltre 40 anni di esperienza nel design di modelli di maglia e uncinetto, DROPS Design offre la più estesa collezione di modelli gratuiti su internet - tradotti in 17 lingue. Ad oggi vi possiamo fornire 324 cataloghi e 12290 modelli - 9561 dei quali sono tradotti in Italiano.
Ci stiamo impegnando molto per darvi il meglio che vi possiamo offrire in termini di maglia e uncinetto, ispirazioni e consigli così come filati di grande qualità ad un prezzo incredibile! Volete utilizzare i nostri modelli per qualcosa d'altro oltre al vostro uso personale? Potete leggere tutto ciò che è consentito nel testo sul Copyright in basso su tutte le pagine dei nostri modelli. Buon lavoro!
Lasciare un commento sul modello DROPS 168-27
Noi saremmo felici di ricevere i tuoi commenti e opinioni su questo modello!
Se vuoi fare una domanda, fai per favore attenzione a selezionare la categoria corretta nella casella qui sotto per velocizzare il processo di risposta. I campi richiesti sono indicati da *.