
Categorie popolari
State cercando un filato?


Commenti / Domande (42)
![]() Reix ha scritto:
Reix ha scritto:
Bonjour, je souhaiterais annuler ma commande n° 224562. Je la recommanderais plus tard (finance oblige) en enlevant les aiguilles circulaires. Merci
24.03.2018 - 12:44DROPS Design ha risposto:
Bonjour Mme Reix, pour toute aide sur votre commande, merci de bien vouloir contacter le magasin où vous l'avez passée, retrouvez ses coordonnées dans la liste des magasins DROPS. Bon tricot!
26.03.2018 - 10:57
![]() Reix ha scritto:
Reix ha scritto:
Bonjour, combien de pelotes me faut il pour une taille 40 (l). Merci
23.03.2018 - 14:16DROPS Design ha risposto:
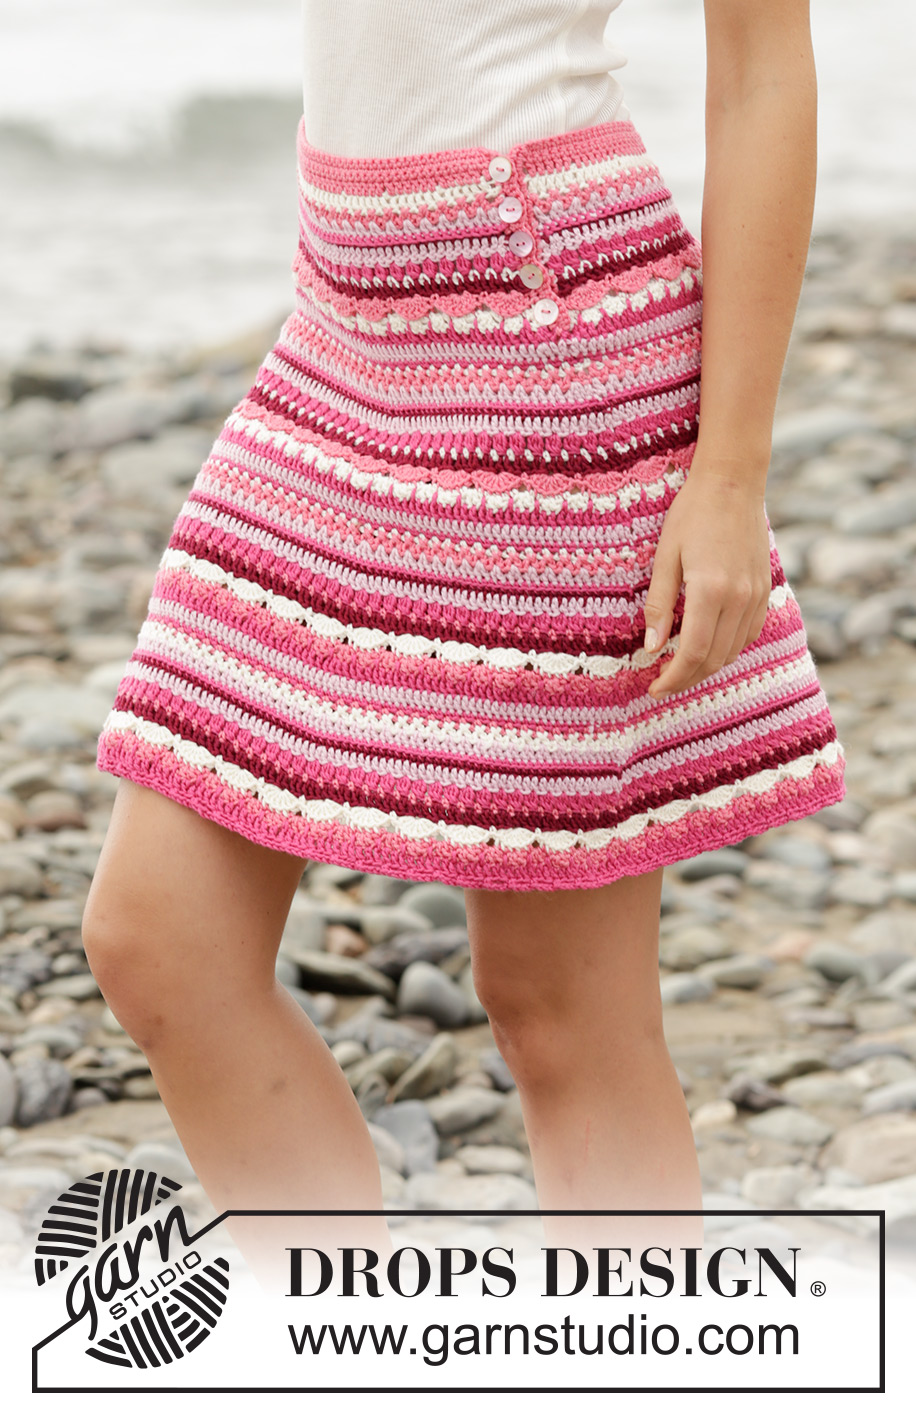
Bonjour Reix! Il vous faut: 2 pelotes coloris n° 13, corail; 2 pelotes coloris n° 14, cerise; 2 pelotes coloris n° 07, bordeaux; 2 pelotes Coloris n° 05, rose poudré; 2 pelotes Coloris n° 01, naturel. Au total 10 pelotes. Pour une jupe unie 450 g = 9 pelotes de la couleur choisie. Bon travail!
23.03.2018 - 14:50
![]() Antoinette Van Den Akker ha scritto:
Antoinette Van Den Akker ha scritto:
De uitleg van symbool bij toer 11 snap ik niet. Er staat: haak op 1e toer 1l, haak op de volgende toeren 1 dstk om l en in v 2 toeren naar beneden. Is hier een andere uitleg voor of een instructie video?
21.01.2018 - 10:21DROPS Design ha risposto:
Hoi Antoinette, Dit symbool is eigenlijk opgesplitst over 2 toeren. In de eerste toer haak je een losse; in de tweede toer haak je een dubbel stokje in de losse van 2 toerendaaronder, waarbij je het dubbele stokje a.h.w over de losse van de vorige toer legt. Als je inzoomt op de foto, kun je zien dat hij eroverheen ligt. Ik zal er 'over' in plaats van 'om' de lossen van maken; dat is wat duidelijker.
23.01.2018 - 09:51Avril ha scritto:
Hi I am confused by the symbol on the first row of A.1b (a V with a spot on each side) can you advice me?
17.03.2017 - 20:11DROPS Design ha risposto:
Dear Avril, on 1st row in A.1b you will work 2 tr between the 2 cross tr worked in A.1a (6th symbol = 1 tr around space between 2 tr). Happy crocheting!
20.03.2017 - 08:33
![]() Bethany ha scritto:
Bethany ha scritto:
In row 1a, you have us skipping a chain every 6 dc. Do we ch1 for the skipped stitch? Adorable skirt - thank you.
04.03.2017 - 19:40DROPS Design ha risposto:
Dear Bethany, do not chain 1 st for every skipped st, you start with more chains on the fundation chains than you will need dc on 1st round to avoid the fundation chain to tighten the work, so that you will start with 141 ch in 1st size, but at the end of 1st row you should have 120 dc. Happy crocheting!
06.03.2017 - 09:08Rossitza Ivanova ha scritto:
Thank you very much for your answers :-) ... and just last question - would you advise me to cut the yarn after each row (colour) until the vent is finished or I could crochet continuously back and fourth following the stripe scheme?
31.10.2016 - 12:01DROPS Design ha risposto:
Dear Mrs Rossitza, you can let the yarn follow but make sure to not tighten when working each colour to keep correct length. If you think stripes maybe too high, rather cut the colour. Happy crocheting!
31.10.2016 - 14:03Rossitza Ivanova ha scritto:
"For every inc work 1 more repetition of A.1b in width AT THE SAME TIME when piece measures 12 cm / 4¾''" - is also difficult to understand. What do we repeat- one row, all stripes from A.1b? Thanks in advance
29.10.2016 - 18:54DROPS Design ha risposto:
Dear Mrs Rossitza, when you inc sts on a row, you will have enough sts to work 1 more repeat of A.1b in width, ie you are inc 6 sts (= 1 repeat of A.1b = 6 sts). Continue on next row as shown in A.1b, repeating the 6 sts around. Happy crocheting!
31.10.2016 - 10:23Rossitza Ivanova ha scritto:
Could you please explain me what exactly means : "Work A.1a 20-22-24-26-30-33 times in total in width" because I understand that we start with A1a (1 row) and then we continue with A1b in stripes (15 rows) and than we start again with A1a, A1b, etc. Where I am wrong? Do we do this repetition 20-22-24-26-30-33 time?
29.10.2016 - 18:07DROPS Design ha risposto:
Dear Mrs Rossitza, A.1a is worked over 6 sts, repeat A.1a a total of 20-22-24-26-30-33 times in the round = 20-22-24-26-30-33 repeats of A.1a = 120-132-144-156-180-198 dc (US-crochet terminology). Then work A.1b, ie repeat A.1b a total of 20-22-24-26-30-33 times in the round. At the same time, work the stripes: Row 1 in A.1a = Coral, then work the stripes in A.1b changing the colours as explained. Happy crocheting!
31.10.2016 - 10:14
![]() Maren ha scritto:
Maren ha scritto:
Skal a1b hækles en gang i højden før udtagningerne starter? kan se det er blevet spurgt om før, men med forskellige svar
19.09.2016 - 09:31DROPS Design ha risposto:
Hej Maren. Ja, jeg kan se at min norske og svenske kollega er uenige her :) Men jeg ville sige som min norske at du tager tager ud hver gang du haekler A.1B - saa ogsaa förste gang.
28.09.2016 - 14:31
![]() Hanne Mette Andersson ha scritto:
Hanne Mette Andersson ha scritto:
Hei. Skal hele A.1b strikkes en gang i høyden før man starter på økningene?
27.05.2016 - 22:43DROPS Design ha risposto:
Hej Hanne. Nej, du repeterer A.1b og öker samtidig x antal m som beskrevet i ØKETIPS:Det økes på rad/omg 1, 4, 7, 11 og 12 i mønster A.1b (dvs det økes 6 m jevnt fordelt totalt 5 ganger per repetisjon av A.1b). Det økes ved å hekle 2 st i/om samme m. For å beregne hvor ofte det skal økes på omg, regner man det totale m-antallet på raden/omg (f.eks 132 m) og deler med antall økninger som skal gjøres (f.eks 6) = 22. Dvs i dette eksempelet økes det 1 st i hver 22.m.
30.05.2016 - 13:41
|
||||||||||||||||||||||||||||||||||||||||
Berry Ripple#berryrippleskirt |
||||||||||||||||||||||||||||||||||||||||
|
|
||||||||||||||||||||||||||||||||||||||||
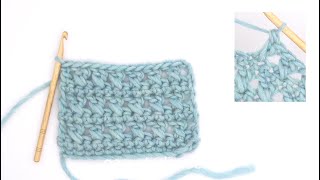
Gonna DROPS all’uncinetto, a strisce e con motivo a ventaglio, in "Cotton Merino". La gonna viene lavorata dall’alto verso il basso. Taglie: Dalla S alla XXXL.
DROPS 169-22 |
||||||||||||||||||||||||||||||||||||||||
|
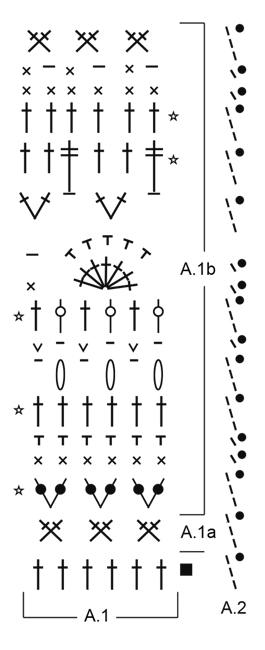
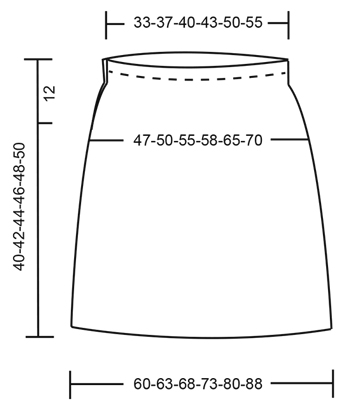
MOTIVO: Vedere i diagrammi A.1 e A.2. Il diagramma A.2 mostra come iniziare e finire ogni giro/riga (quando si lavora avanti e indietro, non si lavora la m.bss alla fine della riga). INFORMAZIONI PER IL LAVORO: Sostituire la prima m.a all’inizio di ogni riga di m.a con 3 cat. Sostituire la prima m.b all’inizio di ogni riga di m.b con 1 cat STRISCE-1: Lavorare il diagramma A.1a come segue: RIGA 1: Corallo Ripetere poi il diagramma A.1b lavorando a strisce colorate come indicato di seguito: RIGA/GIRO 1: Rosa cipria – ATTENZIONE: Aumentare nel corso di questa riga/giro. RIGA/GIRO 2: Rosa ciliegia RIGA/GIRO 3: Bordeaux RIGA/GIRO 4: Rosa cipria - ATTENZIONE: Aumentare nel corso di questa riga/giro. RIGA/GIRO 5: Rosa ciliegia RIGA/GIRO 6: Panna RIGA/GIRO 7: Bordeaux - ATTENZIONE: Aumentare nel corso di questa riga/giro. RIGA/GIRO 8: Corallo RIGA/GIRO 9: Panna RIGA/GIRO 10: Panna RIGA/GIRO 11: Rosa ciliegia - ATTENZIONE: Aumentare nel corso di questa riga/giro. RIGA/GIRO 12: Rosa cipria - ATTENZIONE: Aumentare nel corso di questa riga/giro. RIGA/GIRO 13: Rosa ciliegia RIGA/GIRO 14: Panna RIGA/GIRO 15: Corallo SUGGERIMENTO PER GLI AUMENTI: Aumentare nel corso della riga/del giro 1, 4, 7, 11 e 12 del diagramma A.1b (quindi aumentare 6 m a intervalli regolari per 5 volte in tutto nel diagramma A.1b). Per aumentare, lavorare 2 m.a nella/intorno alla stessa m. Per calcolare ogni quante m aumentare, dividere il numero complessivo delle m sulla riga/sul giro (p.es: 132 m) per il numero di aumenti da fare (p.es 6) = 22. Quindi, in questo caso, bisogna aumentare 1 m.a ogni 22 m. STRISCE-2 Continuare a lavorare il diagramma A.1b, ma scambiare tra loro il colore corallo ed il panna. Quindi nel giro dove viene indicato di lavorare con il colore corallo, lavorare con il colore panna e viceversa. ---------------------------------------------------------- GONNA: Si lavora dall’alto verso il basso. Lavorare avanti e indietro fino al completamento dell’apertura per il bordo per i bottoni sul lato; proseguire in tondo. Con l’uncinetto n° 4 ed il colore panna, avviare 141-155-169-183-211-232 cat (comprese 3 cat per girare il lavoro). Lavorare la prima riga come segue: 1 m.a nella 4a cat dall’uncinetto (= 2 m.a) - VEDERE LE INFORMAZIONI PER IL LAVORO, 1 m.a in ognuna delle 4 cat successive, * saltare 1 cat, 1 m.a in ognuna delle 6 cat successive *, ripetere da *-* su tutta la riga = 120-132-144-156-180-198 m.a. Lavorare le STRISCE -1 - vedere le spiegazioni sopra. Ripetere il diagramma A.1a 20-22-24-26-30-33 volte in tutto in larghezza. Dopo aver completato il diagramma A.1a 1 volta in verticale, lavorare il diagramma A.1b sul diagramma A.1a (la prima riga del diagramma A.1b viene lavorata sul rovescio del lavoro). Proseguire con le strisce. RICORDARSI LA TENSIONE DEL LAVORO! Ripetere il diagramma A.1b in verticale e aumentare come segue: Aumentare 6 m a intervalli regolari - VEDERE IL SUGGERIMENTO PER GLI AUMENTI - 16-16-17-18-18-20 volte in tutto = 216-228-246-264-288-318 m. Ad ogni aumento, lavorare 1 ripetizione in più del diagramma A.1b in larghezza; ALLO STESSO TEMPO, quando il lavoro misura 12 cm, l’apertura sul lato è completata. Si prosegue ora in tondo: l’inizio del giro è sul lato. Dopo aver lavorato il diagramma A.1b 2 volte in verticale, lavorare le STRISCE -2 - vedere le spiegazioni sopra. Tagliare il filo quando il lavoro misura 40-42-44-46-48-50 cm, finire con una riga a piacere del diagramma A.1b. BORDO IN VITA: Con il colore corallo, lavorare un bordo nelle m.a della prima riga della gonna, come segue: lavorare 1 riga con 1 m.b in ogni m.a e poi lavorare 2 righe con 1 m.b in ogni m.b = 120-132-144-156-180-198 m.b. ASOLA: Lungo il lato dell’apertura sul davanti, lavorare delle asole con il colore corallo come segue (iniziare dal basso): 2 m.b (lavorare 2 m.b intorno alla prima riga di m.a e 1 m.b intorno alla prima riga di m.b), 3 cat, saltare 1 cm, * lavorare 2 m.b intorno alla riga di m.a successiva /alla riga di m.b successiva, 3 cat, saltare 1 cm *, ripetere da *-* altre 3 volte e finire con 2 m.b intorno all’ultima riga di m.a in alto, girare e lavorare la riga successiva come segue: 1 m.b in ogni m.b e 3 m.b in ogni arco di cat. Tagliare il filo. BORDO PER I BOTTONI: Lungo l’altra lato dell’apertura, lavorare 5 righe di m.b avanti e indietro con il colore corallo (alla prima riga, lavorare 2 m.b intorno ad ogni riga di m.a e 1 m.b intorno ad ogni riga di m.b). Tagliare il filo. Attaccare i bottoni sul bordo. |
||||||||||||||||||||||||||||||||||||||||
Spiegazioni del diagramma |
||||||||||||||||||||||||||||||||||||||||
|
||||||||||||||||||||||||||||||||||||||||
 |
||||||||||||||||||||||||||||||||||||||||
 |
||||||||||||||||||||||||||||||||||||||||
Avete terminato questo modello?Allora taggate le vostre foto con #dropspattern #berryrippleskirt o inviatele alla #dropsfan gallery. Avete bisogno di aiuto con questo modello?Troverete 12 video tutorial, una sezione per i commenti/domande e molto altro guardando il modello su www.garnstudio.com © 1982-2026 DROPS Design A/S. Ci riserviamo tutti i diritti. Questo documento, compreso tutte le sue sotto-sezioni, è protetto dalle leggi sul copyright. Potete leggere quello che potete fare con i nostri modelli alla fine di ogni modello sul nostro sito. |
||||||||||||||||||||||||||||||||||||||||


Con oltre 40 anni di esperienza nel design di modelli di maglia e uncinetto, DROPS Design offre la più estesa collezione di modelli gratuiti su internet - tradotti in 17 lingue. Ad oggi vi possiamo fornire 324 cataloghi e 12290 modelli - 9561 dei quali sono tradotti in Italiano.
Ci stiamo impegnando molto per darvi il meglio che vi possiamo offrire in termini di maglia e uncinetto, ispirazioni e consigli così come filati di grande qualità ad un prezzo incredibile! Volete utilizzare i nostri modelli per qualcosa d'altro oltre al vostro uso personale? Potete leggere tutto ciò che è consentito nel testo sul Copyright in basso su tutte le pagine dei nostri modelli. Buon lavoro!
Lasciare un commento sul modello DROPS 169-22
Noi saremmo felici di ricevere i tuoi commenti e opinioni su questo modello!
Se vuoi fare una domanda, fai per favore attenzione a selezionare la categoria corretta nella casella qui sotto per velocizzare il processo di risposta. I campi richiesti sono indicati da *.