
Categorie popolari
State cercando un filato?


Commenti / Domande (22)
![]() Marion ha scritto:
Marion ha scritto:
Jeg strikker mod Charlotte i str Xxl Hvor mange masker skalder være på forstykket og hvor mange på bakstykke før felling til armhull
15.09.2025 - 15:26DROPS Design ha risposto:
Hei Marion. Det står at man skal ha 202 masker i oppskriften før det felles til ermhull = 202/2=101 - 6 masker til ermhull = 95 masker foran og 95 masker bak. mvh DROPS Design
23.09.2025 - 19:37
![]() Hanne Nielsen ha scritto:
Hanne Nielsen ha scritto:
Ser mega fin ud
10.07.2024 - 12:16
![]() Dorothee Häußge ha scritto:
Dorothee Häußge ha scritto:
Wunderschönes Modell. Ich habe das Abketten der 4Maschen gut hinbekommen und auch schon gepostet. Ich liebe Drops Garne und Anleitungen.
23.06.2024 - 16:35
![]() Dorothee ha scritto:
Dorothee ha scritto:
Leider ein Wort vergessen: hinten die nächste (4. )rechts stricken und dann die drei darüberheben.
22.06.2024 - 19:31
![]() Dorothee ha scritto:
Dorothee ha scritto:
Ich mache die Abnahmen der 4 Maschen so, wie sonst die zwei. das heißt: Am Anfang die erste Masche stricken, wieser auf die linke Nadel und die drei nächsten Maschen darüber heben. Hinten die ersten drei Maschen wie zum Rechtsstricken abheben, die nächste (4,) auf die rechte Nadel heben und die vorher abgehobenen drei darüberheben. Das sieht dann aus, wie anfangs rechts zusammengestrick und am Ende rechts verschränkt zusammengestrickt.
22.06.2024 - 15:26
![]() Linda ha scritto:
Linda ha scritto:
Is dit patroon ook verkrijgbaar op 2 naalden? Ik vraag dit voor en bewoonster van 95! jaar. het luikt haar en mij niet om met rondbreinaalden te breien. alvast bedankt
07.04.2021 - 15:34DROPS Design ha risposto:
Dag Linda,
Nee, helaas is dit patroon er alleen voor rondbreinaalden. Je zou het patroon wel zelf aan kunnen passen door de mouwen en het lijf apart te breien en naderhand op de raglanlijnen en de zijnaden in elkaar te zetten. Je moet dan aan een extra kant steek aan beide kanten toevoegen bij de mouwen en de panden.
Om een patroon aan te passen om op rechte naalden te breien hebben we een instructie gemaakt. Hoewel dit patroon niet zo geschikt is om dit te doen, heb je wellicht toch iets aan deze instructie. Deze vind je hier.
08.04.2021 - 09:14
![]() Maxine Bell ha scritto:
Maxine Bell ha scritto:
WOW!!! You are amazing. I've never had such quick responses from any pattern. There video helped tremendously. Thank you so much. I will sing your praises to everyone.
14.02.2020 - 16:22
![]() Maxine Bell ha scritto:
Maxine Bell ha scritto:
I love this pattern! I also love the name because Charlotte is my late mother's name. My question is, do I carry the Purl stitch on the knit rows between the pattern? Thank you for your time on this question.
29.01.2020 - 20:40DROPS Design ha risposto:
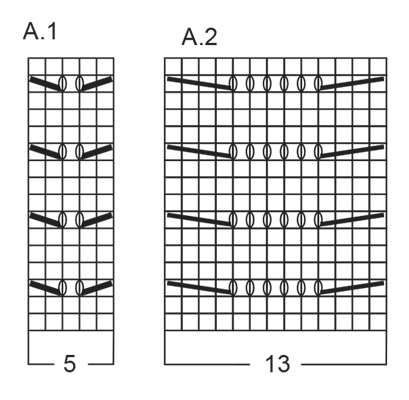
Dear Mrs Bell, diagrams A.1 and A.2 are worked in the round, ie all stitches will be knitted seen from RS - see 1st symbol. Happy knitting!
30.01.2020 - 09:26
![]() Elisabeth Hortman ha scritto:
Elisabeth Hortman ha scritto:
Jeg strikker strl M Ihht. oppskriften skal det være 14 m( A1) pluss 13m ( A2) og 14m ( A1) altså 41 masker i mønster Pluss 50 m Glattstrikk i hver side Dette blir da 41+50+41+50 og da mangler jeg 20 masker .... i oppskriften står det at jeg skal legge opp 162 ???? Hva gjør jeg galt her ?? Får ikke antallet / mønster til å gå opp Skal eller kan jeg utelate mønster bak ?? ?
29.03.2019 - 11:11DROPS Design ha risposto:
Hei Elisabeth. A.1 er 5 masker. Du strikker slik: 25 masker glattstrikk, videre strikkes mønster slik: 2 masker vrang, A.1 (=5 masker) altså totalt 7 masker. Videre strikkes 2 masker vrang, A.2 (=13 masker), 2 masker vrang (totalt 17 masker), så styrikker du A.1, 2 masker vrang (= totaslt 7 masker). Du har nå strikket mønster over 7 + 17 + 7 = 31 masker. Videre strikker du 50 masker glattstrikk, gjentar de 31 maskene i mønster, og strikker 25 masker glattstrikk. 25 + 31 + 50 + 31 + 25 = 162 masker. God fornøyelse
04.04.2019 - 15:28
![]() Sivan ha scritto:
Sivan ha scritto:
Is there supposed to be a one stitch decrease every time you do A1 and A2 and just shift the purls so the pattern still lines up? I've watched the video multiple times but it hasn't helped because there isn't sound, its too fast, and I don't know continental style. I'm not sure if I'm following the pattern correctly. Thank you!
16.05.2018 - 18:22DROPS Design ha risposto:
Dear Shawn, the number of sts should be the same in A.1 and A.2 all the way. Work row 3 in A.1 as follows: K2 tog, YO, K1, slip 1 st as if to K, K 1, psso. Work rows 3, 7, 11 and 15 in A.2 as follows: K4 rog, YO, (K1, YO) work from (to) a total of 5 times, K4 twisted tog. Happy knitting!
17.05.2018 - 08:03
|
|||||||||||||||||||
Charlotte#charlottetop |
|||||||||||||||||||
|
|
|||||||||||||||||||
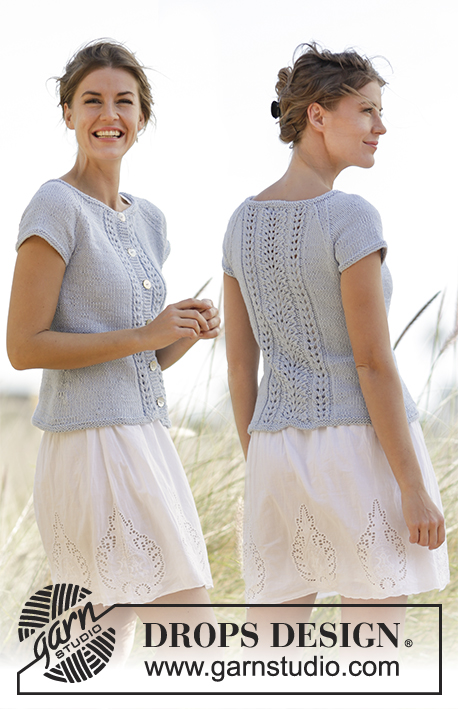
Maglia DROPS lavorata ai ferri con motivo traforato, raglan e maniche corte in ”Paris”. Taglie: S - XXXL.
DROPS 168-15 |
|||||||||||||||||||
|
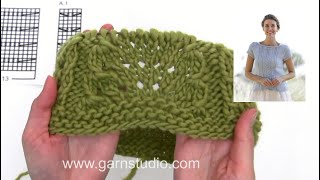
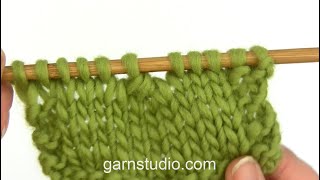
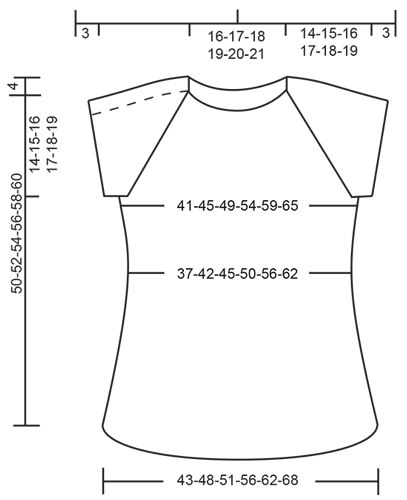
M LEGACCIO (in tondo): 1 “costa” a m legaccio = 2 giri. * 1 giro dir e 1 giro rov *, ripetere *-*. MOTIVO: Vedere i diagrammi A.1 e A.2. SUGGERIMENTO PER LE DIMINUZIONI: Diminuire come segue: iniziare 3 m prima della m con il segnapunti: 2 m insieme a dir, 2 m dir (il segnapunti è tra queste m), passare 1 m a dir senza lavorarla, 1 m dir, accavallare la m passata sopra quella appena lavorata. SUGGERIMENTO PER IL LAVORO: Se la tensione del lavoro non è corretta in altezza e il lavoro è troppo tirato, le diminuzioni per il raglan saranno troppo corte e gli scalfi troppo piccolo. Questo può essere aggiustato lavorando 1 giro in più senza diminuzioni in modo uniforme tra le diminuzioni. -------------------------------------------------------- -------------------------------------------------------- MAGLIA: Lavorato in tondo. Avviare 146-162-174-190-210-230 m con i f circolari n° 5 mm. Lavorare 2 “coste” a M LEGACCIO – leggere la spiegazione sopra. Poi lavorare come segue dal lato: 21-25-28-32-30-35 m a m rasata, * 2 m rov, A.1 ( = 5 m) *, ripetere *-* 1-1-1-1-2-2 volte in totale, 2 m rov, A.2 (= 13 m), 2 m rov, *A.1, 2 m rov,* ripetere *-* 1-1-1-1-2-2 volta in totale, 42-50-56-64-60-70 m a m rasata, * 2 m rov, A.1*, ripetere *-* 1-1-1-1-2-2 volta in totale, 2 m rov, A.2 (= 13 m), 2 m rov, *A.1, 2 m rov * ripetere *-* 1-1-1-1-2-2 volte in totale, 21-25-28-32-30-35 m a m rasata. Inserire 2 segnapunti nel lavoro; 1 all’inizio del giro e 1 dopo 73-81-87-95-105-115 m. Continuare il motivo in questo modo. FARE ATTENZIONE ALLA TENSIONE DEL LAVORO! Quando il lavoro misura 5 cm, diminuire 1 m a ogni lato del segnapunti, ripetere le diminuzioni ogni 3 cm altre 4 volte – LEGGERE IL SUGGERIMENTO PER LE DIMINUZIONI = 126-142-154-170-190-210 m. Quando il lavoro misura 21 cm, aumentare 1 m a ogni lato dei segnapunti, ripetere gli aumenti ogni 6-6-7-7-8-8 cm altre 2 volte = 138-154-166-182-202-222 m. Quando il lavoro misura 36-37-38-39-40-41 cm, intrecciare 6 m a ogni lato (= 3 m a ogni lato del segnapunti a ogni lato), lavorare le m rimaste come prima = 126-142-154-170-190-210 m. BORDO DELLE MANICHE: Avviare 52-56-60-62-66-70 m con i f a doppia punta n° 5 mm con Paris. Lavorare 2 “coste”, poi lavorare a m rasata fino a quando il lavoro misura 3 cm. Ora intrecciare 6 m al centro sotto la manica = 46-50-54-56-60-64 m. Lavorare l’altro bordo della manica nello stesso modo. SPRONE: Trasferire le maniche sullo stesso f circolare del corpo dove sono state intrecciate le m per gli scalfi (senza prima lavorarle) = 218-242-262-282-310-338 m. Inserire 1 segnapunti in ogni punto di passaggio tra le maniche e il corpo = 4 segnapunti. Continuare a m rasata e con il motivo come prima e ALLO STESSO TEMPO sul giro successivo diminuire per il raglan in ognuno dei 4 punti di passaggio tra il corpo e le maniche (cioè 8 diminuzioni per giro di diminuzioni) – LEGGERE IL SUGGERIMENTO PER LE DIMINUZIONI e IL SUGGERIMENTO PER IL LAVORO! Diminuire a giri alterni 16-16-16-17-18-18 volte, poi su ogni giro 0-2-4-4-5-7 volte. Alla fine di tutte le diminuzioni, rimangono 90-98-102-114-126-138 m sul giro. Lavorare 2 “coste” e ALLO STESSO TEMPO sul 1° giro distribuire 6-11-12-22-31-40 diminuzioni in modo uniforme = 84-87-90-92-95-98 m. Intrecciare. CONFEZIONE: Cucire le aperture sotto le maniche. |
|||||||||||||||||||
Spiegazioni del diagramma |
|||||||||||||||||||
|
|||||||||||||||||||
 |
|||||||||||||||||||
 |
|||||||||||||||||||
Avete terminato questo modello?Allora taggate le vostre foto con #dropspattern #charlottetop o inviatele alla #dropsfan gallery. Avete bisogno di aiuto con questo modello?Troverete 27 video tutorial, una sezione per i commenti/domande e molto altro guardando il modello su www.garnstudio.com © 1982-2026 DROPS Design A/S. Ci riserviamo tutti i diritti. Questo documento, compreso tutte le sue sotto-sezioni, è protetto dalle leggi sul copyright. Potete leggere quello che potete fare con i nostri modelli alla fine di ogni modello sul nostro sito. |
|||||||||||||||||||


Con oltre 40 anni di esperienza nel design di modelli di maglia e uncinetto, DROPS Design offre la più estesa collezione di modelli gratuiti su internet - tradotti in 17 lingue. Ad oggi vi possiamo fornire 324 cataloghi e 12290 modelli - 9561 dei quali sono tradotti in Italiano.
Ci stiamo impegnando molto per darvi il meglio che vi possiamo offrire in termini di maglia e uncinetto, ispirazioni e consigli così come filati di grande qualità ad un prezzo incredibile! Volete utilizzare i nostri modelli per qualcosa d'altro oltre al vostro uso personale? Potete leggere tutto ciò che è consentito nel testo sul Copyright in basso su tutte le pagine dei nostri modelli. Buon lavoro!
Lasciare un commento sul modello DROPS 168-15
Noi saremmo felici di ricevere i tuoi commenti e opinioni su questo modello!
Se vuoi fare una domanda, fai per favore attenzione a selezionare la categoria corretta nella casella qui sotto per velocizzare il processo di risposta. I campi richiesti sono indicati da *.