
Categorie popolari
State cercando un filato?


Commenti / Domande (166)
![]() Janet Konecne ha scritto:
Janet Konecne ha scritto:
I am working on a Medium size - This is to answer the question you had in response to my question about the errata....Thank you.
07.01.2019 - 17:18DROPS Design ha risposto:
Dear Mrs Konecne, in size M you start yoke with 286 sts and decrease for raglan on sleeve: 17 + 4 times 2 sts on each sleeve = 84 sts in total on both sleeves and on body: 2 + 16 times 2 sts on back piece + 1 st on each front piece = 72 sts in total. There were 286 sts - (84 sts dec on sleeves + 72 sts dec on body) = 130 sts. Happy knitting!
08.01.2019 - 09:38
![]() Janet Konecne ha scritto:
Janet Konecne ha scritto:
I have just finished this sweater and wonder if there is an errata for the top portion of the sweater. I have followed the decreases correctly (even made a chart to keep track of the different decreases in sleeve and body), but the stitch count is not correct and it is a very wide neck line! Am I missing something in the count? I look forward to a response as I LOVE this pattern, but am so dissappointed in the finish at the top....
04.01.2019 - 17:08DROPS Design ha risposto:
Dear Mrs Konecne, can you please tell us the size you are working ? Thank you!
07.01.2019 - 08:18
![]() MARISOL ha scritto:
MARISOL ha scritto:
¿EN MEXICO, DONDE COMPRO LOS DROPS?
29.12.2018 - 00:32DROPS Design ha risposto:
Hola Marisol. Aquí tienes el línk para los envíos internacionales: https://www.garnstudio.com/findastore.php?s=w&cid=23
30.12.2018 - 15:25
![]() Nathalie ha scritto:
Nathalie ha scritto:
Bonjour, pour les 5 premiers cm avant les diminutions, comment se tricote le deuxième rang ? faut-il inverser les mailles ? Si on a fait 8 mailles envers 8 mailles endroit au premier rang on inverse en faisant 8 mailles endroits 8 mailles envers pour créer un jersey ? Merci Nathalie
24.08.2018 - 08:39DROPS Design ha risposto:
Bonjour Nathalie, au deuxieme rang, il faut inverser les mailles, cela veut dire que sur l'envers vous tricotez les mailles comme elles se presentent. Bon tricot!
24.08.2018 - 10:18
![]() Therese ha scritto:
Therese ha scritto:
Zou u de instructie onder het kopje PAS wat meer uitgebreid kunnen uitleggen, zodat ik beter begrijp hoe ik de raglan in het breiwerk kan verwerken? Zie voorgaande vraag!
15.08.2018 - 12:50DROPS Design ha risposto:
Dag Therese, Bij de uitleg voor RAGLAN bovenaan het patroon staat hoe je moet minderen. Dus welke techniek je gebruikt voor de raglan afhankelijk van waar je bent; na de raglan op de goede/verkeerde kant van het werk of voor de raglan op de goede/verkeerde kant van het werk. Daarnaast staat in de uitleg bij het patroon hoe vaak je moet minderen; dit is voor de mouw en het lijf namelijk verschillend.
20.08.2018 - 10:05
![]() Therese ha scritto:
Therese ha scritto:
Sorry, het breien van de raglan was mij duidelijk alleen begrijp ik niet hoe ik dit in het breiwerk moet verwerken. Zoals ik het lees (op de goede kant): raglan mouw breien op de laatste steken van de mouw/ markeerder 2 en de eerste twee steken achterpand en de tweede bij markeerder 4 in overgang mouw met voorpand. Om de naald breien, zodat je steeds op dezelfde plek mindert. Volgens mij wordt de raglan op het linker- en rechtervoorpand en aan de beide zijde van het achterpand dan verschillend.
13.08.2018 - 10:31DROPS Design ha risposto:
Om de hoeveel naalden je mindert staat aangegeven in het patroon, dit is voor de mouwen en de panden verschillende, dus je mindert niet persé steeds op dezelfde plek (lees tegelijkertijd op mouwen en lijf.)
20.08.2018 - 10:09
![]() Therese ha scritto:
Therese ha scritto:
Hallo, ik wil aan de raglan beginnen, maar begrijp de uitleg niet. Voor welke markeerders brei je twee samen en de overige steken voor de mouw en voor welke markeerders voor het lijf. De eerste 16 minderingen voor de mouw minder je om de naald. Je mindert dus steeds op dezelfde plek, terwijl bij de andere markeerders niet geminderd wordt. Lijkt mij niet kloppen. Zou je een meer uitgebreide uitleg kunnen geven over het maken van de raglan?
11.08.2018 - 20:42DROPS Design ha risposto:
Dag Therese, Omdat je inderdaad verschillend op het lijf en de mouwen mindert bij de raglan heb ik de instructie voor het minderen voor de raglan aangepast, zodat het wat duidelijker is. Hopelijk kom je er nu uit.
12.08.2018 - 17:54
![]() Van Hyfte ha scritto:
Van Hyfte ha scritto:
Hallo , ik probleem met de mouwen , hoe krijg ik ze in de het briewerk ? mvg Christine
19.07.2018 - 20:48DROPS Design ha risposto:
Dag Christine, Deze hoef je er niet in te zetten of aan te naaien, maar je zet ze samen met het lijf op dezelfde rondbreinaald, zodat je daarna de pas kunt breien. Op de plek op het lijf waar afgekant is voor de armsgaten, zet je de mouwen op dezelfde rondbreinaald als het lijf.
07.08.2018 - 09:54Nicola Robinson ha scritto:
I've cast on 32 stitches as required and I have a total of 4 double pointed needles. Do I somehow get 10 stitches on one needle and 11 stitches on each of the other 2 needles, using the fourth needle to knit with??
19.05.2018 - 06:06Nicola Robinson ha scritto:
Susan I am extremely confused. I still have NO idea how to get from knitting with two needles to knitting with four!! I've never done this before and I can't find any explanations how to do this, so that video is completely useless to me. Secondly, that video (which shows knitting already on four needles) has no sound.
19.05.2018 - 05:50DROPS Design ha risposto:
Hi Nicola, To work the sleeves in the round with double pointed needles, cast on all stitches with 2 needles and then divide all the stitches between 4 of the double pointed needles leaving you with 1 free needle to work with. The first row is a bit tricky as you have to make sure that the work is not twisted, but you work on from the last cast-on stitch (where the strand is) to the first cast on stitch, so that you get a round. Work to end of first needle and then use the new free needle to work needle 2 and so on. I hope this helps. Happy knitting!
22.05.2018 - 08:19
|
||||||||||
Romantic Twist#romantictwistcardigan |
||||||||||
 |
 |
|||||||||
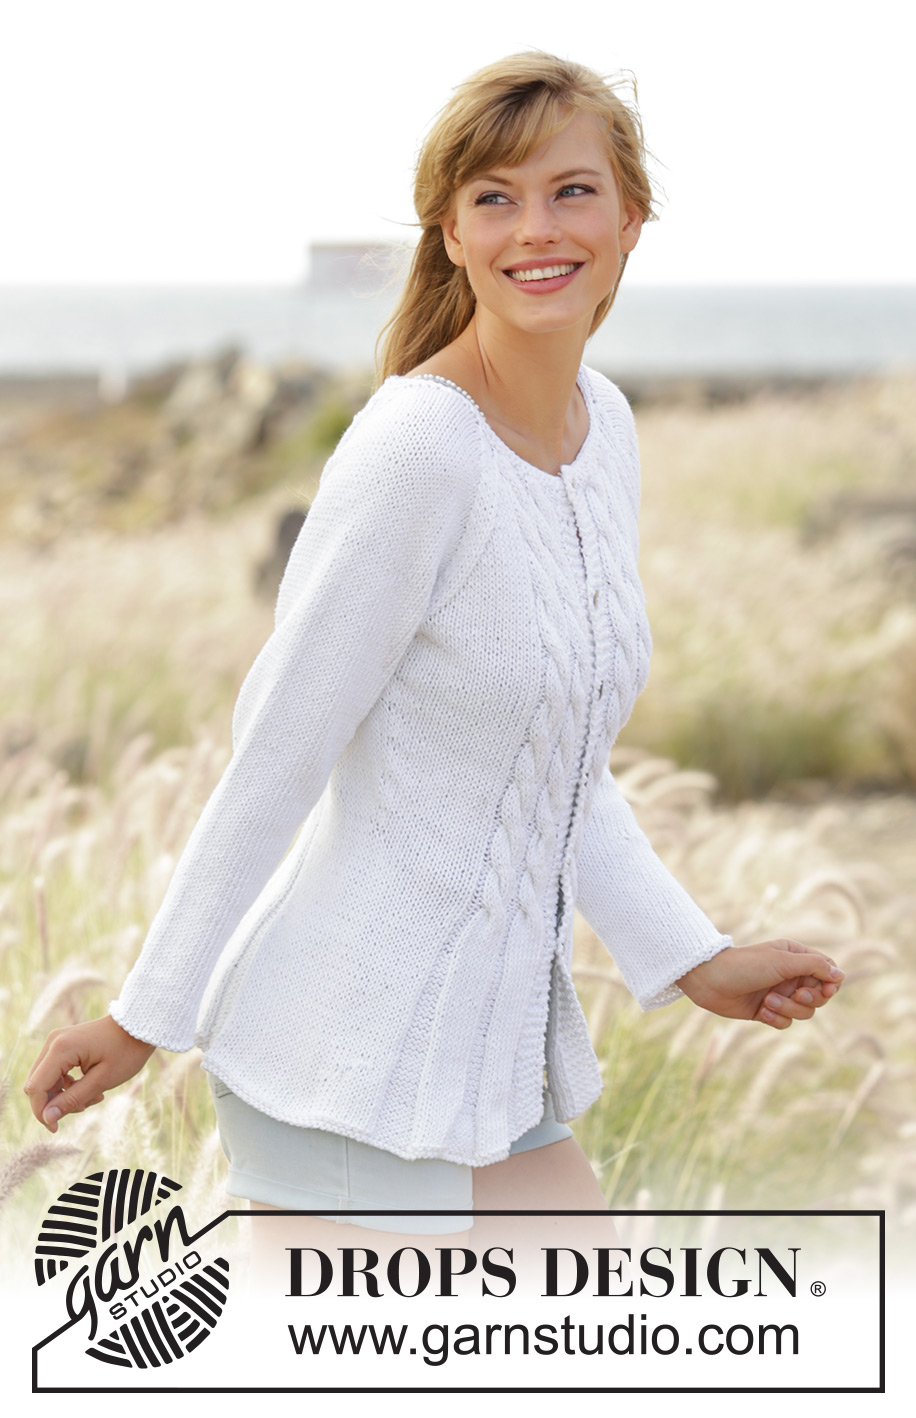
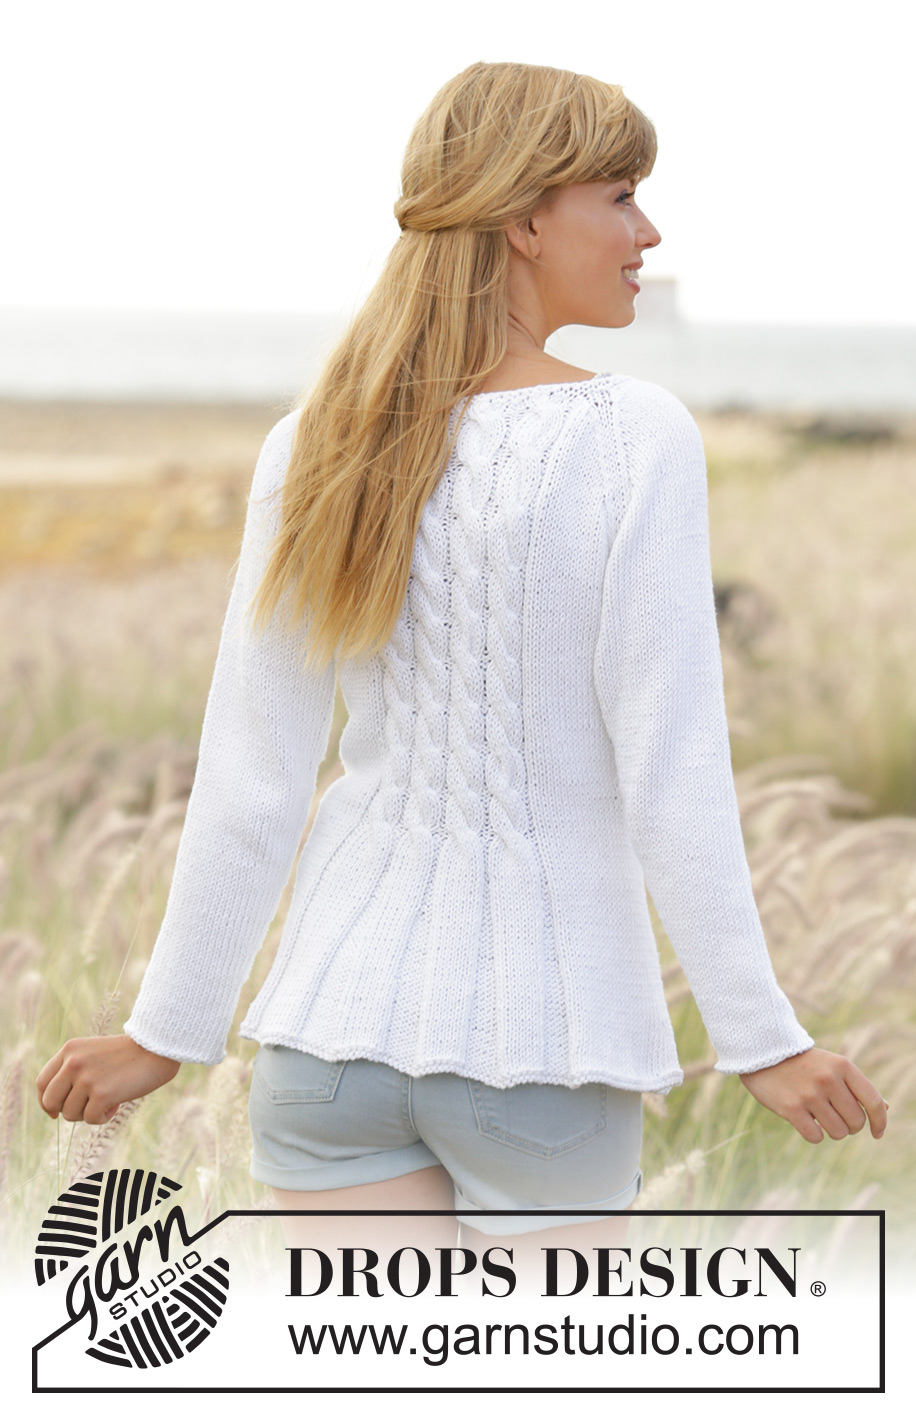
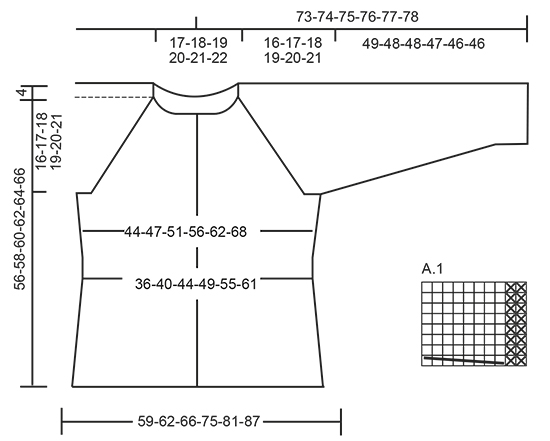
Cardigan aderente DROPS lavorato ai ferri con trecce e raglan in ”Paris”. Taglie: S - XXXL.
DROPS 169-1 |
||||||||||
|
M LEGACCIO (avanti e indietro): Lavorare tutti i f a dir. 1 “costa” a m legaccio = 2 f dir. M LEGACCIO (lavorata in tondo): 1 “costa” a m legaccio = 2 giri. * 1 giro dir e 1 giro rov *, ripetere *-*. SUGGERIMENTO PER LE DIMINUZIONI: Diminuire 1 m lavorando 2 m insieme a rov. Diminuire in modo alternato all’inizio e alla fine delle sezioni a rov. MOTIVO: Vedere il diagramma A.1. Il diagramma mostra tutti i f del motivo visti dal diritto del lavoro. RAGLAN: Diminuire 2 m in ogni punto di passaggio tra il corpo e le maniche. Diminuire come segue dal diritto del lavoro: lavorare 2 m insieme a dir, 2 m dir (il segnapunti è tra queste m), passare 1 m a dir senza lavorarla, 1 m dir, accavallare la m passata sopra quella appena lavorata. Diminuire come segue dal rovescio del lavoro: 2 m insieme a rov ritorto, 2 m rov (il segnapunti è tra queste m), 2 m insieme a rov. SUGGERIMENTO PER IL LAVORO: Se la tensione del lavoro non è corretta in altezza e il lavoro risulta troppo tirato, le diminuzioni del raglan saranno troppo corte e lo scalfo troppo piccolo. Ciò può essere aggiustato lavorando 1 ferro in più senza diminuzioni distribuito in modo uniforme tra le diminuzioni. ASOLE: Diminuire per le asole sul bordo destro. 1 asola = lavorare insieme a dir la 2° e la 3° m dal centro davanti, poi fare 1 gettato. Diminuire per le asole quando il lavoro misura: TAGLIA S: 19, 26, 33, 40, 47 e 54 cm. TAGLIA M: 19, 26, 33, 40, 48 e 56 cm. TAGLIA L: 19, 26, 34, 42, 50 e 58 cm. TAGLIA XL: 19, 28, 36, 44, 52 e 60 cm. TAGLIA XXL: 19, 26, 33, 40, 47, 54 e 62 cm TAGLIA XXXL: 19, 26, 33, 40, 48, 56 e 64 cm ---------------------------------------------------------- CORPO: Lavorato avanti e indietro sui f circolari dal centro davanti. Avviare 216-228-240-266-286-306 m (comprese 5 m per il bordo a ogni lato verso il centro davanti) con i f circolari n° 5 mm con Paris. Lavorare 1 “costa” a M LEGACCIO – leggere la spiegazione sopra, poi lavorare come segue – dal diritto del lavoro: 5 m a m legaccio, * 8 m rov, 8 m dir *, ripetere *-* 2 volte in totale, 8 m rov, 27-33-39-44-54-64 m a m rasata, * 8 m rov, 8 m dir *, ripetere *-* 4-4-4-5-5-5 volte in totale, 8 m rov, 27-33-39-44-54-64 m a m rasata, * 8 m rov, 8 m dir *, ripetere *-* 2 volte in totale, 8 m rov, 5 m a m legaccio. Ripetere questo motivo verso l’alto. FARE ATTENZIONE ALLA TENSIONE DEL LAVORO! Quando il lavoro misura 5 cm, diminuire 1 m in tutte le sezioni a rov (= 11-11-11-12-12-12 diminuzioni per giro di diminuzioni) – LEGGERE IL SUGGERIMENTO PER LE DIMINUZIONI. Ripetere le diminuzioni ogni 3 cm altre 5 volte = 150-162-174-194-214-234 m. Diminuire per le ASOLE sul bordo destro – leggere la spiegazione sopra. Quando il lavoro misura 21 cm, lavorare come segue: 5 m a m legaccio, A.1 2 volte, 2 m rov, m rasata sulle 27-33-39-44-54-64 m successive, A.1 4-4-4-5-5-5 volte, 2 m rov, m rasata sulle 27-33-39-44-54-64 m successive, A.1 2 volte, 2 m rov, 5 m a m legaccio. Inserire 2 segnapunti nel lavoro; 40-43-46-51-56-61 m all’interno di ogni lato (dietro = 70-76-82-92-102-112 m). Quando il lavoro misura 23 cm, aumentare 1 m a ogni lato di tutti i segnapunti (= 4 aumenti), ripetere gli aumenti ogni 2½-3-3-3½-3½-4 cm altre 5 volte = 174-186-198-218-238-258 m. Quando il lavoro misura 40-41-42-43-44-45 cm, lavorare il f successivo (dal diritto del lavoro) come segue: lavorare 43-46-49-54-59-64 m, intrecciare le 6 m successive, lavorare 76-82-88-98-108-118 m, intrecciare le 6 m successive e lavorare le 43-46-49-54-59-64 m rimaste. Mettere il lavoro da parte e lavorare le maniche. MANICA: Lavorata in tondo con i f a doppia punta. Avviare 32-34-36-38-40-42 m con i f a doppia punta n° 5 mm con Paris. Lavorare 1 “costa”, poi lavorare a m rasata. Inserire 1 segnapunti all’inizio del giro (= centro sotto la manica). Quando il lavoro misura 8 cm, aumentare 2 m al centro sotto la manica. Aumentare ogni 3-2½-2½-2½-2-2 cm altre 13-13-14-15-16-16 volte = 60-62-66-70-74-76 m. Quando il lavoro misura 49-48-48-47-46-46 cm (misure più corte per le taglie più grandi a causa dell’arrotondamento della manica più lungo), intrecciare 6 m al centro sotto la manica = 54-56-60-64-68-70 m. Mettere il lavoro da parte e lavorare l’altra manica. SPRONE: Trasferire le maniche sullo stesso f circolare del corpo dove sono state intrecciate le m per gli scalfi = 270-286-306-334-362-386 m. Inserire un segnapunti in tutti i punti di passaggio tra le maniche e il corpo. Continuare il motivo come prima, ALLO STESSO TEMPO diminuire per il RAGLAN – leggere la spiegazione sopra. Diminuire in modo diverso sul corpo e sulle maniche. RAGLAN SULLE MANICHE: Diminuire a f alterni 16-17-17-18-18-19 volte, poi su ogni f 4-4-6-7-9-9 volte (= 20-21-23-25-27-28 volte in totale). RAGLAN SUL CORPO: Diminuire ogni 4 f 4-2-0-0-0-0 volte, a f alterni 11-16-19-21-19-16 volte, poi su ogni f 0-0-2-0-7-15 volte (= 15-18-21-21-26-31 volte in totale). Alla fine di tutte le diminuzioni, rimangono 130-130-130-150-150-150 m sul f. Sul f successivo diminuire 2 m su ogni treccia in A.1 = 114-114-114-132-132-132 m. Lavorare 2 “coste” su tutte le m, sul 1° f distribuire 20-16-12-26-22-18 diminuzioni in modo uniforme = 94-98-102-106-110-114 m. Intrecciare. CONFEZIONE: Cucire le aperture al centro sotto le maniche. Attaccare i bottoni sul bordo sinistro. |
||||||||||
Spiegazioni del diagramma |
||||||||||
|
||||||||||
 |
||||||||||
Avete terminato questo modello?Allora taggate le vostre foto con #dropspattern #romantictwistcardigan o inviatele alla #dropsfan gallery. Avete bisogno di aiuto con questo modello?Troverete 26 video tutorial, una sezione per i commenti/domande e molto altro guardando il modello su www.garnstudio.com © 1982-2026 DROPS Design A/S. Ci riserviamo tutti i diritti. Questo documento, compreso tutte le sue sotto-sezioni, è protetto dalle leggi sul copyright. Potete leggere quello che potete fare con i nostri modelli alla fine di ogni modello sul nostro sito. |
||||||||||


Con oltre 40 anni di esperienza nel design di modelli di maglia e uncinetto, DROPS Design offre la più estesa collezione di modelli gratuiti su internet - tradotti in 17 lingue. Ad oggi vi possiamo fornire 324 cataloghi e 12284 modelli - 9555 dei quali sono tradotti in Italiano.
Ci stiamo impegnando molto per darvi il meglio che vi possiamo offrire in termini di maglia e uncinetto, ispirazioni e consigli così come filati di grande qualità ad un prezzo incredibile! Volete utilizzare i nostri modelli per qualcosa d'altro oltre al vostro uso personale? Potete leggere tutto ciò che è consentito nel testo sul Copyright in basso su tutte le pagine dei nostri modelli. Buon lavoro!
Lasciare un commento sul modello DROPS 169-1
Noi saremmo felici di ricevere i tuoi commenti e opinioni su questo modello!
Se vuoi fare una domanda, fai per favore attenzione a selezionare la categoria corretta nella casella qui sotto per velocizzare il processo di risposta. I campi richiesti sono indicati da *.