
Categorie popolari
State cercando un filato?


Commenti / Domande (46)
![]() DB ha scritto:
DB ha scritto:
I am having a hard time reading the chart. Do you have the written out version available? Thank you, DB
28.07.2021 - 12:19DROPS Design ha risposto:
Dear DB, we only have diagram to this pattern, but this lesson should be able to help you understanding how to read diagrams. Happy knitting!
28.07.2021 - 13:41
![]() Monica 77 ha scritto:
Monica 77 ha scritto:
Buon giorno, scusate la domanda ma sono una prncipiante :quando ho il lavoro al rovescio(ferro di ritorno) li prendo come si presentano o tutti al diritto?grazie in anticipo x la risposta
28.03.2021 - 21:42DROPS Design ha risposto:
Buonasera Monica, per il ferro di ritorno deve lavorare come indicato nel diagramma, che mostra tutti i ferri di lavoro. Buon lavoro!
28.03.2021 - 21:55
![]() Benedetta ha scritto:
Benedetta ha scritto:
Buongiorno, ho lavorato 15maglie x 19 ferri a maglia rasata col ferro circolare n. 6, ma ho ottenuto un quadrato 8,5 cm x 8,5 cm. Che ferri devo usare? Grazie
14.11.2020 - 10:10DROPS Design ha risposto:
Buongiorno Benedetta, deve provare a rifare il campione usando una misura di ferri più grande. Buon lavoro!
14.11.2020 - 15:37
![]() Eloise ha scritto:
Eloise ha scritto:
Does reverse mean backwards? Do I now knit left to right (A3 to A1)? And do I also flip the knit/purl stitches? For example, do I know knit row 8 (rather than purl it as I did with the first piece) because it’s now from the WS? Or is this still considered the RS side?
09.03.2020 - 07:26DROPS Design ha risposto:
Dear Eloïse, both pieces should be mirrored, ie work 2nd piece as first one but cast on 1 st at the end of row from RS instead of from WS so that the 2 sts in garter st are at the end of row from RS instead of at the beg of row from RS and so on. Happy knitting!
09.03.2020 - 12:42
![]() Eloise ha scritto:
Eloise ha scritto:
Is it absolutely necessary to knit the second piece in reverse? I find it very confusing.. is there any way to knit it as the first piece but still be able to put it together in the end? Thanks!
08.03.2020 - 22:25DROPS Design ha risposto:
Dear Eloise, the poncho is asymmetric, that is why you need to knit the first piece mirrored for the second, otherwise you will not be able to put the pieces together.
08.03.2020 - 22:49
![]() Chiara ha scritto:
Chiara ha scritto:
Ciao, per realizzare il poncho si può usare un filato A+A, vuol dire che uso un filato del 3 - 3,5 in doppio? Grazie
01.01.2020 - 18:47DROPS Design ha risposto:
Buongiorno Chiara. Sì, può sostituire il filato indicato con un filato del gruppo A usato doppio. Verifichi sempre la correttezza del campione. Buon lavoro!
02.01.2020 - 11:17
![]() Melinda Fülöp ha scritto:
Melinda Fülöp ha scritto:
Hej Hur ska man sticka den andra delen sen? Jag blir tacksam om svaret blir på svenska. Tack
16.12.2019 - 17:08DROPS Design ha risposto:
Hej Melinda, du stickar den andra delen på samma vis fast du lägger upp en ny maska i andra sidan. Lycka till :)
17.12.2019 - 11:38
![]() Maja ha scritto:
Maja ha scritto:
Hi, I'm a bit confused with how the written pattern corresponds to the diagram. I've now worked the first 2 rows. It says "Continue like this until piece measures 30 cm / 11 3/4'' from cast-on edge." Does this mean that I simply repeat the first 2 rows until the pattern measures 30cm, or should I keep following the diagram upwards? I'm quite a new knitter so I apologise if this is a silly question. Thanks!
26.10.2019 - 22:22DROPS Design ha risposto:
Hi Maja, You continue the pattern upwards. Happy knitting!
28.10.2019 - 07:42
![]() Linda ha scritto:
Linda ha scritto:
Can this be done with written instructions instead of of by diagram or chart? I absolutely love this and I do not do well by charts. I usually write the instructions down on paper which works better for me. Thanks for sharing your beautiful work and pattern.
16.08.2019 - 20:11DROPS Design ha risposto:
Dear Linda, you will find how to read knitting diagrams here. Happy knitting!
19.08.2019 - 08:58
![]() Katerina ha scritto:
Katerina ha scritto:
Hi, would it be possible to have a 30 cm vent in both sides?
08.03.2019 - 21:17DROPS Design ha risposto:
Yes, just knit the garter just add the plus stitch for the seaming where you want the split start / end. Happy Knitting.
10.03.2019 - 16:47
|
||||||||||||||||||||||
So Classy!#soclassyponcho |
||||||||||||||||||||||
 |
 |
|||||||||||||||||||||
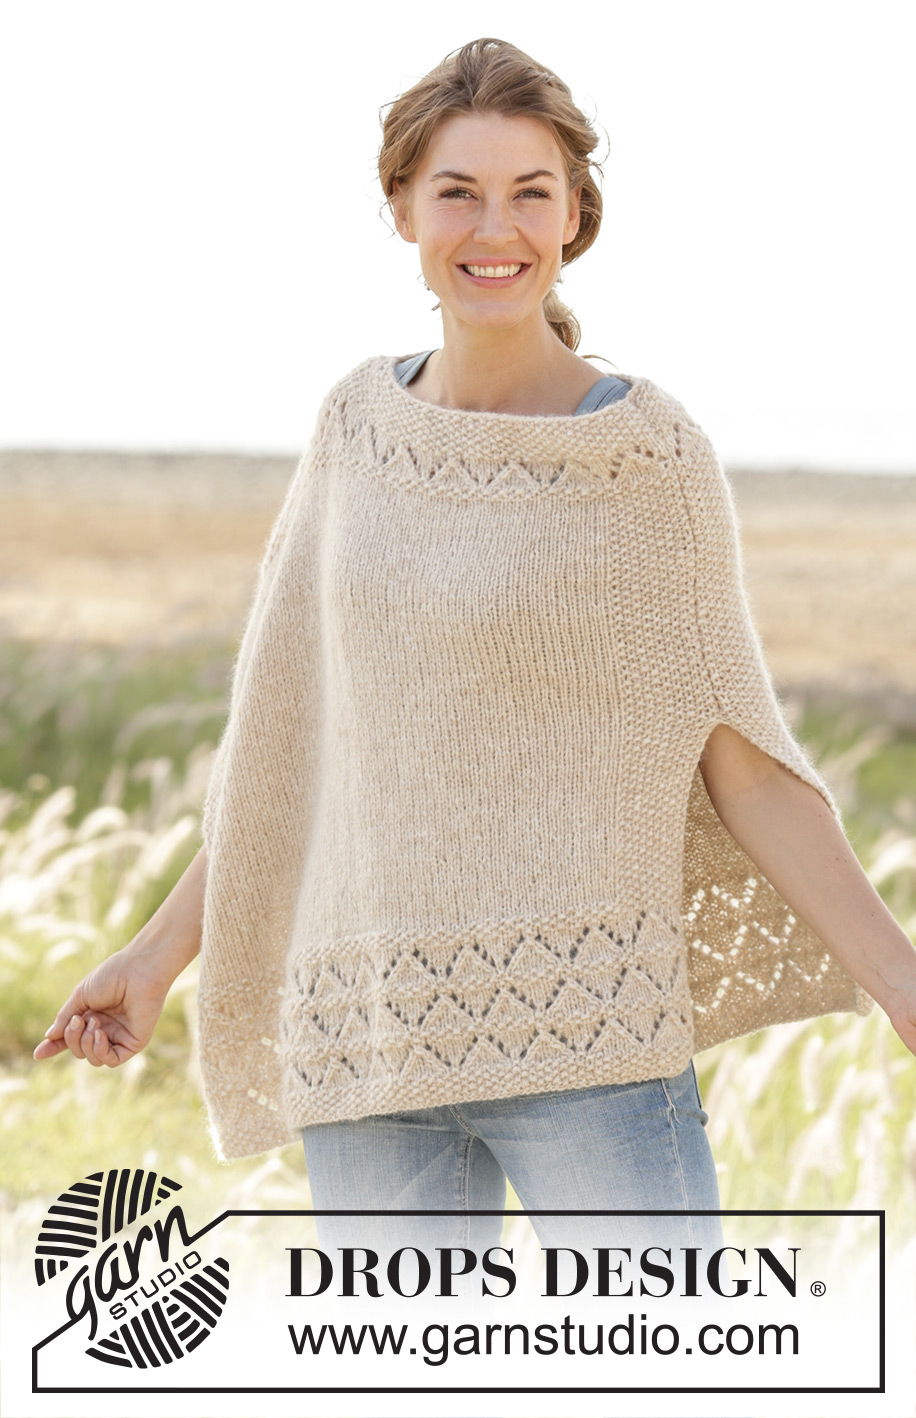
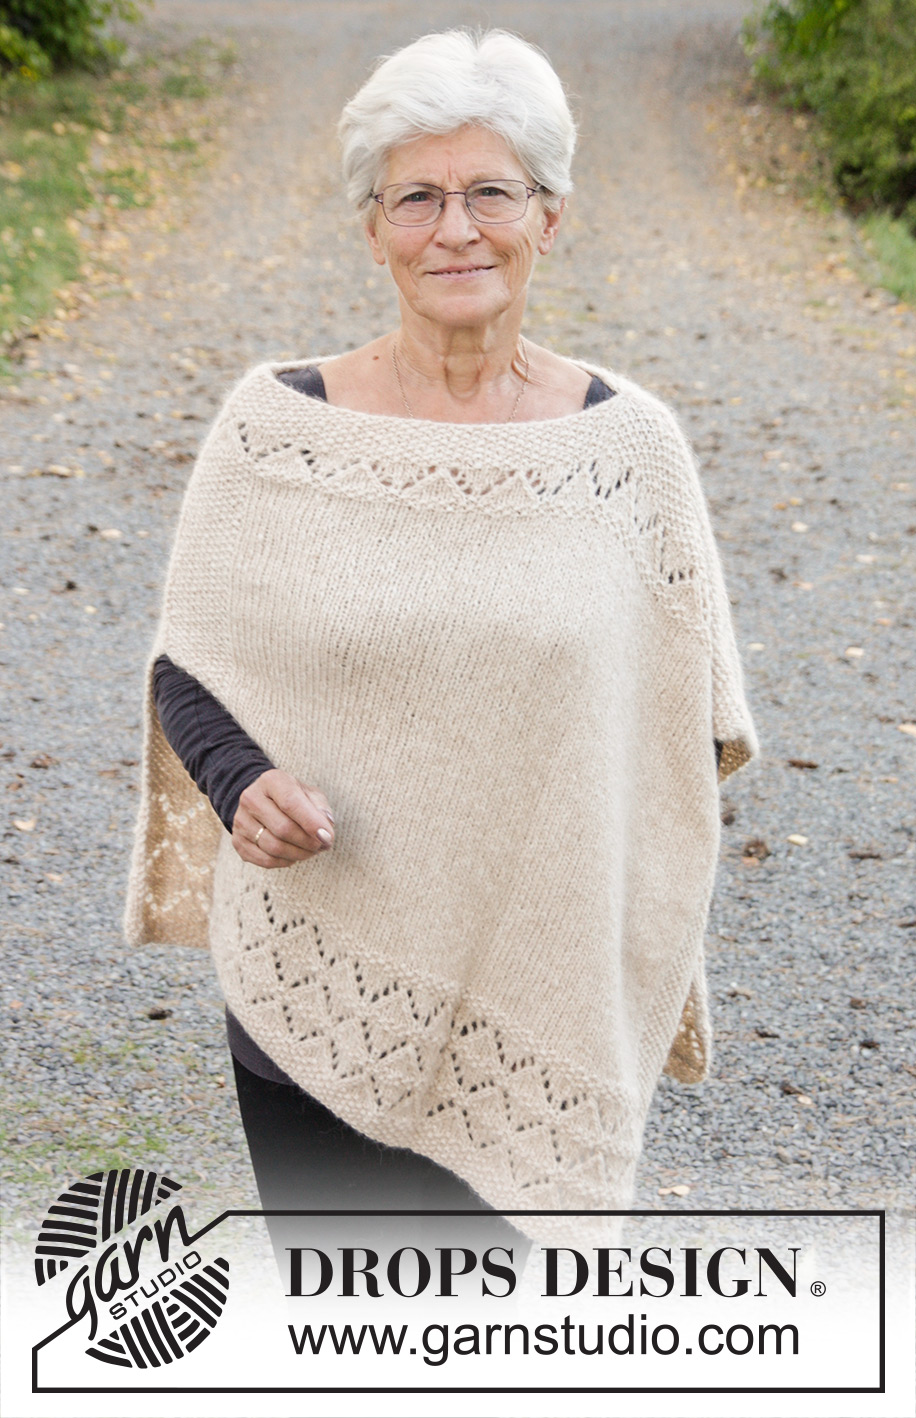
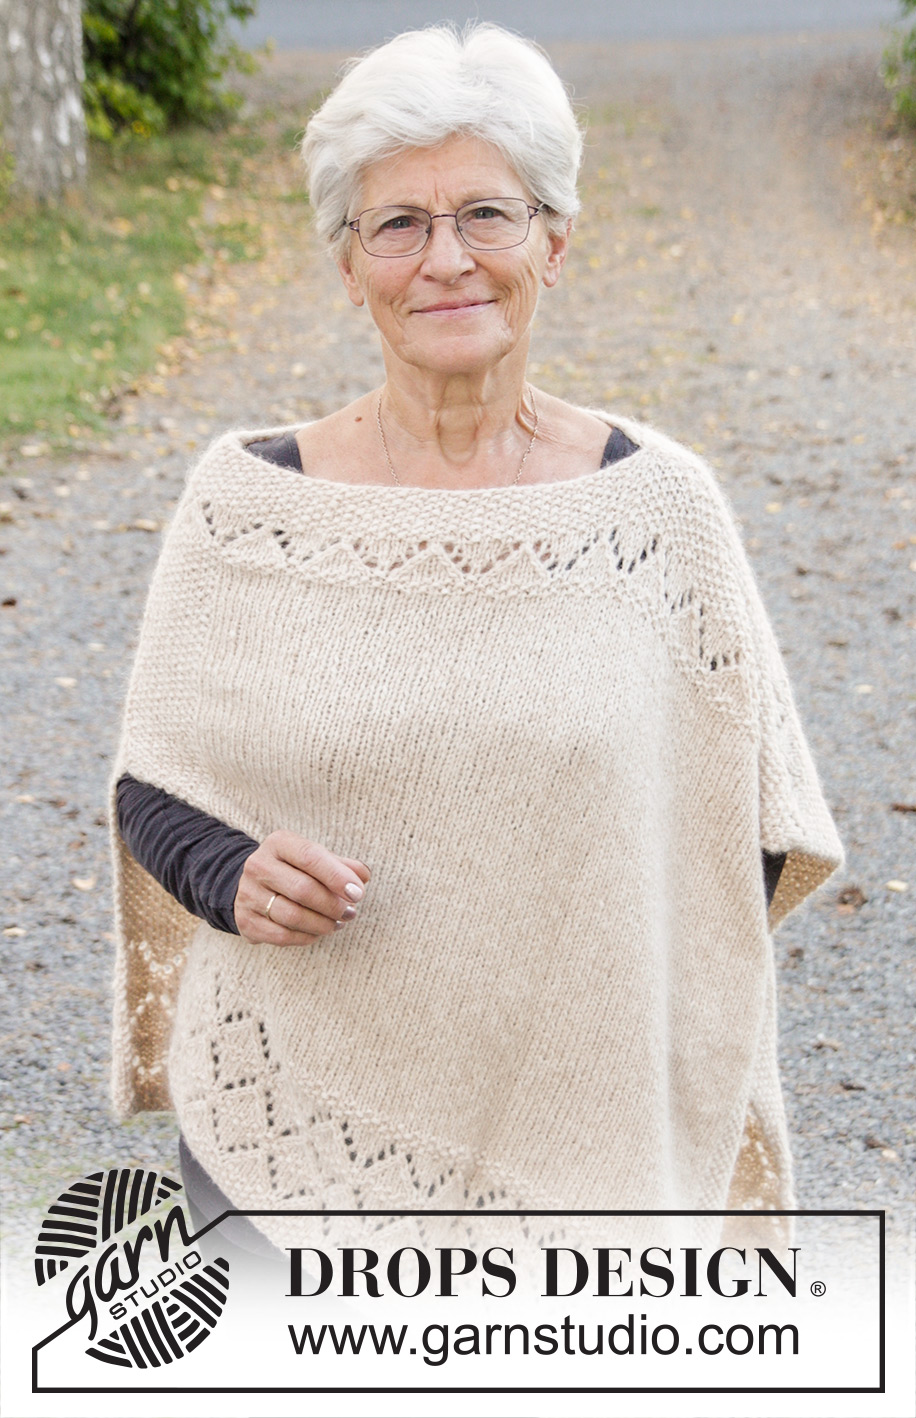
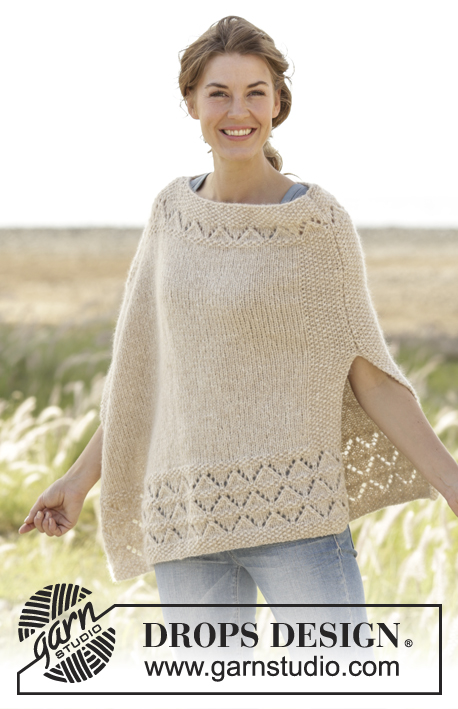
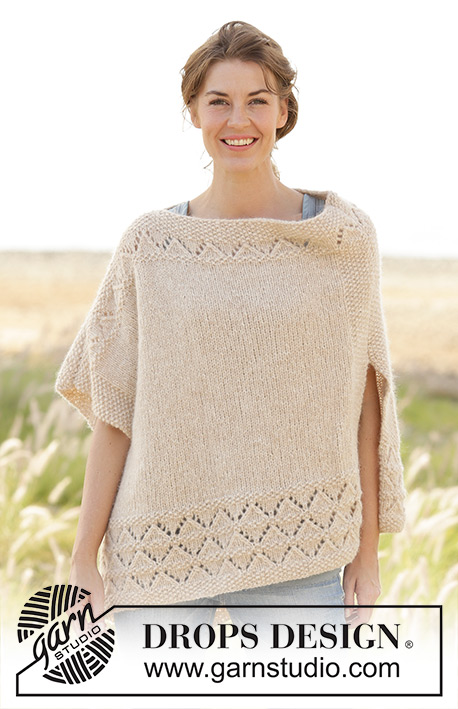
Poncho DROPS ai ferri, a grana di riso e con motivo traforato, in "Air". Taglie: Dalla S alla XXXL.
DROPS 170-28 |
||||||||||||||||||||||
|
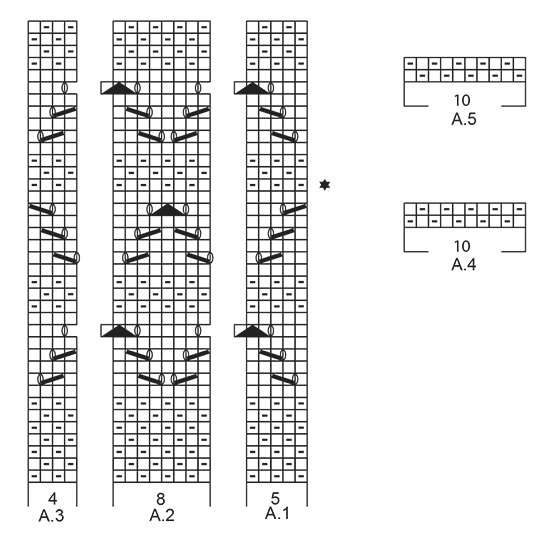
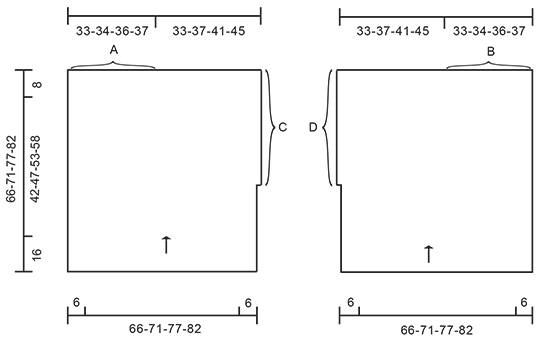
PUNTO LEGACCIO (avanti e indietro sui ferri): Lavorare tutti i ferri a dir. 1 “costa” a legaccio = 2 ferri a dir. MOTIVO: Vedere i diagrammi da A.1 a A.5. I diagrammi mostrano tutti i ferri del motivo, visti sul diritto del lavoro. ---------------------------------------------------------- PONCHO: Si lavora avanti e indietro sui ferri circolari in 2 parti, cucite tra loro alla fine. Avviare 99-107-115-123 m (compresa 1 m vivagno a punto legaccio da ciascun lato) sui ferri circolari n° 6 con il filato Air. Lavorare il motivo, come segue: 1 m vivagno a PUNTO LEGACCIO – vedere le spiegazioni sopra, diagramma A.1 (= 5 m), ripetere il diagramma A.2 (= 8 m) 11-12-13-14 volte in larghezza, diagramma A.3 (= 4 m), 1 m vivagno a punto legaccio. ATTENZIONE: lavorare sempre le m vivagno a punto legaccio fino alla fine del lavoro; fanno parte della grana di riso. RICORDARSI LA TENSIONE DEL LAVORO ! Dopo aver completato i diagrammi da A.1 a A.3 1 volta in verticale, proseguire come segue, sul diritto del lavoro: Lavorare il diagramma A.4 (ATTENZIONE: la 1a m del diagramma = m vivagno), 79-87-95-103 m a maglia rasata, diagramma A.5 sulle ultime 10 m sui ferri (ATTENZIONE: l’ultima m del diagramma = m vivagno). Proseguire in questo modo finché il lavoro non misura 30 cm dal ferro di avvio delle m. Alla fine del ferro successivo sul rovescio del lavoro, avviare 1 nuova m (indica lo spacco laterale) = 100-108-116-124 m. Lavorare questa nuova m a punto legaccio. Quindi ci sono ora 2 m vivagno a punto legaccio all’inizio del ferro sul diritto del lavoro. Quando il lavoro misura 58-63-69-74 cm, lavorare come segue, iniziando dal ferro indicato nel diagramma dalla stella: lavorare 2 m vivagno a punto legaccio, diagramma A.1, ripetere il diagramma A.2 11-12-13-14 volte in larghezza, diagramma A.3, 1 m vivagno a punto legaccio. Dopo aver lavorato il diagramma una volta in verticale, ripetere gli ultimi 2 ferri del diagramma finché il lavoro non misura 66-71-77-82 cm. Intrecciare le m lavorando a dir le m rov e a rov le m dir. Avviare le m e lavorare un’altra parta uguale ma a specchio. CONFEZIONE: Vedere il grafico. Cucire A e B a punto maglia. Poi cucire C e D nel filo esterno delle m vivagno. C’è ora uno spacco lungo 30 cm su un lato e uno spacco lungo l’intero altro lato. Tagliare il filo. |
||||||||||||||||||||||
Spiegazioni del diagramma |
||||||||||||||||||||||
|
||||||||||||||||||||||
 |
||||||||||||||||||||||
 |
||||||||||||||||||||||
Avete terminato questo modello?Allora taggate le vostre foto con #dropspattern #soclassyponcho o inviatele alla #dropsfan gallery. Avete bisogno di aiuto con questo modello?Troverete 20 video tutorial, una sezione per i commenti/domande e molto altro guardando il modello su www.garnstudio.com © 1982-2026 DROPS Design A/S. Ci riserviamo tutti i diritti. Questo documento, compreso tutte le sue sotto-sezioni, è protetto dalle leggi sul copyright. Potete leggere quello che potete fare con i nostri modelli alla fine di ogni modello sul nostro sito. |
||||||||||||||||||||||


Con oltre 40 anni di esperienza nel design di modelli di maglia e uncinetto, DROPS Design offre la più estesa collezione di modelli gratuiti su internet - tradotti in 17 lingue. Ad oggi vi possiamo fornire 324 cataloghi e 12290 modelli - 9561 dei quali sono tradotti in Italiano.
Ci stiamo impegnando molto per darvi il meglio che vi possiamo offrire in termini di maglia e uncinetto, ispirazioni e consigli così come filati di grande qualità ad un prezzo incredibile! Volete utilizzare i nostri modelli per qualcosa d'altro oltre al vostro uso personale? Potete leggere tutto ciò che è consentito nel testo sul Copyright in basso su tutte le pagine dei nostri modelli. Buon lavoro!
Lasciare un commento sul modello DROPS 170-28
Noi saremmo felici di ricevere i tuoi commenti e opinioni su questo modello!
Se vuoi fare una domanda, fai per favore attenzione a selezionare la categoria corretta nella casella qui sotto per velocizzare il processo di risposta. I campi richiesti sono indicati da *.