
Categorie popolari
State cercando un filato?


Commenti / Domande (67)
![]() Jeanine Ebert ha scritto:
Jeanine Ebert ha scritto:
Grüezi Noch eine Frage zum Ärmel. Wenn ich bei 58 cm die Maschen abkette, wieviele Maschen sollten noch auf der Nadel sein? Ich hab noch 15 Maschen das gibt ca. 7 cm in der Breite….. da geht mir das zusammen nähen nicht ganz auf….. Liebe Grüsse und danke im Voraus für die Antwort. 😊
19.12.2023 - 17:57DROPS Design ha risposto:
Liebe Frau Ebert, die übrige Maschenanzahl ist nicht so wichtig, was aber wichtig ist, ist die Länge vom Ärmeltopp, es muss 11-12-14-16 cm (siehe Größe und Maßskizze) sein, damit der Ärmel schön am Armloch passt. Viel Spaß beim stricken!
20.12.2023 - 07:52
![]() Jeanine Ebert ha scritto:
Jeanine Ebert ha scritto:
Grüezi Meine Frage bezieht sich auf den Kragen. Am Schluss der Anleitung zum linken Vorderteil steht, dass die Maschen des Kragens auf eine Hilfsnadel gelegt werden müssen. Kann Mann die auch gleich abketten? Liebe Grüsse und danke im Voraus für die Antwort 😊
19.12.2023 - 17:24DROPS Design ha risposto:
Liebe Frau Ebert, ja die Maschen können Sie auch abketten, aber es wird besser aussehen, wenn Sie diese Maschen nicht abketten, so wird das Zusammennähen mehr unsichtbar sein. Siehe Video. Viel Spaß beim stricken!
20.12.2023 - 07:47
![]() Louise Wesson ha scritto:
Louise Wesson ha scritto:
Hello Drops team, I am knitting 69-8, doing the fronts simultaneously. I have reached the point of increasing for collar, but am confused by "Increase 2 sts inside 1 edge st at the center front of collar"--is that 1 edge stitch the same as the first edge stitch? (thus, k1, increase 2, k4, k1 in stockinette, and continue in pattern)? Thank you for your support.
06.12.2023 - 22:39DROPS Design ha risposto:
Dear Mrs Wesson, increase from RS before the last stitch on left front piece/after the first stitch on right front piece; increase first 2 sts (and work the other sts as before) then incraes 1 stitch inside this stitch. Happy knitting!
07.12.2023 - 09:12
![]() Evelyn ha scritto:
Evelyn ha scritto:
Het is gelukt, ik maakte een denkfout
12.11.2023 - 19:15
![]() Evelyn ha scritto:
Evelyn ha scritto:
Bedankt voor de reactie, maar dan brei je de 16 st 3x ipv 2x aangezien je aan de andere kant begint, dan wordt dit toch langer dan 16cm?
12.11.2023 - 17:52DROPS Design ha risposto:
Dag Evelyn,
Nee, want je breit de het rechter voorpand exact in spiegelbeeld. Op een gegeven moment brei je 2 naalden alleen over de 7 steken van de bies, dus je keert het werk na 7 steken en dan brei je terug 7 steken in ribbelsteken. Daarna brei je weer over alle steken op de naald.
13.11.2023 - 06:57
![]() Evelyn ha scritto:
Evelyn ha scritto:
De verkorte naalden voor de sjaalkraag linkerkant is duidelijk, maar hoe werkt dit voor de rechterkant?
11.11.2023 - 20:32DROPS Design ha risposto:
Dag Evelyn,
Voor het rechter voorpand doe je dit precies andersom, dus ook hier brei je alleen over de 7 steken van de knoopbies. Bij het ene pand zitten deze 7 steken aan het einde van de naald, bij het andere pand aan het begin van de naald.
12.11.2023 - 17:34
![]() Kerstin ha scritto:
Kerstin ha scritto:
In der Anleitung steht Folgendes „Mit Paris auf 5,5, 48-51-54-58 M. anschlagen (inkl 1 Randm + 6 Bordm). 12 cm Krausrippe stricken. Mit dem Muster weiterfahren. Die äussersten 6 M. wie folgt stricken (von der rechen Seite): 5 M. Krausrippe, 1 M. glatt stricken. Lesen Sie die ganze Anleitung bevor Sie weiterstricken!“ Frage: Stricke ich die 51 Maschen komplett in Krausrippe oder 5 M Krausrippe, 1 Masche glatt stricken und dann im Muster weiterstricken?
08.10.2023 - 08:11DROPS Design ha risposto:
Liebe Kerstin, ganz am Anfang stricken Sie zuerst Krausrippen über alle Maschen, dann stricken Sie die Blenden-Maschen wie beschrieben. Viel Spaß beim stricken!
09.10.2023 - 08:59
![]() Kerstin ha scritto:
Kerstin ha scritto:
In der Anleitung vom linken Vorderteils steht: "Die nächsten 2 R. werden nur in Krausrippe über die äussersten 7 M. gestrickt - die restlichen M. werden nicht gestrickt". Warum werden die restlichen Maschen auf der Nadel nicht gestrickt?
04.10.2023 - 10:33DROPS Design ha risposto:
Liebe Kerstin, man strickt hier verkürzten Reihen damit der Kragen schöner liegt, so werden hier 2 Reihen über die ersten 7 Maschen gestrickt, dann stricken Sie über alle Maschen wie zuvor weiter. Viel Spaß beim stricken!
04.10.2023 - 14:00
![]() ´Kerstin ha scritto:
´Kerstin ha scritto:
Beim linken Vorderteil steht: "Die aufgenommenen Maschen werden in Krausrippe gestrickt. Den Bord weiter in Krausrippe stricken und die 1 Masche glatt wird weiter in glatt gestrickt". Werden die übrigen Maschen auf der Nadel mit dem Muster weiter gestrickt?
04.10.2023 - 10:32DROPS Design ha risposto:
Liebe Kerstin, ja genau :)
04.10.2023 - 14:00
![]() Kerstin ha scritto:
Kerstin ha scritto:
Ich fange jetzt an , das linke Vorderteil zu stricken. In der Anleitung steht Folgendes: "Innerhalb der Randmasche werden 2 Maschen für den Kragen aufgenommen". Bedeutet das ich am Anfang und am Ende jeweils aus einer Randmasche 2 Maschen mache oder stricke ich nur aus der ersten Randmasche 2 weitere Randmaschen.
04.10.2023 - 10:30DROPS Design ha risposto:
Liebe Kerstin, diese Zunahme ist für den Kragen, so beim linken Vorderteil wird es am Anfang der Hin-Reihe, nach der 1. Masche zugenommen (bei dem rechten Vorderteil = am Ende der Hin-Reihe, vor der letzten Masche). Viel Spaß beim stricken!
04.10.2023 - 13:59
|
|
DROPS 69-8 |
|
 |
 |
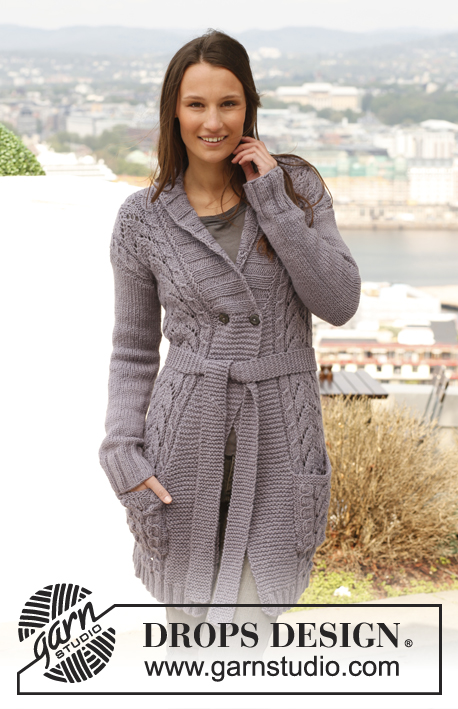
Giacca DROPS, in "Paris" con cintura
DROPS 69-8 |
|
|
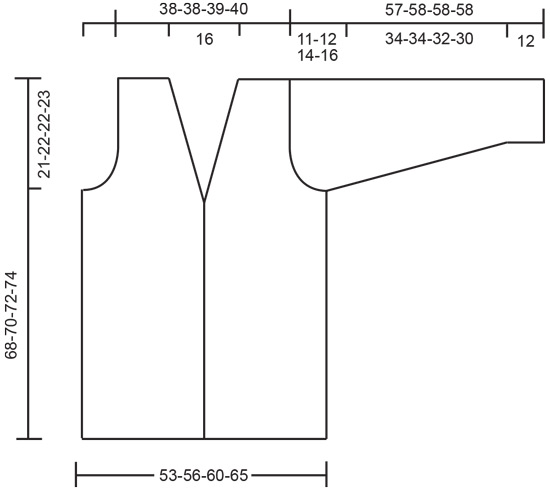
TENSIONE DELLA MAGLIA/CAMPIONE: 16 m x 20 f = 10 x 10 cm a maglia rasata. PUNTO LEGACCIO (avanti e indietro sul f): 1 “cresta di legaccio = 2 ferri. Lavorare tutti i ferri a diritto. MOTIVO (visto sul diritto del lavoro): * 2 f maglia rasata, 1 f rovescio *, ripetere da *-*. DIMINUZIONI: Tutte le diminuzioni per lo scollo si fanno sul diritto del lavoro. DAVANTI DESTRO: Diminuire così: Passare 1 m a dir senza lavorarla, 1 m dir, accavallare la m passata sopra quella lavorata. DAVANTI SINISTRO: Diminuire così: 2 m insieme a dir. DIETRO: Avviare 86-92-98-106 m (incl 1 m vivagno ad ogni lato) con i ferri 5,5 ed il filato Paris. Lavorare a punto legaccio per 12 cm, continuare con il Motivo – vedere le spiegazioni sopra. RICORDATI LA TENSIONE DELLA MAGLIA! Quando il lavoro misura 47-48-50-51 cm, intrecciare per gli scalfi ad ogni lato ogni 2 ferri: 3 m 1-2-2-2 volte, 2 m 2-2-3-4 volte, 1 m 5-5-5-7 volte = 62-62-64-64 m. Quando il lavoro misura 66-68-70-72 cm, intrecciare le 24 maglie centrali per lo scollo. Poi intrecciare 1 m al ferro successivo lato scollo = rimangono 18-18-19-19 m per le spalle. Intrecciare le maglie rimanenti quando il lavoro misura 68-70-72-74 cm. DAVANTI SINISTRO: Avviare 48-51-54-58 m (incl 1 m vivagno + 6 m di bordo davanti) con il f 5,5 e Paris. Lavorare a punto legaccio per 12 cm su tutte le m. Continuare con il Motivo, ma lavorare le 6 m di bordo davanti così a partire dal bordo (visto sul diritto del lavoro): 5 m punto legaccio, 1 m maglia rasata. Leggere attentamente tutto il paragrafo prima di continuare. Quando il lavoro misura 46-47-49-50 cm, aumentare 2 m a 1 m dal bordo davanti, per il collo – lavorare le maglie aumentate per il collo a punto legaccio. La maglia lavorata a maglia rasata deve continuare ad essere lavorata a maglia rasata lungo tutto il collo. Lavorare i 2 ferri successivi a punto legaccio sulle 7 m di bordo davanti soltanto – le m rimanenti non vengono lavorate. Aumentare poi 1 m all’interno di 1 m di bordo davanti 6 volte ogni ferro, poi 1 m 6 volte ogni 2 ferri e 1 m 6 volte ogni 4 ferri = 20 m aumentate per il collo. Allo stesso tempo, quando il lavoro misura 47-48-50-51 cm, intrecciare per gli scalfi ai lati come per il dietro. Allo stesso tempo, quando il lavoro misura 50-51-53-54 cm, diminuire per formare lo scollo (continuare a aumentare per il collo): Diminuire all’interno delle 5 m a punto legaccio + 1 m a maglia rasata + le maglie che sono state aumentate per il collo così: 1 m 18 volte ogni 2 ferri- vedere DIMINUZIONI. Quando il lavoro misura 68-70-72-74 cm, intrecciare le maglie per la spalla + 6 m di bordo davanti = 18-18-19-19 m intrecciate. Rimangono ora sul ferro solo le m a punte legaccio per il collo = 20 m. Continuare a punto legaccio su queste maglie così: * 2 ferri di punto legaccio su tutte le m, 2 ferri di punto legaccio solo sulle prime 16 m (=m lato bordo davanti) *, ripetere da *-* finché il collo non misuri ca 8 cm (misurato nella parte interno – misurerà ca 16 cm lungo il bordo esterno). Mettere le maglie su un ferma maglie in attesa. DAVANTI DESTRO: Avviare e lavorare come il davanti sinistro, ma intrecciare per gli scalfi e lo scollo nel senso inverso. MANICHE: Avviare 38-38-40-42 m (incl 1 m vivagno ad ogni lato) con i f 5,5 e Paris. Lavorare a punto legaccio per 12 cm, continuare con il Motivo. Allo stesso tempo, quando il lavoro misura 13-13-14-14 cm, aumentare ad ogni lato: 1 m in totale 13-14-13-14 volte ogni 2,5-2-2-2 cm = 64-66-66-70 m. Quando la manica misura ca 46-46-44-42 cm, diminuire per l’arrotondamento della manica ogni 2 ferri: 3 m 1-1-1-0 volta, 2 m 3-3-2-2 volte, 1 m 4-5-7-10 volte, poi diminuire 2 m ad ogni lato finché il lavoro non misuri 56-57-57-57 e poi 3 m 1 volta. Il lavoro misura ca 57-58-58-58 cm, Intrecciare le m rimanenti. CINTURA: Avviare 9 m con i f 5,5 e Paris. Lavorare a punto legaccio fino alla lunghezza desiderata oppure fino a quando la cintura misura ca 120-130-140-150 cm. Intrecciare. CONFEZIONE: Cucire le spalle. Cucire il collo in mezzo dietro con dei punti maglia e cucirlo allo scollo dietro. Attaccare le maniche. Cucire le maniche e i lati all'interno della m vivagno. |
|
 |
|
Avete terminato questo modello?Allora taggate le vostre foto con #dropspattern o inviatele alla #dropsfan gallery. Avete bisogno di aiuto con questo modello?Troverete 23 video tutorial, una sezione per i commenti/domande e molto altro guardando il modello su www.garnstudio.com © 1982-2026 DROPS Design A/S. Ci riserviamo tutti i diritti. Questo documento, compreso tutte le sue sotto-sezioni, è protetto dalle leggi sul copyright. Potete leggere quello che potete fare con i nostri modelli alla fine di ogni modello sul nostro sito. |
|


Con oltre 40 anni di esperienza nel design di modelli di maglia e uncinetto, DROPS Design offre la più estesa collezione di modelli gratuiti su internet - tradotti in 17 lingue. Ad oggi vi possiamo fornire 324 cataloghi e 12290 modelli - 9561 dei quali sono tradotti in Italiano.
Ci stiamo impegnando molto per darvi il meglio che vi possiamo offrire in termini di maglia e uncinetto, ispirazioni e consigli così come filati di grande qualità ad un prezzo incredibile! Volete utilizzare i nostri modelli per qualcosa d'altro oltre al vostro uso personale? Potete leggere tutto ciò che è consentito nel testo sul Copyright in basso su tutte le pagine dei nostri modelli. Buon lavoro!
Lasciare un commento sul modello DROPS 69-8
Noi saremmo felici di ricevere i tuoi commenti e opinioni su questo modello!
Se vuoi fare una domanda, fai per favore attenzione a selezionare la categoria corretta nella casella qui sotto per velocizzare il processo di risposta. I campi richiesti sono indicati da *.