
Categorie popolari
State cercando un filato?


Commenti / Domande (44)
![]() Chris ha scritto:
Chris ha scritto:
Hello, I see at the very bottom of lothlorien/166-43 a border that looks like a garter stitch band. I don't see it in the written instructions. Do I start with this border or is it added at the finishing of the poncho? Thank you, Chris
08.08.2022 - 04:46DROPS Design ha risposto:
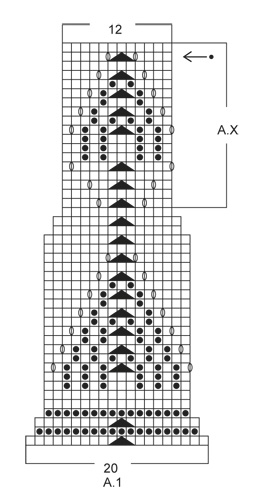
Dear Chris, the 2 ridges visible at the bottom of the jacket are the 4 first rows worked at the bottom of A.1 (= knit 1 row from RS with decreases, knit 1 row from WS, knit 1 row from RS with decreases, knit 1 row from WS). Happy knitting!
08.08.2022 - 07:54
![]() Patricia ha scritto:
Patricia ha scritto:
Re bonjour, j'ai compris pas la peine de me répondre à ma question . Le fait de l'écrire je viens de comprendre. Il ne faut pas tricoter trop tard le soir on n'a pas les idées claires. Merci, bonne journée.
09.03.2020 - 09:06
![]() Patricia ha scritto:
Patricia ha scritto:
Bonjour, je viens de finir A1, si j'ai bien compris je dois tricoter A2 A3 A4 puis de nouveau A2 A3 A4 et ainsi de suite sur tout le rang. Je si fais cela au bout d'un moment je suis décalée et les diminutions et les jetés se retrouvent au milieu des 12 mailles de A1. ça ne cadre plus . Je ne sais pas si j'arrive à me faire comprendre, je suis perdue. Merci de votre aide.
09.03.2020 - 08:47DROPS Design ha risposto:
Bonjour Patricia, vous allez répéter A.3 seulement, autrement dit, vous tricotez vos 4 m de bordure devant au point mousse, puis les 6 m de A.2, puis vous répétez les 12 mailles de A.3 jusqu'à ce qu'il reste 11 mailles, et vous terminez par les 7 m de A.4 et 4 m au point mousse. Sur l'envers, tricotez A.4, répétez A.3 et terminez par A.2 en lisant les diagrammes de gauche à droite. Bon tricot!
09.03.2020 - 12:46
![]() Henna Oron ha scritto:
Henna Oron ha scritto:
Ik vind het vermoeiend om lange tijd naar het beeldscherm te kijken, zijn uw patronen ook als PDF te printen?
21.01.2020 - 22:32DROPS Design ha risposto:
Dag Henna,
Jazeker! Onder de materialenlijst staat een knop 'Patroon'. Klik hierop en klik dan op afdrukken, om een print te maken van het patroon.
26.01.2020 - 14:51
![]() RossWildflower ha scritto:
RossWildflower ha scritto:
The first row instructions say: Cast on 429-489-529-549 sts on circular needle size 5 mm / US 8 with 1 strand BabyAlpaca Silk and 1 strand Kid-Silk (= 2 strands). Work pattern as follows from RS: 4 band sts in GARTER ST - see explanation above, work last st in A.1, A.1 (= 20 sts) 21-24-26-27 times in width, 4 band sts in garter st. Does this mean I should work the first stitch in ALL RS rows and last stitch in ALL WS rows as the last st in A.1? For how many rows?
27.06.2019 - 19:30DROPS Design ha risposto:
Dear Mrs RossWildflower, from RS you will always work the last stitch in A.1 after the front band sts and before repeating A.1 (read diagrams from the right towards the left). From WS work the front band sts, then repeat A.1 (read diagrams from the left towards the right) then work the last st in A.1 and finish with the front band sts. That way pattern will be symetrical on each side. Read more about diagrams here. Happy knitting!
28.06.2019 - 06:27
![]() Pauline ha scritto:
Pauline ha scritto:
Hallo, ich würde allzu gerne dieses Modelll stricken, vertrage aber keine Mohair-Garne auf meiner Haut. Kann ich Kid-Silk einfach weglassen? Falls ja, reicht Baby Alpaca Silk 2-fädig für dieses Modell aus oder benötige ich das Garn dann 3-fädig? Welche Nadelstärke ist für Alpaca Silk 2-fädig oder 3-fädig am Besten?
20.06.2019 - 20:52DROPS Design ha risposto:
Liebe Pauline, Sie können 1 Faden Kid-Silk durch 1 Faden BabyAlpaca Silk ersetzen, so stricken Sie mit 2 Fäden BabyAlpaca Silk - beide gehören der Garngruppe A - benutzen Sie unseren Garnumrechner um die neue Menge zu kalkulieren (die Garnmenge in BabyAlpaca Silk für Ihre Größe kommt noch dazu). Viel Spaß beim stricken!
21.06.2019 - 06:56
![]() Susanne ha scritto:
Susanne ha scritto:
Hallo, ich verstehe nicht, was mit „A.X“ gemeint ist? „Wenn A.1 1 x in der Höhe gestr wurde, sind 261-297-321-333 M auf der Nadel. A.X noch 1 x in der Höhe arb. Die KNOPFLÖCHER nicht vergessen - siehe oben. Dann die 2 letzten R von A.X noch 11-10-9-9 x in der Höhe arb. Die Arb hat eine Gesamtlänge von ca. 38-37-36-36 cm ab dem Anschlagrand.“ Nochmal A1???? Danke und Gruß!
18.05.2019 - 14:36DROPS Design ha risposto:
Liebe Susanne, wenn A.1 1x in der Höhe gestrickt wird, stricken Sie die mit A.X markierten Reihen = die letzten 18 Reihen in A.1 - dann wiederholen Sie nur die 2 letzten Reihen (siehe Pfeil und schwarzer Punkt). Viel Spaß beim stricken!
20.05.2019 - 10:11
![]() Valérie P. ha scritto:
Valérie P. ha scritto:
Bonjour, Je viens de recommencer l'ouvrage car je ne sais pas si il faut commencer le A1 par la dernière maille du motif sur toute la hauteur du A1? ou simplement sur les 3 premiers rangs ? merci de votre réponse
26.08.2018 - 09:58DROPS Design ha risposto:
Bonjour Valérie, quand vous tricotez A.1, vous tricotez ainsi: 4 m point mousse, la dernière m de A.1, puis vous répétez A.1 en largeur et terminez par 4 m point mousse, et ce, jusqu'à ce que A.1 soit terminé en hauteur: le motif est ainsi symétrique de chaque côté. Bon tricot!
05.09.2018 - 14:37
![]() Valérie P. ha scritto:
Valérie P. ha scritto:
Bonjour, Je voudrais savoir si vous avez une vidéo qui montre comment monter les 429 mailles avec 2 jeux d'aiguilles circulaires pour ce modèle. Merci
10.08.2018 - 10:45DROPS Design ha risposto:
Bonjour Valérie P., nous n'avons pas de vidéo de ce type, montez simplement la moitié des mailles sur une aiguille circulaire, et montez l'autre moité des mailles sur l'autre aiguille à suivre simplement. Bon tricot!
10.08.2018 - 10:56Marilyn ha scritto:
I am on row 10, having made the yarnovers in row 9. I don't know how I can purl the yarnovers without creating a new stitch. Row 11 does not show additional stitches. Please help!
09.02.2018 - 03:15DROPS Design ha risposto:
Hi Marilyn, All the yarn overs are accompanied by either K2 together or slip 1 stitch, knit 1 and pass the slipped stitch over. So the number of stitches stays the same and the pattern gives the lace effect. On the next row purl the yarn overs to leave a hole. Happy knitting!
09.02.2018 - 07:06
|
||||||||||||||||||||||||||||
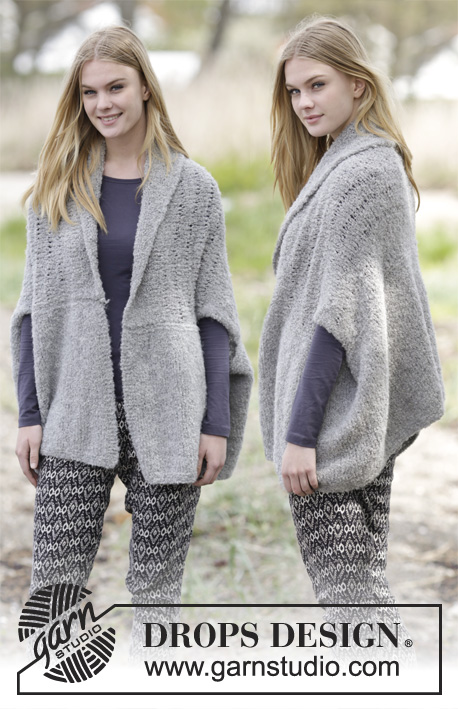
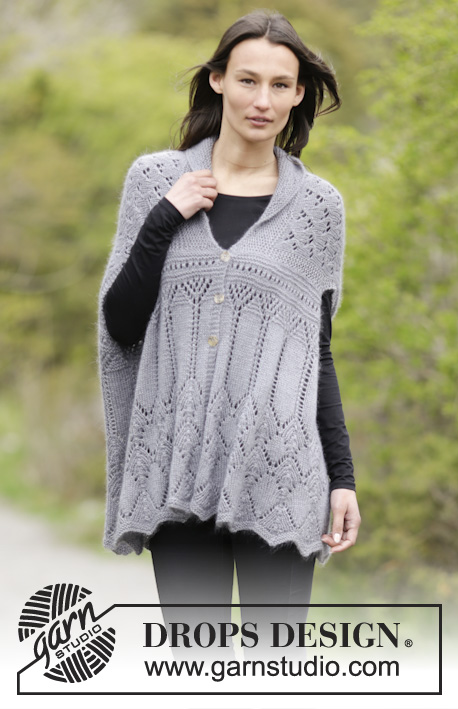
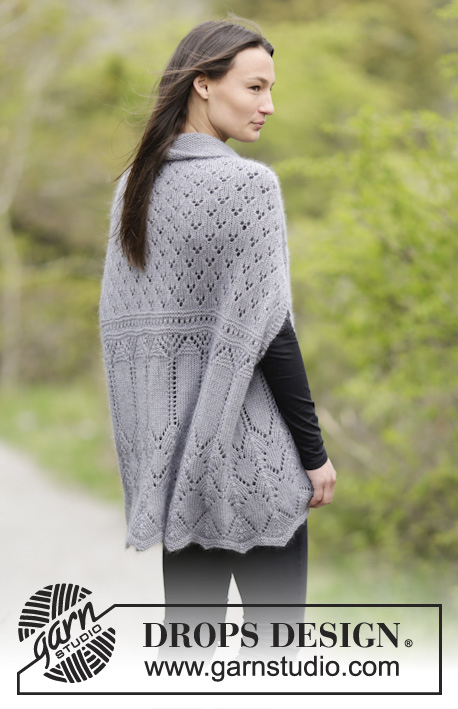
Lothlorien#lothloriencardigan |
||||||||||||||||||||||||||||
 |
 |
|||||||||||||||||||||||||||
Cardigan DROPS lavorato ai ferri a maglia legaccio con motivo traforato e collo a scialle in "BabyAlpaca Silk" e "Kid-Silk". Taglie: S-XXXL.
DROPS 166-43 |
||||||||||||||||||||||||||||
|
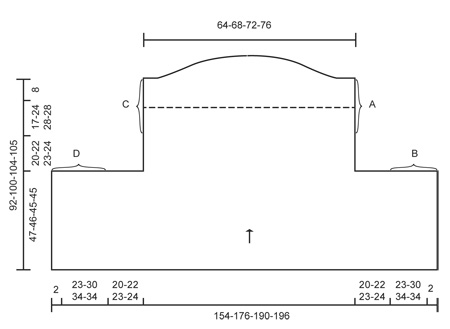
M LEGACCIO (avanti e indietro): Lavorare tutti i f a dir. 1 "costa" a m legaccio = 2 f dir. MOTIVO: Vedere i diagrammi A.1-A.8. I diagrammi mostrano tutti i f del motivo visti dal diritto del lavoro. SUGGERIMENTO PER GLI AUMENTI: Aumentare 1 m facendo 1 gettato, sul f successivo lavorare il gettato a dir ritorto (cioè lavorare nel filo dietro della m invece di quello davanti) per evitare buchi. ASOLE: Diminuire per le asole sul bordo destro (cioè le prime 4 m viste dal diritto del lavoro). 1 asola = lavorare insieme a dir la 2° e la 3° m dal bordo e fare 1 gettato. Diminuire per le asole quando il lavoro misura: TAGLIA S/M: 29, 37 e 45 cm TAGLIA L/XL: 28, 36 e 44 cm TAGLIA XXL: 27, 35 e 43 cm TAGLIA XXXL: 27, 35 e 43 cm ---------------------------------------------------------- CARDIGAN: Lavorato avanti e indietro sui f circolari. Lavorare con 2 f circolari da 80 cm per avere spazio per tutte le m all’inizio del lavoro. Iniziare in basso sul dietro e davanti, poi intrecciare le m a ogni lato, continuare sul dietro, poi lavorare il collo a scialle prima di cucire il lavoro. Avviare 429-489-529-549 m con I ferri circolari n° 5 mm con 1 capo di BabyAlpaca Silk e 1 capo di Kid-Silk (= 2 capi). Lavorare il motivo come segue dal diritto del lavoro: 4 m del bordo a M LEGACCIO – leggere la spiegazione sopra, lavorare l’ultima m di A.1, A.1 (= 20 m) 21-24-26-27 volte in larghezza, 4 m del bordo a m legaccio. FARE ATTENZIONE ALLA TENSIONE DEL LAVORO! Lavorare le 4 m del bordo a m legaccio fino alla fine del lavoro. Quando tutto A.1 è stato lavorato 1 volta in verticale, ci sono 261-297-321-333 m sul f. Ripetere A.X un’altra volta in verticale. Ricordarsi delle ASOLE – leggere la spiegazione sopra. Poi ripetere gli ultimi 2 f di A.X altre 11-10-9-9 volte in verticale. Il lavoro misura circa 38-37-36-36 cm dal bordo di avvio. Ora lavorare come segue: 4 m del bordo a m legaccio, A.2 (= 6 m), A.3 (= 12 m) 20-23-25-26 volte in larghezza, A.4 (= 7 m), 4 m per il bordo a m legaccio. Quando A.2-A.4 sono stati lavorati 1 volta in verticale, continuare con A.5 all’interno delle m del bordo a ogni lato. NOTA: Sul 7° f lavorare l’ultima m prima delle m del bordo a dir, e sul 10 f distribuire 2-1-2-1 aumenti = 263-298-323-334 m. Quando A.5 è stato lavorato 1 volta in verticale, lavorare 2 f a m rasata, ALLO STESSO TEMPO all’inizio di questi 2 f intrecciare 77-91-100-102 m = 109-116-123-130 m. Ora continuare come segue: 4 m a m legaccio, A.6 (= 6 m), A.7 (= 7 m) fino a quando rimangono 8 m, A.8 (= 4 m), 4 m a m legaccio. Quando il lavoro misura 84-92-96-97 cm – aggiustarlo in modo da finire dopo il 6° o 12° f in A.6-A.8 – passare ai f circolari n° 4,5 mm e continuare a m legaccio fino alla fine del lavoro. Lavorare le prime 45-48-50-53 m, inserire 1 segnapunti nella m successiva, lavorare 4-4-5-5 m, inserire un segnapunti nella m successiva, lavorare 7-8-9-10 m, inserire un segnapunti nella m successiva, lavorare 4-4-5-5 m, inserire un segnapunti nella m successiva, lavorare le 45-48-50-53 m successive (= 4 segnapunti). Sul f successivo dal diritto del lavoro, aumentare 1 m prima delle 4 m con i segnapunti – LEGGERE IL SUGGERIMENTO PER GLI AUMENTI (= 4 aumenti). Ripetere gli aumenti in modo alternato sul lato destro e sinistro di ogni segnapunti ogni 4 f altre 4 volte (= 20 aumenti) = 129-136-143-150 m. Sulla costa successive non lavorare le 10-14-16-18 m più esterne a ogni lato, poi sulle 8 coste successive lavorare 4 m in meno su ogni f. Lavorare 2 coste su tutte le m, ALLO STESSO TEMPO sul 1° f distribuire 12-16-20-24 aumenti in modo uniforme = 141-152-163-174 m. Intrecciare senza stringere. CONFEZIONE: Cucire i margini A e B (vedere lo schema). Cucire nei fili più esterni delle m di vivagno per evitare una cucitura spessa. Scalfo = 20-22-23-24 cm Ripetere dall’altro lato. Cioè cucire C e D nello stesso modo. Affrancare. |
||||||||||||||||||||||||||||
Spiegazioni del diagramma |
||||||||||||||||||||||||||||
|
||||||||||||||||||||||||||||
 |
||||||||||||||||||||||||||||
 |
||||||||||||||||||||||||||||
 |
||||||||||||||||||||||||||||
Avete terminato questo modello?Allora taggate le vostre foto con #dropspattern #lothloriencardigan o inviatele alla #dropsfan gallery. Avete bisogno di aiuto con questo modello?Troverete 19 video tutorial, una sezione per i commenti/domande e molto altro guardando il modello su www.garnstudio.com © 1982-2026 DROPS Design A/S. Ci riserviamo tutti i diritti. Questo documento, compreso tutte le sue sotto-sezioni, è protetto dalle leggi sul copyright. Potete leggere quello che potete fare con i nostri modelli alla fine di ogni modello sul nostro sito. |
||||||||||||||||||||||||||||


Con oltre 40 anni di esperienza nel design di modelli di maglia e uncinetto, DROPS Design offre la più estesa collezione di modelli gratuiti su internet - tradotti in 17 lingue. Ad oggi vi possiamo fornire 324 cataloghi e 12290 modelli - 9561 dei quali sono tradotti in Italiano.
Ci stiamo impegnando molto per darvi il meglio che vi possiamo offrire in termini di maglia e uncinetto, ispirazioni e consigli così come filati di grande qualità ad un prezzo incredibile! Volete utilizzare i nostri modelli per qualcosa d'altro oltre al vostro uso personale? Potete leggere tutto ciò che è consentito nel testo sul Copyright in basso su tutte le pagine dei nostri modelli. Buon lavoro!
Lasciare un commento sul modello DROPS 166-43
Noi saremmo felici di ricevere i tuoi commenti e opinioni su questo modello!
Se vuoi fare una domanda, fai per favore attenzione a selezionare la categoria corretta nella casella qui sotto per velocizzare il processo di risposta. I campi richiesti sono indicati da *.