
Categorie popolari
State cercando un filato?


Commenti / Domande (18)
![]() Pauline ha scritto:
Pauline ha scritto:
When working from the chart I understand it’s in the round. The confusion I have is the chart to the right has 5 st to start and the one on the left has 7 st. There’s a gap between those stitches, do I ignore the gap and knit across to complete the left side or do I work them separately joining up as you progress up the chart. If I don’t leave a gap it seems like I’ve made a very tiny point.
15.11.2024 - 03:56DROPS Design ha risposto:
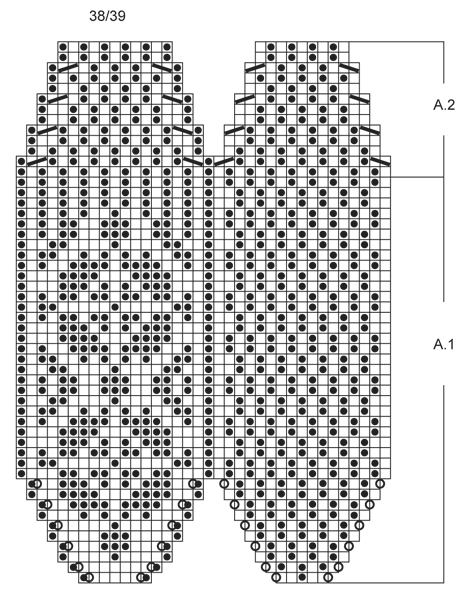
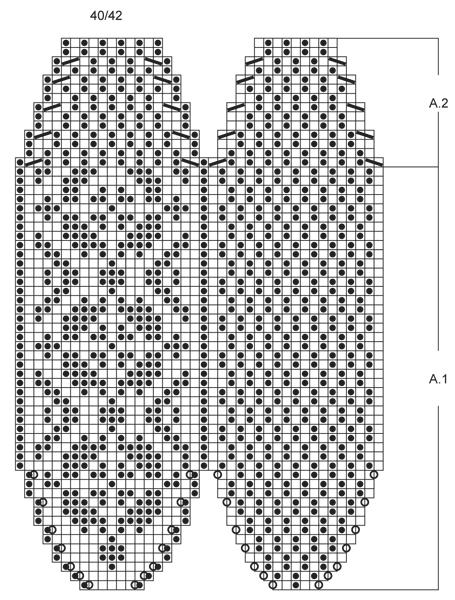
Dear Pauline, you start with 12 stitches, which are the 7+5 stitches in the charts. There should be no gaps between the stitches; the gaps in the charts are to better visualize the increases of the pattern towards the middle, until both sides of the chart are fully connected. But in the actual piece all of it will be connected, so the gaps are ignored. Happy knitting!
17.11.2024 - 19:50
![]() Pauline ha scritto:
Pauline ha scritto:
When working from the chart I understand it’s in the round. The confusion I have is the chart to the right has 5 st to start and the one on the left has 7 st. There’s a gap between those stitches, do I ignore the gap and knit across to complete the left side or do I work them separately joining up as you progress up the chart. If I don’t leave a gap it seems like I’ve made a very tiny point.
15.11.2024 - 03:52DROPS Design ha risposto:
Dear Pauline, you start with 12 stitches, which are the 7+5 stitches in the charts. There should be no gaps between the stitches; the gaps in the charts are to better visualize the increases of the pattern towards the middle, until both sides of the chart are fully connected. But in the actual piece all of it will be connected, so the gaps are ignored. Happy knitting!
17.11.2024 - 19:50
![]() Alexa ha scritto:
Alexa ha scritto:
Eine technische Frage zum Ausdruck: mit Handy und Tablet klappt es nicht. Oder gibt's einen Trick? LG und Dank an dieser Stelle für die tollen Anleitungen und Wolle! Alexa
25.08.2021 - 16:16DROPS Design ha risposto:
Liebe Alexa, es sollte genauso möglich sein: klicken sie auf "Drucken", dann "Anleitung", eine neue Seite soll sich öffnen, oben rechts auf "Die Anleitung ausdrucken" klicken, um die Einstellungen für den Drucker zu öffnen, dann wird die Anleitung gedruckt. Viel Spaß beim stricken!
26.08.2021 - 08:29
![]() Karo ha scritto:
Karo ha scritto:
Hallo! Ich verstehe den Beginn von A1 nicht. Ich starte mit 12 Maschen mittelblau auf dem Nadelspiel und beginne dann mit A1. Das sind in Runde 1 aber nur 5 Maschen? Danke
21.01.2021 - 19:03DROPS Design ha risposto:
Liebe Karo, A.1 hat 12 Maschen und wird am Anfang und am Ende in 2 Teile gezeichnet: die 5 ersten sind für die Sohlen, die 7 nächsten sind für das obere Fuß, dh bei der 1. Reihe stricken Sie: 1 Umschlag, 5 Maschen wie im Diagram für Ihre Größe gezeigt, 1 Umschlag, dann stricken Sie das 2. Teil: 1 Masche blau, 1 Umschlag, 5 Maschen, 1 Umschlag, 1 Masche blau = jezt haben Sie 4 M zugenommen = 16 M auf der Nadel. Viel Spaß beim stricken!
22.01.2021 - 07:53
![]() Teresa ha scritto:
Teresa ha scritto:
Hello, Should I expect to get the stockinette pattern gauge of 18 sts x 23 rows when working two strands in color? Teresa
05.10.2020 - 18:04DROPS Design ha risposto:
Dear Teresa, you should get the same tension with nordic pattern as with stocking stitch. Happy knitting!
06.10.2020 - 10:10
![]() Jenny Cyr ha scritto:
Jenny Cyr ha scritto:
Bonjour, Je voudrais avoir plus d'explications pour le modèle 161-20, je ne comprend pas ce passage "Rabattre souplement avec 2 fils. Monter maintenant 17-19-21 m avec les aiguilles 4.5 et 2 fils bleu moyen. Continuer avec seul 1 fil et tricoter 2 côtes mousse, puis reprendre les mailles en attente". Comment 2 fils et 1 fil? Est ce possible de faire un petit vidéo avec plus d'explications. Merci beau modèle. Jenny
24.06.2020 - 15:45DROPS Design ha risposto:
Bonjour Mme Cyr, cette vidéo montre comment monter les mailles et comment les rabattre avec 2 fils. Bon tricot!
24.06.2020 - 17:06
![]() Alexandra Shirley Hansen ha scritto:
Alexandra Shirley Hansen ha scritto:
Kan denne opskrift laves i størrelse 44/45... ? Hvordan gør jeg? Alexandra
11.02.2019 - 20:59DROPS Design ha risposto:
Hej Alexandra, når du først er igang, så tror jeg let du kan strikke det strykke rundt om foden så langt du vil, inden du går igang med hælen. God fornøjelse!
12.02.2019 - 09:42
![]() Dayen ha scritto:
Dayen ha scritto:
Is het mogelijk om het patroon uit te breiden naar maat 46 (EUR)?
30.03.2016 - 00:29DROPS Design ha risposto:
Hoi Dayen. Ik kan je helaas niet helpen met individuele aanpassingen, maar het zou mogelijk moeten zijn met hulp van de stekenverhouding (aantal st per 10 cm) en als je weet hoe groot de slof dan moet worden. Succes!
01.04.2016 - 16:33
![]() Lilith ha scritto:
Lilith ha scritto:
Die Slipper finde ich wunderschön, leider kann ich noch keine Muster stricken. Deshalb meine Bitte: könnten Sie mir eine Kurzanleitung geben, wie ich daraus unifarbene Slipper stricken kann? Vielen Dank!
14.03.2015 - 12:36DROPS Design ha risposto:
Sie können ganz einfach die Farbwechsel weglassen und stricken die Diagranmme nur einfarbig glatt re mit den Zunahmen und Abnahmen. Sie müssen nur beachten, dass durch das Norwegermuster die Hausschuhe etwas dicker sind, da man ja den Faden, den man gerade nicht braucht, beim Stricken auf der Rückseite mitführt. Ihre Schuhe werden dann also etwas "dünnschichtiger". Für einen Einstieg ins Musterstricken schauen Sie sich doch einfach mal unser Hilfsvideo "Fair Isle" oben im Kopf neben dem Foto an - es ist nicht so schwierig, wie es Ihnen vielleicht erscheint, man muss nur ein wenig aufpassen und mitzählen. Sie können das Muster auch an einem Probestück testen.
14.03.2015 - 18:28
![]() Anna Göransson ha scritto:
Anna Göransson ha scritto:
Mystofflor. dessa tofflor är bra att ha på inne och bra passform.
30.01.2015 - 17:00
|
||||||||||||||||
Alfie#alfieslippers |
||||||||||||||||
 |
 |
|||||||||||||||
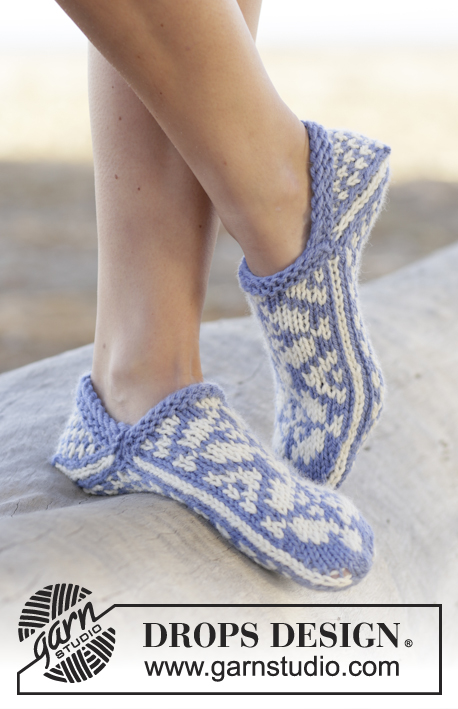
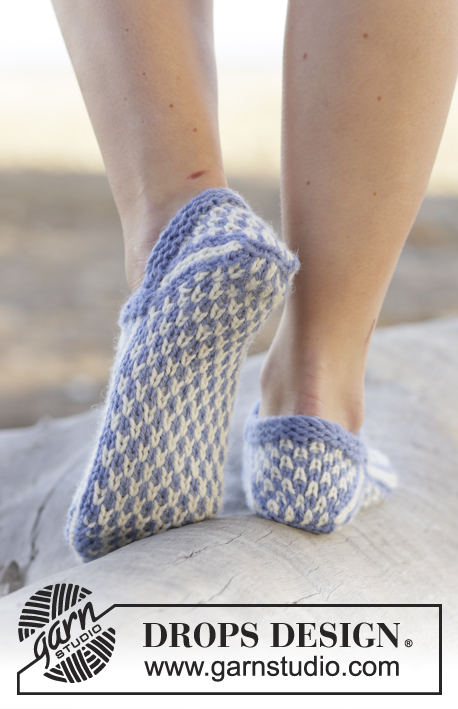
Pantofole DROPS lavorate ai ferri con motivo norvegese in "Nepal". Taglie: 35 - 42
DROPS 161-20 |
||||||||||||||||
|
M LEGACCIO (avanti e indietro): Lavorare tutti i f a dir. 1 “costa” a m legaccio = 2 f dir. CERCHIO MAGICO: Iniziare con questa tecnica per evitare un buco al centro. Tenere l’estremità del filato nella mano sinistra e arrotolarlo attorno all’indice (da sinistra a destra). Tenere l’occhiello con l’indice e il pollice sinistro. Inserire il f nell’occhiello, prendere il filo, farlo passare nell’occhiello, fare un gettato (spostare il filo da dietro verso di voi), e far passare il gettato attraverso la m sul f, * inserire il f nell’occhiello, 1 gettato, far passare il gettato attraverso l’occhiello, 1 gettato e far passare il gettato attraverso la m più esterna sul f destro (cioè l’ultima m fatta) *, ripetere *-* fino a quando ci sono 12-12-12 m sul f. Distribuire le m sui f a doppia punta n° 4,5 mm. Poi lavorare come spiegato nel modello – ALLO STESSO TEMPO far passare l’estremità del filo in modo che l’occhiello venga tirato e il buco scompaia. MOTIVO: Vedere i diagrammi A.1 e A.2. I diagrammi mostrano tutti i f del motivo visti dal diritto del lavoro. Lavorare tutto il motivo a m rasata. Scegliere il diagramma per la taglia corretta. ---------------------------------------------------------- PANTOFOLA: Lavorare in tondo a m rasata dalla punta verso il tallone. Iniziare con il blu lavanda e il CERCHIO MAGICO – leggere la spiegazione sopra - con i f a doppia punta n° 4,5 mm. Sul 1° giro lavorare il MOTIVO seguendo il diagramma A.1 – leggere la spiegazione sopra. FARE ATTENZIONE ALLA TENSIONE DEL LAVORO! Alla fine di A.1, trasferire le prime 15-17-19 m sul giro (= sotto il piede) su un fermamaglie, poi lavorare 2 “coste” a M LEGACCIO avanti e indietro – leggere la spiegazione sopra, sulle ultime 17-19-21 m sul giro (= sopra del piede) con il blu lavanda. Intrecciare senza stringere a 2 capi. Ora avviare 17-19-21 m con i f n° 4,5 mm con 2 capi di blu lavanda. Continuare con 1 capo e lavorare 2 coste, riportare tutte le m dal fermamaglie sui f di lavoro = 32-36-40 m. Continuare in tondo con il motivo e le diminuzioni secondo il diagramma A.2. Quando tutto il diagramma è stato lavorato in verticale e rimangono 16-20-20 m sul giro, intrecciare le m rimaste. Lavorare un’altra pantofola nello stesso modo. CONFEZIONE: Cucire il tallone m per m all’interno del bordo di chiusura. Cucire i bordi a m legaccio in modo ordinate a ogni lato del piede: mettere i bordi a m legaccio del sopra del piede sul bordo a m legaccio del dietro del piede e cucire attraverso entrambi gli strati. Chiudere e affrancare. |
||||||||||||||||
Spiegazioni del diagramma |
||||||||||||||||
|
||||||||||||||||
 |
||||||||||||||||
 |
||||||||||||||||
 |
||||||||||||||||
Avete terminato questo modello?Allora taggate le vostre foto con #dropspattern #alfieslippers o inviatele alla #dropsfan gallery. Avete bisogno di aiuto con questo modello?Troverete 14 video tutorial, una sezione per i commenti/domande e molto altro guardando il modello su www.garnstudio.com © 1982-2026 DROPS Design A/S. Ci riserviamo tutti i diritti. Questo documento, compreso tutte le sue sotto-sezioni, è protetto dalle leggi sul copyright. Potete leggere quello che potete fare con i nostri modelli alla fine di ogni modello sul nostro sito. |
||||||||||||||||


Con oltre 40 anni di esperienza nel design di modelli di maglia e uncinetto, DROPS Design offre la più estesa collezione di modelli gratuiti su internet - tradotti in 17 lingue. Ad oggi vi possiamo fornire 325 cataloghi e 12298 modelli - 9569 dei quali sono tradotti in Italiano.
Ci stiamo impegnando molto per darvi il meglio che vi possiamo offrire in termini di maglia e uncinetto, ispirazioni e consigli così come filati di grande qualità ad un prezzo incredibile! Volete utilizzare i nostri modelli per qualcosa d'altro oltre al vostro uso personale? Potete leggere tutto ciò che è consentito nel testo sul Copyright in basso su tutte le pagine dei nostri modelli. Buon lavoro!
Lasciare un commento sul modello DROPS 161-20
Noi saremmo felici di ricevere i tuoi commenti e opinioni su questo modello!
Se vuoi fare una domanda, fai per favore attenzione a selezionare la categoria corretta nella casella qui sotto per velocizzare il processo di risposta. I campi richiesti sono indicati da *.