
Categorie popolari
State cercando un filato?


Commenti / Domande (102)
![]() Britta ha scritto:
Britta ha scritto:
In der ersten lochmusterreihe beginnt das Lochmuster mit 1x 1a dann wird 1b mehrfach wiederholt bis es zum Ende nochmal auf 1c endet. Halte ich in den folgenden Reihen diesen Rythmus bei? Oder sttricke ich jeweils von a bis c und wiederhole diese dann komplett? Ich habe besonders in der letzten Lochreihe, in der über a und c drei Maschen zusammengestrickt werden müssen, Schwierigkeiten
07.02.2015 - 19:37DROPS Design ha risposto:
a & c zeigen den Beginn und das Ende der Lochmuster-R, b wird dazwischen gestrickt. a und c stricken Sie also in jeder R nur 1x und wdh b dazwischen. Was die letzte R betrifft, orientieren Sie sich einfach am Muster und nicht an den "Schnitten" zwischen a/b und b/c, dann ist es ganz logisch, wie Sie stricken müssen. Der Lochmuster-Bereich beginnt mit 2 M re, dann * 1 Umschl, 3 M wie beschrieben zusstr, 1 Umschl, 3 M re *, von *-* fortlaufend wdh, enden mit 1 Umschl, 3 M re zusstr, 1 Umschl, 2 M re.
08.02.2015 - 17:32
![]() Anneli ha scritto:
Anneli ha scritto:
Koftan jag länge letat efter. Såå fin.
07.02.2015 - 00:26
![]() Marianne Königsson ha scritto:
Marianne Königsson ha scritto:
Hej ! Funderar på att beställa denna kofta men är osäker på storleken. Jag drar 38-40 i storlek, motsvaras det av medium. Tacksam om jag kan få vilka storlekar, S-M-L. XL motsvarar så jag vet. Vilket garn är det som visas på bilden - ljus beige ? Anger model nedan. //Mvh, Marianne PS Modell: Stickad DROPS kofta i ”Bomull-Lin” eller ”Paris” med hålmönster och sjalkrage. Stl S - XXXL. DROPS 159-2 DROPS Design: Modell nr l-131 DS
31.01.2015 - 21:10DROPS Design ha risposto:
Hej Marianne, Ja det motsvarar en M, du hittar måtten på koftan nederst i beskrivningen. Koftan på bilden är stickat i Bomull-Lin 03. Lycka till!
02.02.2015 - 13:40
![]() Jette Zangger ha scritto:
Jette Zangger ha scritto:
Jeg mener der bør stå A 4 m 1 gang b6 m 22 gange c3 m 1 gang og ikke ordet total det forvirrer men tak for hjælp
27.01.2015 - 09:05Jette Zangger ha scritto:
Strikker str. M med 201 maske mønster a b c er tilsammen 13 m. Hvordan kan jeg strikke det totalt 22 gange det er jo alt for mange masker. Vil du forklare mig det nærmere og skal mønster AB med hele vejen. Venter hurtigt svar da jeg har købt garn til trøjen.
27.01.2015 - 08:57
![]() Jette Zangger ha scritto:
Jette Zangger ha scritto:
Jeg kan ikke få maskeantallet til at passe med mønstret.jeg strikker str. M med 201 maske. 28 m til forkant plus 3 mønster a og b total 22 gange er 66 og 44 det er 110 så nu 172 men hvad med mønster Ac ???? Skal det med 1 gang eller hvad kh jette
21.01.2015 - 12:06DROPS Design ha risposto:
Hej Jette. Det skulle passe. Naar du strikker M, saa skal du strikke: 2 glatstrik, 1 vr og 28 m forkant. Saa kommer mönstret: A.1A (= 4 m) één gang, A.1B (= 6 m) gentager du 22 gange (= 132 m) og saa A.1C (= 3 m) één gang og slut af med 28 m forkant, 1 vr og 2 glatstrik = 3+28+4+132+3+28+3 = 201.
21.01.2015 - 15:29
![]() ANITA HALDER ha scritto:
ANITA HALDER ha scritto:
Es handelt sich um ein sehr schönes Teil . Ich hoffe, dass es bald eine Anleitung zu ha ben ist.
13.01.2015 - 01:35
![]() Gabi Flaschberger ha scritto:
Gabi Flaschberger ha scritto:
Würde mich über eine Anleitung sehr freuen! Sieht super aus!
10.01.2015 - 13:19
![]() Michaela Lingner ha scritto:
Michaela Lingner ha scritto:
Wunderschöner Cardigan. Passt sicher zu jedem Outfit. Freu mich schon auf die Anleitung. Hoffentlich wird sie hochgeladen.
02.01.2015 - 17:33
![]() Katrin ha scritto:
Katrin ha scritto:
Wunderschönes Modell! Ich freue mich schon auf die Anleitung :)
01.01.2015 - 19:44
|
||||||||||||||||
Lace Affair#laceaffairjacket |
||||||||||||||||
 |
 |
|||||||||||||||
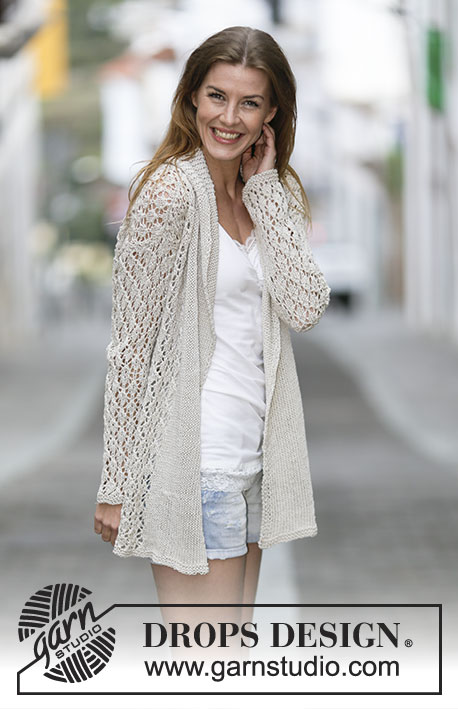
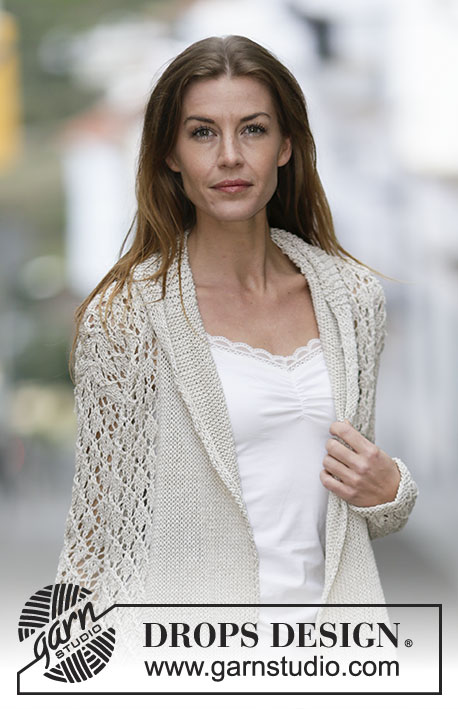
Cardigan DROPS ai ferri, con motivo traforato e collo a scialle, in "Bomull-Lin" oppure in "Paris". Taglie: Dalla S alla XXXL.
DROPS 159-2 |
||||||||||||||||
|
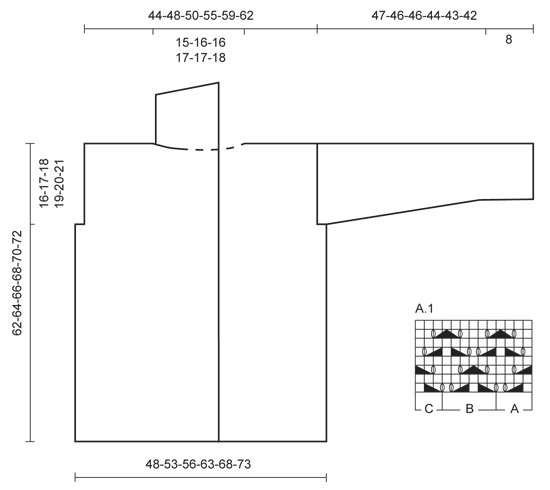
PUNTO LEGACCIO (avanti e indietro): Lavorare tutti i ferri a dir. 1 “costa” a legaccio = 2 ferri a dir. MOTIVO: Vedere il diagramma A.1. Il diagramma mostra tutti i ferri del motivo, visti sul diritto del lavoro. INFORMAZIONI PER IL LAVORO: Le m dei bordi davanti tenderanno a piegarsi verso l’interno nel corso della lavorazione, ma una volta confezionato il capo, resteranno più dritti. SUGGERIMENTO PER GLI AUMENTI: Per aumentare 1 m fare 1 m gettata; al ferro successivo, lavorare la m gettata ritorta (quindi lavorarla nel filo posteriore e non in quello anteriore) per evitare che si formi un buco. ---------------------------------------------------------- DAVANTI e DIETRO: Si lavorano avanti e indietro sui ferri circolari dal centro, davanti. Avviare, senza stringere troppo il filo, 185-201-211-235-251-265 m sui ferri circolari n° 4,5 con il filato Bomull-Lin o con il filato Paris. Lavorare 2 COSTE A LEGACCIO - vedere le spiegazioni sopra. Passare ai ferri circolari n° 5,5 e lavorare il ferro successivo (= sul diritto del lavoro) come segue: 2 m a maglia rasata, 1 m rov, maglia rasata sulle 26-28-27-27-26-24 m successive (= bordo davanti), diagramma A.1A (= 4 m), ripetere il diagramma A.1B (= 6 m) 20-22-24-28-31-34 volte in tutto, diagramma A.1C (= 3 m), lavorare a maglia rasata le 26-28-27-27-26-24 m successive, 1 m rov e 2 m a maglia rasata (= bordo davanti). Proseguire in questo modo - VEDERE LE INFORMAZIONI PER IL LAVORO e RICORDARSI LA TENSIONE DEL LAVORO. Quando il lavoro misura ca.46-47-48-49-50-51 cm, inserire 2 segni: il primo segno dopo le prime 54-58-60-67-71-75 m ed il secondo segno prima delle ultime 54-58-60-67-71-75 m (= tra i due segni ci sono 77-85-91-101-109-115 m per il dietro). Al ferro successivo, intrecciare per gli scalfi le 3-4-5-6-7-8 m che precedono e le 3-4-5-6-7-8 m che seguono ognuno dei due segni (= 6-8-10-12-14-16 m intrecciate da ciascun lato). Dividere ora il lavoro e finire ogni parte separatamente. DIETRO: = 71-77-81-89-95-99 m. Proseguire con il motivo come prima, con 1 m vivagno a punto legaccio da ciascun lato, finché il lavoro non misura 60-62-64-66-68-70 cm. Intrecciare ora le 21-23-23-25-25-27 m centrali per lo scollo e finire ogni spalla separatamente. Al ferro successivo, diminuire 1 m per lo scollo = per la spalla rimangono 24-26-28-31-34-35 m. Intrecciare le m quando il lavoro misura 62-64-66-68-70-72 cm. DAVANTI SINISTRO: = 51-54-55-61-64-67 m. Lavorare 1 m vivagno a punto legaccio verso lo scalfo e proseguire seguendo il motivo come prima, finire con 26-27-27-27-27-24 m a maglia rasata, 1 m rov e 2 m a maglia rasata (= bordo davanti) verso il centro davanti finché il lavoro non misura 62-64-66-68-70-72 cm. All’inizio del ferro successivo sul diritto del lavoro, intrecciare le prime 24-26-28-31-34-36 m per la spalla = per lo scollo rimangono 27-28-27-30-30-31 m. Lavorare queste m a punto legaccio - ALLO STESSO TEMPO, lavorare a ferri accorciati, iniziando sul rovescio del lavoro, come segue: * Lavorare 1 costa a legaccio su tutte le m. Al ferro successivo, sul rovescio del lavoro, lavorare 21-22-21-24-24-25 m dir, girare e lavorare il ferro di ritorno a dir *, ripetere da *-* finché il lavoro non misura ca.9-10-10-10½-10½-11 cm da dove sono state intrecciate le m per la spalla (lato corto). Intrecciare ora le m senza stringere troppo il filo. DAVANTI DESTRO: Lavorare come indicato per il davanti sinistro, ma a specchio. Iniziare i ferri accorciati per il collo sul diritto del lavoro. MANICHE: Si lavorano avanti e indietro. Avviare, senza stringere troppo il filo, 35-37-39-39-41-43 m (compresa 1 m vivagno da ciascun lato) sui ferri circolari n° 4,5 con il filato Bomull-Lin oppure con il filato Paris. Lavorare 2 coste a legaccio. Passare ai ferri circolari n° 5,5 e lavorare il ferro successivo (= sul diritto del lavoro) come segue: 1 m vivagno a punto legaccio, 1-2-0-0-1-2 m a maglia rasata, diagramma A.1A (= 4 m), ripetere il diagramma A.1B sulle 24-24-30-30-30-30 m successive (= 4-4-5-5-5-5 ripetizioni del diagramma), diagramma A.1C (= 3 m), 1-2-0-0-1-2 m a maglia rasata, finire con 1 m vivagno a punto legaccio. Quando il lavoro misura 8 cm, aumentare 1 m all’interno di 1 m vivagno, da ciascun lato - VEDERE IL SUGGERIMENTO PER GLI AUMENTI sopra, lavorare le m aumentate seguendo il motivo. Ripetere questi aumenti ogni 4½-4-3½-3-2½-2½ cm altre 8-9-10-11-12-13 volte = 53-57-61-63-67-71 m. Quando il lavoro misura 45-44-43-40-39-37 cm, inserire 1 segno da ciascun lato della manica (per la confezione). Quando il lavoro misura 47-46-46-44-43-42 cm (misure più corte nelle taglie più grandi, perché le spalle sono più larghe), intrecciare tutte le m. CONFEZIONE: Cucire le spalle e montare le maniche nell’asola esterna delle m vivagno. Cucire le maniche all’interno di 1 m vivagno - ATTENZIONE: La parte superiore della manica lavorata dopo il segno, deve combaciare con le m intrecciate per gli scalfi. Cucire le estremità del collo al centro, sul dietro e cucire il collo allo scollo sul dietro - ATTENZIONE! La cucitura deve essere fatta sul rovescio in modo che non sia visibile quando il collo viene ripiegato. Passare leggermente con il ferro a vapore sopra il bordo davanti, in modo da renderlo più piatto. |
||||||||||||||||
Spiegazioni del diagramma |
||||||||||||||||
|
||||||||||||||||
 |
||||||||||||||||
Avete terminato questo modello?Allora taggate le vostre foto con #dropspattern #laceaffairjacket o inviatele alla #dropsfan gallery. Avete bisogno di aiuto con questo modello?Troverete 21 video tutorial, una sezione per i commenti/domande e molto altro guardando il modello su www.garnstudio.com © 1982-2026 DROPS Design A/S. Ci riserviamo tutti i diritti. Questo documento, compreso tutte le sue sotto-sezioni, è protetto dalle leggi sul copyright. Potete leggere quello che potete fare con i nostri modelli alla fine di ogni modello sul nostro sito. |
||||||||||||||||


Con oltre 40 anni di esperienza nel design di modelli di maglia e uncinetto, DROPS Design offre la più estesa collezione di modelli gratuiti su internet - tradotti in 17 lingue. Ad oggi vi possiamo fornire 324 cataloghi e 12290 modelli - 9561 dei quali sono tradotti in Italiano.
Ci stiamo impegnando molto per darvi il meglio che vi possiamo offrire in termini di maglia e uncinetto, ispirazioni e consigli così come filati di grande qualità ad un prezzo incredibile! Volete utilizzare i nostri modelli per qualcosa d'altro oltre al vostro uso personale? Potete leggere tutto ciò che è consentito nel testo sul Copyright in basso su tutte le pagine dei nostri modelli. Buon lavoro!
Lasciare un commento sul modello DROPS 159-2
Noi saremmo felici di ricevere i tuoi commenti e opinioni su questo modello!
Se vuoi fare una domanda, fai per favore attenzione a selezionare la categoria corretta nella casella qui sotto per velocizzare il processo di risposta. I campi richiesti sono indicati da *.