
Categorie popolari
State cercando un filato?


Commenti / Domande (39)
Jennifer ha scritto:
I have attempted the "foot" of this pattern 3 times now and 3 times frogged. The pattern says to increase at the beginning and end of rounds 1-8 but the heel all three times has been huge. I would love some actual help on this. Is there anyone who has had this work who would be willing to help me understand this?
22.12.2014 - 19:56DROPS Design ha risposto:
Dear Jennifer, remember to check your tension, I made these slippers myself and they turned out very well - if your tension doesn't match, try to adjust following your own measures. Happy crocheting!
23.12.2014 - 18:55Jennifer ha scritto:
When it says continue til piece measures 7cm, do I measure from side to side, front to back or from top of foot to toe? Thanks!
22.12.2014 - 18:33DROPS Design ha risposto:
Dear Jennifer, start to measure from beg of "Foot" part, ie from round 1 under section "FOOT" - fold slippers double and measure from 1st round to last round worked (straight). Happy crocheting!
23.12.2014 - 18:50Roger ha scritto:
When measuring out the 6-7-8 cm/ 2 1/2-2 3/4-3" after the final increase where is this done from. I did one doing it from the last increase and the boot just loops huge.
08.12.2014 - 18:08DROPS Design ha risposto:
Dear Roger, you measure from the beg of "foot" - where it says before "now measure piece from here", ie from round 1 under "foot". Happy crocheting!
10.12.2014 - 14:20
![]() Lia ha scritto:
Lia ha scritto:
Ich verstehe leider den Satz, der unter "Alle Größen" steht. Ich habe nun 55 M in der Runde. Es heißt, man muss 1fM in jede M häkeln, bis die Arbeit 7 cm erreicht (bei Fußgröße 39). Ab welchem Punkt misst man diese 7 cm ab? Ab dem Moment, an dem man anfägt diese zu machen oder ab dem Schaft (denn das wären bei mir schon 7 cm an der Hacke) ? Danke im Voraus =)
02.12.2014 - 19:20DROPS Design ha risposto:
Sie messen ab der 1. Rd, die unter "Fuß" beschrieben ist.
06.03.2015 - 14:24
![]() Julia ha scritto:
Julia ha scritto:
Hallo, ich möchte den Bund in einer anderen Farbe häkeln. Wie genau muss ich die wolle aufteilen beim Kauf? 50:50 von jeder Farbe? Vielen Dank und Grüße
24.11.2014 - 23:20DROPS Design ha risposto:
Liebe Julia, wir haben das Modell nur einfarbig gearbeitet, Sie müssen dann evtl. die Länge des Schafts anpassen.
02.12.2014 - 18:27
![]() Linda ha scritto:
Linda ha scritto:
From rows 1 to 6/8 where it states at the beginning and end of every other row to make 2 sc in 1st and last sc is this not at the back of foot where the heel is.
18.11.2014 - 04:14DROPS Design ha risposto:
Dear Linda, on the rounds 1 to 8 under "Foot" you inc 2 sts at beg of round, and 2 sts at end of round (= middle back, towards heel), at the same time, you inc on mid upper foot (2 sts in the middle st 7 sts around ch). Happy crocheting!
18.11.2014 - 09:31
![]() Linda ha scritto:
Linda ha scritto:
By increasing sc at the heel on every round when finished there is way to much heel. Everything else on the foot fits perfectly. How do I solve this problem.
13.11.2014 - 13:19DROPS Design ha risposto:
Dear Linda, there are no inc for heel, the inc on foot (round 1 to 6-8 - see size) are done on mid upper foot. You continue then working sc in the round before decreasing on mid back (crochet the first 2 and last 2 sc on round tog). Happy crocheting!
13.11.2014 - 14:08
![]() Colleen Fougere ha scritto:
Colleen Fougere ha scritto:
I am in the process of completing the foot but I'm stuck on one part. In round 2 (4 and 6) after completing sc in the first 12 it requires you to "7 dc in ch" - I'm really not sure what to do here. Could you please explain this part for me as I can't find a tutorial to help me??? Thank you so much for your help!
25.10.2014 - 19:38DROPS Design ha risposto:
Dear Mrs Fougere, on round 1 (5 and 7) you work 1 ch in the middle upper foot (toe), on next round (2, 4 and 6), you work 7 dc around this ch. Happy crocheting!
27.10.2014 - 09:02
![]() Mijke ha scritto:
Mijke ha scritto:
Tommiesje: bij toer 1 staat 'herhaal 13x'. Dus de eerste, die stap voor stap uitgelegd is, en daarna 13x herhalen. Dat is in totaal dus 14 sterren.
18.10.2014 - 23:30
![]() Tommiesje1 . ha scritto:
Tommiesje1 . ha scritto:
Ik maak de middelste mt., maar blijf uit komen op 13 sterren in toer 2.Ik vind het ook vreemd dat als je begint met 13 sterren in toer1, je opeens in toer 2 14 sterren moet hebben.Hoe kan dit? Maak ik een fout, of zit er een fout in het patroon? Gaarne uw antwoord. BVD,
18.10.2014 - 11:04
|
|
Sweet Spirited#sweetspiritedslippers |
|
|
|
|
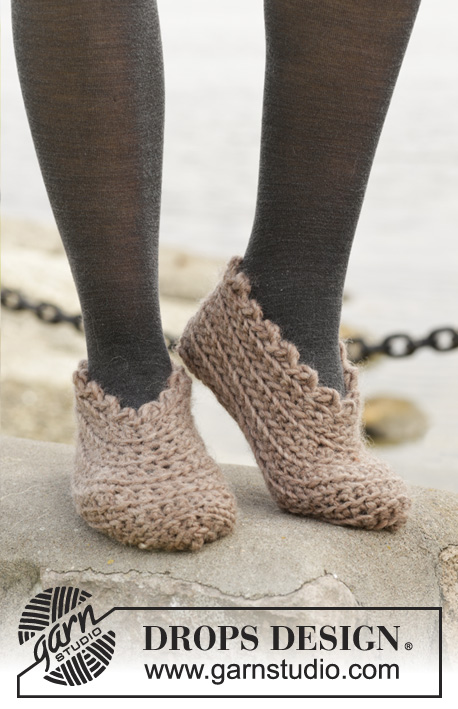
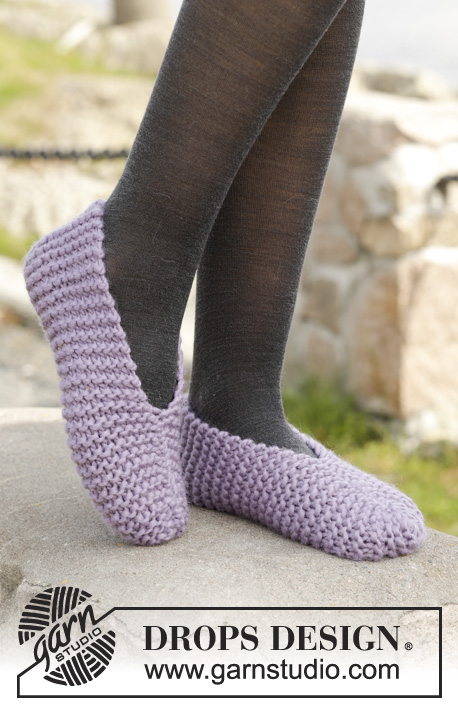
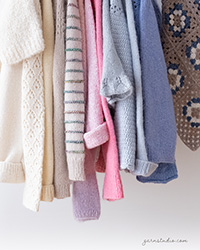
Pantofole DROPS lavorate all’uncinetto con motivo a stella in "Snow".
DROPS 156-9 |
|
|
SUGGERIMENTO PER IL LAVORO: Assicurarsi che le m riprese siano abbastanza lasse. SUGGERIMENTO PER LE DIMINUZIONI: Lavorare 1 m.b ma aspettare con l’ultimo passaggio (= 2 m sull’uncinetto), poi lavorare la m.b successiva ma sull’ultimo passaggio, far passare il filo attraverso tutte le m sull’uncinetto = 1 m.b diminuita. INFORMAZIONI PER IL LAVORO: All’inizio del giro a m.b lavorare 1 cat (non sostituisce la 1° m.b). Finire il giro con 1 m.bss nella 1° m.b all’inizio del giro. ---------------------------------------------------------- PANTOFOLA: Lavorata in tondo, top down. GAMBA: Avviare 25-29-31 cat LASSE con l’uncinetto n° 8 mm con Snow e formare un anello con 1 m.bss nella 1° cat. Poi lavorare il motivo a stella come segue: 1° GIRO: LEGGERE IL SUGGERIMENTO PER IL LAVORO! Lavorare 3 cat, riprendere 5 m, iniziare nella 2° cat dall’uncinetto (= 6 m sull’uncinetto), fare 1 gettato e far passare il filo attraverso tutte e 6 le m, lavorare 1 cat per fare un buco sulle 6 m, * riprendere 1 m nel buco, riprendere 1 m a lato sull’ultima delle 6 m, riprendere 1 m nella stessa cat in cui è stata riprese l’ultima delle 6 m, 1 m in ognuna delle 2 cat successive (= 6 m sull’uncinetto), fare un gettato e farlo passare attraverso tutte e 6 le m, 1 cat *, ripetere *-* 11-13-14 volte in totale, finire con 1 m.bss nella 3° cat all’inizio del giro. 2° GIRO: 2 cat, lavorare 2 m.ma in ogni “buco della stella”, finire il giro con 1 m.bss nella 2° cat dall’inizio del giro = 12-14-15 stelle. FARE ATTENZIONE ALLA TENSIONE DEL LAVORO! 3° GIRO: 3 cat, riprendere 1 m nella 2° e 3° cat dall’uncinetto, 1 m nel filo dietro di ognuna delle prime 3 m.m.a sulla riga (= 6 m sull’uncinetto), fare 1 gettato e far passare il filo attraverso tutte e 6 le m, 1 cat, * riprendere 1 m nel buco, 1 m a lato sull’ultima delle 6 m, 1 m nel filo dietro della stessa m.m.a in cui è stata ripresa l’ultima delle 6 m, 1 m nel filo dietro di ognuna delle 2 m.m.a (= 6 m sull’uncinetto), fare un gettato e farlo passare attraverso tutte e 6 le m, 1 cat *, ripetere *-* 11-13-14 volte in totale, finire con 1 m.bss nella 3° cat all’inizio del giro. Ripetere il 2° e 3° giro 8 volte in totale. Poi ripetere il 2° giro un’altra volta = 9 righe con le stelle. Il lavoro misura circa 30 cm. Girare il lavoro con il rovescio del lavoro verso l’esterno, girare e lavorare 1 giro nel modo opposto come segue: lavorare 1 cat, 1 m.b in ogni m.m.a e ALLO STESSO TEMPO diminuire 4-4-6 m in modo uniforme – LEGGERE IL SUGGERIMENTO PER LE DIMINUZIONI, finire con 1 m.bss nella 1° m.b = 21-25-25 m.b. ORA MISURARE IL LAVORO DA QUI! PIEDE : Lavorare in tondo. Lavorare ogni m.b nel filo dietro delle m.b sul giro sotto. 1° GIRO: LEGGERE LE INFORMAZIONI PER IL LAVORO! Lavorare 2 m.b nella 1° m.b, 1 m.b in ognuna delle 8-10-10 m.b, 2 m.b nella m.b successiva, 1 cat, saltare la m.b successiva, 2 m.b nella m.b successiva, 1 m.b in ognuna delle 8-10-10 m.b successive e 2 m.b nell’ultima m.b = 24-28-28 m.b + 1 cat. 2° GIRO: Lavorare 1 m.b in ognuna delle prime 12-14-14 m.b, 7 m.a intorno alla cat e 1 m.b in ognuna delle ultime 12-14-14 m.b = 31-35-35 m. 3° GIRO: lavorare 2 m.b nella 1° m, 1 m.b in ognuna delle 13-15-15 m successive, 2 m.b nella m successiva, 1 cat, saltare la m.b successiva, 2 m.b nella m successiva, 1 m.b in ognuna delle 13-15-15 m successive e 2 m.b nell’ultima m = 34-38-38 m.b + 1 cat. 4° GIRO: Lavorare 1 m.b in ognuna delle prime 17-19-19 m.b, 7 m.a intorno alla cat e 1 m.b in ognuna delle ultime 17-19-19 m.b = 41-45-45 m. 5° GIRO: lavorare 2 m.b nella 1° m, 1 m.b in ognuna delle 18-20-20 m successive, 2 m.b nella m successiva, 1 cat, saltare la m.b successiva, 2 m.b nella m successiva, 1 m.b in ognuna delle 18-20-20 m successive e 2 m.b nell’ultima m = 44-48-48 m.b + 1 cat 6° GIRO: Lavorare 1 m.b in ognuna delle prime 22-24-24 m.b, 7 m.a intorno alla cat e 1 m.b in ognuna delle ultime 22-24-24 m.b = 51-55-55 m. Finire qui gli aumenti per la TAGLIA 35/37 e 38/40. TAGLIA 41/43: 7° GIRO: Lavorare 1 m.b in ognuna delle prime 27 m, 1 cat, saltare la m successiva e lavorare 1 m.b in ognuna delle 27 m successive. 8° GIRO: Lavorare 1 m.b in ognuna delle prime 27 m, 7 m.a intorno alla cat e 1 m.b in ognuna delle ultime 27 m.b = 61 m. TUTTE LE TAGLIE: Dopo l’ultimo aumento ci sono 51-55-61 m sul giro. Continuare in tondo con 1 m.b in ogni m fino a quando il lavoro misura 6-7-8 cm. Sui 5 giri successivi lavorare insieme le prime e le ultime 2 m.b sul giro in 1 m.b – Ricordarsi del SUGGERIMENTO PER LE DIMINUZIONI (lavorare le altre m.b come prima) = 41-45-51 m.b. Chiudere e affrancare. CONFEZIONE: Iniziare sotto il piede sul davanti della punta. Cucire margine a margine nel filo più esterno delle m di vivagno per evitare una cucitura spessa al centro sotto il piede. Chiudere e affrancare. Piegare la gamba in modo che il diritto del lavoro sia verso l’esterno. Lavorare un’altra pantofola nello stesso modo. |
|
Avete terminato questo modello?Allora taggate le vostre foto con #dropspattern #sweetspiritedslippers o inviatele alla #dropsfan gallery. Avete bisogno di aiuto con questo modello?Troverete 8 video tutorial, una sezione per i commenti/domande e molto altro guardando il modello su www.garnstudio.com © 1982-2026 DROPS Design A/S. Ci riserviamo tutti i diritti. Questo documento, compreso tutte le sue sotto-sezioni, è protetto dalle leggi sul copyright. Potete leggere quello che potete fare con i nostri modelli alla fine di ogni modello sul nostro sito. |


Con oltre 40 anni di esperienza nel design di modelli di maglia e uncinetto, DROPS Design offre la più estesa collezione di modelli gratuiti su internet - tradotti in 17 lingue. Ad oggi vi possiamo fornire 324 cataloghi e 12190 modelli - 9461 dei quali sono tradotti in Italiano.
Ci stiamo impegnando molto per darvi il meglio che vi possiamo offrire in termini di maglia e uncinetto, ispirazioni e consigli così come filati di grande qualità ad un prezzo incredibile! Volete utilizzare i nostri modelli per qualcosa d'altro oltre al vostro uso personale? Potete leggere tutto ciò che è consentito nel testo sul Copyright in basso su tutte le pagine dei nostri modelli. Buon lavoro!
Lasciare un commento sul modello DROPS 156-9
Noi saremmo felici di ricevere i tuoi commenti e opinioni su questo modello!
Se vuoi fare una domanda, fai per favore attenzione a selezionare la categoria corretta nella casella qui sotto per velocizzare il processo di risposta. I campi richiesti sono indicati da *.