
Categorie popolari
State cercando un filato?


Commenti / Domande (39)
![]() Genette ha scritto:
Genette ha scritto:
Hi, After the final decrease instruction on the leg portion of the piece, I find that the hole is now too small to get my foot into. I'm making the size 41/43 version. How can I rectify this? Thanks
07.08.2016 - 08:30DROPS Design ha risposto:
Dear Genette, sure you can make less dec than stated in the pattern to adjust on your foot size, but remember you will then have to adjust the next step (foot) too. Happy crocheting!
08.08.2016 - 09:44
![]() Susanne ha scritto:
Susanne ha scritto:
Når man skal måle 6-7-8 cm hvor måler man så den fra, er det fra når man er færdig med udtagning eller ??
15.03.2016 - 16:58DROPS Design ha risposto:
Hej Susanne, ja og du har kun de sidste 5 omg tilbage inden du er færdig. God fornøjelse!
16.03.2016 - 15:44
![]() Ann Naegelen ha scritto:
Ann Naegelen ha scritto:
The pattern is beautiful. On the 2nd round of foot, what does it mean to do 7 dc around ch. What chain. Thanks for the help
19.01.2016 - 22:28DROPS Design ha risposto:
Dear Mrs Naeglen, on round 1 you have crocheted 1 ch between (2 sc in next sc, ch 1, 2 sc in next sc), on round 2, you will crochet 7 dc around this chain. Happy crocheting!
20.01.2016 - 11:50Luz Maria Garrido De Bueno ha scritto:
Soy señora mayor y en sus paginas, modelos, explicaciones, patrones y consejos encuentro la mayor distracción. Gracias por permitirme disfrutar de ello, y proporcionarme tantos modelos que gracias a ustedes he tejido para mis nietas.
27.11.2015 - 13:39
![]() Loele ha scritto:
Loele ha scritto:
Voor het mooie aangezicht heb ik de boord al omgedraaid voordat ik aan de laatste 2 sterren toeren begon. De meerdering voor en na de losse waar de 7stokjes op de voet inkomen om en om in de voorste en achterste lus gehaakt. Je krijgt dan minder grote openingen. Verder heel leuk patroon. Lekker warme sloffen.
27.11.2015 - 13:30
![]() Sandra ha scritto:
Sandra ha scritto:
Hallo, ik had gevraagd over wat ik moet doen boven de stokjes. Ik heb de sok nogmaals gemaakt met garen wat duidelijker te zien is en daar ben ik uitgekomen wat ik moet doen. Mijn vraag mag dus weggegooid worden. Bedankt voor de moeite Sandra
13.11.2015 - 16:34DROPS Design ha risposto:
Hoi Sandra. Super, mooi om te horen. Veel haakplezier verder.
13.11.2015 - 17:19
![]() Sandra ha scritto:
Sandra ha scritto:
Ik ben bezig met de sokken van Drops 156-9. Nu kom ik niet uit de 3e toer van de voet. In toer 2 heb ik 7 stokjes moeten haken in de losse en dan moet ik in toer 3 2vaste in een stokje, 1 losse, 1 overslaan, 2 vaste in stokje en dan 1 vaste in elke steek. Dan heb ik nog wat stokjes over of moet had ik de 7 stokjes als een bolletjes moeten haken of moet ik alleen het eerste en het laatste stokje haken? Ik kom er niet uit en kan ook geen video terug vinden. Alvast bedankt, Sandra
11.11.2015 - 18:06DROPS Design ha risposto:
Hoi Sandra. Kan je aangeven welke maat je haakt, dan kan ik makkelijker meetellen en je helpen :-) Bvd.
12.11.2015 - 16:08
![]() Karen ha scritto:
Karen ha scritto:
I am left handed will the pattern still work out correct if I am working the other way round. Do you have any left handed instructions for this pattern.
09.11.2015 - 18:27DROPS Design ha risposto:
Dear Karen, you are welcome to contact your DROPS Store for any individual assistance. Happy crocheting!
10.11.2015 - 09:37
![]() FLUNA ha scritto:
FLUNA ha scritto:
Super agréable à crocheter ces chaussons. le point est très joli, très agréable à réaliser, et la laine est toute douce. Le travail monte vite. pour l'instant je n'en suis qu'à la longueur à la jambe et je n'ai pas de souci. J'ai hâte de continuer la suite pour voir le rendu définitif.
08.11.2015 - 23:42
![]() Linda ha scritto:
Linda ha scritto:
I can't not find the yarn you use for these, and your other boot patterns, is there another yarn I can use
11.08.2015 - 23:51DROPS Design ha risposto:
Dear Linda, please click here to get the list of stores in Canada and/or shipping to Canada. Happy knitting!
12.08.2015 - 18:41
|
|
Sweet Spirited#sweetspiritedslippers |
|
|
|
|
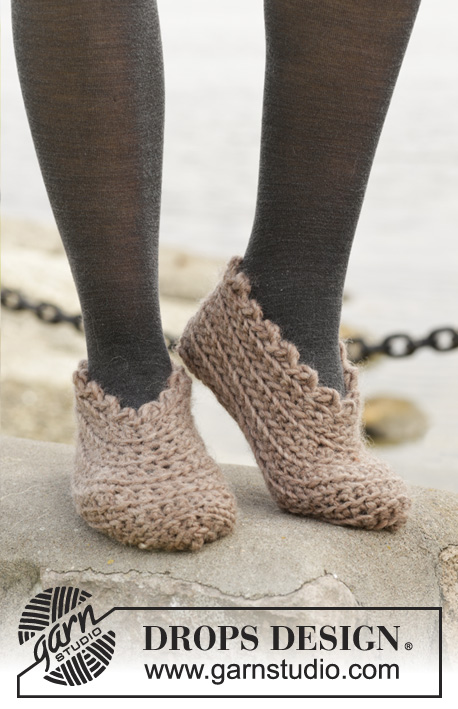
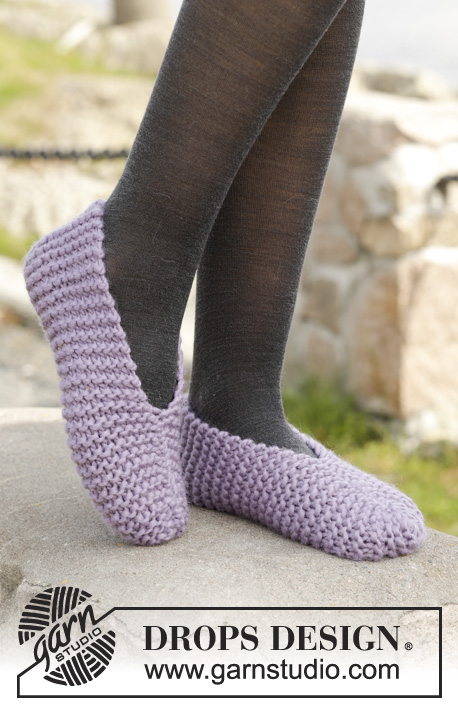
Pantofole DROPS lavorate all’uncinetto con motivo a stella in "Snow".
DROPS 156-9 |
|
|
SUGGERIMENTO PER IL LAVORO: Assicurarsi che le m riprese siano abbastanza lasse. SUGGERIMENTO PER LE DIMINUZIONI: Lavorare 1 m.b ma aspettare con l’ultimo passaggio (= 2 m sull’uncinetto), poi lavorare la m.b successiva ma sull’ultimo passaggio, far passare il filo attraverso tutte le m sull’uncinetto = 1 m.b diminuita. INFORMAZIONI PER IL LAVORO: All’inizio del giro a m.b lavorare 1 cat (non sostituisce la 1° m.b). Finire il giro con 1 m.bss nella 1° m.b all’inizio del giro. ---------------------------------------------------------- PANTOFOLA: Lavorata in tondo, top down. GAMBA: Avviare 25-29-31 cat LASSE con l’uncinetto n° 8 mm con Snow e formare un anello con 1 m.bss nella 1° cat. Poi lavorare il motivo a stella come segue: 1° GIRO: LEGGERE IL SUGGERIMENTO PER IL LAVORO! Lavorare 3 cat, riprendere 5 m, iniziare nella 2° cat dall’uncinetto (= 6 m sull’uncinetto), fare 1 gettato e far passare il filo attraverso tutte e 6 le m, lavorare 1 cat per fare un buco sulle 6 m, * riprendere 1 m nel buco, riprendere 1 m a lato sull’ultima delle 6 m, riprendere 1 m nella stessa cat in cui è stata riprese l’ultima delle 6 m, 1 m in ognuna delle 2 cat successive (= 6 m sull’uncinetto), fare un gettato e farlo passare attraverso tutte e 6 le m, 1 cat *, ripetere *-* 11-13-14 volte in totale, finire con 1 m.bss nella 3° cat all’inizio del giro. 2° GIRO: 2 cat, lavorare 2 m.ma in ogni “buco della stella”, finire il giro con 1 m.bss nella 2° cat dall’inizio del giro = 12-14-15 stelle. FARE ATTENZIONE ALLA TENSIONE DEL LAVORO! 3° GIRO: 3 cat, riprendere 1 m nella 2° e 3° cat dall’uncinetto, 1 m nel filo dietro di ognuna delle prime 3 m.m.a sulla riga (= 6 m sull’uncinetto), fare 1 gettato e far passare il filo attraverso tutte e 6 le m, 1 cat, * riprendere 1 m nel buco, 1 m a lato sull’ultima delle 6 m, 1 m nel filo dietro della stessa m.m.a in cui è stata ripresa l’ultima delle 6 m, 1 m nel filo dietro di ognuna delle 2 m.m.a (= 6 m sull’uncinetto), fare un gettato e farlo passare attraverso tutte e 6 le m, 1 cat *, ripetere *-* 11-13-14 volte in totale, finire con 1 m.bss nella 3° cat all’inizio del giro. Ripetere il 2° e 3° giro 8 volte in totale. Poi ripetere il 2° giro un’altra volta = 9 righe con le stelle. Il lavoro misura circa 30 cm. Girare il lavoro con il rovescio del lavoro verso l’esterno, girare e lavorare 1 giro nel modo opposto come segue: lavorare 1 cat, 1 m.b in ogni m.m.a e ALLO STESSO TEMPO diminuire 4-4-6 m in modo uniforme – LEGGERE IL SUGGERIMENTO PER LE DIMINUZIONI, finire con 1 m.bss nella 1° m.b = 21-25-25 m.b. ORA MISURARE IL LAVORO DA QUI! PIEDE : Lavorare in tondo. Lavorare ogni m.b nel filo dietro delle m.b sul giro sotto. 1° GIRO: LEGGERE LE INFORMAZIONI PER IL LAVORO! Lavorare 2 m.b nella 1° m.b, 1 m.b in ognuna delle 8-10-10 m.b, 2 m.b nella m.b successiva, 1 cat, saltare la m.b successiva, 2 m.b nella m.b successiva, 1 m.b in ognuna delle 8-10-10 m.b successive e 2 m.b nell’ultima m.b = 24-28-28 m.b + 1 cat. 2° GIRO: Lavorare 1 m.b in ognuna delle prime 12-14-14 m.b, 7 m.a intorno alla cat e 1 m.b in ognuna delle ultime 12-14-14 m.b = 31-35-35 m. 3° GIRO: lavorare 2 m.b nella 1° m, 1 m.b in ognuna delle 13-15-15 m successive, 2 m.b nella m successiva, 1 cat, saltare la m.b successiva, 2 m.b nella m successiva, 1 m.b in ognuna delle 13-15-15 m successive e 2 m.b nell’ultima m = 34-38-38 m.b + 1 cat. 4° GIRO: Lavorare 1 m.b in ognuna delle prime 17-19-19 m.b, 7 m.a intorno alla cat e 1 m.b in ognuna delle ultime 17-19-19 m.b = 41-45-45 m. 5° GIRO: lavorare 2 m.b nella 1° m, 1 m.b in ognuna delle 18-20-20 m successive, 2 m.b nella m successiva, 1 cat, saltare la m.b successiva, 2 m.b nella m successiva, 1 m.b in ognuna delle 18-20-20 m successive e 2 m.b nell’ultima m = 44-48-48 m.b + 1 cat 6° GIRO: Lavorare 1 m.b in ognuna delle prime 22-24-24 m.b, 7 m.a intorno alla cat e 1 m.b in ognuna delle ultime 22-24-24 m.b = 51-55-55 m. Finire qui gli aumenti per la TAGLIA 35/37 e 38/40. TAGLIA 41/43: 7° GIRO: Lavorare 1 m.b in ognuna delle prime 27 m, 1 cat, saltare la m successiva e lavorare 1 m.b in ognuna delle 27 m successive. 8° GIRO: Lavorare 1 m.b in ognuna delle prime 27 m, 7 m.a intorno alla cat e 1 m.b in ognuna delle ultime 27 m.b = 61 m. TUTTE LE TAGLIE: Dopo l’ultimo aumento ci sono 51-55-61 m sul giro. Continuare in tondo con 1 m.b in ogni m fino a quando il lavoro misura 6-7-8 cm. Sui 5 giri successivi lavorare insieme le prime e le ultime 2 m.b sul giro in 1 m.b – Ricordarsi del SUGGERIMENTO PER LE DIMINUZIONI (lavorare le altre m.b come prima) = 41-45-51 m.b. Chiudere e affrancare. CONFEZIONE: Iniziare sotto il piede sul davanti della punta. Cucire margine a margine nel filo più esterno delle m di vivagno per evitare una cucitura spessa al centro sotto il piede. Chiudere e affrancare. Piegare la gamba in modo che il diritto del lavoro sia verso l’esterno. Lavorare un’altra pantofola nello stesso modo. |
|
Avete terminato questo modello?Allora taggate le vostre foto con #dropspattern #sweetspiritedslippers o inviatele alla #dropsfan gallery. Avete bisogno di aiuto con questo modello?Troverete 8 video tutorial, una sezione per i commenti/domande e molto altro guardando il modello su www.garnstudio.com © 1982-2026 DROPS Design A/S. Ci riserviamo tutti i diritti. Questo documento, compreso tutte le sue sotto-sezioni, è protetto dalle leggi sul copyright. Potete leggere quello che potete fare con i nostri modelli alla fine di ogni modello sul nostro sito. |


Con oltre 40 anni di esperienza nel design di modelli di maglia e uncinetto, DROPS Design offre la più estesa collezione di modelli gratuiti su internet - tradotti in 17 lingue. Ad oggi vi possiamo fornire 324 cataloghi e 12190 modelli - 9461 dei quali sono tradotti in Italiano.
Ci stiamo impegnando molto per darvi il meglio che vi possiamo offrire in termini di maglia e uncinetto, ispirazioni e consigli così come filati di grande qualità ad un prezzo incredibile! Volete utilizzare i nostri modelli per qualcosa d'altro oltre al vostro uso personale? Potete leggere tutto ciò che è consentito nel testo sul Copyright in basso su tutte le pagine dei nostri modelli. Buon lavoro!
Lasciare un commento sul modello DROPS 156-9
Noi saremmo felici di ricevere i tuoi commenti e opinioni su questo modello!
Se vuoi fare una domanda, fai per favore attenzione a selezionare la categoria corretta nella casella qui sotto per velocizzare il processo di risposta. I campi richiesti sono indicati da *.