
Categorie popolari
State cercando un filato?


Commenti / Domande (12)
![]() Wilnellia Diep ha scritto:
Wilnellia Diep ha scritto:
I love all your patterns. Unfortunately I do not understand how to knit the neck warmer which seems to me easy at first. `could you give me every step until the end? I started by doing the top 2K2P First row 2nd row etc… when to increase … Thank you so much for your support
14.12.2024 - 21:41DROPS Design ha risposto:
Dear Wilnellia, you cast on stitches for the neck warmer. Then work 4 rounds in garter stitch. Continue in stocking stitch until piece measures 12 cm. Then you start slipping stitches to a thread: work and slip the first 4 stitches to one thread, work in stocking stitches until 4 stitches are left, work and slip the last 4 stitches to another thread. *Turn the piece, work and slip the new first 2 stitches to the thread on this side, work in stocking stitch until 2 stitches are left, work and slip the last 2 stitches to the thread on this side.* Repeat * to * until 1 stitch is left on the needle. Cut the yarn and place all stitches back on needle to continue working. Happy knitting!
15.12.2024 - 22:59
![]() Corina Avram ha scritto:
Corina Avram ha scritto:
Also, what should happen after the hat reaches 14-16cm? One should knit without increasing until 17-18 cm?
18.12.2023 - 13:11DROPS Design ha risposto:
Dear Mrs Avram, when piece measures 14 cm, increase one more time, then when piece measures 16 cm increase one last time (there are now 67-69 sts), then continue over these stitches until pieces measures 17-18 cm, then cast off. Happy knitting!
19.12.2023 - 07:31
![]() Corina Avram ha scritto:
Corina Avram ha scritto:
Hello, about the hat instructions: "When piece measures 9-10 cm, work in garter st over all sts AT THE SAME TIME on 1st row inc 4 sts evenly = 59-61 sts. Repeat inc when piece measures 14 and 16 cm = 67-69 sts on needle" Is the increase done on every row, RS and WS? My hat reached 69 stitches, but measures only 12 cm. Thanks :) Corina
18.12.2023 - 13:09DROPS Design ha risposto:
Dear Mrs Avram, increase on a row from right side (read how to increase evenly here); increase when hat measures 10 cm, then work until it measures 14 cm and increase evenly 4 sts, then work until it measures 16 cm and increase 4 sts evenly = there are 69 sts in total when piece measures 16 cm.. Cast off when it measures 18 cm. Happy knitting!
18.12.2023 - 16:21
![]() Diane Turcot ha scritto:
Diane Turcot ha scritto:
Pour le tour du cou, après que l'ouvrage mesure 12 cm, vous dites de le diviser, en deux? Donc 25 et 24 m. Pouvez-vous expliquer clairement la suite. Tricoter les mailles restantes? Combien, le reste des 25? Ensuite on tourne?Je ne comprends pas. SVP, aidez-moi, je veux le réussir. MERCI
26.10.2021 - 02:56DROPS Design ha risposto:
Bonjour Mme Turcot, vous divisez l'ouvrage pour le tricoter de ce moment en allers et retours (pas en rond) en jersey sur les aiguilles circulaires. Ce sont les rangs raccourcis. Regardez la video ICI. Pour la suite, suivez les explications. Bon tricot!
26.10.2021 - 17:21
![]() Helena ha scritto:
Helena ha scritto:
Sadly, I still don't understand the instructions for the neck warmer. Also, it always helps to state if the item is knitted top down or bottom up. It helps get a picture of the garment in the head. Hat in this pattern is great though - I knitted 4 of them. Pity about the neck warmer, unless you improve on the instructions.
22.11.2019 - 20:21DROPS Design ha risposto:
Dear Helena, the neck warmer is worked top down, first in the round, then with short rhows (leave first 4 sts then 2 sts unworked at the end of each row until the middle stitch remains on needle, then work in the round again for the last rounds. Happy knitting!
25.11.2019 - 08:11
![]() Helena ha scritto:
Helena ha scritto:
I have done countless knitting from your patterns and I really like everything you do. However, the instructios for this neck warmer are totally incomprehensible to me. I don't understand at all where to make a division and what stitches to put on a stitch holder and which ones to knit. Love the hat though.
05.10.2019 - 12:47DROPS Design ha risposto:
Dear Helena, work now in rows (short rows): work the first 4 sts and slip them on a thread, work to the end of the row, turn and work the first 4 sts and slip them on a thread, work to the end of the row (= 4 sts on each side are on a thread). Continue like this but slip the first 2 sts at the beg of each row -both from RS and from WS on a thread until 1 stitch remains (= middle stitch). Happy knitting!
07.10.2019 - 10:55
![]() Rosalba Di Salvio ha scritto:
Rosalba Di Salvio ha scritto:
Salve,io vorrei fare questo cappello per una taglia 58 cm e 60 cm vorrei farlo con i ferri circolari e il filato Big delight,perché preferisco lavorare in cerchio che con i ferri diritti e poi cucire alla fine,come devo fare? Grazie per l'aiuto
15.02.2019 - 21:05DROPS Design ha risposto:
Buongiorno Rosalba, per un aiuto così personalizzato può rivolgersi al suo rivenditore DROPS di fiducia. Buon lavoro!
17.02.2019 - 09:37
![]() Rosalba ha scritto:
Rosalba ha scritto:
Salve,io vorrei fare questo cappello per una taglia 58 cm e 60 cm vorrei farlo con i ferri circolari e il filato Big delight,perché preferisco lavorare in cerchio che con i ferri diritti e poi cucire alla fine,come devo fare? Grazie per l'aiuto
15.02.2019 - 18:47
![]() Isabelle ha scritto:
Isabelle ha scritto:
Que veut dire 1m lis au point mousse de chaque côté? Vous dite de continuée en jersey. Merci!
18.02.2018 - 20:27DROPS Design ha risposto:
Bonjour Isabelle, on continue en jersey mais la 1ère et la dernière maille va se tricoter à l'endroit tous les rangs (= mailles lisière pour la couture). Bon tricot!
19.02.2018 - 10:18
![]() Jacqueline Lhote ha scritto:
Jacqueline Lhote ha scritto:
Je ne comprends pas la division et le glissement des mailles pour le tour de cou
08.02.2015 - 18:51DROPS Design ha risposto:
Bonjour Mme Lhote, vous tricotez comme pour les rangs raccourcis en laissant non travaillées les mailles de chaque côté, puis reprenez toutes les mailles ensemble, en rond. Bon tricot!
08.02.2015 - 19:34
|
|
Eliana#elianaset |
|
|
|
|
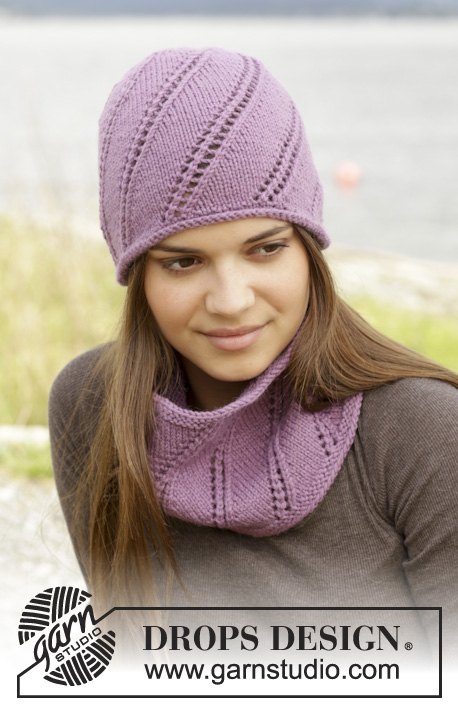
Cappello e scaldacollo DROPS lavorati ai ferri a maglia legaccio e maglia rasata in "Andes".
DROPS 156-40 |
|
|
M LEGACCIO (avanti e indietro sui f): Lavorare tutti i f a dir. 1 "costa" a m legaccio = 2 f dir. M LEGACCIO (in tondo sui f circolari): * 1 giro dir e 1 giro rov *, ripetere *-*. 1 "costa" a m legaccio = 2 giri. ---------------------------------------------------------- CAPPELLO: Lavorare avanti e indietro a M LEGACCIO - leggere la spiegazione sopra, dall'alto in basso. Avviare 9 m con i f n° 8 mm con Andes. 1° F (e i f dal rovescio del lavoro): lavorare tutti i f a dir. 2° F (= diritto del lavoro): * 1 m dir, 1 gettato *, ripetere *-* fino a quando rimane 1 m, finire con 1 m dir = 17 m. Lavorare i gettati a dir ritorto sul f successivo (cioè lavorare nel filo dietro della m) per evitare buchi. 4° F (= diritto del lavoro): * 2 m dir, 1 gettato *, ripetere *-* fino a quando rimane 1 m, finire con 1 m dir = 25 m. 6° F (= diritto del lavoro): * 3 m dir, 1 gettato *, ripetere *-* fino a quando rimane 1 m, finire con 1 m dir = 33 m. 8° F (= diritto del lavoro): * 4 m dir, 1 gettato *, ripetere *-* fino a quando rimane 1 m, finire con 1 m dir = 41 m. 10° F (= diritto del lavoro): * 5 m dir, 1 gettato *, ripetere *-* fino a quando rimane 1 m, finire con 1 m dir = 49 m. 12° F (= diritto del lavoro): lavorare a dir e ALLO STESSO TEMPO distribuire 6-8 aumenti in modo uniforme (= circa dopo ogni 8-6 m) = 55-57 m. FARE ATTENZIONE ALLA TENSIONE DEL LAVORO! Inserire 1 segnapunti nel lavoro, ORA MISURARE IL LAVORO DA QUI! Poi lavorare a m rasata con 1 m di vivagno a m legaccio a ogni lato del lavoro. Quando il lavoro misura 9-10 cm, lavorare a m legaccio su tutte le m e ALLO STESSO TEMPO sul 1° f distribuire 4 aumenti in modo uniforme = 59-61 m. Ripetere gli aumenti quando il lavoro misura 14 e 16 cm = 67-69 m sul f. Intrecciare quando il lavoro misura 17-18 cm. CONFEZIONE: Cucire nel filo più esterno delle m di vivagno. Tirare forte la cima del cappello e affrancare. ---------------------------------------------------------- SCALDACOLLO: Lavorato in tondo con i f circolari. Avviare 49 m con i f circolari n° 8 mm con Andes. Lavorare 2 "coste" a M LEGACCIO - leggere la spiegazione sopra. Lavorare a m rasata fino a quando il lavoro misura 12 cm. FARE ATTENZIONE ALLA TENSIONE DEL LAVORO! Ora dividere il lavoro e lavorare avanti e indietro a m rasata come segue: lavorare le prime 4 m, poi trasferirle su un fermamaglie, lavorare le m rimaste, ripetere sull'altro lato del lavoro. Ora ci sono 4 m su un fermamaglie a ogni lato del lavoro. Poi lavorare come segue: * lavorare le prime 2 m, poi trasferirle su un fermamaglie, lavorare le m rimaste *, ripetere *-* su ogni f. Cioè trasferire 2 m su un fermamaglie a ogni lato del lavoro su questi 2 f. Continuare in questo modo fino a quando rimane 1 m sul f (= m centrale). Tagliare il filo. Poi riportare tutte le m sui f circolari = 49 m. Ora lavorare in tondo sui f circolari dal centro dietro. Lavorare come segue: * 1 m rov, 1 gettato *, ripetere *-* fino alla m centrale (= 24 volte), 1 m rov, * 1 gettato, 1 m rov *, ripetere *-* per tutto il giro (= 24 volte) = 97 m. Lavorare 1 giro dir, lavorare i gettati a dir ritorto. Poi lavorare 1 "costa" su tutte le m e ALLO STESSO TEMPO sul 1° giro aumentare facendo 1 gettato dopo la 1° m a ogni lato della m centrale (cioè 48 m a ogni lato) e 1 YO dell'ultima m sul giro = 101 m sul f. Intrecciare senza stringere. |
|
Avete terminato questo modello?Allora taggate le vostre foto con #dropspattern #elianaset o inviatele alla #dropsfan gallery. Avete bisogno di aiuto con questo modello?Troverete 23 video tutorial, una sezione per i commenti/domande e molto altro guardando il modello su www.garnstudio.com © 1982-2026 DROPS Design A/S. Ci riserviamo tutti i diritti. Questo documento, compreso tutte le sue sotto-sezioni, è protetto dalle leggi sul copyright. Potete leggere quello che potete fare con i nostri modelli alla fine di ogni modello sul nostro sito. |


Con oltre 40 anni di esperienza nel design di modelli di maglia e uncinetto, DROPS Design offre la più estesa collezione di modelli gratuiti su internet - tradotti in 17 lingue. Ad oggi vi possiamo fornire 324 cataloghi e 12290 modelli - 9561 dei quali sono tradotti in Italiano.
Ci stiamo impegnando molto per darvi il meglio che vi possiamo offrire in termini di maglia e uncinetto, ispirazioni e consigli così come filati di grande qualità ad un prezzo incredibile! Volete utilizzare i nostri modelli per qualcosa d'altro oltre al vostro uso personale? Potete leggere tutto ciò che è consentito nel testo sul Copyright in basso su tutte le pagine dei nostri modelli. Buon lavoro!
Lasciare un commento sul modello DROPS 156-40
Noi saremmo felici di ricevere i tuoi commenti e opinioni su questo modello!
Se vuoi fare una domanda, fai per favore attenzione a selezionare la categoria corretta nella casella qui sotto per velocizzare il processo di risposta. I campi richiesti sono indicati da *.