
Categorie popolari
State cercando un filato?


Commenti / Domande (56)
![]() Nina ha scritto:
Nina ha scritto:
Hei! Kunne jeg tovet denne bereten? Eller vil det se rart ut?
21.06.2024 - 02:49DROPS Design ha risposto:
Hei Nina, Etter toving blir bereten mindre i størrelse og mye tettere. Hvis du skal ha samme fasongen, må den strikkes større og deretter trekkes ut til riktig fasong etter toving. God fornøyelse!
21.06.2024 - 06:46
![]() Monique ha scritto:
Monique ha scritto:
Puis je remplacer le point mousse du début par des côtes 2/2 ?
06.05.2024 - 22:11DROPS Design ha risposto:
Bonjour Monique, probablement mais il faudra peut être ajuster le nombre de mailles pour avoir un multiple de 4 d'une part - pensez aussi que les côtes resserrent davantage l'ouvrage que le point mousse, il vous faudra peut être ajuster aussi le nombre de mailles en conséquence, vous pouvez essayer pour voir si le résultat vous convient. Bon tricot!
07.05.2024 - 07:47
![]() Elisabeth ha scritto:
Elisabeth ha scritto:
Bonjour, le point mousse en bordure autour du châle se fait à la fin en relevant des mailles ? En suivant les explications , je n’obtiens que du jersey avec2 rangs de points mousse dans le travail. Merci pour votre aide
12.02.2023 - 08:44DROPS Design ha risposto:
Bonjour Elisabeth, le châle se tricote de haut en bas, en jersey avec une côte mousse à intervalles réguliers, et on le termine une côte mousse) puis 2 rangs endroit, on a ainsi 2 côtes mousse avant de rabattre, comme sur la photo. Bon tricot!
13.02.2023 - 09:38
![]() Elisabeth ha scritto:
Elisabeth ha scritto:
Bonjour, je n’arrive pas à voir le point mousse sur les bords du chale.
04.02.2023 - 11:56DROPS Design ha risposto:
Bonjour Elisabeth, peut-être parce que les photos ne montrent pas vraiment les côtés de l'ouvrage? On tricote le châle de haut en bas, les mailles lisières au point mousse se trouvent donc dans la base en haut du triangle et on tricote en jersey avec une côte mousse ( au rang 6 des rangs 2 à 7). Bon tricot!
06.02.2023 - 15:26
![]() Cristina ha scritto:
Cristina ha scritto:
Hallo, was bedeutet das: DROPS Design 12.09.2019 kl. 20:22: Buonasera Ilaria, i modelli a maglia andrebbero sempre bloccati dopo il lavaggio. Buon lavoro! Danke Cristina
10.10.2020 - 16:11DROPS Design ha risposto:
Liebe Cristina, die fertige Strickstücke werden immer gespannt. ( mit Stecknadeln auf einer geeigneten Unterlage spannen, anfeuchten (z.B. mit einer Sprühflasche für Blumen) und trocknen lassen, danach entfernen Sie die Stecknadeln). Viel Spaß beim stricken!
12.10.2020 - 07:49
![]() Diane ha scritto:
Diane ha scritto:
This is the worst pattern I’ve ever knitted. It doesn’t tell where the middle stitch is, row 1 has more instructions than there are available stitches. It’s terrible! I’m disappointed, I bought all the yarn I needed and the pattern is just really bad. Also, no way to get help. I will never again buy a pattern from your company.
09.09.2020 - 05:15DROPS Design ha risposto:
Dear Diane, we are very sorry to hear that you got so many worries with this pattern, you are always welcome to ask your question here in this section to get helped - your DROPS store can always help you too - and you can also ask more knitters around the world in our DROPS Workshop. Row 1 on shawl is worked over 9 sts, you increase 4 sts = there are 13 sts at the end of this row. Hope this could help you to start. Happy knititng!
09.09.2020 - 09:28
![]() Holly ha scritto:
Holly ha scritto:
Hello! When knitting just the beret, do you just need circular needles, or do you also need double pointed needles? If the double pointed needles are needed, at what point would they be used? Thanks!
12.01.2020 - 01:50DROPS Design ha risposto:
Hi Holly, You will need the double pointed needles at the top of the beret, when you have decreased so many stitches that the circular needle is too long. Happy knitting!
13.01.2020 - 07:25
![]() Ilaria ha scritto:
Ilaria ha scritto:
Grazie mille!
12.09.2019 - 20:28
![]() Ilaria ha scritto:
Ilaria ha scritto:
Salve!! Ho realizzato entrambi i capi del modello e volevo sapere.. lo scialle va bloccato?
12.09.2019 - 18:53DROPS Design ha risposto:
Buonasera Ilaria, i modelli a maglia andrebbero sempre bloccati dopo il lavaggio. Buon lavoro!
12.09.2019 - 20:22
![]() Katt ha scritto:
Katt ha scritto:
I have come into a problem with the beret pattern. It says to add 5 stitch markers and decrease a stitch before and after each marker resulting in 8 sts decreased. If you are including the bor marker in the decreases it would be 10 sts decreased. So I have skipped the bor stitch decreases but now it has one side of the beret all flat with no decrease...help!!!!
12.03.2019 - 04:50DROPS Design ha risposto:
Dear Katt, you decrease a total of 10 sts on every decrease round (2 sts at each of the 5 markers), and repeat these decreases on every other round a total of 8 times (= a total of 8 rounds with decreases). Happy knitting!
12.03.2019 - 10:10
|
|
Winter Blush#winterblushset |
|
 |
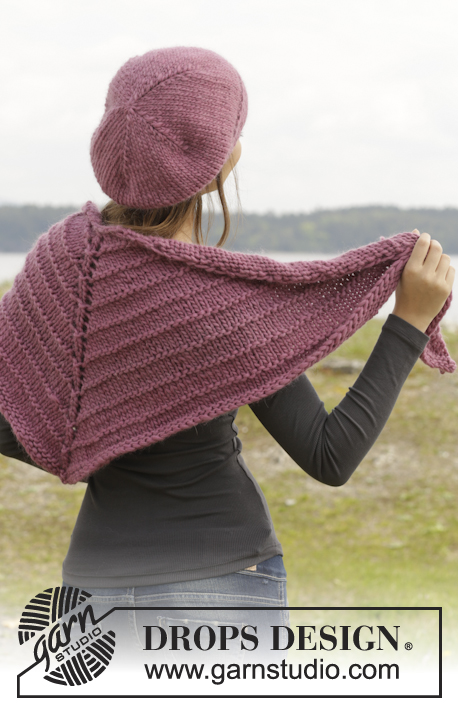 |
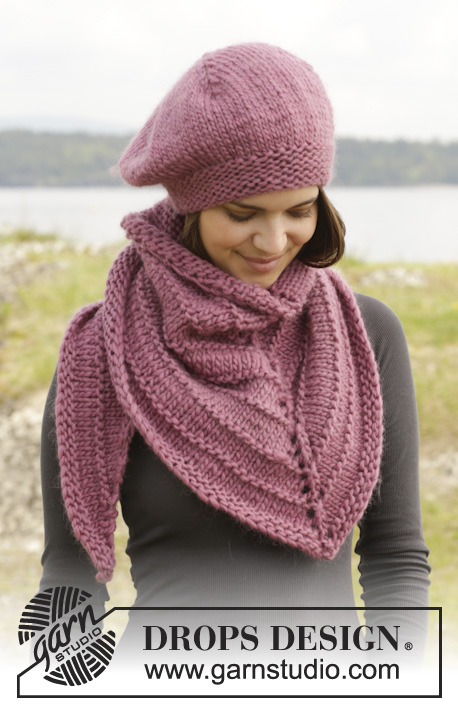
Basco e scialle DROPS ai ferri, a punto legaccio e maglia rasata, in "Snow".
DROPS 156-49 |
|
|
SUGGERIMENTO PER CAMBIARE GOMITOLO: Quando si cambia gomitolo, dividere in 2 gli ultimi 15 cm del filo del gomitolo finito – tagliare una delle due parti e fare la stessa cosa con il filo del nuovo gomitolo. Sovrapporre i primi e gli ultimi 15 cm dei due gomitoli, in modo da ottenere lo spessore giusto e continuare a lavorare – questo consente di rendere invisibile il passaggio tra due gomitoli. PUNTO LEGACCIO (in tondo, sui ferri circolari): Lavorare * 1 giro a dir, 1 giro a rov *, ripetere da *-*. 1 “costa” a legaccio = 2 giri. SUGGERIMENTO PER GLI AUMENTI: Per aumentare 1 m, lavorare 2 m nella stessa m: quindi lavorare la m sia nel filo anteriore che in quello posteriore. SUGGERIMENTO PER LE DIMINUZIONI: Diminuire 1 m prima del segno, come segue: lavorare finché non rimangono 2 m prima del segno, passare 1 m a dir senza lavorarla, 1 m dir, accavallare la m passata sulla m lavorata. Diminuire 1 m dopo il segno, come segue: lavorare 2 m insieme a dir. ---------------------------------------------------------- BASCO: Si lavora in tondo sui ferri circolari e sui ferri a doppia punta. Avviare, senza stringere troppo il filo, 45 m sui ferri circolari n° 6 con il filato Snow. Lavorare a PUNTO LEGACCIO – vedere le spiegazioni sopra – finché il lavoro non misura 6 cm. RICORDARSI LA TENSIONE DEL LAVORO! Al giro successivo, aumentare 1 m in ogni m - vedere il SUGGERIMENTO PER GLI AUMENTI = sui ferri ci sono 90 m. Proseguire a maglia rasata. Quando il lavoro misura 16 cm, inserire 5 segni nel lavoro come segue: Inserire il 1° segno all’inizio del giro, poi inserire 1 segno ogni 18 m = 5 segni. Proseguire a maglia rasata e, ALLO STESSO TEMPO, diminuire ogni 2 giri come segue: Diminuire 1 m da ciascun lato di ogni segno 8 volte in tutto - vedere il SUGGERIMENTO PER LE DIMINUZIONI = rimangono 10 m. Passare il filo attraverso le rimanenti 10 m, stringere e fermare il filo. ----------------------------------------------------------- SCIALLE: Si lavora avanti e indietro sui ferri circolari. VEDERE IL SUGGERIMENTO PER CAMBIARE IL FILATO! Avviare 9 m sui ferri circolari n° 8 con il filato Snow. Lavorare come segue: FERRO 1 (= diritto del lavoro): 1 m dir, 1 m gettata, 3 m dir, 1 m gettata, 1 m dir (= m centrale) inserire un segno in questa m, 1 m gettata, 3 m dir, 1 m gettata e 1 m dir = 13 m. FERRO 2 (= rovescio del lavoro): 1 m rov, 1 m gettata, lavorare a rov finché non rimane 1 m, 1 m gettata e 1 m rov = sono state aumentate 2 m. FERRO 3: 1 m dir, 1 m gettata, lavorare a dir fino alla m centrale, 1 m gettata, 1 m dir (= m centrale), 1 m gettata, lavorare a dir finché non rimane 1 m, 1 m gettata e 1 m dir = sono state aumentate 4 m. RICORDARSI LA TENSIONE DEL LAVORO! FERRO 4: 1 m rov, 1 m gettata, lavorare a rov finché non rimane 1 m, 1 m gettata e 1 m rov = sono state aumentate 2 m. FERRO 5: 1 m dir, 1 m gettata, lavorare a dir fino alla m centrale, 1 m gettata, 1 m dir (= m centrale), 1 m gettata, lavorare a dir finché non rimane 1 m, 1 m gettata e 1 m dir = sono state aumentate 4 m. FERRO 6: 1 m dir, 1 m gettata, lavorare a dir finché non rimane 1 m, 1 m gettata e 1 m dir = sono state aumentate 2 m. FERRO 7: 1 m dir, 1 m gettata, lavorare a dir fino alla m centrale, 1 m gettata, 1 m dir (= m centrale), 1 m gettata, lavorare a dir finché non rimane 1 m, 1 m gettata e 1 m dir = sono state aumentate 4 m. Ripetere i ferri dal 2 al 7 finché il lavoro non misura ca. 45 cm misurati lungo la m centrale – assicurarsi che l’ultimo ferro sia un ferro 7 con le m lavorate a dir e con gli aumenti. Lavorare 1 ferro a dir dal dir del lavoro e intrecciare le m senza stringere sul ferro successivo dal dir del lavoro. |
|
Avete terminato questo modello?Allora taggate le vostre foto con #dropspattern #winterblushset o inviatele alla #dropsfan gallery. Avete bisogno di aiuto con questo modello?Troverete 20 video tutorial, una sezione per i commenti/domande e molto altro guardando il modello su www.garnstudio.com © 1982-2026 DROPS Design A/S. Ci riserviamo tutti i diritti. Questo documento, compreso tutte le sue sotto-sezioni, è protetto dalle leggi sul copyright. Potete leggere quello che potete fare con i nostri modelli alla fine di ogni modello sul nostro sito. |
|


Con oltre 40 anni di esperienza nel design di modelli di maglia e uncinetto, DROPS Design offre la più estesa collezione di modelli gratuiti su internet - tradotti in 17 lingue. Ad oggi vi possiamo fornire 324 cataloghi e 12290 modelli - 9561 dei quali sono tradotti in Italiano.
Ci stiamo impegnando molto per darvi il meglio che vi possiamo offrire in termini di maglia e uncinetto, ispirazioni e consigli così come filati di grande qualità ad un prezzo incredibile! Volete utilizzare i nostri modelli per qualcosa d'altro oltre al vostro uso personale? Potete leggere tutto ciò che è consentito nel testo sul Copyright in basso su tutte le pagine dei nostri modelli. Buon lavoro!
Lasciare un commento sul modello DROPS 156-49
Noi saremmo felici di ricevere i tuoi commenti e opinioni su questo modello!
Se vuoi fare una domanda, fai per favore attenzione a selezionare la categoria corretta nella casella qui sotto per velocizzare il processo di risposta. I campi richiesti sono indicati da *.