
Categorie popolari
State cercando un filato?


Commenti / Domande (77)
![]() Hanne Opheim Tiller ha scritto:
Hanne Opheim Tiller ha scritto:
Det står at det er en jakke,men det står ingenting hvordan jeg skal strikke forstykkene for i oppskriften er for og bakstykket likt . Skulle gjerne vite hvordan forstykkene er strikket for det ser jo riktig så fint ut på bilde. Har fått garn og oppskrift i adventskalenderen og jeg startet med en gang. Håper det er noen som kan hjelpe meg. Hilsen strikkeglad dame
23.12.2014 - 17:15DROPS Design ha risposto:
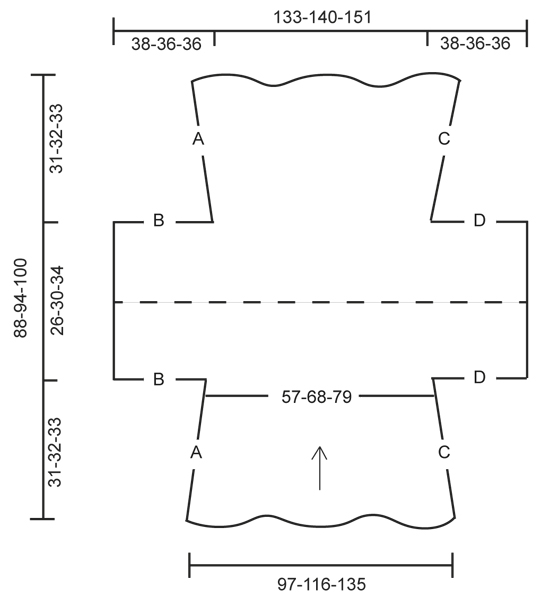
Hej Hanne. Du strikker den i ét stykke og legger op/lukker af til ermer. Se ogsaa monteringsskema nederst. Gud jul!
24.12.2014 - 11:30
![]() Beatrice Baumann ha scritto:
Beatrice Baumann ha scritto:
Ich habe gerade diese Jacke auf die Nadel genommen. Gehe ich Recht in der Annahme, dass die Angaben in der Massskizze die ungedehnte Jacke wiedergeben? Kann ich das Rückenteil verlängern in dem ich den Mustersatz A1B auf der Rückseite der Jacke bis zur gewünschten Rückenteillänge wiederhole oder verändert sich dadurch der Sitz der Jacke? Herzlichen Dank
22.12.2014 - 05:38DROPS Design ha risposto:
Ganz so einfach ist es nicht, da Sie ja die Kanten C und C bzw. A und A aneinandernähen müssen. Sie müssten also auch das Vorderteil entsprechend verlängern, dadurch wird es allerdings vielleicht zu voluminös. Die Jacke ist ungedehnt gemessen, sie weitet sich noch etwas.
09.03.2015 - 10:21
![]() Jean Williams ha scritto:
Jean Williams ha scritto:
Are you able to advise the approximate finished length of the S/M from the neck to the hem. I have just cast on for the sleeves and it looks as if it is going to be short, although on the picture it does not. Many thanks
13.12.2014 - 18:36DROPS Design ha risposto:
Dear Mrs Williams, in first size (XS/S) you should have 31 cm from cast on row to sts cast on for sleeve and in size M/L, 32 cm - seam will be under sleeve - total lenght will be somewhat shorter than the full length because of collar (see picture). Happy knitting!
14.12.2014 - 16:51
![]() Eileen ha scritto:
Eileen ha scritto:
Hallo, Ich habe Gr. 36/38 und nicht unbedingt ein Fan von zu oversized... Welche Grösse wäre die passende ? Danke
02.12.2014 - 21:01DROPS Design ha risposto:
Liebe Eileen, schauen Sie sich am besten die Maße in der Maßskizze an. Ich denke, Sie sollten die kleinste Größe stricken, da die Jacke durch das Muster auch noch dehnbar ist. Ein lockerer Sitz ist hier jedoch erwünscht, Sie können ja auch auf dem Foto sehen, wie die Jacke fällt.
03.12.2014 - 16:22
![]() Marielle ha scritto:
Marielle ha scritto:
Bonjour, je n'arrive pas à comprendre où est l'encolure et où sont les côtés du devant.
19.11.2014 - 18:20DROPS Design ha risposto:
Bonjour Marielle, les mailles du montage et les mailles rabattues forment après assemblage l'ouverture du gilet: dos, devants et col - cf schéma (A+A et C+C = coutures côtés - B+B et D+D = coutures manches). Bon tricot!
20.11.2014 - 09:08
![]() Chiara ha scritto:
Chiara ha scritto:
Sto facendo questo modello ma mi sono fermata perché' non capisco come calare per lo scollo e l'apertura sul davanti.Grazie Chiara
09.11.2014 - 19:28DROPS Design ha risposto:
Buonasera Chiara. Proceda seguendo le indicazioni così come sono, non è prevista un'apertura sul davanti e non ci sono diminuzioni per lo scollo. Per indossare il capo, dovrà infilare le maniche e portare dietro il collo la parte che corrisponde al davanti. Buon lavoro!
09.11.2014 - 20:35
![]() Michel ha scritto:
Michel ha scritto:
Je viens de terminer ce magnifique modèle et le rendu est superbe. La laine est hyper agréable à tricoter et d'une douceur exceptionnelle. Il m'a fallu peu de temps pour le réaliser ce qui est aussi bien agréable! Je dis bravo à la créatrice.
20.10.2014 - 14:56Marianne Hansen ha scritto:
Jeg skjønner ikke hvor åpningen blir, for det strikkes ikke fra midt foran? Forsiden og baksiden ser ut til å strikkes likt? hilsen Marianne
10.10.2014 - 16:03DROPS Design ha risposto:
Hej Marianne, du ser på måleskitsen hvordan den er strikket. Den er strikket som et stort rygstykke som syes sammen i siderne til ærmer. Se forklaringen og måleskitsen. God fornøjelse!
17.10.2014 - 15:37
![]() Ewa Jansson ha scritto:
Ewa Jansson ha scritto:
Förstår inte monteringen!
06.10.2014 - 09:51DROPS Design ha risposto:
Hej Ewa, du måste titta på måttskissen nederst i beskrivningen. Vik på mitten och sy A mot A och B mot B osv. Lycka till
16.10.2014 - 14:45
![]() Ciel Ellis ha scritto:
Ciel Ellis ha scritto:
How many skeins are required to produce this sweater?
30.09.2014 - 18:52DROPS Design ha risposto:
Dear Mrs Ellis, requested amound of yarn is stated on the right side of the picture under tab "materials", for example you need here in the first 2 sizes 125 g / 25 g a ball DROPS Brushed Alpaca Silk = you need 5 balls in the first 2 sizes (and 150/25 = 6 balls in the larger size). Happy knitting!
01.10.2014 - 10:09
|
||||||||||||||||
Let's Dance#letsdancecardigan |
||||||||||||||||
 |
 |
|||||||||||||||
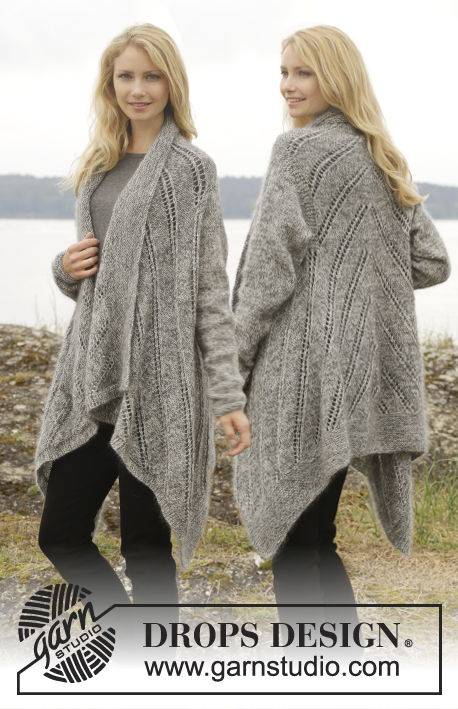
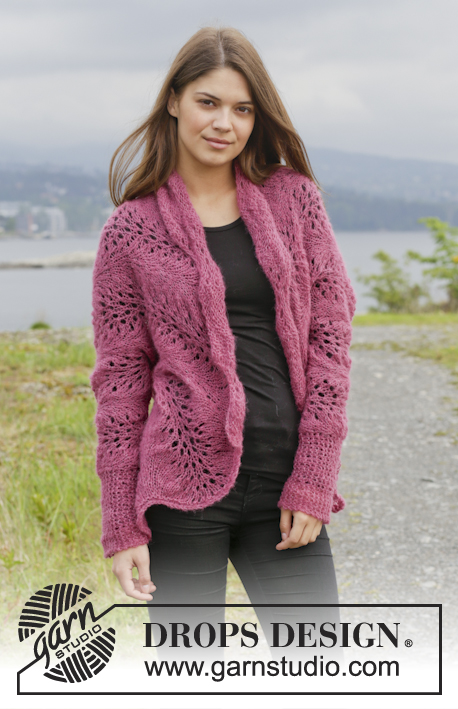
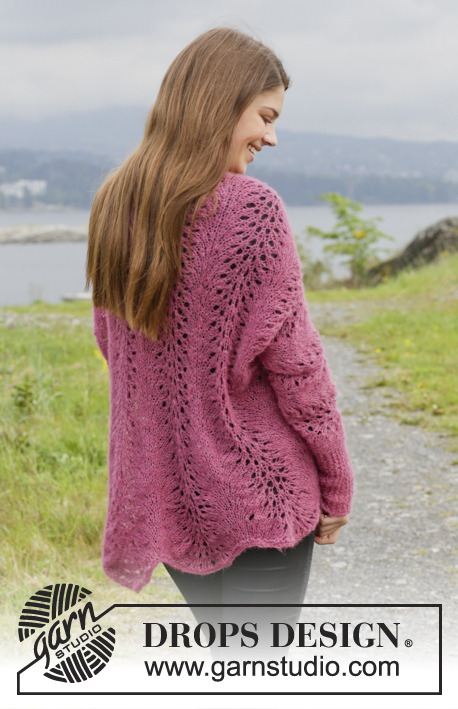
Giacca DROPS ai ferri, con motivo a onde, in "Brushed Alpaca Silk". Taglie: Dalla XS alla XXL.
DROPS 156-10 |
||||||||||||||||
|
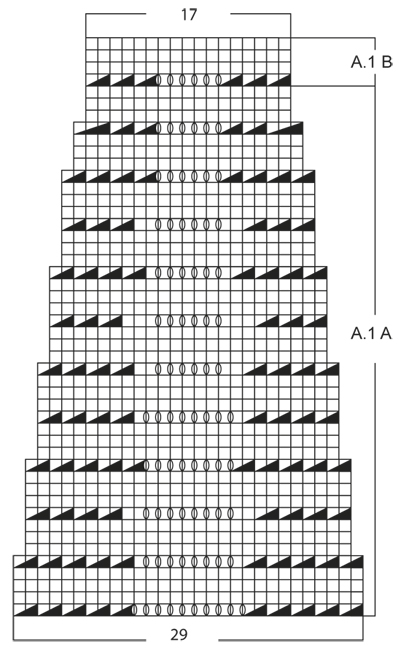
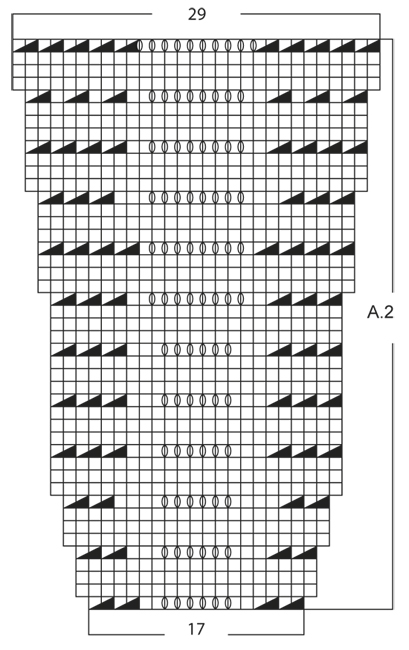
PUNTO LEGACCIO (avanti e indietro sui ferri): Lavorare tutti i ferri a dir. 1 “costa” a legaccio = 2 ferri a dir. MOTIVO: Vedere i diagrammi A.1 e A.2. I diagrammi mostrano tutti i ferri del motivo, visti sul diritto del lavoro. ---------------------------------------------------------- GIACCA: Si lavora avanti e indietro sui ferri circolari per avere sufficiente spazio per tutte le m. Sovrapporre le due estremità dello stesso ferro circolare (oppure usare un altro ferro della stessa misura ca. in aggiunta ai ferri circolari n° 6) e avviare, con il filato Brushed Alpaca Silk, 147-176-205 m (comprese le m vivagno) sui due ferri. In questo modo si ottiene un bordo elastico. Sfilare uno dei ferri e lavorare 1 COSTA A LEGACCIO - vedere le spiegazioni sopra. Lavorare ora il diagramma A.1A con 1 m vivagno a punto legaccio da ciascun lato. RICORDARSI LA TENSIONE DEL LAVORO! Dopo aver lavorato il diagramma A.1A 1 volta in verticale, sui ferri ci sono 87-104-121 m ed il lavoro misura ca.24 cm. Proseguire con il diagramma A.1B con 1 m vivagno da ciascun lato, finché il lavoro non misura 31-32-33 cm. Avviare ora 56-53-53 m da ciascun lato per le maniche - avviare le m su 2 ferri come fatto all’inizio del lavoro = 199-210-227 m. Proseguire con il diagramma A1B come prima, ma lavorare le prime / ultime 23-20-20 m da ciascun lato a punto legaccio. Quando il lavoro misura 44-47-50 cm, inserire 1 segno - DA ADESSO IN AVANTI, MISURARE IL LAVORO DA QUESTO PUNTO ! Quando il lavoro misura 13-15-17 cm - assicurarsi che il ferro successivo sia il 1° ferro del diagramma A.1B – intrecciare, SENZA STRINGERE TROPPO IL FILO, le 56-53-53 m da ciascun lato (è molto importante intrecciare le m senza stringere il filo per evitare che la cucitura sotto le maniche risulti troppo stretta) = sui ferri rimangono 87-104-121 m. Proseguire con il diagramma A.1B lavorando 1 m vivagno a punto legaccio da ciascun lato finché il lavoro non misura 17-20-23 cm dal segno. Lavorare poi seguendo il diagramma A.2 con 1 m vivagno da ciascun lato. Una volta completato il diagramma A.2, sui ferri ci sono 147-176-205 m. Lavorare 1 costa a legaccio e, SENZA STRINGERE TROPPO IL FILO, intrecciare le m dopo l’ultimo ferro del diagramma A.2; il lavoro deve avere la stessa lunghezza da ciascun lato del segno. CONFEZIONE: Cucire insieme A con A - vedere il grafico - a 1 m dai bordi. Cucire B con B. L’ apertura restante forma lo scalfo. Ripetere in modo uguale con i bordi C e D, sull’altro lato. |
||||||||||||||||
Spiegazioni del diagramma |
||||||||||||||||
|
||||||||||||||||
 |
||||||||||||||||
 |
||||||||||||||||
 |
||||||||||||||||
Avete terminato questo modello?Allora taggate le vostre foto con #dropspattern #letsdancecardigan o inviatele alla #dropsfan gallery. Avete bisogno di aiuto con questo modello?Troverete 17 video tutorial, una sezione per i commenti/domande e molto altro guardando il modello su www.garnstudio.com © 1982-2026 DROPS Design A/S. Ci riserviamo tutti i diritti. Questo documento, compreso tutte le sue sotto-sezioni, è protetto dalle leggi sul copyright. Potete leggere quello che potete fare con i nostri modelli alla fine di ogni modello sul nostro sito. |
||||||||||||||||


Con oltre 40 anni di esperienza nel design di modelli di maglia e uncinetto, DROPS Design offre la più estesa collezione di modelli gratuiti su internet - tradotti in 17 lingue. Ad oggi vi possiamo fornire 324 cataloghi e 12290 modelli - 9561 dei quali sono tradotti in Italiano.
Ci stiamo impegnando molto per darvi il meglio che vi possiamo offrire in termini di maglia e uncinetto, ispirazioni e consigli così come filati di grande qualità ad un prezzo incredibile! Volete utilizzare i nostri modelli per qualcosa d'altro oltre al vostro uso personale? Potete leggere tutto ciò che è consentito nel testo sul Copyright in basso su tutte le pagine dei nostri modelli. Buon lavoro!
Lasciare un commento sul modello DROPS 156-10
Noi saremmo felici di ricevere i tuoi commenti e opinioni su questo modello!
Se vuoi fare una domanda, fai per favore attenzione a selezionare la categoria corretta nella casella qui sotto per velocizzare il processo di risposta. I campi richiesti sono indicati da *.