
Categorie popolari
State cercando un filato?


Commenti / Domande (147)
![]() Karin ha scritto:
Karin ha scritto:
Ich habe noch eine frage, die verkürzten reihen wieder holen.heisst das wenn ich einmal kompl die reihe durch gestrickt habe, das ich von vorne wie am anfang drüber stricke?
24.04.2014 - 12:42DROPS Design ha risposto:
Liebe Karin, die verkürzten R wiederholen Sie immer von *-*, wie bei "verkürzte R" beschrieben. Ein Rapport besteht also aus 8 R an der breitesten Stelle und aus 2 R an der schmalsten Stelle. Dann fangen Sie die verkürzten R wieder von vorne an.
26.04.2014 - 11:31
![]() Karin ha scritto:
Karin ha scritto:
Ich hänge fest bei A.2 c.2M re hier wenden. wie kann das muster mit unterschiedl Ma anschlag aufgehen?
23.04.2014 - 19:27DROPS Design ha risposto:
Liebe Karin, vielleicht helfen Ihnen die Antworten zu den deutschen Kommentaren vom 11.04. und 20.02. weiter, dort wurde bereits erklärt, wie man im Muster wendet. Ansonsten können Sie gerne noch einmal fragen. Gutes Gelingen!
26.04.2014 - 11:29
![]() Nicole Schmidt ha scritto:
Nicole Schmidt ha scritto:
Hallo, ich habe eine Frage zu den Muster A.2 in der dritten Reihe bei 57 Maschen. Wie bekomme ich den Übergang zwischen den ersten 7 und den zweiten sieben Maschen hin, da der Übergang von B zu C Mitten in den Maschen ist, die zusammen gestrickt werden? Vielen Dank.
11.04.2014 - 15:44DROPS Design ha risposto:
Liebe Nicole, am besten kümmern Sie sich nicht um den genauen Übergang, sondern beachten einfach, dass die 3. R nicht mit 1 M re anfängt wie die 1. R, sondern mit 2 M re zusammen. Das Muster wird also im Vergleich zur 1. R um 1 M versetzt. Dann stricken Sie einfach immer 1 Umschlag, 2 M re zusammen im Wechsel, am Ende dann 1 Umschlag und 1 M re. Sie stricken den gesamten A.2/A.3 über insgesamt 13-19-25 M (A.2A/A.3A = 3 M, A.2B/A.2B = 8-14-25 M und A.2C/A.3C = 2 M).
12.04.2014 - 11:24
![]() Seniel ha scritto:
Seniel ha scritto:
I notice when transitioning from the row K 1, A.2A, A.2 B over the next 8-14-20 sts, A.2 C, K 2, to the row A.1(= 23 sts) There seems to be large gaps between the K2 to the beginning of A.1... how can I prevent this? When watching the video it fast forwards over that EXACT part so Im not sure if there is a trick
06.04.2014 - 01:18DROPS Design ha risposto:
Dear Mrs Senial, you will find different videos showing how to work short rows, you can use the method with wrap to avoid holes (see tab "Videos" at the right side of the picture). Happy knitting!
07.04.2014 - 09:57
![]() Felix Jacqueline ha scritto:
Felix Jacqueline ha scritto:
Bonjour, très joli modèle cependant un point à éclaircir le 1er rang ok 10mailles 2ème rang 25 mailles ce qui totalise les 35 mailles du 2ème rang je ne comprends pas le 3ème rang je totalise 19 mailles alors qu'il m'en faudrait 22 il manque 3 mailles à tricoter pour faire les 57 (1 end + a2a 3 + a2b 4 +a2a 3 + a2b 4 + a2c 2 + 2 end je compte 19 au lieu de 22 cordialement
02.04.2014 - 12:52DROPS Design ha risposto:
Bonjour Mme Felix, on tricote A.2b sur les 14 m suivantes : (...), 1 m end, A.2A (=3m), A.2 B au-dessus des 14 m suiv (soit 2 fois le diagramme A.2B puis encore 1 fois sur les 2 m suiv = 2.5 fois le diag), A.2 C, 2 m end. Bon tricot!
02.04.2014 - 14:25Gisela ha scritto:
Hola, no entiendo lo de las filas acortadas, me podrian ayudar
31.03.2014 - 22:07DROPS Design ha risposto:
Hola Gisela. Te recomiendo ver los videos que tienes asignados a este patrón (el apartado de videos está junto a los materiales).
02.04.2014 - 20:13
![]() Seniel ha scritto:
Seniel ha scritto:
THANK YOU. one more thing, do I continue the short rows through the whole thing or do I just do it for the first 8 rows then just follow normal pattern?
27.03.2014 - 03:28DROPS Design ha risposto:
Dear Senial, continue pattern + short rows all the way until piece measures 15 3/4"-16½"-17 1/4" at the most narrow and 63"-66"-69" at the widest. Happy knitting!
27.03.2014 - 10:24
![]() Will Zegers ha scritto:
Will Zegers ha scritto:
Ik het rechterpand klaar maar problemen met het linkerpand. Hoe moet ik beginnen . Snap beschrijving let op begin in de 2e nld in à.1en à.3 niet!!!
25.03.2014 - 10:23DROPS Design ha risposto:
Hoi Will. Omdat je begint met de verkorte toeren op de verkeerde kant begin je met de 2e nld in de teltekeningen A.1 en A.3
26.03.2014 - 12:39
![]() Yvonne ha scritto:
Yvonne ha scritto:
Goedenavond, Bedankt voor de video bij dit patroon. Na 6 keer uithalen heb ik het patroon nu onder de knie. Het is heerlijk om dit te breien. Nogmaals bedankt voor de duidelijke uitleg in de video
21.03.2014 - 21:44
![]() Will ha scritto:
Will ha scritto:
In het telpatroon klopt niet. In de 3e en 5e nld kom ik 4 St. Tekort. . Deze nld zijn de 35 St. Vd 3e nld. +8+a2c zijn 47 St. Ipv 51. Ook voor de 7e nld kom ik dan 4 St. Tekort. Kunt u mij helpen waar het niet klopt, wil heel graag beginnen aan dit leuke vestje
05.03.2014 - 14:43DROPS Design ha risposto:
Hoi Will. Het telpatroon klopt. Het is belangrijk dat het aantal st hetzelfde blijft, en dat je bij het breien van A.2 goed in de gaten houdt dat het aantal samenbreien klopt met de omslagen. We hebben net een video klaar over hoe je dit telpatroon breit samen met de verkorte toeren. Hij zal morgen gepubliceerd worden.
05.03.2014 - 15:04
|
||||||||||||||||
Summer Snug#summersnugjacket |
||||||||||||||||
 |
 |
|||||||||||||||
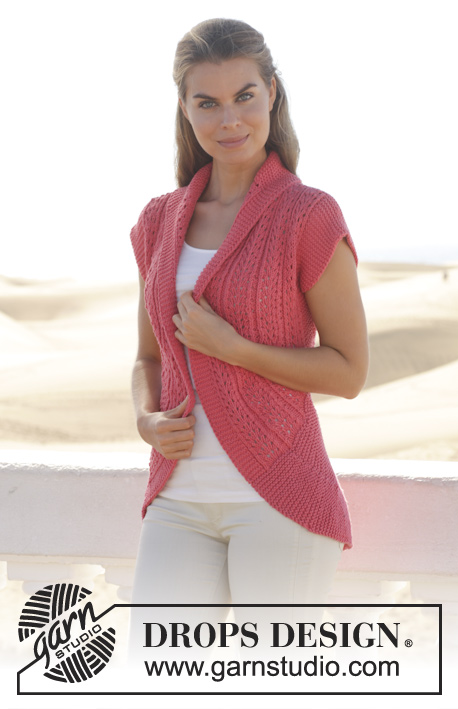
Giacca DROPS lavorata a cerchio con motivo a pizzo in "Paris". Taglie: S - XXXL.
DROPS 154-8 |
||||||||||||||||
|
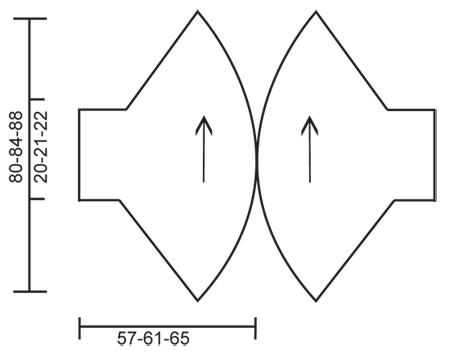
M LEGACCIO (avanti e indietro sui f): Lavorare tutti i f a dir. 1 “costa” a m legaccio = 2 f dir. MOTIVO: Vedere i diagrammi A.1-A.3. I diagrammi mostrano tutti i f del motivo visti dal diritto del lavoro. FERRI ACCORCIATI: * Lavorare 1 f sulle prime 10 m sul f, girare e tornare indietro. Lavorare 1 f sulle prime 35 m sul f, girare e tornare indietro. Lavorare 1 f sulle prime 51-57-63 m sul f, girare e tornare indietro. Lavorare 1 f su tutte le m, girare e tornare indietro *. Ripetere *-*, cioè 8 f nel punto più ampio e 2 f nel punto più stretto in 1 ripetizione. ---------------------------------------------------------- DAVANTI/DIETRO DESTRO: Lavorato avanti e indietro sui f circolari. Avviare 86-92-98 m con i f circolari n° 6 mm con Paris. Lavorare 1 “costa” a M LEGACCIO – leggere la spiegazione sopra. Poi lavorare il motivo e ALLO STESSO TEMPO lavorare i FERRI ACCORCIATI – leggere la spiegazione sopra (1° f = dal diritto del lavoro): 5 m a m legaccio, 2 m dir, 3 m rov, (girare qui), 2 m dir, A.1 (= 23 m) (girare qui), 1 m dir, A.2 A, A.2 B sulle 8-14-20 m successive, A.2 C, 2 m dir, (girare qui), A.1(= 23 m), 2 m dir, 3 m rov, 2 m dir, 5 m a m legaccio. Continuare il motivo fino a quando il lavoro misura 40-42-44 cm nel punto più stretto e 160-168-176 cm nel punto più ampio. Lavorare 1 “costa” su tutte le m e intrecciare. DAVANTI/DIETRO SINISTRO: Lavorato avanti e indietro sui f circolari. Avviare 86-92-98 m con i f circolari n° 6 mm con Paris. Lavorare 1 “costa” a LEGACCIO – leggere la spiegazione sopra. Lavorare 1 f dir dal diritto del lavoro. Poi lavorare il motivo, ALLO STESSO TEMPO lavorare a FERRI ACCORCIATI – leggere la spiegazione sopra (1° f = dal rovescio del lavoro - NOTA: iniziare sul 2° f in A.1 e A.3): 5 m a m legaccio, 2 m rov, 3 m dir, (girare qui), 2 m rov, A.1 (= 23 m), (girare qui), 1 m rov, A.3 A, A.3 B sulle 8-14-20 m successive, A.3 C, 2 m rov, (girare qui), A.1 (= 23 m), 2 m rov, 3 m dir, 2 m rov, 5 m a m legaccio. Continuare il motivo fino a quando il lavoro misura 40-42-44 cm nel punto più stretto e 160-168-176 cm nel punto più ampio. Lavorare 1 “costa” su tutte le m e intrecciare. CONFEZIONE: Cucire i margini di avvio e di chiusura. Mettere le due parti una verso l’altra in modo che le 5 m a m legaccio nel lato più ampio combacino, e cucire circa 58-62 cm al centro dietro, margine a margine – assicurarsi che la cucitura sulle parti sia al centro sotto la manica. |
||||||||||||||||
Spiegazioni del diagramma |
||||||||||||||||
|
||||||||||||||||
 |
||||||||||||||||
 |
||||||||||||||||
Avete terminato questo modello?Allora taggate le vostre foto con #dropspattern #summersnugjacket o inviatele alla #dropsfan gallery. Avete bisogno di aiuto con questo modello?Troverete 20 video tutorial, una sezione per i commenti/domande e molto altro guardando il modello su www.garnstudio.com © 1982-2026 DROPS Design A/S. Ci riserviamo tutti i diritti. Questo documento, compreso tutte le sue sotto-sezioni, è protetto dalle leggi sul copyright. Potete leggere quello che potete fare con i nostri modelli alla fine di ogni modello sul nostro sito. |
||||||||||||||||


Con oltre 40 anni di esperienza nel design di modelli di maglia e uncinetto, DROPS Design offre la più estesa collezione di modelli gratuiti su internet - tradotti in 17 lingue. Ad oggi vi possiamo fornire 324 cataloghi e 12290 modelli - 9561 dei quali sono tradotti in Italiano.
Ci stiamo impegnando molto per darvi il meglio che vi possiamo offrire in termini di maglia e uncinetto, ispirazioni e consigli così come filati di grande qualità ad un prezzo incredibile! Volete utilizzare i nostri modelli per qualcosa d'altro oltre al vostro uso personale? Potete leggere tutto ciò che è consentito nel testo sul Copyright in basso su tutte le pagine dei nostri modelli. Buon lavoro!
Lasciare un commento sul modello DROPS 154-8
Noi saremmo felici di ricevere i tuoi commenti e opinioni su questo modello!
Se vuoi fare una domanda, fai per favore attenzione a selezionare la categoria corretta nella casella qui sotto per velocizzare il processo di risposta. I campi richiesti sono indicati da *.