
Categorie popolari
State cercando un filato?


Commenti / Domande (147)
![]() Tina Nielsen ha scritto:
Tina Nielsen ha scritto:
Glemte lige noget... Hvordan kan det være der er ulige antal pinde i A1 og A2A mm man skal jo strikke vrang pinden tilbage eller læser jeg mønstret forkert?
19.06.2016 - 20:06DROPS Design ha risposto:
Hej Tina. Jeg tror der er glemt noget der, men jeg ville strikke en vrang pind tilbage og saa starte paany.
24.06.2016 - 12:55
![]() Tina Nielsen ha scritto:
Tina Nielsen ha scritto:
Nu har jeg lavet de første 8 rk af A1 så der er 8 rk i den brede ende og to i den smalle ende. Starter jeg så forfra med 10 m og vend. Der er så 4 pinde tilbage af A1 fortsætter jeg bare der og det samme med de andre mønstre. Spørgsmålet er altså... Efter hver gang man har nået 8 pinde starter man så med 10m og vende 35 m og vend 51 m og vend alle masker og vend...? Håber i forstår mit spørgsmål...
19.06.2016 - 19:49DROPS Design ha risposto:
Hej Tina. Du skal hele tiden fortsaette med vendinger og mönster som det kommer. Det betyder at du vil have flere gentagelser af A.1 i den ene side end i den anden. Saa det er at holde tungen lige i munden og eventuelt notere hvor du er i hvert mönster.
24.06.2016 - 12:54
![]() Barbara Kerr ha scritto:
Barbara Kerr ha scritto:
I found the pattern works if I did A2B for 10sts instead of 8 sts The video unfortunately fast forwards at that point
19.05.2016 - 20:12DROPS Design ha risposto:
Dear Mrs Kerr, in A.2 (1st size), you work A.3A (= 3 sts), then A.2B (= 4 sts) a total of 2 times over the next 8 sts then finish with A.2C (= 2 sts) - on 1st row A.2C is similar as the last 2 sts in A.2B, but on row 2, you will have to work with A.2C over the last 3 sts in A.2. Happy knitting!
20.05.2016 - 10:53
![]() Barbara ha scritto:
Barbara ha scritto:
The cast on is 86, the stitch count is 83 10+25+9+4+25+10=83 Please help me to set it up correctly Thank you
16.05.2016 - 01:19DROPS Design ha risposto:
Dear Barbara, you cast on 86 sts but then you have to work short rows, so you don't work on all the sts on needle: which is the point you've got stuck? Happy knitting!
16.05.2016 - 09:32Jirapannee Supratya ha scritto:
The video shows upto 8 rows. How about the last 4rows of the work pattern 1set of A1. Do we start the work shot row right away with the work pattern OR we work 4 rows over all sts. and starting the work short row with the next repetition of 1st set of A1. Note: I understand that short row will be worked through out not only the 1set of work.
23.11.2015 - 13:38DROPS Design ha risposto:
Dear Mrs Supratya, you will work following A.1 when working on these sts, so that both A.1 will be worked differently - follow each A.1 with the following row you are working on. Happy knitting!
23.11.2015 - 13:58Jirapannee Supratya ha scritto:
Since the web not allow me to finish my question in one input, here is the 2nd question 2) The work SHORT ROW is an 8 rows set. ( 8rows at the widest and 2rows at the most narrow in 1 repetition) . The work pattern calls for 12 rows. When I finish the 8 rows , I will continue work 4 more rows over all sts before repeating the work pattern and work short row. Do I understand it correctly ? if not, pls help clarifying the next step.
22.11.2015 - 08:02DROPS Design ha risposto:
Dear Mrs Supratya, the short rows are worked over 8 rows and are repeated all the way to shape the piece. Look at the video in the previous answer to figure out how to work. Happy knitting!
23.11.2015 - 09:54
![]() Ruth Jose ha scritto:
Ruth Jose ha scritto:
Thank you. wrap on wrong side! the purl row! going to buy the yarn tomorrow!
17.09.2015 - 03:11
![]() Ruth Jose ha scritto:
Ruth Jose ha scritto:
One more question! on left side, do I read the pattern from rt to left and start on a all purl row? which is row 2, and is it purl 2 tog and spp? I love Paris
16.09.2015 - 00:13DROPS Design ha risposto:
Dear Ruth Jose, all rows with yo have to be done from RS. On right front piece, work row 1 from RS and start short rows from RS. On left front piece, K first 1 row from RS and work short rows beg with row 2 in A.1 and A.3. (nb: from RS: read diagram from the right towards the left, from WS: read from the left towards the right). Happy knitting!
16.09.2015 - 09:17
![]() Ruth Jose ha scritto:
Ruth Jose ha scritto:
Hi , Is this correct? Third turn K1(K1, K2T0G ,0 ,K2TOG, O, K2TOG ,O)X2, K2TOG,O,K2, ==19 STITCHES +35= 54 I should have 57???? Please help before I buy the yarn!
15.09.2015 - 00:16DROPS Design ha risposto:
Dear Ruth Jose, when working 1st row in A.2 on 3rd turn, continue as follows after A.1 and first sts: K1, A.2A (= K1, K2 tog, YO), then work A.2B over the next 14 sts (repeat A.2B a total of 3 times: K2 tog, YO, K2, YO, then work K2, YO), and work A.2C (= K2 tog, YO). Happy knitting!
15.09.2015 - 09:58
![]() Ruth Jose ha scritto:
Ruth Jose ha scritto:
Lost three stitches on third turn! I have 19 stitches and 35=54. I should have 57
14.09.2015 - 23:52DROPS Design ha risposto:
Dear Ruth Jose, remember to check your number of sts worked in each diagram, a good idea can be to add extra marker between each kind of pattern/diagram so that you can check if your number of sts match. Happy knitting!
15.09.2015 - 09:49
|
||||||||||||||||
Summer Snug#summersnugjacket |
||||||||||||||||
 |
 |
|||||||||||||||
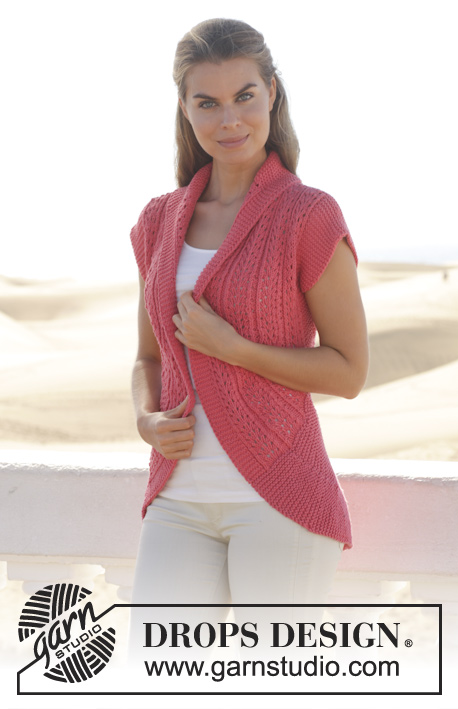
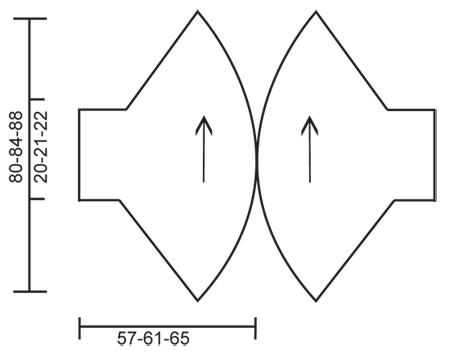
Giacca DROPS lavorata a cerchio con motivo a pizzo in "Paris". Taglie: S - XXXL.
DROPS 154-8 |
||||||||||||||||
|
M LEGACCIO (avanti e indietro sui f): Lavorare tutti i f a dir. 1 “costa” a m legaccio = 2 f dir. MOTIVO: Vedere i diagrammi A.1-A.3. I diagrammi mostrano tutti i f del motivo visti dal diritto del lavoro. FERRI ACCORCIATI: * Lavorare 1 f sulle prime 10 m sul f, girare e tornare indietro. Lavorare 1 f sulle prime 35 m sul f, girare e tornare indietro. Lavorare 1 f sulle prime 51-57-63 m sul f, girare e tornare indietro. Lavorare 1 f su tutte le m, girare e tornare indietro *. Ripetere *-*, cioè 8 f nel punto più ampio e 2 f nel punto più stretto in 1 ripetizione. ---------------------------------------------------------- DAVANTI/DIETRO DESTRO: Lavorato avanti e indietro sui f circolari. Avviare 86-92-98 m con i f circolari n° 6 mm con Paris. Lavorare 1 “costa” a M LEGACCIO – leggere la spiegazione sopra. Poi lavorare il motivo e ALLO STESSO TEMPO lavorare i FERRI ACCORCIATI – leggere la spiegazione sopra (1° f = dal diritto del lavoro): 5 m a m legaccio, 2 m dir, 3 m rov, (girare qui), 2 m dir, A.1 (= 23 m) (girare qui), 1 m dir, A.2 A, A.2 B sulle 8-14-20 m successive, A.2 C, 2 m dir, (girare qui), A.1(= 23 m), 2 m dir, 3 m rov, 2 m dir, 5 m a m legaccio. Continuare il motivo fino a quando il lavoro misura 40-42-44 cm nel punto più stretto e 160-168-176 cm nel punto più ampio. Lavorare 1 “costa” su tutte le m e intrecciare. DAVANTI/DIETRO SINISTRO: Lavorato avanti e indietro sui f circolari. Avviare 86-92-98 m con i f circolari n° 6 mm con Paris. Lavorare 1 “costa” a LEGACCIO – leggere la spiegazione sopra. Lavorare 1 f dir dal diritto del lavoro. Poi lavorare il motivo, ALLO STESSO TEMPO lavorare a FERRI ACCORCIATI – leggere la spiegazione sopra (1° f = dal rovescio del lavoro - NOTA: iniziare sul 2° f in A.1 e A.3): 5 m a m legaccio, 2 m rov, 3 m dir, (girare qui), 2 m rov, A.1 (= 23 m), (girare qui), 1 m rov, A.3 A, A.3 B sulle 8-14-20 m successive, A.3 C, 2 m rov, (girare qui), A.1 (= 23 m), 2 m rov, 3 m dir, 2 m rov, 5 m a m legaccio. Continuare il motivo fino a quando il lavoro misura 40-42-44 cm nel punto più stretto e 160-168-176 cm nel punto più ampio. Lavorare 1 “costa” su tutte le m e intrecciare. CONFEZIONE: Cucire i margini di avvio e di chiusura. Mettere le due parti una verso l’altra in modo che le 5 m a m legaccio nel lato più ampio combacino, e cucire circa 58-62 cm al centro dietro, margine a margine – assicurarsi che la cucitura sulle parti sia al centro sotto la manica. |
||||||||||||||||
Spiegazioni del diagramma |
||||||||||||||||
|
||||||||||||||||
 |
||||||||||||||||
 |
||||||||||||||||
Avete terminato questo modello?Allora taggate le vostre foto con #dropspattern #summersnugjacket o inviatele alla #dropsfan gallery. Avete bisogno di aiuto con questo modello?Troverete 20 video tutorial, una sezione per i commenti/domande e molto altro guardando il modello su www.garnstudio.com © 1982-2026 DROPS Design A/S. Ci riserviamo tutti i diritti. Questo documento, compreso tutte le sue sotto-sezioni, è protetto dalle leggi sul copyright. Potete leggere quello che potete fare con i nostri modelli alla fine di ogni modello sul nostro sito. |
||||||||||||||||


Con oltre 40 anni di esperienza nel design di modelli di maglia e uncinetto, DROPS Design offre la più estesa collezione di modelli gratuiti su internet - tradotti in 17 lingue. Ad oggi vi possiamo fornire 324 cataloghi e 12290 modelli - 9561 dei quali sono tradotti in Italiano.
Ci stiamo impegnando molto per darvi il meglio che vi possiamo offrire in termini di maglia e uncinetto, ispirazioni e consigli così come filati di grande qualità ad un prezzo incredibile! Volete utilizzare i nostri modelli per qualcosa d'altro oltre al vostro uso personale? Potete leggere tutto ciò che è consentito nel testo sul Copyright in basso su tutte le pagine dei nostri modelli. Buon lavoro!
Lasciare un commento sul modello DROPS 154-8
Noi saremmo felici di ricevere i tuoi commenti e opinioni su questo modello!
Se vuoi fare una domanda, fai per favore attenzione a selezionare la categoria corretta nella casella qui sotto per velocizzare il processo di risposta. I campi richiesti sono indicati da *.