
Categorie popolari
State cercando un filato?


Commenti / Domande (162)
![]() Barre ha scritto:
Barre ha scritto:
Pourquoi nous faisons des mailles en l\'air après le devant merci
01.11.2025 - 11:26
![]() Barre ha scritto:
Barre ha scritto:
Je ne comprends pas le nombre de mailles pour les devants pour les manches et le dos
30.10.2025 - 14:18DROPS Design ha risposto:
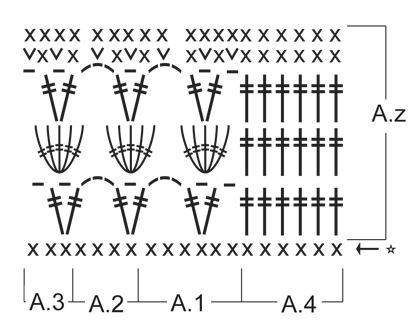
Bonjour Mme Barre, vous avez 209 m au dernier rang de l'empiècement, réparties ainsi: 36 m (devant gauche: 6 m de A.4, 6 m de A.1 et 24 m de A.2); 40 m pour la manche gauche, 60 m pour le dos, 40 m pour la manche droite et 33 m pour le devant droit (24 m deA.2, 3 m de A.3 et 6 m de A.4); vous allez sauter les 40 m des manches et les remplacer par 8 ml, et, au rang suivant, sautez ces 8 ml pour crocheter A.2 sur tous les A.2 précédents des devants et du dos. Bon crochet!
31.10.2025 - 07:12
![]() Rebours ha scritto:
Rebours ha scritto:
Mais au 2emAZ on ne trouve pas au milieu des 2 doubles brides des rangs qu'on avait au rang d'avant
05.10.2025 - 17:58DROPS Design ha risposto:
Bonjour Mme Rebours, lorsque vous crochetez le 2ème A.z en hauteur, assurez-vous de bien crocheter comme avant: A.1 = 6 mailles, répétez A.2 (= 4 mailles) jusqu'à ce qu'il reste 9 mailles et terminez par 3 m de A.3 et 6 m de A.4, placez de nouveau des marqueurs entre chaque diagramme pour que votre nombre de mailles tombe juste; les groupes de brides/doubles brides ne seront pas alignés sur ceux du 1er A.z à cause des augmentations dans les rangs de mailles serrées. Bon crochet!
06.10.2025 - 08:04
![]() Barre ha scritto:
Barre ha scritto:
Lorsqu'on a fait le 1er AZ on en refait un ème complètement après on sépare pour les 3 morceaux et les manches
05.10.2025 - 17:11DROPS Design ha risposto:
Bonjour Mme Barre, on va diviser l'empiècement pour les manches et le bas du gilet après avoir crocheté 2 fois le diagramme A.z en hauteur dans toutes les tailles. Bon crochet!
06.10.2025 - 08:01
![]() Rebours ha scritto:
Rebours ha scritto:
Je ne comprends pas car au début vous dites au rang suivant de recommencer en sans inverse alors que sur le dessin vous nous montré un groupe de 5 mailles dans les 2 doubles brides
01.10.2025 - 17:20
![]() Rebours ha scritto:
Rebours ha scritto:
Je ne comprends pas car au début vous dites au rang suivant de recommencer en sans inverse alors que sur le dessin vous nous montré un groupe de 5 mailles dans les 2 doubles brides
01.10.2025 - 17:17DROPS Design ha risposto:
Bonjour Mme Rebours, j'avoue ne pas comprendre votre question, effectivement, quand on crochète sur l'envers, on doit lire les diagrammes de gauche à droite donc ainsi: A.4, puis A.3, A.2, A.1 et A.4. Comme vous avez 1 groupe de 2 double-brides par motif A.1, A.2 et A.3, vous aurez 1 groupe de 5 double-brides par motif au rang suivant, soit autant de groupe de double-brides que de groupe de 5 double-brides, puis de nouveau de groupe de double-brides au 3ème rang de A.z). Bon crochet!
02.10.2025 - 08:35
![]() Barre ha scritto:
Barre ha scritto:
Svp dites moi à quel endroit je peu me tromper car j'ai bien mon nombre de mail au départ
29.09.2025 - 15:56DROPS Design ha risposto:
Bonjour Mme Barre, regardez les réponses précédentes, pensez surtout à bien mettre un marqueur entre chaque motif à répéter: après A.4, après A.1, après chaque A.2, et après A.3, vous pourrez ainsi mieux vérifier votre nombre de mailles pour qu'il corresponde bien à chaque rang. Bon crochet!
30.09.2025 - 17:14
![]() Barre ha scritto:
Barre ha scritto:
Je ne comprend pas pourquoi j\'ai fait des robes des rideaux et que vous je n\'arrive pas à faire le model il y a forcément quelque chose qui ne va pas
29.09.2025 - 11:34
![]() Rebours ha scritto:
Rebours ha scritto:
Combien devons nous avoir le motif de 5 brides sur le model pour une t aille S je ne comprend pourquoi j'ai 165 mailles avant les augmentation des ns du 1er rang franchement je suis perdue
28.09.2025 - 18:27DROPS Design ha risposto:
Bonjour Mme Rebours, en taille S vous aurez autant de groupes de 5 brides que de motifs A.1, A.2 et A.3 soit, au tout début: 1 x A.1 + 24 x A.2 + 1 x A.3 = 26 groupes de brides/de 5 brides, entre les bordures des devants. Bon crochet!
30.09.2025 - 17:04
![]() Barre ha scritto:
Barre ha scritto:
Je fais exactement ce que vous me dites et je me retrouve avec 165 m avant la 1ere augmentation de 24 alors que j'ai bien mes 96 mailles merci je vais abandonner le modèle
28.09.2025 - 10:36DROPS Design ha risposto:
Bonjour Mme Barre, pensez à bien mettre des marqueurs entre chaque motif pour bien repérer le nombre de mailles à chaque rang, puis au 1er rang de ms vous augmentez 24 m soit 117+24=141 mailles et au dernier rang de ms, vous augmentez 24 m soit 141+24= 165 mailles au total lorsque A.z est terminé. Dans ces 165 mailles sont comptées les mailles de A.4, A.1, A.2 et a.4 soit toutes les mailles du rang et pas seulement les mailles de A.2. Bon crochet!
30.09.2025 - 16:49
|
|||||||||||||||||||
Nevertheless#neverthelesscardigan |
|||||||||||||||||||
|
|
|||||||||||||||||||
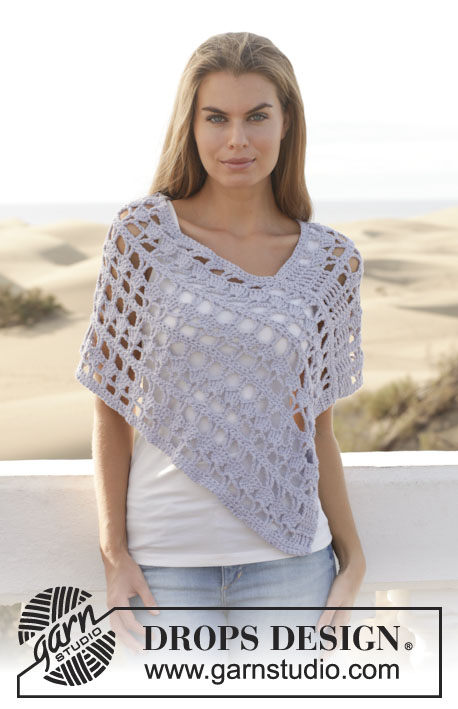
Cardigan DROPS lavorata all’uncinetto in "Paris". Taglie: S - XXXL.
DROPS 153-10 |
|||||||||||||||||||
|
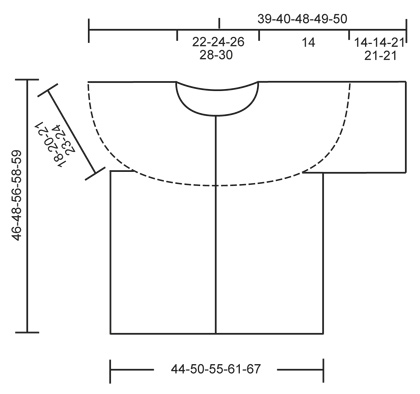
MOTIVO: Vedere i diagrammi A.1-A.4. INFORMAZIONI PER IL LAVORO: Sostituire la 1° m.b su ogni riga a m.b con 1 cat. Sostituire la 1° m.a.d su ogni riga a m.a.d con 4 cat. SUGGERIMENTO PER GLI AUMENTI: Aumentare lavorando 2 m.b in 1 m.b. ---------------------------------------------------------- CARDIGAN: Lavorata dall’alto in basso, avanti e indietro dal centro davanti. SPRONE: Avviare 156-166-177-188-198 cat lasse (compresa 1 cat con cui girare) con l’uncinetto n° 5 mm con Paris. Lavorare la 1° riga come segue: lavorare 1 m.b nella 2° cat dall’uncinetto, * 1 m.b in ognuna delle 3 cat successive, saltare 1 cat *, ripetere *-*, e finire con 1 m.b in ognuna delle ultime 2-4-3-2-4 cat = 117-125-133-141-149 m.b (= la 1° riga del diagramma) – LEGGERE LE INFORMAZIONI PER IL LAVORO. Continuare a lavorare come segue: A.4 (= bordo), A.1, A.2 sulle 96-104-112-120-128 m.b successive (= 24-26-28-30-32 volte in larghezza), finire con A.3 e A.4 (= bordo). Lavorare il diagramma A.z 1 volta in verticale, ALLO STESSO TEMPO sulle ultime 2 righe distribuire 24-28-32-36-40 aumenti in modo uniforme su ognuna delle righe (= 48-56-64-72-80 aumenti in totale) – LEGGERE IL SUGGERIMENTO PER GLI AUMENTI sopra. NOTA: non aumentare su A.4 = 165-181-197-213-229 m. Poi lavorare il diagramma A.z 1 volta in verticale (A.2 è ora lavorato 36-40-44-48-52 volte in larghezza), ALLO STESSO TEMPO sulle ultime 2 righe aumentare 22-26-30-34-38 m in modo uniforme su ognuna delle righe (= 44-52-60-68-76 aumenti in totale). NOTA: non aumentare su A.4 = 209-233-257-281-305 m. CORPO: ORA MISURARE IL LAVORO DA QUI. Continuare come segue: A.4, A.1, A.2 sulle 24-28-32-36-40 m.b successive (= 6-7-8-9-10 volte in larghezza) (davanti), 8 cat (sotto manica), saltare 40-44-48-52-56 m.b dalla riga precedente (scalfo, m usate per la manica in seguito), A.2 sulle 60-68-76-84-92 m.b successive (dietro), 8 cat (sotto manica), saltare 40-44-48-52-56 m.b dalla riga precedente (scalfo, m usate per la manica in seguito), A.2 sulle 24-28-32-36-40 m.b successive (davanti) e finire con A.3 e A.4. Continuare a lavorare come segue: lavorare A.4, A.1, A.2 sulle 24-28-32-36-40 m.b successive (= 6-7-8-9-10 volte in larghezza) (davanti), saltare 8 cat (sotto manica), A.2 sulle 60-68-76-84-92 m.b successive (dietro), saltare 8 cat (sotto manica), A.2 sulle 24-28-32-36-40 m.b successive (davanti) e finire con A.3 e A.4. Ripetere A.z fino a quando il lavoro misura circa 28-28-35-35-35 cm, finire dopo un’intera ripetizione di A.z. Chiudere e affrancare. Il lavoro misura circa 46-48-56-58-59 cm dalla spalla. MANICA: Lavorata in tondo. ORA MISURARE IL LAVORO DA QUI. Lavorata dall’alto in basso. Iniziare lavorando al centro sotto la manica come segue: lavorare 2 m.b nella 1° cat (delle 8 cat), 1 m.b in ognuna delle 7 cat successive e 1 m.b in ognuna delle 40-44-48-52-56 m.b dallo sprone = 49-53-57-61-65 m.b. Continuare a lavorare come segue: 4 cat, A.1, A.2 sulle 40-44-48-52-56 m successive (= 10-11-12-13-14 volte in larghezza), finire con A.3 e 1 m.bss nella 4° cat. Continuare in questo modo fino a quando il lavoro misura circa 14-14-21-21-21 cm, finire dopo un’intera ripetizione di A.z. Chiudere e affrancare. CONFEZIONE: Lavorare un bordo a m.b attorno al collo per ottenere una bella rifinitura come segue: lavorare * 1 m.b in ognuna delle 3 cat successive, saltare 1 cat *, ripetere *-*, e finire con 1 m.b in ognuna delle ultime 4-6-5-4-6 cat = 118-126-134-142-150 m.b. Attaccare i bottoni sul bordo sinistro, a distanza di circa 7 cm. |
|||||||||||||||||||
Spiegazioni del diagramma |
|||||||||||||||||||
|
|||||||||||||||||||
 |
|||||||||||||||||||
 |
|||||||||||||||||||
Avete terminato questo modello?Allora taggate le vostre foto con #dropspattern #neverthelesscardigan o inviatele alla #dropsfan gallery. Avete bisogno di aiuto con questo modello?Troverete 6 video tutorial, una sezione per i commenti/domande e molto altro guardando il modello su www.garnstudio.com © 1982-2026 DROPS Design A/S. Ci riserviamo tutti i diritti. Questo documento, compreso tutte le sue sotto-sezioni, è protetto dalle leggi sul copyright. Potete leggere quello che potete fare con i nostri modelli alla fine di ogni modello sul nostro sito. |
|||||||||||||||||||


Con oltre 40 anni di esperienza nel design di modelli di maglia e uncinetto, DROPS Design offre la più estesa collezione di modelli gratuiti su internet - tradotti in 17 lingue. Ad oggi vi possiamo fornire 324 cataloghi e 12290 modelli - 9561 dei quali sono tradotti in Italiano.
Ci stiamo impegnando molto per darvi il meglio che vi possiamo offrire in termini di maglia e uncinetto, ispirazioni e consigli così come filati di grande qualità ad un prezzo incredibile! Volete utilizzare i nostri modelli per qualcosa d'altro oltre al vostro uso personale? Potete leggere tutto ciò che è consentito nel testo sul Copyright in basso su tutte le pagine dei nostri modelli. Buon lavoro!
Lasciare un commento sul modello DROPS 153-10
Noi saremmo felici di ricevere i tuoi commenti e opinioni su questo modello!
Se vuoi fare una domanda, fai per favore attenzione a selezionare la categoria corretta nella casella qui sotto per velocizzare il processo di risposta. I campi richiesti sono indicati da *.