
Categorie popolari
State cercando un filato?


Commenti / Domande (162)
![]() Yvonne Duckstein ha scritto:
Yvonne Duckstein ha scritto:
Hallo, das Häkeln des Reglan bedeutet nur das oberste Teil über der Brust? Man häkelt das Musterbild nur 1x ?! Und dann kommen in den letzten beiden Reihen die Zunahmen? Habe ich das so richtig verstanden? Danke und Beste Grüße Yvonne Duckstein
30.03.2026 - 14:32DROPS Design ha risposto:
Liebe Frau Duckstein, das Diagram A.z wird insgesamt 2 Mal in der Höhe gehäkelt. Die Zunahmen werden bei den 2 letzten Reihen vom 1. Rapport in der Höhe gehäkelt, dann bei den 2 letzten Reihen vom 2. Rapport in der Höhe (4 Reihen mit Zunahmen). Viel Spaß beim Häkeln!
07.04.2026 - 14:06
![]() Rebours ha scritto:
Rebours ha scritto:
Encolure beaucoup trop importante comment la diminuer Merci si vous avez une obtion0
19.12.2025 - 17:50
![]() Barre ha scritto:
Barre ha scritto:
Je me retrouve avec 12 A2
15.12.2025 - 17:50DROPS Design ha risposto:
Bonjour Mme Barre, vérifiez bien votre nombre de mailles et le décompte donné hier (on commence par A.1, on répète 10 fois A.2 et on termine par A.3, on aura ainsi 12 groupes de double-brides au total pour la manche. Bon crochet!
16.12.2025 - 08:57
![]() Barre ha scritto:
Barre ha scritto:
Sur les ms ont continu toujours en ms si non on a plus de 10 A1 MERCI
15.12.2025 - 17:27DROPS Design ha risposto:
Bonjour Mme Barre, en taille S/M vous avez sauté 40 m de l'empiècement pour la manche, vous allez crocheter ces 40 m dans le point fantaisie A.1-A.2-A.3 exactement comme avant + dans les 9 mailles crochetées sous la manche; si vous avez davantage de mailles, vous pouvez probablement ajuster en fonction de votre nombre; attention à ce que vous ayez suffisamment de mailles pour crocheter le point fantaisie. Bon crochet!
16.12.2025 - 08:56
![]() Barre ha scritto:
Barre ha scritto:
Je suis arrivée à la manche mais j'ai un problème j'ai mais 49 ms mais pourquoi après vous dites de continuer sur les 40 mailles sur les 9 mailles on fait quoi Merci
14.12.2025 - 19:40DROPS Design ha risposto:
Bonjour Mme Barre, on crochète le tout 1er rang des manches en mailles serrées: 1 ms dans la 1ère des 8 ml et 1 ms dans les 40 ms de l'empiècement = 49 ms. Crochetez ensuite: A.1 (= 6 m), répétez 10 fois A.2 (= 8 m x 10 = 40) et terminez par A.3 (= 3 m) = 6+40+3=49 m. Commencez les tours par 4 ml pour remplacer 1 double-bride / 1 ml pour remplacer 1 ms et terminez les tours par 1 mc dans la 4ème/la 1ère ml du début du tour. Bon crochet!
15.12.2025 - 15:17
![]() Barre ha scritto:
Barre ha scritto:
À la fin du 1er rang du dos quand on a crocheter les 60 mailles que fait on Merci
02.12.2025 - 18:59DROPS Design ha risposto:
Bonjour Mme Barre, lorsque vous divisez l'ouvrage, vous sautez les mailles des manches que vous remplacez par 8 mailles en l'air, et, au 2ème rang, vous crochetez les diagrammes comme avant en sautant les 8 mailles en l'air des emmanchures. Crochetez ainsi toutes les mailles comme avant: on va avoir ainsi, A.4, A.1 puis A.2 pour la fin du devant, tout le long du dos, au début de l'autre devant et on termine par A.4 et A.4 (vu sur l'endroit). Bon crochet!
03.12.2025 - 08:15
![]() Rebours ha scritto:
Rebours ha scritto:
Lorsque l'on a terminé le 1er A2il faut bien piquer dans 1maille il y a quelque chose qui m'échappe à ce moment la
12.11.2025 - 15:21DROPS Design ha risposto:
Bonjour Mem Rebours, à la fin du dernier A.2 (sur les 24 mailles), vous terminez A.2 par 3 ml, vous crochetez les 8 ml et vous sautez les mailles de la manche, puis vous reprenez A.2 dans le motif suivant (1 ml, vous sautez 1 ms, les double-brides, etc...). Quand vous crochèterez le rang suivant, crochetez les 5 double-brides dans l'arceau d'1 ml comme avant et tout le rang (donc rien dans les 8 mailles en l'air de chaque côté sous les manches. Bon crochet!
12.11.2025 - 16:52
![]() Rebours ha scritto:
Rebours ha scritto:
Lorsqu'on arrive à la 24 ème maille du devant l'on fait une maille serrée ou une double bride Merci
10.11.2025 - 11:59DROPS Design ha risposto:
Bonjour Mme Rebours, terminez le dernier A.2 en largeur par 3 mailles en l'air, sautez les 2 ms suivantes, puis crochetez 8 mailles en l'air, sautez les mailles indiquées pour la manche et commencez le A.2 du dos dans la maille suivante; au tour suivant, rappelez-vous que les 8 mailles en l'air ne seront pas crochetées. Bon crochet!
11.11.2025 - 15:59
![]() Barre ha scritto:
Barre ha scritto:
Excusez moi mais je ne comprend pas comment faire avec les 8 mailles en l'air
04.11.2025 - 08:31DROPS Design ha risposto:
Bonjour Mme Barre, lorsque vous crochetez le rang de division manches/dos et devants, vous les crochetez à la place des manches, et au rang suivant, vous sautez ces 8 mailles en l'air, vous ne les crochetez pas pour le bas du gilet, vous les crochèterez seulement quand vous ferez les manches. Bon crochet!
04.11.2025 - 17:12
![]() Barre ha scritto:
Barre ha scritto:
Les 8 mailles en l'air ne font pas 40 mailles
01.11.2025 - 19:35DROPS Design ha risposto:
Bonjour Mme Barre, les 8 mailles en l'air sont faites quand on saute les 40 mailles des manches, elles seront crochetées ensuite lorsque l'on termine les manches. Bon crochet!
03.11.2025 - 07:38
|
|||||||||||||||||||
Nevertheless#neverthelesscardigan |
|||||||||||||||||||
|
|
|||||||||||||||||||
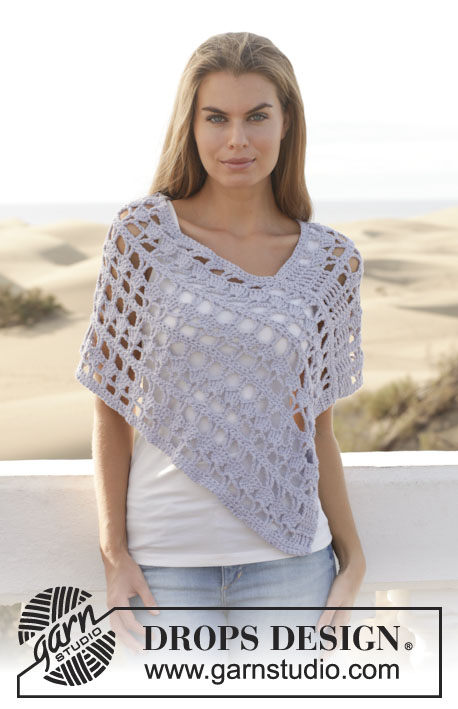
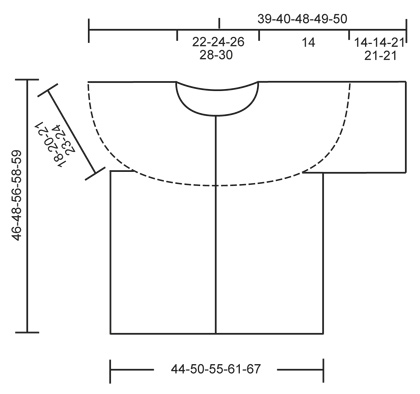
Cardigan DROPS lavorata all’uncinetto in "Paris". Taglie: S - XXXL.
DROPS 153-10 |
|||||||||||||||||||
|
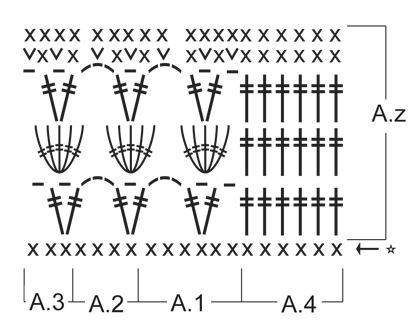
MOTIVO: Vedere i diagrammi A.1-A.4. INFORMAZIONI PER IL LAVORO: Sostituire la 1° m.b su ogni riga a m.b con 1 cat. Sostituire la 1° m.a.d su ogni riga a m.a.d con 4 cat. SUGGERIMENTO PER GLI AUMENTI: Aumentare lavorando 2 m.b in 1 m.b. ---------------------------------------------------------- CARDIGAN: Lavorata dall’alto in basso, avanti e indietro dal centro davanti. SPRONE: Avviare 156-166-177-188-198 cat lasse (compresa 1 cat con cui girare) con l’uncinetto n° 5 mm con Paris. Lavorare la 1° riga come segue: lavorare 1 m.b nella 2° cat dall’uncinetto, * 1 m.b in ognuna delle 3 cat successive, saltare 1 cat *, ripetere *-*, e finire con 1 m.b in ognuna delle ultime 2-4-3-2-4 cat = 117-125-133-141-149 m.b (= la 1° riga del diagramma) – LEGGERE LE INFORMAZIONI PER IL LAVORO. Continuare a lavorare come segue: A.4 (= bordo), A.1, A.2 sulle 96-104-112-120-128 m.b successive (= 24-26-28-30-32 volte in larghezza), finire con A.3 e A.4 (= bordo). Lavorare il diagramma A.z 1 volta in verticale, ALLO STESSO TEMPO sulle ultime 2 righe distribuire 24-28-32-36-40 aumenti in modo uniforme su ognuna delle righe (= 48-56-64-72-80 aumenti in totale) – LEGGERE IL SUGGERIMENTO PER GLI AUMENTI sopra. NOTA: non aumentare su A.4 = 165-181-197-213-229 m. Poi lavorare il diagramma A.z 1 volta in verticale (A.2 è ora lavorato 36-40-44-48-52 volte in larghezza), ALLO STESSO TEMPO sulle ultime 2 righe aumentare 22-26-30-34-38 m in modo uniforme su ognuna delle righe (= 44-52-60-68-76 aumenti in totale). NOTA: non aumentare su A.4 = 209-233-257-281-305 m. CORPO: ORA MISURARE IL LAVORO DA QUI. Continuare come segue: A.4, A.1, A.2 sulle 24-28-32-36-40 m.b successive (= 6-7-8-9-10 volte in larghezza) (davanti), 8 cat (sotto manica), saltare 40-44-48-52-56 m.b dalla riga precedente (scalfo, m usate per la manica in seguito), A.2 sulle 60-68-76-84-92 m.b successive (dietro), 8 cat (sotto manica), saltare 40-44-48-52-56 m.b dalla riga precedente (scalfo, m usate per la manica in seguito), A.2 sulle 24-28-32-36-40 m.b successive (davanti) e finire con A.3 e A.4. Continuare a lavorare come segue: lavorare A.4, A.1, A.2 sulle 24-28-32-36-40 m.b successive (= 6-7-8-9-10 volte in larghezza) (davanti), saltare 8 cat (sotto manica), A.2 sulle 60-68-76-84-92 m.b successive (dietro), saltare 8 cat (sotto manica), A.2 sulle 24-28-32-36-40 m.b successive (davanti) e finire con A.3 e A.4. Ripetere A.z fino a quando il lavoro misura circa 28-28-35-35-35 cm, finire dopo un’intera ripetizione di A.z. Chiudere e affrancare. Il lavoro misura circa 46-48-56-58-59 cm dalla spalla. MANICA: Lavorata in tondo. ORA MISURARE IL LAVORO DA QUI. Lavorata dall’alto in basso. Iniziare lavorando al centro sotto la manica come segue: lavorare 2 m.b nella 1° cat (delle 8 cat), 1 m.b in ognuna delle 7 cat successive e 1 m.b in ognuna delle 40-44-48-52-56 m.b dallo sprone = 49-53-57-61-65 m.b. Continuare a lavorare come segue: 4 cat, A.1, A.2 sulle 40-44-48-52-56 m successive (= 10-11-12-13-14 volte in larghezza), finire con A.3 e 1 m.bss nella 4° cat. Continuare in questo modo fino a quando il lavoro misura circa 14-14-21-21-21 cm, finire dopo un’intera ripetizione di A.z. Chiudere e affrancare. CONFEZIONE: Lavorare un bordo a m.b attorno al collo per ottenere una bella rifinitura come segue: lavorare * 1 m.b in ognuna delle 3 cat successive, saltare 1 cat *, ripetere *-*, e finire con 1 m.b in ognuna delle ultime 4-6-5-4-6 cat = 118-126-134-142-150 m.b. Attaccare i bottoni sul bordo sinistro, a distanza di circa 7 cm. |
|||||||||||||||||||
Spiegazioni del diagramma |
|||||||||||||||||||
|
|||||||||||||||||||
 |
|||||||||||||||||||
 |
|||||||||||||||||||
Avete terminato questo modello?Allora taggate le vostre foto con #dropspattern #neverthelesscardigan o inviatele alla #dropsfan gallery. Avete bisogno di aiuto con questo modello?Troverete 6 video tutorial, una sezione per i commenti/domande e molto altro guardando il modello su www.garnstudio.com © 1982-2026 DROPS Design A/S. Ci riserviamo tutti i diritti. Questo documento, compreso tutte le sue sotto-sezioni, è protetto dalle leggi sul copyright. Potete leggere quello che potete fare con i nostri modelli alla fine di ogni modello sul nostro sito. |
|||||||||||||||||||


Con oltre 40 anni di esperienza nel design di modelli di maglia e uncinetto, DROPS Design offre la più estesa collezione di modelli gratuiti su internet - tradotti in 17 lingue. Ad oggi vi possiamo fornire 324 cataloghi e 12290 modelli - 9561 dei quali sono tradotti in Italiano.
Ci stiamo impegnando molto per darvi il meglio che vi possiamo offrire in termini di maglia e uncinetto, ispirazioni e consigli così come filati di grande qualità ad un prezzo incredibile! Volete utilizzare i nostri modelli per qualcosa d'altro oltre al vostro uso personale? Potete leggere tutto ciò che è consentito nel testo sul Copyright in basso su tutte le pagine dei nostri modelli. Buon lavoro!
Lasciare un commento sul modello DROPS 153-10
Noi saremmo felici di ricevere i tuoi commenti e opinioni su questo modello!
Se vuoi fare una domanda, fai per favore attenzione a selezionare la categoria corretta nella casella qui sotto per velocizzare il processo di risposta. I campi richiesti sono indicati da *.