
Categorie popolari
State cercando un filato?


Commenti / Domande (52)
Nina ha scritto:
4th symbol in diagram makes 1 st out of 3 (you pass one over two already knitted tog.)
11.08.2014 - 14:10
![]() Cresta ha scritto:
Cresta ha scritto:
Help! I end up with a spare stitch in each block. Can you write out in standard knitting code what the steps over 4 rows should be? My version would be this: over 5 stitches: r1: p, kt (knit twisted), p, k, yo, k (ie 6 stitches now exist in place of 5) r2: k, pt (purl twisted), k, p, p, p, yo (ie 7 stitches now exist in place of 5) r3: p, kt, p, slip, k, k, psso 2 (now 6 stitches) r4: k, pt, k, p, p - ie instructions for 5 stitches, but still have a sixth one.
10.08.2014 - 20:14DROPS Design ha risposto:
Dear Cresta, diagram is read from the right to the left from RS and from the left to the right from WS, so that row 2 will be P3, YO, K, Ptwisted, P and row 4: K2, K, P twisted, K. NB: the YO created on row 2 should be dropped off needle on row 3. Happy knitting!
12.08.2014 - 11:44
![]() Gerd ha scritto:
Gerd ha scritto:
Hej! Jag har en kund som gör den här modellen i storlek L. Det har gått 3 nystan mer än på garnåtgången. Ändå stickade hon storlek M på ärmarna. Vi ser också på kommentarena att det har hänt fler gånger. Så det vore bra om det ändrades.
28.05.2014 - 08:59Leonor ha scritto:
En la explicacion del punto M1 hay un simbolo q significa "este punto no existe en esta vuelta", como lo tejo entonces?
12.05.2014 - 01:27DROPS Design ha risposto:
Hola Leonor. El símbolo "no existe" significa que no hay punto en la vta y como no hay punto - no se trabaja. Eso pasa porque tenemos que explicar la labor en un diagrama plano.
17.05.2014 - 20:33
![]() Susan Loudon ha scritto:
Susan Loudon ha scritto:
On your lace pattern, row 1 says: 1 YO between 2 sts, K YO on next row." But below, you say that row 2 is P3, YO. Where do I K the YO?, as described above? It lines up right in the middle of the P3... Also, the stitch count varies row to row, so the patterns don't line up, making the stripe pattern as shown in the photo...what am I doing wrong? Could you please describe the Lace Diagram, stitch by stitch, row by row , including the edge sts etc for one complete block?
11.05.2014 - 06:51DROPS Design ha risposto:
Dear Mrs Loudon, you are right for row 2. The pattern should be lined up, repeat A.1 until 4 sts remain on row, P 1, K 1 twisted, P 1 and 1 edge st in garter st. Work the twisted st P twisted from WS (as the 3 first sts in A.1). From WS, work these 3 sts then repeat A.1 starting from left towards right. Happy knitting!
12.05.2014 - 09:17
![]() Susan Loudon ha scritto:
Susan Loudon ha scritto:
Thank-you for the description of the lace... but I'm still confused! You note that on R3 to slip 1 st as if to P,K2,psso the 2K sts...etc... but your pattern says" drop YO off the needle on next row (which would be Row 3),. So I'm not sure when to drop that YO because you don't mention it in your instruction.??? thanks! Susan
10.05.2014 - 00:48DROPS Design ha risposto:
Dear Susan, the YO made on 2nd row is then dropped on 3rd row (you don't work this YO), so that on 3rd row you will: drop the yo from previous row, then slip 1 st as if to P, K 2, psso the 2 K sts (2 sts remain). Happy knitting!
10.05.2014 - 09:43
![]() Susan ha scritto:
Susan ha scritto:
Could you please send me a link to your video instruction for the complete lace pattern for IBIZA 153-12. I notice on your webpage that you have a lot of lace patterns, but you don't have this one! It seems very confusing with different stitch counts on each row. thank-you!
09.05.2014 - 05:42DROPS Design ha risposto:
Dear Susan, your request have been forwarded. the lace pattern is worked over 3 sts as follows. R1(RS): K1,YO,K1 - R2(WS): P3,YO - R3: slip 1 st as if to P, K 2, psso the 2 K sts (2 sts remain) - R4: P2. Happy knitting!
09.05.2014 - 08:59
![]() Susan ha scritto:
Susan ha scritto:
I've just begun this challenging pattern and am having a problem with the Lace Pattern. Does the A-1 diagram read as normal, from the bottom right to the left, then up one row from left to right? I've asked the Question on other sites and have had different answers! I've completed Row 1, now want to go to Row 2 but don't know where to start .. at the P 3 end or at the K,P twist,K end?
09.05.2014 - 01:32DROPS Design ha risposto:
Dear Susan, diagrams are read from right towards left from RS and left towards right from WS. The 1st row finished with the first 3 sts in diagram, so that you start row 2 with K, P twisted, K and then A.1 (P3, YO). Happy knitting!
09.05.2014 - 08:54
![]() Anne ha scritto:
Anne ha scritto:
Som mange av dropsoppskriftene, stemmer ikke antall garnnøster, jeg måtte kjøpe 4 ekstra nøster. maskeantallet stemmer i cm.
21.04.2014 - 21:18
![]() M. Mulder ha scritto:
M. Mulder ha scritto:
Trui is af, hij is prachtig, maar twee bollen te weinig. En dan zit je met een ander verfbad.
27.03.2014 - 16:30
|
||||||||||||||||||||||
Ibiza#ibizasweater |
||||||||||||||||||||||
|
|
||||||||||||||||||||||
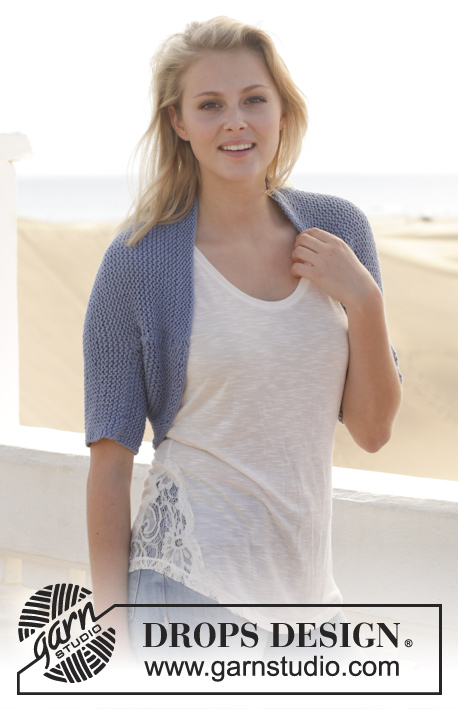
Maglia DROPS ai ferri, con motivo traforato, in "Paris". Taglie: Dalla S alla XXXL.
DROPS 153-12 |
||||||||||||||||||||||
|
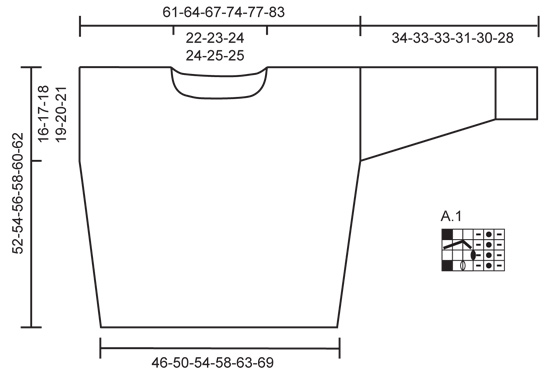
PUNTO LEGACCIO (avanti e indietro sui ferri): Lavorare tutti i ferri a dir. 1 “costa” a legaccio = 2 ferri a dir. MOTIVO: Vedere il diagramma A.1. Il diagramma mostra tutti i ferri del motivo, visti sul diritto del lavoro. ---------------------------------------------------------- MAGLIA: Si lavora avanti e indietro sui ferri, in parti separate, cucite insieme alla fine del lavoro. DAVANTI: Avviare 76-83-88-94-103-113 m (compresa 1 m vivagno da ciascun lato) sui ferri n° 5,5 e lavorare 3 coste a punto legaccio. Proseguire a maglia rasata con 1 m vivagno a punto legaccio - vedere le spiegazioni sopra - da ciascun lato. Quando il lavoro misura ca.2 cm, aumentare 1 m da ciascun lato; aumentare facendo 1 m gettata all’interno di 1 m vivagno; al ferro successivo, lavorare la m gettata ritorta per evitare che si formi un buco. Ripetere questi aumenti ogni 3-3½-3½-3-3½-3½ cm ca. altre 11-10-10-12-10-10 volte (= 12-11-11-13-11-11 volte in tutto) = sui ferri ci sono 100-105-110-120-125-135 m. Proseguire finché il lavoro non misura 36-37-38-39-40-41 cm. Inserire un segno da ciascun lato: indica dove verranno cucite le maniche. Proseguire come segue, sul diritto del lavoro: 1 m vivagno a punto legaccio, ripetere il diagramma A.1 finché non rimangono 4 m sul ferro, 1 m rov, 1 m dir ritorto, 1 m rov e 1 m vivagno a punto legaccio. La m lavorata a dir ritorto sul diritto del lavoro, si lavora a rov ritorto sul rovescio del lavoro. Proseguire in questo modo finché il lavoro non misura 46-48-50-52-54-56 cm; assicurarsi di aver completato una intera ripetizione del diagramma A.1 in verticale. Lavorare le prime 35-37-39-44-46-51 m come prima, intrecciare le 30-31-32-32-33-33 m successive e lavorare le restanti m sul ferro come prima. Lavorare ora ogni spalla separatamente - ALLO STESSO TEMPO, intrecciare 1 m all’inizio di ogni ferro, per il collo, 3 volte in tutto = per ogni spalla rimangono 32-34-36-41-43-48 m. Proseguire finché il lavoro non misura 52-54-56-58-60-62 cm; intrecciare le m. DIETRO: Lavorare come indicato per il davanti, ma proseguire finché il lavoro non misura 50-52-54-56-58-60 cm - assicurarsi di aver completato una intera ripetizione del diagramma A.1 in verticale – e intrecciare le m per il collo. Lavorare come prima sulle prime 33-35-37-42-44-49 m, intrecciare le 34-35-36-36-37-37 m successive e lavorare le restanti m del ferro come prima. Lavorare ogni spalla separatamente - ALLO STESSO TEMPO, intrecciare 1 m all’inizio del ferro successivo per il collo = per ogni spalla rimangono 32-34-36-41-43-48 m. Proseguire finché il lavoro non misura 52-54-56-58-60-62 cm; intrecciare le m. MANICHE: Avviare 45-45-50-50-53-53 m sui ferri n° 5,5 (compresa 1 m vivagno da ciascun lato) e lavorare 3 coste a legaccio avanti e indietro sui ferri. Proseguire come segue: 1 m vivagno a punto legaccio, 0-0-0-0-2-2 m rov, diagramma A.1 finché non rimangono 4-4-4-4-5-5 m, 1 m rov, 1 m a dir ritorto, 1-1-1-1-2-2 m rov e 1 m vivagno a punto legaccio. La m lavorata a dir ritorto sul diritto del lavoro, si lavora a rov ritorto sul rovescio del lavoro Proseguire finché il lavoro non misura 12 cm, assicurarsi di aver completato una intera ripetizione del diagramma A.1 in verticale. Proseguire a maglia rasata e, ALLO STESSO TEMPO, aumentare 1 m da ciascun lato, all’interno di 1 m vivagno a punto legaccio; ripetere questi aumenti ogni 6½-4½-4½-3½-4-2½ cm ca., altre 3-4-4-5-4-5 volte (= 4-5-5-6-5-6 volte in tutto) = sui ferri ci sono 53-55-60-62-63-65 m. Proseguire finché il lavoro non misura 34-33-33-31-30-28 cm e intrecciare le m (misure più corte per le taglie più grandi perché le spalle sono più larghe). Lavorare la seconda manica in modo uguale. CONFEZIONE e COLLO: Cucire una spalla, lasciare l’altra aperta. Riprendere, sul diritto del lavoro, da 80 a 100 m intorno al collo. Lavorare 3 coste a legaccio avanti e indietro sui ferri; intrecciare le m. Cucire l’altra spalla e il lato del collo. Cucire le maniche tra i due segni sul davanti e sul dietro. Cucire sotto le maniche e i lati all’interno della m vivagno. |
||||||||||||||||||||||
Spiegazioni del diagramma |
||||||||||||||||||||||
|
||||||||||||||||||||||
 |
||||||||||||||||||||||
Avete terminato questo modello?Allora taggate le vostre foto con #dropspattern #ibizasweater o inviatele alla #dropsfan gallery. Avete bisogno di aiuto con questo modello?Troverete 20 video tutorial, una sezione per i commenti/domande e molto altro guardando il modello su www.garnstudio.com © 1982-2026 DROPS Design A/S. Ci riserviamo tutti i diritti. Questo documento, compreso tutte le sue sotto-sezioni, è protetto dalle leggi sul copyright. Potete leggere quello che potete fare con i nostri modelli alla fine di ogni modello sul nostro sito. |
||||||||||||||||||||||


Con oltre 40 anni di esperienza nel design di modelli di maglia e uncinetto, DROPS Design offre la più estesa collezione di modelli gratuiti su internet - tradotti in 17 lingue. Ad oggi vi possiamo fornire 324 cataloghi e 12290 modelli - 9561 dei quali sono tradotti in Italiano.
Ci stiamo impegnando molto per darvi il meglio che vi possiamo offrire in termini di maglia e uncinetto, ispirazioni e consigli così come filati di grande qualità ad un prezzo incredibile! Volete utilizzare i nostri modelli per qualcosa d'altro oltre al vostro uso personale? Potete leggere tutto ciò che è consentito nel testo sul Copyright in basso su tutte le pagine dei nostri modelli. Buon lavoro!
Lasciare un commento sul modello DROPS 153-12
Noi saremmo felici di ricevere i tuoi commenti e opinioni su questo modello!
Se vuoi fare una domanda, fai per favore attenzione a selezionare la categoria corretta nella casella qui sotto per velocizzare il processo di risposta. I campi richiesti sono indicati da *.