
Categorie popolari
State cercando un filato?


Commenti / Domande (52)
![]() Selva ha scritto:
Selva ha scritto:
Bonjour, Je ne comprends pas le diagramme A1, Au second rang, j'ai une maille en trop. Pourriez -vous m'expliquer ? Cdt.
16.03.2025 - 22:18DROPS Design ha risposto:
Bonjour Mme Selva, c'est normal, vous avez fait 1 jeté entre les 2 mailles endroit vous avez donc 1 m en plus; au 3ème rang, vous allez diminuer cette maille en plus: glissez la 1ère de ces 3 mailles endroit comme pour la tricoter à l'envers, tricotez les 2 mailles suivantes à l'endroit et passez la maille glissée par-dessus les 2 mailles tricotées = il reste 2 mailles de nouveau. (n'oubliez pas le jeté du 2ème rang qu'il faudra laisser tomber au 3ème rang). Retrouvez ici comment tricoter ce type de petites torsades. Bon tricot!
17.03.2025 - 09:51
![]() Kath ha scritto:
Kath ha scritto:
Where's A1? I don't see it in the pattern.
13.05.2022 - 23:52DROPS Design ha risposto:
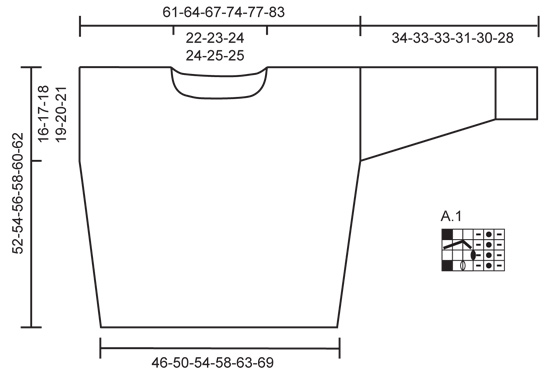
Dear Kath, you can find chart A.1 just under the sleeve in the measurements sketch, below the pattern instructions. Happy knitting!
15.05.2022 - 22:32
![]() Eva ha scritto:
Eva ha scritto:
Nagyon orulok, hogy vannak ezek a mintak, de a megadott fonalmennyiseg nem elegendo. Hogy leget az, higy a magyar leirasban kevesebbet adnak meg, mint pl az angolnal?
25.12.2021 - 20:08
![]() Jackie ha scritto:
Jackie ha scritto:
This is a lovely jumper and worth the time and effort it took to work out the pattern! Last advice very helpful however you do need to remember that rows 1 and 3 you start with the pattern as stated but with rows 2 and 4 you need to first do 4 stitches (plus the edge stitch makes 5 total) as follows: K (edge stitch), K1, P1 twisted, K1 then do the pattern. Also, don't forget to drop the yarn overs in row 3. They are there purely to make the thread loose enough to go over 2 stitches.
12.08.2020 - 17:39
![]() Victoria ha scritto:
Victoria ha scritto:
Thank you so much :)
09.07.2020 - 16:16
![]() Victoria ha scritto:
Victoria ha scritto:
I have read the lesson but still find it confusing - perhaps it is my age. I cannot see how hard it would be to provide 4 lines of pattern for those of us who are struggling with the digram
08.07.2020 - 17:12DROPS Design ha risposto:
Hi Victoria, The jumper is worked back and forth, so the rows alternate from the right side to the wrong side (when working from the wrong side, you work from left to right). Starting on the right side the pattern is as follows Row 1: P1, K1 twisted, P1, K1. 1YO, K1, repeat. Row 2: P3, 1YO, K1, P1 twisted, K1, repeat Row 3: P1, K1 twisted, P1, slip 1, k2, psso, repeat Row 4: P2, K1, P1 twisted, K1, repeat. Happy knitting!
09.07.2020 - 07:39
![]() Victoria ha scritto:
Victoria ha scritto:
I have read all the Q&As but I'm still struggling with the pattern in the A1 diagram. Is it possible to PLEASE just write out the full instructions. From the numbers of questions here I am sure many knitters would appreciate it. Thx
08.07.2020 - 15:54DROPS Design ha risposto:
Dear Victoria, The DROPS patterns are knitted and crocheted by thousands and thousands of people around the world. We understand however that in certain countries, with different knitting/crochet traditions than Scandinavia, our patterns might be written in a way that differs from what some are used to. But of course we want everyone to understand our patterns, so that’s why we have created an extensive library of tutorial videos as well as step by step lessons that explain how to follow the techniques we use and how to read the diagrams in our patterns. Give them a try!
08.07.2020 - 16:43
![]() Mia ha scritto:
Mia ha scritto:
Hello, other than the garter edge stitch, how do we knit the 4 stitches in row 2 that we knitted at the end of row 1, before we start on the A.1 Diagram (pattern?) I am saying this because in row 1 we are not finishing the row with the same 6 stitches that are part of the A.1 Diagram. The 4 stitches are extra, not part of the A.1 Diagram. Can you please describe row 2 right at the start? like edge garter stitch, ...... Thank you
30.03.2020 - 09:16DROPS Design ha risposto:
Dear Mia, from RS you work: 1 edge st in garter st, repeat A.1 until 4 sts remain and work these 4 sts like this: P1, K1 twisted, P1, 1 edge st in garter st. From WS work: 1 edge st in garter st, K1, P1 twisted, K1, repeat A.1 (reading now from the left towards the right), 1 edge st in garter st. read more about diagrams here. Happy knitting!
30.03.2020 - 11:30
![]() Lotte Meincke ha scritto:
Lotte Meincke ha scritto:
Hvad gør man, når der står at “omslaget slippes ned på næste pind”??? (Opskrift 153-12) Findes der videoer, der viser, hvad der menes med symbolerne? Mvh Lotte
13.02.2020 - 12:20DROPS Design ha risposto:
Hej Lotte, prøv at lave en lille strikkeprøve over de 5 masker i diagrammet, med 2 kantmasker i hver side 1.pind strikker du 2 kantm, 1vr, 1drejet ret, 1vrang, 1ret, 1 omslag, 1ret, 2 kantm 2.pind strikker du (fra vrangen) 2kantm, 3 vrang, 1omslag, 1 ret, 1 drejet vrang, 1ret, 2kantm 3.pind strikker du (fra retten) 2 kantm, 1vrang, 1drejet ret, 1vrang, slip omlaget af pinden så der bliver hul, tag 1 m løst af p som om den strikkes vrang, 2ret, løft den løse maske over de 2ret, 2kantm 4.pind strikker du fra vrangen, 2kantm, 2vrang, 1ret, 1 drejet vrang,1ret, 2kantm Strik gerne de 4 pinde 2-3 gange i højden så du kan se systemet. God fornøjelse!
14.02.2020 - 11:22
![]() Manuela ha scritto:
Manuela ha scritto:
Herzlichen Dank für die rasche Antwort, natürlich gleich ausprobiert und klappt wunderbar. Möchte jedoch darauf hinweisen dass dann die Beschreibung des Symbols nicht korrekt ist, bei dieser wird nämlich davon gesprochen diesen Umschlag in der nächsten Reihe rechts zu stricken ! LG und danke nochmal
30.09.2019 - 17:07
|
||||||||||||||||||||||
Ibiza#ibizasweater |
||||||||||||||||||||||
|
|
||||||||||||||||||||||
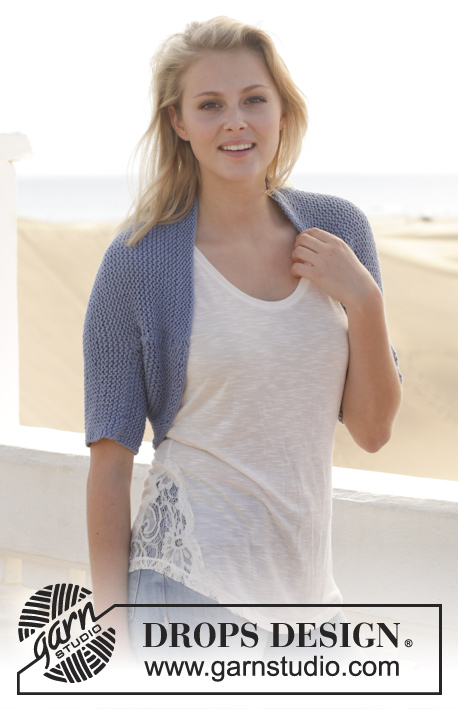
Maglia DROPS ai ferri, con motivo traforato, in "Paris". Taglie: Dalla S alla XXXL.
DROPS 153-12 |
||||||||||||||||||||||
|
PUNTO LEGACCIO (avanti e indietro sui ferri): Lavorare tutti i ferri a dir. 1 “costa” a legaccio = 2 ferri a dir. MOTIVO: Vedere il diagramma A.1. Il diagramma mostra tutti i ferri del motivo, visti sul diritto del lavoro. ---------------------------------------------------------- MAGLIA: Si lavora avanti e indietro sui ferri, in parti separate, cucite insieme alla fine del lavoro. DAVANTI: Avviare 76-83-88-94-103-113 m (compresa 1 m vivagno da ciascun lato) sui ferri n° 5,5 e lavorare 3 coste a punto legaccio. Proseguire a maglia rasata con 1 m vivagno a punto legaccio - vedere le spiegazioni sopra - da ciascun lato. Quando il lavoro misura ca.2 cm, aumentare 1 m da ciascun lato; aumentare facendo 1 m gettata all’interno di 1 m vivagno; al ferro successivo, lavorare la m gettata ritorta per evitare che si formi un buco. Ripetere questi aumenti ogni 3-3½-3½-3-3½-3½ cm ca. altre 11-10-10-12-10-10 volte (= 12-11-11-13-11-11 volte in tutto) = sui ferri ci sono 100-105-110-120-125-135 m. Proseguire finché il lavoro non misura 36-37-38-39-40-41 cm. Inserire un segno da ciascun lato: indica dove verranno cucite le maniche. Proseguire come segue, sul diritto del lavoro: 1 m vivagno a punto legaccio, ripetere il diagramma A.1 finché non rimangono 4 m sul ferro, 1 m rov, 1 m dir ritorto, 1 m rov e 1 m vivagno a punto legaccio. La m lavorata a dir ritorto sul diritto del lavoro, si lavora a rov ritorto sul rovescio del lavoro. Proseguire in questo modo finché il lavoro non misura 46-48-50-52-54-56 cm; assicurarsi di aver completato una intera ripetizione del diagramma A.1 in verticale. Lavorare le prime 35-37-39-44-46-51 m come prima, intrecciare le 30-31-32-32-33-33 m successive e lavorare le restanti m sul ferro come prima. Lavorare ora ogni spalla separatamente - ALLO STESSO TEMPO, intrecciare 1 m all’inizio di ogni ferro, per il collo, 3 volte in tutto = per ogni spalla rimangono 32-34-36-41-43-48 m. Proseguire finché il lavoro non misura 52-54-56-58-60-62 cm; intrecciare le m. DIETRO: Lavorare come indicato per il davanti, ma proseguire finché il lavoro non misura 50-52-54-56-58-60 cm - assicurarsi di aver completato una intera ripetizione del diagramma A.1 in verticale – e intrecciare le m per il collo. Lavorare come prima sulle prime 33-35-37-42-44-49 m, intrecciare le 34-35-36-36-37-37 m successive e lavorare le restanti m del ferro come prima. Lavorare ogni spalla separatamente - ALLO STESSO TEMPO, intrecciare 1 m all’inizio del ferro successivo per il collo = per ogni spalla rimangono 32-34-36-41-43-48 m. Proseguire finché il lavoro non misura 52-54-56-58-60-62 cm; intrecciare le m. MANICHE: Avviare 45-45-50-50-53-53 m sui ferri n° 5,5 (compresa 1 m vivagno da ciascun lato) e lavorare 3 coste a legaccio avanti e indietro sui ferri. Proseguire come segue: 1 m vivagno a punto legaccio, 0-0-0-0-2-2 m rov, diagramma A.1 finché non rimangono 4-4-4-4-5-5 m, 1 m rov, 1 m a dir ritorto, 1-1-1-1-2-2 m rov e 1 m vivagno a punto legaccio. La m lavorata a dir ritorto sul diritto del lavoro, si lavora a rov ritorto sul rovescio del lavoro Proseguire finché il lavoro non misura 12 cm, assicurarsi di aver completato una intera ripetizione del diagramma A.1 in verticale. Proseguire a maglia rasata e, ALLO STESSO TEMPO, aumentare 1 m da ciascun lato, all’interno di 1 m vivagno a punto legaccio; ripetere questi aumenti ogni 6½-4½-4½-3½-4-2½ cm ca., altre 3-4-4-5-4-5 volte (= 4-5-5-6-5-6 volte in tutto) = sui ferri ci sono 53-55-60-62-63-65 m. Proseguire finché il lavoro non misura 34-33-33-31-30-28 cm e intrecciare le m (misure più corte per le taglie più grandi perché le spalle sono più larghe). Lavorare la seconda manica in modo uguale. CONFEZIONE e COLLO: Cucire una spalla, lasciare l’altra aperta. Riprendere, sul diritto del lavoro, da 80 a 100 m intorno al collo. Lavorare 3 coste a legaccio avanti e indietro sui ferri; intrecciare le m. Cucire l’altra spalla e il lato del collo. Cucire le maniche tra i due segni sul davanti e sul dietro. Cucire sotto le maniche e i lati all’interno della m vivagno. |
||||||||||||||||||||||
Spiegazioni del diagramma |
||||||||||||||||||||||
|
||||||||||||||||||||||
 |
||||||||||||||||||||||
Avete terminato questo modello?Allora taggate le vostre foto con #dropspattern #ibizasweater o inviatele alla #dropsfan gallery. Avete bisogno di aiuto con questo modello?Troverete 20 video tutorial, una sezione per i commenti/domande e molto altro guardando il modello su www.garnstudio.com © 1982-2026 DROPS Design A/S. Ci riserviamo tutti i diritti. Questo documento, compreso tutte le sue sotto-sezioni, è protetto dalle leggi sul copyright. Potete leggere quello che potete fare con i nostri modelli alla fine di ogni modello sul nostro sito. |
||||||||||||||||||||||


Con oltre 40 anni di esperienza nel design di modelli di maglia e uncinetto, DROPS Design offre la più estesa collezione di modelli gratuiti su internet - tradotti in 17 lingue. Ad oggi vi possiamo fornire 324 cataloghi e 12290 modelli - 9561 dei quali sono tradotti in Italiano.
Ci stiamo impegnando molto per darvi il meglio che vi possiamo offrire in termini di maglia e uncinetto, ispirazioni e consigli così come filati di grande qualità ad un prezzo incredibile! Volete utilizzare i nostri modelli per qualcosa d'altro oltre al vostro uso personale? Potete leggere tutto ciò che è consentito nel testo sul Copyright in basso su tutte le pagine dei nostri modelli. Buon lavoro!
Lasciare un commento sul modello DROPS 153-12
Noi saremmo felici di ricevere i tuoi commenti e opinioni su questo modello!
Se vuoi fare una domanda, fai per favore attenzione a selezionare la categoria corretta nella casella qui sotto per velocizzare il processo di risposta. I campi richiesti sono indicati da *.