
Categorie popolari
State cercando un filato?


Commenti / Domande (47)
![]() Hanne Bach Holm ha scritto:
Hanne Bach Holm ha scritto:
Når borten er strikket og alle masker samlet skal der strikkes 22 cm, hvorfra tages målet ?
30.04.2024 - 17:15DROPS Design ha risposto:
Hej Hanne, du måler fra starten af arbejdet :)
03.05.2024 - 11:06
![]() MIchele Bailey ha scritto:
MIchele Bailey ha scritto:
Hello I cannot see the corrected diagram for A.1. Where do i find it please?
12.05.2023 - 18:24DROPS Design ha risposto:
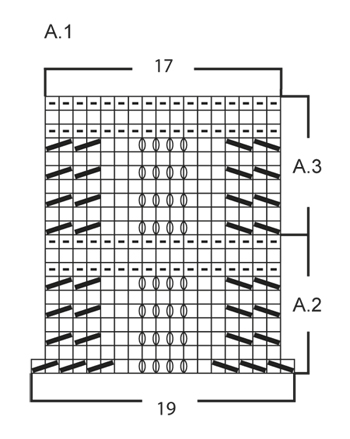
Dear Michele, the correct diagram is the one you see in the webpage; we already removed the incorrect one. A.1 is the full chart, while A.2 and A.3 are parts of A.1. Happy knitting!
13.05.2023 - 19:26
![]() Lucia ha scritto:
Lucia ha scritto:
Sto realizzando il modello nella misura più piccola: prima diminuzione a 21 cm, seconda diminuzione dopo 4,5 cm = 25,5 cm. Poi ogni cm. 8 volte = 33,5 cm. Poi con cinque coste a legaccio bisognerebbe arrivare a 43 cm., ma 10 ferri a legaccio non possono corrispondere a 9,5 cm
03.04.2022 - 14:17DROPS Design ha risposto:
Buonasera Lucia, le spiegazioni sono corrette. Buon lavoro!
05.04.2022 - 22:19
![]() Gladys ha scritto:
Gladys ha scritto:
No entiendo que significa una vuelta entre dos puntos
13.11.2021 - 18:07DROPS Design ha risposto:
Hola Gladys, no encuentro este término en el patrón. El único término similar es 1 HEB o hebra entre dos puntos, que es lo mismo que hacer una lazada entre dos puntos.
14.11.2021 - 19:06
![]() Ellen ha scritto:
Ellen ha scritto:
Hi, on the first row of A1 I seem to keep on ending up with 17 stitches on the needle, not 19? Any help would be greatly appreciated!
01.08.2021 - 00:36DROPS Design ha risposto:
Dear Ellen, correct, first row in A.1 is worked over 19 sts but you then decrease 2 sts in each A.1 = 17 sts remain in each A.1 - and a total of 24-26-28-30 stitches has been decreased. Happy knitting!
02.08.2021 - 08:13
![]() Alexine Fleck ha scritto:
Alexine Fleck ha scritto:
I don't understand this: "Continue with A.3 3 times vertically AT THE SAME TIME on last row from RS (i.e. last repetition of A.3 vertically), dec 61 sts evenly = 149-166-183-200 sts. Slip sts on a stitch holder and knit another part the same way." Does it mean: A3 4 times; put 61 stitches on holder? What is the decrease? Can you explain this more step by step?
20.04.2020 - 18:00DROPS Design ha risposto:
Dear Mrs Fleck, you repeat the 10 rows of A.3 a total of 3 times in height (= 30 rows), and on the last row (= 3Oth row = from WS) you will knit all stitches as shown in diagram and at the same time decrease 61 sts (= work K2 tog a total of 61 times evenly spaced - read here how to do so that 149-166-183-200 sts remain on needle. Happy knitting!
21.04.2020 - 09:24
![]() Lotta ha scritto:
Lotta ha scritto:
Hej, står att diagrammet är uppdaterat men ser inte A1 på bilden, endast A2 o A3?
16.11.2019 - 17:59DROPS Design ha risposto:
Hej Lotta, hela A.1 består av A.2 och A.3. Lycka till :)
21.11.2019 - 09:05
![]() Gail Jaffrey ha scritto:
Gail Jaffrey ha scritto:
I really like your poncho pattern 153-29; however the photo of the completed poncho is very unclear. Do you have a clear photo that would help me to see the bottom section so I know whether or not I am doing the lace part of he pattern correctly? Thank you.
06.08.2019 - 03:54DROPS Design ha risposto:
Dear Mrs Jaffrey, we do not have further pictures from the pattern but you will find here how to read diagrams: work pattern decreasing 2 sts in each repeat on first row. Then work A.2-section a total of 1 time in height, and repeat A.3-section a total of 3 times in height decreasing sts evenly on last row last repeat. Happy knitting!
07.08.2019 - 11:48
![]() Gudrun ha scritto:
Gudrun ha scritto:
Leider kann ich in der Anleitung das Diagramm A.1 nicht finden.
29.06.2019 - 11:44DROPS Design ha risposto:
Liebe Gudrun, A.1 ist das ganze Diagram, Sie häkeln zuerst A.2 (= 2 Abnahme bei der 1. Runde) einmal in der Höhe, dann wiederholen Sie A.3 insgesamt 3 Mal in der Höhe. Viel Spaß beim stricken!
01.07.2019 - 06:50
![]() Labat ha scritto:
Labat ha scritto:
Bonjour, je voudrai réaliser ce modèle mais je ne parviens pas à comprendre ni obtenir le diagramme A1, et je ne parviens pas non plus à voir les modifications apportées... Comment faire ? Merci d'avance ! Stèf.
13.05.2018 - 18:32DROPS Design ha risposto:
Bonjour Mme Labat, si vous avez imprimé le modèle avant la date des corrections, il vaudra mieux le réimprimer, sinon, il est juste ainsi. Commencez à lire le diagramme en commençant en bas à droite et de droite à gauche tous les tours. Ainsi, au 1er rang de A.1 (= encadré A.2 à droite), vous diminuez 2 m dans chaque motif puis continuez jusqu'à la fin du diagramme sur les 17 m restantes. Quand le diagramme a été tricoté 1 fois en hauteur, répétez la partie A.3 encore 2 fois (= il aura été tricoté 3 fois au total en hauteur). Bon tricot!
14.05.2018 - 11:01
|
||||||||||||||||
Felicity#felicityponcho |
||||||||||||||||
|
|
||||||||||||||||
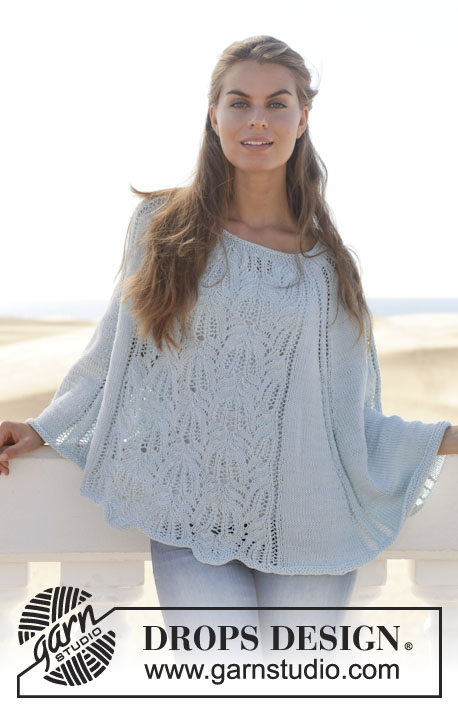
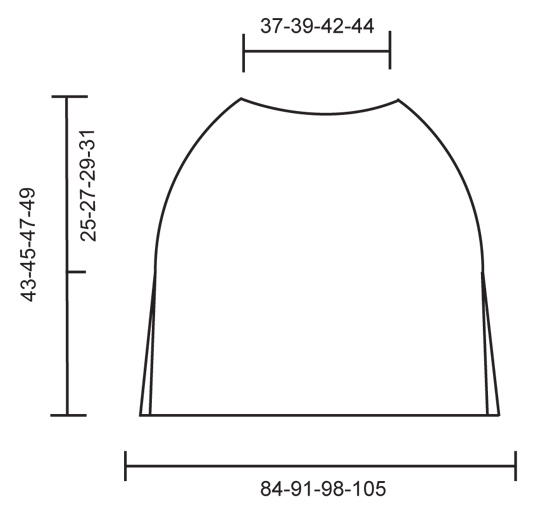
Poncho DROPS ai ferri, con motivo ondulato e spacchi laterali, in "Cotton Light". Taglie: Dalla S alla XXXL.
DROPS 153-29 |
||||||||||||||||
|
PUNTO LEGACCIO (in tondo, sui ferri circolari): Lavorare * 1 giro a dir e 1 giro a rov *, ripetere da *-*. 1 “costa” a legaccio = 2 giri. PUNTO LEGACCIO (avanti e indietro sui ferri): Lavorare tutti i ferri a dir. 1 “costa” a legaccio = 2 ferri a dir. MOTIVO: Vedere i diagrammi da A.1 a A.3. I diagrammi mostrano tutti i ferri del motivo, visti sul diritto del lavoro. SUGGERIMENTO PER LE DIMINUZIONI: Diminuire sempre sul diritto del lavoro! Diminuire come segue, prima del segno: passare 1 m a dir senza lavorarla, 1 m dir, accavallare la m passata sulla m lavorata Diminuire come segue, dopo il segno: lavorare 2 m insieme a dir. ---------------------------------------------------------- PONCHO: Si lavora inizialmente avanti e indietro per creare uno spacco ai lati, poi in tondo fino alla fine del lavoro. Avviare, senza stringere troppo il filo, 234-253-272-291 m (comprese 3 m vivagno da ciascun lato) sui ferri circolari n° 4 con il filato Cotton Light. Lavorare 1 costa a legaccio avanti e indietro - vedere le spiegazioni sopra ! Proseguire come segue: 3 m vivagno a punto legaccio, lavorare il MOTIVO ripetendo il diagramma A.1 (= 19 m nel corso del 1° ferro) 12-13-14-15 volte in larghezza, e finire con 3 m vivagno a punto legaccio. ATTENZIONE: Dopo aver lavorato il 1° ferro del diagramma A.1, in ogni ripetizione del diagramma sono state diminuite 2 m (quindi in tutto, nel corso del ferro, sono state diminuite 24-26-28-30 m) = rimangono 210-227-244-261 m. Proseguire avanti e indietro lavorando il diagramma A.2 1 volta in verticale. Proseguire in modo uguale seguendo il motivo come prima, ma lavorare il diagramma A.3 al posto del diagramma A.2. Ripetere il diagramma A.3 3 volte in verticale; ALLO STESSO TEMPO, nel corso dell’ultimo ferro sul diritto del lavoro (quindi nel corso dell’ultima ripetizione del diagramma A.3 in verticale), diminuire 61 m in modo uniforme = 149-166-183-200 m. Mettere le m in attesa su un ferma maglie e lavorare la seconda parte in modo uguale. Finita la seconda parte, lavorare a maglia rasata tutte le m sul diritto del lavoro. Riportare sui ferri di lavoro le m messe in attesa sul ferma maglie e proseguire a maglia rasata su queste m = 298-332-366-400 m. Proseguire in tondo. Nel corso del giro successivo, inserire 6 segni nel lavoro come segue: 1° segno sopra lo spacco su un lato, 38-42-45-49 m a maglia rasata, inserire un segno, 73-82-93-102 m a maglia rasata, inserire un segno, 38-42-45-49 m a maglia rasata, inserire un segno, 38-42-45-49 m a maglia rasata, inserire un segno, 73-82-93-102 m a maglia rasata, inserire un segno, 38-42-45-49 m a maglia rasata. Proseguire a maglia rasata; ALLO STESSO TEMPO, quando il lavoro misura 21-22-22-20 cm, diminuire come segue: Lavorare a maglia rasata finché non rimangono 2 m prima del primo segno, diminuire ora 1 m da ciascun lato del segno – VEDERE IL SUGGERIMENTO PER LE DIMINUZIONI! Ripetere queste diminuzioni da ciascun lato di ogni segno = 12 m diminuite nel giro. Ripetere queste diminuzioni ogni 4½-3½-2½-2½ cm altre 1-2-4-5 volte (= 2-3-5-6 volte in tutto) = 274-296-306-328 m. Diminuire ora in modo uguale ma diminuire ogni cm 8-9-9-10 volte in tutto = rimangono 178-188-198-208 m. Proseguire con 5 coste a legaccio; ALLO STESSO TEMPO, diminuire 23-24-22-23 m in modo uniforme nel corso del primo ferro della prima costa a legaccio = rimangono 155-164-176-185 m. Intrecciare le m senza stringere troppo il filo; tagliare e fermare il filo. |
||||||||||||||||
Spiegazioni del diagramma |
||||||||||||||||
|
||||||||||||||||
 |
||||||||||||||||
 |
||||||||||||||||
Avete terminato questo modello?Allora taggate le vostre foto con #dropspattern #felicityponcho o inviatele alla #dropsfan gallery. Avete bisogno di aiuto con questo modello?Troverete 20 video tutorial, una sezione per i commenti/domande e molto altro guardando il modello su www.garnstudio.com © 1982-2026 DROPS Design A/S. Ci riserviamo tutti i diritti. Questo documento, compreso tutte le sue sotto-sezioni, è protetto dalle leggi sul copyright. Potete leggere quello che potete fare con i nostri modelli alla fine di ogni modello sul nostro sito. |
||||||||||||||||


Con oltre 40 anni di esperienza nel design di modelli di maglia e uncinetto, DROPS Design offre la più estesa collezione di modelli gratuiti su internet - tradotti in 17 lingue. Ad oggi vi possiamo fornire 324 cataloghi e 12290 modelli - 9561 dei quali sono tradotti in Italiano.
Ci stiamo impegnando molto per darvi il meglio che vi possiamo offrire in termini di maglia e uncinetto, ispirazioni e consigli così come filati di grande qualità ad un prezzo incredibile! Volete utilizzare i nostri modelli per qualcosa d'altro oltre al vostro uso personale? Potete leggere tutto ciò che è consentito nel testo sul Copyright in basso su tutte le pagine dei nostri modelli. Buon lavoro!
Lasciare un commento sul modello DROPS 153-29
Noi saremmo felici di ricevere i tuoi commenti e opinioni su questo modello!
Se vuoi fare una domanda, fai per favore attenzione a selezionare la categoria corretta nella casella qui sotto per velocizzare il processo di risposta. I campi richiesti sono indicati da *.