
Categorie popolari
State cercando un filato?


Commenti / Domande (29)
![]() Solveig Jensen ha scritto:
Solveig Jensen ha scritto:
Hej Jeg er nået til at strikke A1. Da de ulige pinde i diagrammet er vrang-pinde, skal disse ulige linjer så læses fra venstre som almindelige vrangpinde eller skal de læses fra højre som almindelig "ulige" pinde? Håber på svar hurtigt så jeg kan komme videre med denne flotte bluse!
29.05.2015 - 19:30DROPS Design ha risposto:
Hej Solveig. Du laeser vrangpindene fra venstre mod höjre
01.06.2015 - 14:10Maria Luisa Cevolani ha scritto:
Please, in the yoke, on the third row, the last stitch before the five garter stitches band, is a yo?Am I right?
21.04.2015 - 21:27DROPS Design ha risposto:
Dear Mrs Cevolani, depending on your size the last st on 3rd row in A.1 will be either a YO or if 1 st remain, K the last st before the 5 garter sts. Happy knitting!
22.04.2015 - 11:53Maria Luisa Cevolani ha scritto:
Good morning, please I have 3 questions: the diagram shows the right side of the pattern as usual? And the WS is read from left to right, the right side from right to left?I Also don't understand the words on the star:"pattern in diagram does not fit the repetition but fits no of stitches on the entire vest."Thanks for your help!
19.04.2015 - 15:28DROPS Design ha risposto:
Dear Mrs Cevolani, you are correct for how to read the pattern - see also here. When there is a star, just repeat diagram on these rows as stated ie over all sts to get the correct number of sts (diagram is worked on these row over same repeat as before but number of sts will match). Happy knitting!
20.04.2015 - 10:03Maria Luisa Cevolani ha scritto:
Please, I am 93 bust. this cardigan is 90 (M) or 100 (L). I usually buy L garments. What measure would you suggest me better?
29.03.2015 - 15:06DROPS Design ha risposto:
Dear Mrs Cevolani, compare a similar garment you have and like the shape to the measurements in the chart to find out the matching size, depening on how tight/loose you rather want it to be. Happy knitting!
30.03.2015 - 15:46
![]() Lille My ha scritto:
Lille My ha scritto:
Strikker nå mønsterrapport A.1 og lurer på noe angående den. På første rapporten med * på ( der det er perlestrikk) vil jeg få 2 rette eller 2 vrange ved siden av hverandre hver 11. maske. Er dette rett?
30.04.2014 - 11:38DROPS Design ha risposto:
Mønsteret i diag går ikke opp i rapporten men går opp i m antallet på hele vesten. Dvs at du kan strikke perlestrik med skiftevis 1 r/1 vr som stemmer over hele pinden.
07.05.2014 - 11:39
![]() Marieke ha scritto:
Marieke ha scritto:
Folgende Passage im "Raglan-Teil" verstehe ich nicht: "...bis noch 6 M übrig sind, die erste M von A.1 str (damit das Muster in der vorderen Mitte symmetrisch wird, strickt man am Anfang 2 M re zusammen und die letzte M re) und schließen mit 5 Blendenm kraus rechts..." Besonders der Teil in der Klammer ist mir nicht klar. Könnt ihr mir weiterhelfen? Vielen Dank im Voraus!
20.04.2014 - 10:40DROPS Design ha risposto:
Liebe Marieke, Sie stricken ja am Ende der R, vor den 5 Blenden-M, noch einmal die erste M von A.1. In der R in A.1, in der die 1. M darin besteht, dass 2 M re zusammengestrickt werden, stricken Sie stattdessen 1 M re, d.h. die letzte M vor den 5 Blenden-M ist in diesem Fall dann 1 M re und nicht 2 M re zusammen.
22.04.2014 - 13:51
![]() Helda ha scritto:
Helda ha scritto:
I don't understand the decreasing for the sleeves \\--AT THE SAME TIME dec 7-15-12-3-31-28 sts over sts in stockinette st = 163-167-194-219-211-242 sts on needle.--\\
06.04.2014 - 04:53DROPS Design ha risposto:
Dear Helda, on this row, you cast off 8 sts for both armhole, and work all sts in st st + front band sts in garter st as before. The number of sts in st st has to be decreased by 7-31 sts (see size), by working sts tog evenly spaced. Take care to have same number of sts for each front piece. Happy knitting!
07.04.2014 - 10:03
![]() Sari ha scritto:
Sari ha scritto:
Ruutupiirrokset eivät aukea netti ohjeessa DROPS 152-10
16.02.2014 - 08:35DROPS Design ha risposto:
Vika on korjattu, nyt piirrosten tulisi aueta.
17.02.2014 - 13:52
![]() Marleen Staessens ha scritto:
Marleen Staessens ha scritto:
Hééééél mooi en ik wil dit wel maken maar ik krijg het telpatroon niet te zien ?
30.01.2014 - 17:33DROPS Design ha risposto:
Hoi Marleen. Het telpatroon staat onderaan het patroon. Kijk nog een keer.
03.02.2014 - 14:41
![]() Elisa ha scritto:
Elisa ha scritto:
Semplice ed elegante
16.01.2014 - 17:15
|
|||||||||||||||||||||||||
Sunny Side Cardigan#sunnysidecardigan |
|||||||||||||||||||||||||
|
|
|||||||||||||||||||||||||
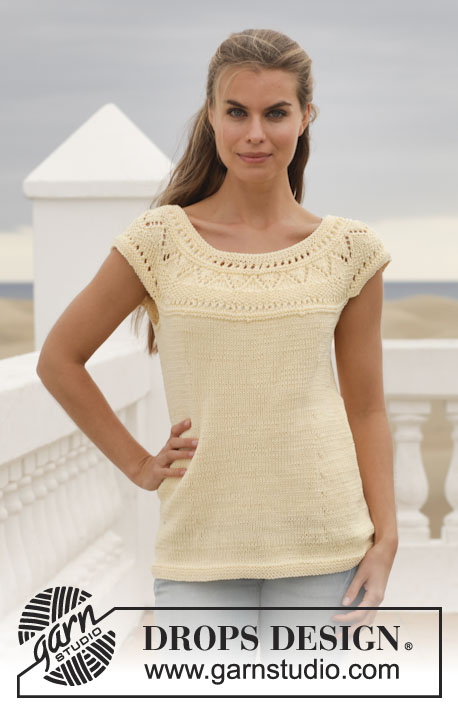
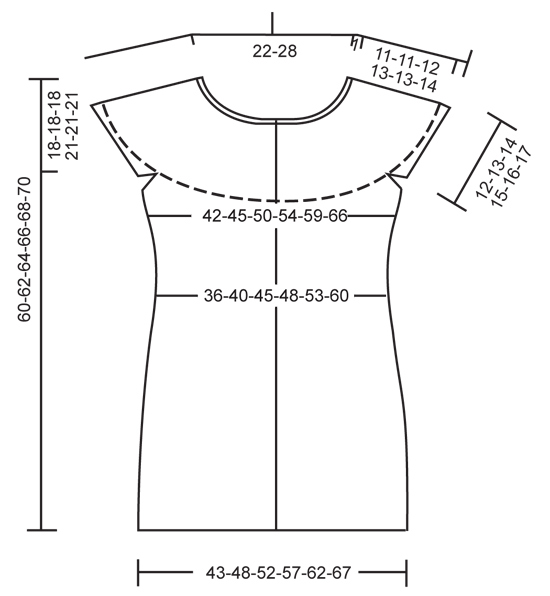
Gilet DROPS con motivo a pizzo e sprone arrotondato in "Muskat". Taglie: S - XXXL.
DROPS 152-10 |
|||||||||||||||||||||||||
|
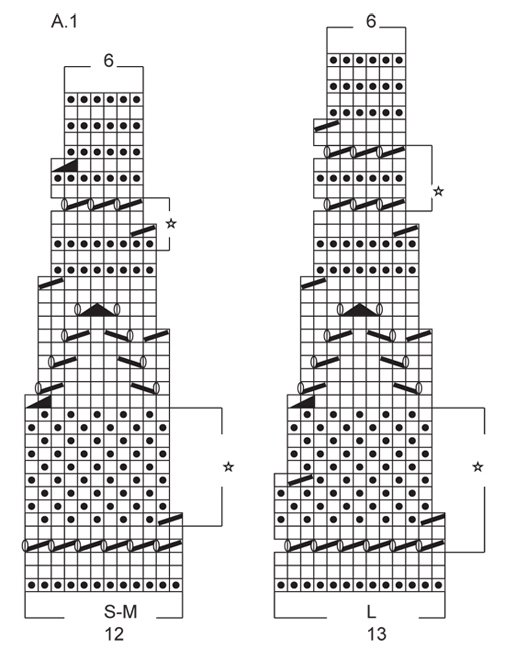
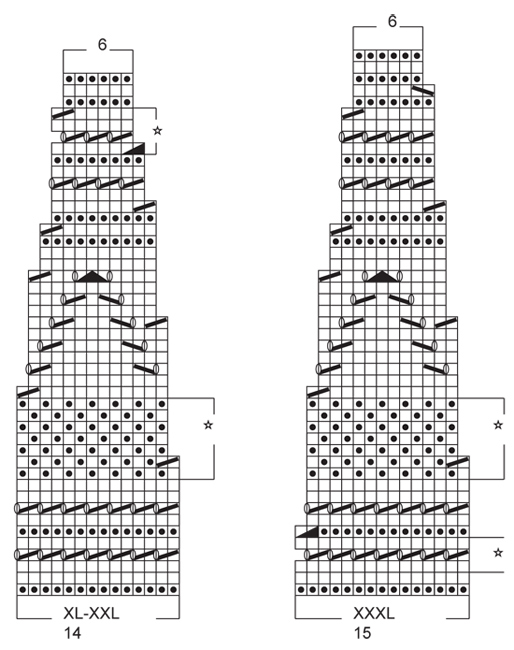
M LEGACCIO (avanti e indietro sui f): Lavorare tutti i f a dir. 1 “costa” a m legaccio = 2 f dir. MOTIVO: Vedere il diagramma A.1. Il diagramma mostra tutti i f del motivo visti dal diritto del lavoro. Vedere il diagramma per la taglia corretta. SUGGERIMENTO PER LE DIMINUZIONI: Diminuire 1 m dopo il 1° e il 3° segnapunti come segue: 2 m insieme a dir. Diminuire 1 m prima del 2° e 4° segnapunti come segue: lavorare fino a quando rimangono 2 m prima del segnapunti, passare 1 m a dir senza lavorarla, 1 m dir, accavallare la m passata sopra quella appena lavorata. SUGGERIMENTO PER GLI AUMENTI: Aumentare 1 m dopo il 1° e 3° segnapunti come segue: Fare 1 gettato. Aumentare 1 m prima del 2° e 4° segnapunti come segue: fare 1 gettato. Sul f successivo lavorare i gettati a ritorto (cioè lavorare nel filo dietro del gettato invece di quello davanti) per evitare buchi. ASOLE: Diminuire per le asole sul bordo destro. 1 asola = lavorare insieme a dir la 2° e la 3° m dal centro davanti e fare 1 gettato. Diminuire per le asole quando il lavoro misura: TAGLIA S: 3, 13, 22, 31, 40, 49 e 59 cm TAGLIA M: 5, 15, 24, 33, 42, 51 e 61 cm TAGLIA L: 7, 15, 23, 31, 39, 47, 55 e 63 cm TAGLIA XL: 8, 16, 24, 32, 40, 48, 56 e 65 cm TAGLIA XXL: 5, 12, 19, 26, 33, 41, 49, 58 e 67 cm TAGLIA XXXL: 5, 13, 21, 29, 37, 45, 53, 61 e 69 cm ---------------------------------------------------------- CORPO: Lavorato avanti e indietro sui f circolari. Avviare 190-210-230-250-270-290 m (comprese 5 m per il bordo a ogni lato) con i f circolari n° 3,5 mm con Muskat. Lavorare 4 “coste” a M LEGACCIO – leggere la spiegazione sopra. Passare ai f circolari n° 4 mm e lavorare dal diritto del lavoro 5 m per il bordo a m legaccio a ogni lato, e a m rasata sulle altre m fino a quando il lavoro misura 7 cm – ricordarsi delle ASOLE. Lavorare le m del bordo a ogni lato a m legaccio fino alla fine del lavoro. FARE ATTENZIONE ALLA TENSIONE DEL LAVORO! Ora inserire 4 segnapunti nel lavoro. Lavorare come segue dal diritto del lavoro: 5 m del bordo a m legaccio, 20-20-25-25-30-30 m dir, inserire 1 segnapunti (= 1° segnapunti), 50-60-60-70-70-80 m dir, inserire 1 segnapunti (= 2° segnapunti), 40-40-50-50-60-60 m dir, inserire 1 segnapunti (= 3° segnapunti), 50-60-60-70-70-80 m dir, inserire 1 segnapunti (= 4° segnapunti), 20-20-25-25-30-30 m dir, finire con 5 m a m legaccio (= m del bordo). Spostare i segnapunti verso l’alto durante il lavoro. Sul f successivo dal diritto del lavoro, diminuire 1 m all’altezza di ogni segnapunti – leggere il SUGGERIMENTO PER LE DIMINUZIONI = 4 diminuzioni sul f. NOTA! Il n° di m al centro, cioè a ogni lato delle m del bordo al centro davanti e al centro dietro è lo stesso, diminuire nelle m ai lati. Ripetere le diminuzioni ogni 8-8-8-6-6-8 f altre 6-7-7-9-8-6 volte (= 7-8-8-10-9-7 diminuzioni in totale) = 162-178-198-210-234-262 m sul f. Continuare a m rasata fino a quando il lavoro misura 32 cm. Sul f successivo dal diritto del lavoro, aumentare 1 m all’altezza di ogni segnapunti – leggere il SUGGERIMENTO PER GLI AUMENTI = 4 aumenti sul f. NOTA! Il n° di m al centro, cioè a ogni lato delle m del bordo al centro davanti e al centro dietro è lo stesso, aumentare nelle m ai lati. Ripetere gli aumenti ogni 4-6-6-4-6-8 f altre 5-4-5-6-5-5 volte (= 6-5-6-7-6-6 volte in totale) = 186-198-222-238-258-286 m sul f. Continuare a m rasata e a m legaccio sulle m del bordo fino a quando il lavoro misura 41-43-45-44-46-48 cm. Poi lavorare 1 “costa” su tutte le m (1° f dal diritto del lavoro). LEGGERE TUTTA LA SEZIONE SEGUENTE PRIMA DI CONTINUARE! Poi diminuire per le maniche sul f successivo dal diritto come segue: 5 m del bordo a m legaccio, 40-43-49-53-58-65 m dir, intrecciare le 8 m successive a m legaccio, 80-86-98-106-116-130 m dir, intrecciare le 8 m successive a m legaccio, 40-43-49-53-58-65 m dir e 5 m per il bordo a m legaccio, ALLO STESSO TEMPO distribuire 7-15-12-3-31-28 diminuzioni sulle m a m rasata = 163-167-194-219-211-242 m sul f. Mettere il lavoro da parte e lavorare i bordi delle maniche. BORDO DELLA MANICA: Lavorato avanti e indietro sui f circolari. Avviare 54-58-62-68-72-76 m con i f circolari n° 3,5 mm con Muskat. Lavorare 2 “coste”, ALLO STESSO TEMPO sul 1° f distribuire 4 diminuzioni in modo uniforme (questo viene fatto per evitare un bordo tirato sulla manica) = 50-54-58-64-68-72 m sul f. Affrancare. Mettere il lavoro da parte e lavorare l’altro bordo della manica. SPRONE: Trasferire i bordi delle maniche sullo stesso f circolare n° 4 mm del corpo dove sono state intrecciate le m per gli scalfi = 263-275-310-347-347-386 m sul f (non lavorare le m quando vengono trasferite sullo stesso f). Lavorare 5 m del bordo a m legaccio, il diagramma A.1(1° f = rovescio del lavoro) (= 12-12-13-14-14-15 m) 21-22-23-24-24-25 ripetizioni in larghezza fino a quando rimangono 6 m, lavorare la 1° m in A.1 (in modo che il motivo sia lo stesso a ogni lato verso il centro davanti, se la 1° m è 2 m insieme a dir, lavorare l’ultima m a dir) e finire con 5 m per il bordo a m legaccio – ricordarsi delle ASOLE. Continuare il motivo in questo modo. Alla fine di tutte le diminuzioni, rimangono 137-143-149-155-155-161 m sul f. Intrecciare. CONFEZIONE: Cucire i bordi delle maniche al corpo. Attaccare i bottoni sul bordo sinistro. |
|||||||||||||||||||||||||
Spiegazioni del diagramma |
|||||||||||||||||||||||||
|
|||||||||||||||||||||||||
 |
|||||||||||||||||||||||||
 |
|||||||||||||||||||||||||
 |
|||||||||||||||||||||||||
Avete terminato questo modello?Allora taggate le vostre foto con #dropspattern #sunnysidecardigan o inviatele alla #dropsfan gallery. Avete bisogno di aiuto con questo modello?Troverete 22 video tutorial, una sezione per i commenti/domande e molto altro guardando il modello su www.garnstudio.com © 1982-2026 DROPS Design A/S. Ci riserviamo tutti i diritti. Questo documento, compreso tutte le sue sotto-sezioni, è protetto dalle leggi sul copyright. Potete leggere quello che potete fare con i nostri modelli alla fine di ogni modello sul nostro sito. |
|||||||||||||||||||||||||


Con oltre 40 anni di esperienza nel design di modelli di maglia e uncinetto, DROPS Design offre la più estesa collezione di modelli gratuiti su internet - tradotti in 17 lingue. Ad oggi vi possiamo fornire 324 cataloghi e 12290 modelli - 9561 dei quali sono tradotti in Italiano.
Ci stiamo impegnando molto per darvi il meglio che vi possiamo offrire in termini di maglia e uncinetto, ispirazioni e consigli così come filati di grande qualità ad un prezzo incredibile! Volete utilizzare i nostri modelli per qualcosa d'altro oltre al vostro uso personale? Potete leggere tutto ciò che è consentito nel testo sul Copyright in basso su tutte le pagine dei nostri modelli. Buon lavoro!
Lasciare un commento sul modello DROPS 152-10
Noi saremmo felici di ricevere i tuoi commenti e opinioni su questo modello!
Se vuoi fare una domanda, fai per favore attenzione a selezionare la categoria corretta nella casella qui sotto per velocizzare il processo di risposta. I campi richiesti sono indicati da *.