
Categorie popolari
State cercando un filato?


Commenti / Domande (37)
![]() Jamie Jedinak ha scritto:
Jamie Jedinak ha scritto:
Hello! Do you know how I can translate this page into English? Thank you so very much these are beautiful and I look forward to learning how to make them thank you for all the links with video etc. :-) happy new year! :-) Jamie
20.01.2021 - 05:36DROPS Design ha risposto:
Dear Mrs Jedinak, this pattern is available in US-English, click on the scroll down menu below the photo and select your language - remember crochet terms are different in UK-English and in US-English. Happy crocheting!
20.01.2021 - 07:56
![]() Kelly ha scritto:
Kelly ha scritto:
Is er een complete video voor het haken van de sokken van Milla? Heeeeel graag :-) Mvg, Kelly
12.10.2019 - 04:31DROPS Design ha risposto:
Dag Kelly,
Nee, helaas is er niet een complete videotutorial van specifiek deze sokken. Wel van de verschillende technieken die gebruikt worden. De video's vind je onderaan het patroon (boven de opmerkingen). Laat evt. weten waar je tegenaan loopt, zodat we je kunnen helpen.
15.10.2019 - 16:24
![]() Natalia Potsada ha scritto:
Natalia Potsada ha scritto:
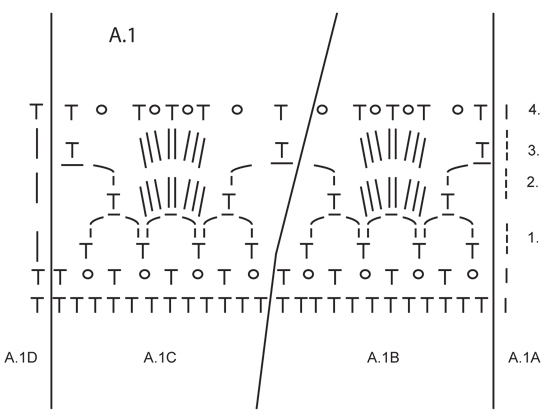
Hallo, mit welcher Reihe aus dem Diagramm beginne ich bei dem Schaft? Danke.
03.05.2019 - 20:06DROPS Design ha risposto:
Liebe Frau Potsada, das Muster vom Fuß muss beim Schaft weitergehäkelt werden, Die letzte Runde wurde eine 3.Runde im A.1, die 1. Reihe beim Schaft wird dann die 4. Reihe in A.1 (dann Reihe 1 bis 4 arbeiten). Viel Spaß beim häkeln!
06.05.2019 - 08:33
![]() Susan ha scritto:
Susan ha scritto:
Oh darn! I began crocheting this awesome pattern thinking that it would be completely explained. I haven't learned how to read diagrams and your link to read patterns wasn't much help. Unfortunately, I will need to change my project 😟
18.09.2018 - 18:06
![]() Neulojaenkeli ha scritto:
Neulojaenkeli ha scritto:
Koskaan en ollut virkannut sukkia, mutta muuta kyllä paljonkin. Ihmettelin piirostanne kun ei ollut ns. yleisen ohjeen muikainen ja varsinkin tätä kierrokselta toiselle siirtymäkohtaa, sillä se näkyy sukissa aika selkeästi, sen olisi voinut suunnitella paremmin. Muuten sukat kauniit. Ja sain kuin sainkin ohjeesta selvää, vaikka se on sekava. Parempi piirros olisi auttanut asiaa. Onneksi sukista oli aika selkeä kuva kuitenkin.
18.06.2018 - 05:15
![]() Bonnie Kisiel ha scritto:
Bonnie Kisiel ha scritto:
I am determined to complete this sock pattern. However, I need someone to clarify why line 3 shows 12 stitches and then line 4 shows that somehow 9 stitches (characters) are supposed to fit into 12 with 4 picots! Thank you.
21.10.2017 - 05:51DROPS Design ha risposto:
Dear Mrs Kisiel, there are 4 picots in each repeat in width (in A.1B as well as in A.1C) on row 2 in the diagram, then work the row 1-4 and there will be 4 picots on last row in diagram (= row 4). Repeat diagram in height from row 1. Happy crocheting!
23.10.2017 - 09:42
![]() Beverly ha scritto:
Beverly ha scritto:
Can you please explain the following: (= 30-40-45 sc). Work 1 sc in every sc while AT THE SAME TIME inc 6-2-0 sc evenly = 36-42-45 sc on round. Continue as follows: A.1A (= 1 st), A.1C (= 12 sts), A.1D over the last 23-29-32 sc.
18.03.2017 - 00:03DROPS Design ha risposto:
Dear Beverly, work first 1 round with sc, at the same time, inc evenly 6 sc in 1st size and 2 sc in 2nd size (no inc in 3rd size). Then work diagrams: A.1A over the next st, then work A.1C (=12 st) 1 time in width, then repeeat A.1D over the last 23-29-32 sc. Happy crocheting!
20.03.2017 - 08:39Wesam ha scritto:
I make it out thank you so much for your help and time, love your pattern and waiting for more, thanks again
17.10.2015 - 01:59Wesam ha scritto:
Hey, that's a really awesome patern and it's really beautiful socks, but I'm having a small problem, I can't understand the diagrams would anyone help me please. Thanks.
12.10.2015 - 22:09DROPS Design ha risposto:
Dear Mrs Wesam, please click here to learn more about didagrams. Each st/group of st is representated by 1 symbol - see diagram text. The vertical lines delimit the parts of the diagram to be worked (A.1A, A.1C, A.1D) or to be repeated (A.1B). Happy crocheting!
13.10.2015 - 09:37
![]() Siebke ha scritto:
Siebke ha scritto:
Goedemorgen "Dropsdesign", Klopt het dat ik een punt onderaan de hiel heb. Op de foto ziet het er zo mooi rond uit. Heb de hiel precies zo afgewerkt als in het filmpje, de sok dubbel vouwen en samenhaken. vriendelijke groeten, Siebke
10.09.2015 - 09:11DROPS Design ha risposto:
Hoi Siebke. Bedoel je dat er een puntje is aan de onderkant waar je de naad middenachter hebt? Dat kan, maar meestal wordt dat veel beter na een keer wassen en dragen. Als je het niet mooi vindt, kan je ook de naad een beetje aanpassen, zodat die niet zo "scherp" is.
11.09.2015 - 14:10
|
|||||||||||||
Milla#millasocks |
|||||||||||||
|
|
|||||||||||||
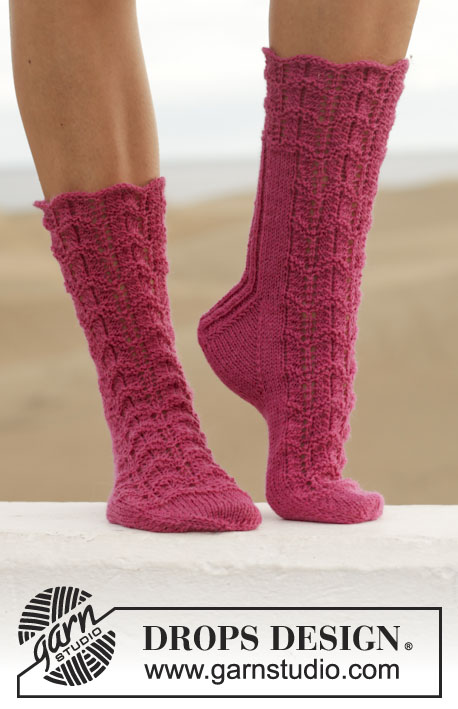
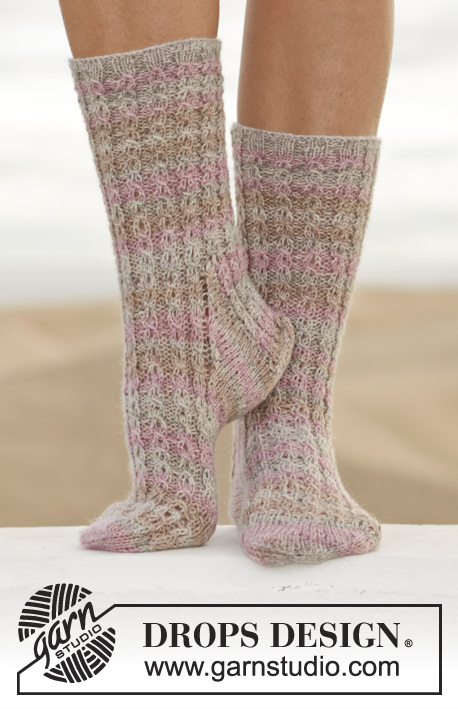
Calzini DROPS all’uncinetto, con motivo traforato, in "Big Fabel". Taglie: Dalla 35 alla 43.
DROPS 154-33 |
|||||||||||||
|
SUGGERIMENTO PER IL LAVORO: Sostituire la prima m.b all’inizio di ogni giro di m.b con 1 cat. Finire ogni giro con 1 m.bss nella cat all’inizio del giro. Sostituire la prima m.a all’inizio di ogni giro di m.a con 3 cat. Finire ogni giro con 1 m.bss nella 3a cat dall’inizio del giro. MOTIVO: Vedere il diagramma A.1. ---------------------------------------------------------- CALZINI: Si lavorano in tondo dalla punta. Proseguire avanti e indietro fino al centro, sul dietro (tallone). Con l’uncinetto n° 3,5 ed il filato Big Fabel, avviare 4 cat e formare un anello con 1 m.bss nella prima cat. GIRO 1: Lavorare 5 m.b nell’anello di cat – VEDERE IL SUGGERIMENTO PER IL LAVORO ! GIRO 2: Lavorare 2 m.b in ogni m.b = 10 m.b. GIRO 3: * 1 m.b nella prima m.b, 2 m.b nella m.b successiva *, ripetere da *-* 5 volte in tutto = 15 m.b. GIRO 4: * 1 m.b in ognuna delle 2 m.b successive, 2 m.b nella m.b successiva *, ripetere da *-* 5 volte in tutto = 20 m.b. GIRO 5: Lavorare 1 m.b in ogni m.b. GIRO 6: * 1 m.b in ognuna delle 3 m.b successive, 2 m.b nella m.b successiva *, ripetere da *-* 5 volte in tutto = 25 m.b. GIRO 7: Lavorare 1 m.b in ogni m.b. GIRO 8: * 1 m.b in ognuna delle 4 m.b successive, 2 m.b nella m.b successiva *, ripetere da *-* 5 volte in tutto = 30 m.b. Gli aumenti sono terminati per la taglia 35/37. GIRO 9: * 1 m.b in ognuna delle 5 m.b successive, 2 m.b nella m.b successiva *, ripetere da *-* 5 volte in tutto = 35 m.b. GIRO 10: * 1 m.b in ognuna delle 6 m.b successive, 2 m.b nella m.b successiva *, ripetere da *-* 5 volte in tutto = 40 m.b. Gli aumenti sono terminati per la taglia 38/40. GIRO 11: * 1 m.b in ognuna delle 7 m.b successive, 2 m.b nella m.b successiva *, ripetere da *-* 5 volte in tutto = 45 m.b. Gli aumenti sono terminati per la taglia 41/43. TUTTE LE TAGLIE: (= 30-40-45 m.b). Lavorare 1 m.b in ogni m.b e, ALLO STESSO TEMPO, aumentare 6-2-0 m.b a intervalli regolari = 36-42-45 m.b. Proseguire come segue: diagramma A.1A (= 1 m), diagramma A.1C (= 12 m), diagramma A.1D sulle ultime 23-29-32 m.b. ATTENZIONE! I primi due giri del diagramma mostrano l’inizio del motivo e sono lavorati una volta sola; ripetere i giri da 1 a 4. Proseguire in questo modo finché il lavoro non misura ca.14-16-18 cm; assicurarsi che l’ultimo giro sia il giro 3 del diagramma A.1. Proseguire a m.b avanti e indietro sulle ultime 22-28-31 m.b (quindi non lavorare le m dei diagrammi A.1A, A.1 C e la prima m del diagramma A.1D) – ricordarsi il SUGGERIMENTO PER IL LAVORO ! Proseguire finché il lavoro non misura 22-24-27 cm, piegare il calzino in due e unire il centro, sul dietro con una riga di m.bss puntando l’uncinetto attraverso entrambi gli strati sul rovescio del lavoro. Tagliare il filo. GAMBA: Inizare sul davanti del calzino. Lavorare il diagramma A.1A come prima, diagramma A.1B; proseguire con il diagramma A.1B (assicurarsi che ci siano 2½-2½-3 ripetizioni in tutto del diagramma A.1B fino al centro, sul dietro) e proseguire come segue a seconda della taglia: Taglie 35/37 – 38/40: finire l’ultimo diagramma A.1B (= in tutto 3-3 ripetizioni del diagramma A.1B). Taglia 41/43: lavorare un’altra ripetizione del diagramma A.1B (= in tutto 4 ripetizioni del diagramma A.1B) Tutte le taglie: lavorare il diagramma A.1 C e finire con 1 m.bss nella prima m. Lavorare 2 ripetizioni del diagramma A.1 in verticale. Tagliare il filo. |
|||||||||||||
Spiegazioni del diagramma |
|||||||||||||
|
|||||||||||||
 |
|||||||||||||
Avete terminato questo modello?Allora taggate le vostre foto con #dropspattern #millasocks o inviatele alla #dropsfan gallery. Avete bisogno di aiuto con questo modello?Troverete 10 video tutorial, una sezione per i commenti/domande e molto altro guardando il modello su www.garnstudio.com © 1982-2026 DROPS Design A/S. Ci riserviamo tutti i diritti. Questo documento, compreso tutte le sue sotto-sezioni, è protetto dalle leggi sul copyright. Potete leggere quello che potete fare con i nostri modelli alla fine di ogni modello sul nostro sito. |
|||||||||||||


Con oltre 40 anni di esperienza nel design di modelli di maglia e uncinetto, DROPS Design offre la più estesa collezione di modelli gratuiti su internet - tradotti in 17 lingue. Ad oggi vi possiamo fornire 324 cataloghi e 12290 modelli - 9561 dei quali sono tradotti in Italiano.
Ci stiamo impegnando molto per darvi il meglio che vi possiamo offrire in termini di maglia e uncinetto, ispirazioni e consigli così come filati di grande qualità ad un prezzo incredibile! Volete utilizzare i nostri modelli per qualcosa d'altro oltre al vostro uso personale? Potete leggere tutto ciò che è consentito nel testo sul Copyright in basso su tutte le pagine dei nostri modelli. Buon lavoro!
Lasciare un commento sul modello DROPS 154-33
Noi saremmo felici di ricevere i tuoi commenti e opinioni su questo modello!
Se vuoi fare una domanda, fai per favore attenzione a selezionare la categoria corretta nella casella qui sotto per velocizzare il processo di risposta. I campi richiesti sono indicati da *.