
Categorie popolari
State cercando un filato?


Commenti / Domande (81)
![]() DROPS Design ha scritto:
DROPS Design ha scritto:
Dzięki rzędom skróconym kołnierz nie będzie ściągał robótki na górze. Proszę zobaczyć video pt. Rzędy skrócone – metoda podstawowa (rozwinie się po kliknięciu na zakładkę video na górze wzoru)
12.02.2014 - 09:29
![]() Barbara ha scritto:
Barbara ha scritto:
Nie rozumiem wskazówek dotyczących kołnierza. Na zdjęciu ten kołnierz jest jak gdyby całością swetra od góry do dołu, a w opisie jest mowa o 23 oczkach, potem o 10 i o jakichś rzędach skróconych. Bardzo proszę o "łopatologiczny" opis tego kołnierza.
11.02.2014 - 00:06DROPS Design ha risposto:
Wykonujemy kołnierz dokładnie tak jak w opisie (na rysunku jest to ta wypustka na górze). Na końcu te wystające „języki” (na każdym przodzie) zostaną zszyte razem na środku tyłu i doszyte do dekoltu tyłu.
12.02.2014 - 09:28
![]() PILAR ha scritto:
PILAR ha scritto:
SE PUEDE TEJER CON AGUJAS NORMALES ¿NO?
05.02.2014 - 14:29DROPS Design ha risposto:
Hola Pilar. Las agujas circulares se usan para tener espacio suficiente para todos los pts.
08.02.2014 - 09:32
![]() Anna ha scritto:
Anna ha scritto:
Jestem osoba początkująca w robieniu na drutach. Razem z teściowa chcemy zrobić ten sweter. Jak zacząć z tymi dwiema wloczkami dla rozmiaru M? Mam nabrać 34 oczka razem z tych dwóch wloczek? Czy zacząć tylko szara i pózniej wyplatac ta kolorowa? Dziękuje za pomoc.
21.01.2014 - 23:20DROPS Design ha risposto:
Bierzemy 2 nitki razem i przerabiamy naraz dwiema nitkami, dokładnie tak samo jakby była to jedna nitka. Powodzenia!
22.01.2014 - 22:54
![]() Annelize ha scritto:
Annelize ha scritto:
Hallo, Wat een leuk patroon. Ik vroeg me alleen af of het ook op gewone breinaalden gebreid kan worden? Aangezien ik met een rondbreinaald niet kan breien. Bedankt alvast.
16.01.2014 - 14:43DROPS Design ha risposto:
Hoi Annelize. Dit patroon wordt heen en weer gebreid op de rondbreinld omdat je veel meer st kwijt kan op een rondbreinld dan op rechte nld. Je kan voor dit patroon ook wel rechte nld gebruiken
17.01.2014 - 17:23
![]() Janneke ha scritto:
Janneke ha scritto:
Wat een leuk patroon! Ik ben bijna klaar, maar zit nog met de kraag. De ene kant wordt twee keer zo hoog als de andere, maar welke kant is dat? De schouderkant, of de 'sluiting'-kant? En misschien dat het zich vanzelf wijst, maar ik vraag me ook af hoe de zijkanten van de kraag tegen elkaar gezet worden als daar 9 steken tussen zitten, die zijn opgezet tussen de twee voorpanden (hals op achterpand)? Bestaat er misschien een foto of tekening van de kraag?
16.01.2014 - 05:51DROPS Design ha risposto:
Hoi Janneke. Naai de kraagdelen samen met de zijkanten (dus de afkantnld van de 23 st van het rechter- en het linker voorpaand) aan elkaar vast en naai de kraag langs de hals (=achterpand) naast de kant st.
16.01.2014 - 11:05
![]() Beate Albig ha scritto:
Beate Albig ha scritto:
Vorrei sapere le misure delle vostre taglie per poter scegliere la taglia M o L.
02.01.2014 - 10:45DROPS Design ha risposto:
Buongiorno, per le misure, scorrendo la pagina, in fondo trova lo schema con le misure, in questo modo può scegliere la taglia giusta per lei. Buon lavoro!!
02.01.2014 - 11:03
![]() Nina ha scritto:
Nina ha scritto:
Sieht toll aus diese Jacke!!! Ich habe eine Frage zu den Farben. Um den gleichen oder ähnlichen (unregelmässigen) Effekt zu bekommen muss ich Fabel print nehmen, oder? giebt es eine Möglichkeit zu sehen, wie anders grau, mit fabel blue lagoon oder z.B. blue sea ausehen würde? Ich frage, weil die fabel print farben sehr unterschiedliche strukturen zu haben scheinen.....und ich möchte gerne den gleichen Effekt wie auf der abbildung, nur dunkler und in blau, grün Tönen...Danke.
28.11.2013 - 22:24DROPS Design ha risposto:
Liebe Nina, ja blue lagoon oder blue sea können Sie ebenfalls benutzen, das sind - wie fun lila - Fabel print Farben und die Länge der Farbrapporte ähnlich. Wir würden uns freuen, auf Facebook ein Foto Ihrer fertigen Weste zu sehen.
29.11.2013 - 07:40Emma Pigott ha scritto:
Hopefully just one more question ;-) Where should the 22sts for the collar be? At the moment I have them above the sleeve section but think this might be wrong.
27.11.2013 - 14:14DROPS Design ha risposto:
Dear Mrs Pigott, the 22 sts put on a st holder are the first sts worked from RS (right front piece) towards mid front (front borders/collar) are worked then back later for collar. In size M, you have then 22 sts left for shoulder/sleeve that you will work back for back piece after working sts from left front + casting on sts for neckline on back piece. Happy knitting!
27.11.2013 - 14:23Emma ha scritto:
I think - like Tiziana ;-) - I'm a bit confused. I've done the right front piece and sleeve and it is now on a stitch holder. I'm coming to the end of the left front piece and sleeve. Do I work 22sts then slip onto a stitch holder, then work the 21sts? Where should I cast on the new stitches - near the sleeve or at the other end? To work the right front piece and sleeve on, do I just put the stitches back onto the needle? Thank you!
25.11.2013 - 13:52DROPS Design ha risposto:
Dear Emma, you first work the 22 sts (size M) from left front piece and shoulder, then cast on 9 sts for neckline back piece and work the 22 sts from right front piece onto same needle, you should now have 53 sts. Happy knitting!
25.11.2013 - 15:48
|
|
Hellebore#helleborecardigan |
|
|
|
|
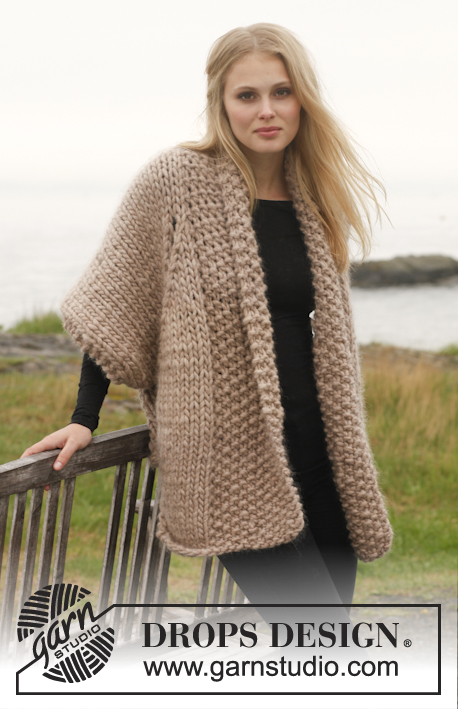
Giacca DROPS ai ferri, a grana di riso in "Andes" e "Fabel". Taglie: Dalla S alla XXXL.
DROPS 151-30 |
|
|
PUNTO LEGACCIO (avanti e indietro sui ferri): Lavorare tutti i ferri a dir. 1 “costa” a legaccio = 2 ferri a dir. GRANA DI RISO: Ferro 1: * 1 m dir, 1 m rov *, ripetere da *-*. Ferro 2: lavorare a rov le m dir e a dir le m rov. Ripetere il ferro 2. ---------------------------------------------------------- DAVANTI DESTRO + MANICA: Si lavora avanti e indietro sui ferri circolari per avere sufficiente spazio per tutte le m, con un capo di ognuna delle qualità di filato. Avviare 33-34-36-37-39-41 m sui ferri circolari n° 15 con 1 capo del filato Andes e 1 capo del filato Fabel. Lavorare 2 ferri a dir. Proseguire a grana di riso su tutte le m - vedere le spiegazioni sopra. Quando il lavoro misura 48-49-50-51-52-53 cm, avviare 10-10-9-8-7-6 nuove m alla fine del ferro successivo sul diritto del lavoro = 43-44-45-45-46-47 m. Inserire 1 segno - DA ADESSO IN AVANTI, MISURARE IL LAVORO DA QUESTO PUNTO ! Quando il lavoro misura ca.22-23-24-25-26-27 cm dal segno (assicurarsi che il ferro successivo sia sul diritto del lavoro), lavorare le prime 22 m come prima, poi mettere queste m in attesa su 1 ferma maglie = rimangono 21-22-23-23-24-25 m, lavorare le restanti m del ferro. Inserire un altro segno (= nella parte superiore, al centro della spalla) – DA ADESSO IN AVANTI, MISURARE IL LAVORO DA QUESTO PUNTO ! Lavorare 1 ferro su tutte le m. Mettere le m in attesa su un ferma maglie e lasciare il lavoro in sospeso. DAVANTI SINISTRO + MANICA: Lavorare come indicato per il davanti destro ma a specchio; proseguire con il dietro senza mettere le m in attesa su un ferma maglie. DIETRO: Proseguire a grana di riso. Al ferro successivo, lavorare come segue sul diritto del lavoro: Lavorare le m del davanti sinistro + manica, avviare 9-9-9-11-11-11 nuove m (= collo, sul dietro) e lavorare le m del davanti destro + manica = 51-53-55-57-59-61 m. Proseguire avanti e indietro finché il lavoro non misura 22-23-24-25-26-27 cm dal segno nella parte superiore, al centro della spalla. Nel corso del ferro successivo, intrecciare le prime 10-10-9-8-7-6 m e le ultime 10-10-9-8-7-6 m; tagliare il filo. Lavorare le restanti 31-33-37-41-45-49 m. Quando il lavoro misura ca.67-69-71-73-75-77 cm, lavorare 2 ferri a dir su tutte le m; intrecciare poi le m senza stringere troppo il filo. COLLO: Riportare sui ferri di lavoro le 22 m del davanti destro messe in attesa sul ferma maglie. Avviare 1 nuova m verso la spalla = 23 m. Lavorare tutte le m a dir a ferri accorciati come segue: Ferri 1 e 2: Iniziare al centro davanti - lavorare 10 m dir, girare e lavorare il ferro successivo a dir. Ferri 3 e 4: Lavorare tutte le m a dir, girare e lavorare il ferro successivo a dir. Ripetere queste 4 ferri finché il collo non misura ca.7-7-7-8-8-8 cm verso la spalla; intrecciare le m. Lavorare in modo uguale riprendendo sui ferri di lavoro le m del davanti sinistro. Cucire le estremità del collo insieme, bordo contro bordo, al centro, sul dietro, e cucire il collo allo scollo all’interno della m vivagno. TASCHE: Avviare 13 m sui ferri circolari n° 15 con 1 capo del filato Andes e 1 capo del filato Fabel. Lavorare a maglia rasata avanti e indietro con 1 m a punto LEGACCIO - vedere le spiegazioni sopra - da ciascun lato finché il lavoro non misura ca.18 cm, intrecciare le m sul diritto del lavoro senza stringere troppo il filo. CONFEZIONE: Cucire le maniche e i lati; cucire bordo contro bordo nell’asola anteriore della m più esterna per evitare una cucitura troppo spessa. Cucire le tasche a ca.5 cm dal bordo inferiore e a 18 cm dal bordo (centro, davanti); cucire nell’asola anteriore della m a punto legaccio da ciascun lato. |
|
 |
|
Avete terminato questo modello?Allora taggate le vostre foto con #dropspattern #helleborecardigan o inviatele alla #dropsfan gallery. Avete bisogno di aiuto con questo modello?Troverete 15 video tutorial, una sezione per i commenti/domande e molto altro guardando il modello su www.garnstudio.com © 1982-2026 DROPS Design A/S. Ci riserviamo tutti i diritti. Questo documento, compreso tutte le sue sotto-sezioni, è protetto dalle leggi sul copyright. Potete leggere quello che potete fare con i nostri modelli alla fine di ogni modello sul nostro sito. |


Con oltre 40 anni di esperienza nel design di modelli di maglia e uncinetto, DROPS Design offre la più estesa collezione di modelli gratuiti su internet - tradotti in 17 lingue. Ad oggi vi possiamo fornire 324 cataloghi e 12290 modelli - 9561 dei quali sono tradotti in Italiano.
Ci stiamo impegnando molto per darvi il meglio che vi possiamo offrire in termini di maglia e uncinetto, ispirazioni e consigli così come filati di grande qualità ad un prezzo incredibile! Volete utilizzare i nostri modelli per qualcosa d'altro oltre al vostro uso personale? Potete leggere tutto ciò che è consentito nel testo sul Copyright in basso su tutte le pagine dei nostri modelli. Buon lavoro!
Lasciare un commento sul modello DROPS 151-30
Noi saremmo felici di ricevere i tuoi commenti e opinioni su questo modello!
Se vuoi fare una domanda, fai per favore attenzione a selezionare la categoria corretta nella casella qui sotto per velocizzare il processo di risposta. I campi richiesti sono indicati da *.