
Categorie popolari
State cercando un filato?


Commenti / Domande (81)
![]() Zuzanna ha scritto:
Zuzanna ha scritto:
Hello Drops! Am I crazy or if casting on stitches for the sleeve at the end of a row on the RS we end up with the left sleeve, not the right one?
24.11.2025 - 22:08DROPS Design ha risposto:
Hi Zuzanna, You are working the right front piece and right sleeve in one section. At the end of the row from the right side, you have reached the sleeve-side of the right front piece and then cast on stitches for the right sleeve. Regards, Drops Team.
25.11.2025 - 06:53
![]() Agga ha scritto:
Agga ha scritto:
Hej...til slut ved højre forstykke og ærme " strik p over m på pind" . Er det slut masker eller?...
18.11.2025 - 11:20DROPS Design ha risposto:
Hej Agga, jeg forstår ikke dit spørgsmål? Du strikker 1 pind mere og sætter nu maskerne på tråden :)
28.11.2025 - 08:02
![]() Felicity Wilson ha scritto:
Felicity Wilson ha scritto:
This is my second attempt to knit this coatigan. Once again, I am stuck at beginning the back piece. Does it include sleeves Extending the front? 61 stitches just does not seem enough. The diagram doesn’t help either. Midway marker also confuses. I’ve been knitting for over 65 years and this is really frustrating. Maybe I need directions more simply written.
15.10.2025 - 07:15DROPS Design ha risposto:
Hi Felicity, now you work the back piece top-down, starting with second half of sleeves. 61 sts (2 sleeves and neck) is enough considering the sample (7sts/10 cm) and the length of the sleeves. Happy knitting!
30.10.2025 - 11:25
![]() Peggy Hall ha scritto:
Peggy Hall ha scritto:
Pattern: Hellebore. I need a better reference for sizes. Like, "medium", in U. S. A. words, size 10-12? Bust measurements 34"-36". Otherwise, I'm totally lost.
24.01.2024 - 06:46
![]() Benedetta ha scritto:
Benedetta ha scritto:
Buongiorno, quando scrivete "Cucire le estremità del collo insieme, bordo contro bordo, al centro, sul dietro" intendete il lato più lungo o quello corto delle estremità? Grazie Cordiali saluti
10.10.2022 - 14:36DROPS Design ha risposto:
Buonasera Benedetta, deve cucire i 2 lati corti e poi cucire il tutto alla scollatura. Buon lavoro!
15.11.2022 - 22:22
![]() Enza ha scritto:
Enza ha scritto:
Ma si può lavorare con i ferri lineari ?
31.10.2021 - 15:07DROPS Design ha risposto:
Buonasera Enza, questo modello è un cardigan, quindi può essere lavorato con i ferri dritti. Buon lavoro!
01.11.2021 - 23:07
![]() Anna ha scritto:
Anna ha scritto:
Hello, I'd like to ask if the diagram is fully describing the pieces? I am a little confused how the separate pieces should look like and how to connect them together. 1. Is the diagram showing right front part and back sewed together? 2. Where would the collar go? 3. What does the striked-through line mean? 4. Would it be possible to upload sweater picture from the back? Maybe it would give some insight into understanding the connection of the pieces. Thank you in advance for your help!
06.01.2021 - 17:29DROPS Design ha risposto:
Witaj, za przerywaną linią jest rękaw. Każdy przód wykonujesz od dołu do góry, nabierając o. na rękaw (w 1 części). Tył przerabiasz od góry do dołu biorąc na druty skrajne o. rękawów z drutów pomocniczych i nabierając między nimi o. na dekolt, powstanie tylna część rękawów+tył. Następnie zamykasz o. po 2 stronach i wykonujesz sam tył. O. na drucie pomocniczym od strony dekoltu przerabiasz rzędami skróconymi wg opisu (2 symetryczne części). Zszywasz obie części kołnierza na środku tyłu (rzędy gdzie były zamknięte oczka) i wszywasz kołnierz wzdłuż dekoltu tyłu. Zszywamy spód rękawów i boki. Pozdrawiamy!
06.01.2021 - 21:44
![]() Anna ha scritto:
Anna ha scritto:
Hello! I need help. With the 15mm knitting needles my swatch is very long and thin. Even if I stretch it, it is longer than expected. 1. Should we really use such big knitting needles? Perhaps my technique is not all right but I am not sure what to change. Would it work if I change to 12mm knitting needles? 2. Should I be stretching the sample to get the expected size? 3. To get felted size S which size should I make? Any help will be appreciated - thank you!
29.11.2020 - 17:53DROPS Design ha risposto:
Dear Anna, in this pattern width would be more important than height that you can adjust only by measuring - this means you should have here 7 sts with 1 strand Andes + 1 strand Fabel in garter stitch = 10 cm in width. Read more about tension here. We are unfortunately not able to adjust every pattern to every single request, this jacket is not supposed to be felted - for any individual assistance you are welcome to contact your yarn store or any knitting forum. Thanks for your comprehension. Happy knitting!
30.11.2020 - 09:25
![]() Joëlle ha scritto:
Joëlle ha scritto:
Bonjour, j'ai tricoté ce modèle qui m'a tapé dans l'oeil pour ces couleurs ,le point,et le moelleux de cette laine. Très vite fait et très facile. Juste un p'tit conseil : rajouter qques mailles de chaque côté au niveau des manches afin qu'elles soient aussi longues que sur le modèle. Juste un peu lâche j'aurai dû prendre une taille d'aiguilles inférieures ou tricoter plus serré cela aurait été mieux car il a tendance à se détendre et s'allonger avec le poids. Merci
25.09.2020 - 23:32
![]() Doris Böttcher ha scritto:
Doris Böttcher ha scritto:
Ich würde gerne die Jacke Hellebore -mit Andes gestrickt, mit der Wolle Air stricken aber ohne ein zweitgarn. wie rechne ich dies um?
23.09.2020 - 11:23DROPS Design ha risposto:
Liebe Frau Böttcher, gerne können Sie 1 Faden DROPS Andes durch 2 Fäden DROPS Air ersetzen, aber DROPS Fabel sollten Sie immer dazu stricken = 1 Faden E oder 2 Fäden C + 1 Faden A (= Fabel oder irgendeine andere Wolle Garngruppe A) - hier lesen Sie mehr über Garnalternativen. Viel Spaß beim stricken!
23.09.2020 - 14:18
|
|
Hellebore#helleborecardigan |
|
|
|
|
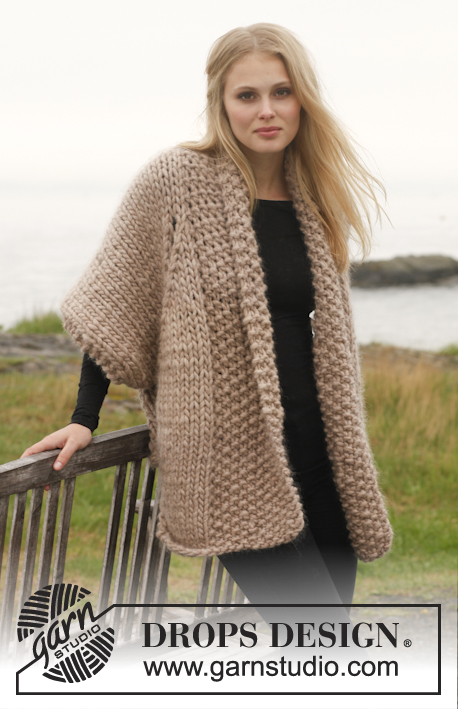
Giacca DROPS ai ferri, a grana di riso in "Andes" e "Fabel". Taglie: Dalla S alla XXXL.
DROPS 151-30 |
|
|
PUNTO LEGACCIO (avanti e indietro sui ferri): Lavorare tutti i ferri a dir. 1 “costa” a legaccio = 2 ferri a dir. GRANA DI RISO: Ferro 1: * 1 m dir, 1 m rov *, ripetere da *-*. Ferro 2: lavorare a rov le m dir e a dir le m rov. Ripetere il ferro 2. ---------------------------------------------------------- DAVANTI DESTRO + MANICA: Si lavora avanti e indietro sui ferri circolari per avere sufficiente spazio per tutte le m, con un capo di ognuna delle qualità di filato. Avviare 33-34-36-37-39-41 m sui ferri circolari n° 15 con 1 capo del filato Andes e 1 capo del filato Fabel. Lavorare 2 ferri a dir. Proseguire a grana di riso su tutte le m - vedere le spiegazioni sopra. Quando il lavoro misura 48-49-50-51-52-53 cm, avviare 10-10-9-8-7-6 nuove m alla fine del ferro successivo sul diritto del lavoro = 43-44-45-45-46-47 m. Inserire 1 segno - DA ADESSO IN AVANTI, MISURARE IL LAVORO DA QUESTO PUNTO ! Quando il lavoro misura ca.22-23-24-25-26-27 cm dal segno (assicurarsi che il ferro successivo sia sul diritto del lavoro), lavorare le prime 22 m come prima, poi mettere queste m in attesa su 1 ferma maglie = rimangono 21-22-23-23-24-25 m, lavorare le restanti m del ferro. Inserire un altro segno (= nella parte superiore, al centro della spalla) – DA ADESSO IN AVANTI, MISURARE IL LAVORO DA QUESTO PUNTO ! Lavorare 1 ferro su tutte le m. Mettere le m in attesa su un ferma maglie e lasciare il lavoro in sospeso. DAVANTI SINISTRO + MANICA: Lavorare come indicato per il davanti destro ma a specchio; proseguire con il dietro senza mettere le m in attesa su un ferma maglie. DIETRO: Proseguire a grana di riso. Al ferro successivo, lavorare come segue sul diritto del lavoro: Lavorare le m del davanti sinistro + manica, avviare 9-9-9-11-11-11 nuove m (= collo, sul dietro) e lavorare le m del davanti destro + manica = 51-53-55-57-59-61 m. Proseguire avanti e indietro finché il lavoro non misura 22-23-24-25-26-27 cm dal segno nella parte superiore, al centro della spalla. Nel corso del ferro successivo, intrecciare le prime 10-10-9-8-7-6 m e le ultime 10-10-9-8-7-6 m; tagliare il filo. Lavorare le restanti 31-33-37-41-45-49 m. Quando il lavoro misura ca.67-69-71-73-75-77 cm, lavorare 2 ferri a dir su tutte le m; intrecciare poi le m senza stringere troppo il filo. COLLO: Riportare sui ferri di lavoro le 22 m del davanti destro messe in attesa sul ferma maglie. Avviare 1 nuova m verso la spalla = 23 m. Lavorare tutte le m a dir a ferri accorciati come segue: Ferri 1 e 2: Iniziare al centro davanti - lavorare 10 m dir, girare e lavorare il ferro successivo a dir. Ferri 3 e 4: Lavorare tutte le m a dir, girare e lavorare il ferro successivo a dir. Ripetere queste 4 ferri finché il collo non misura ca.7-7-7-8-8-8 cm verso la spalla; intrecciare le m. Lavorare in modo uguale riprendendo sui ferri di lavoro le m del davanti sinistro. Cucire le estremità del collo insieme, bordo contro bordo, al centro, sul dietro, e cucire il collo allo scollo all’interno della m vivagno. TASCHE: Avviare 13 m sui ferri circolari n° 15 con 1 capo del filato Andes e 1 capo del filato Fabel. Lavorare a maglia rasata avanti e indietro con 1 m a punto LEGACCIO - vedere le spiegazioni sopra - da ciascun lato finché il lavoro non misura ca.18 cm, intrecciare le m sul diritto del lavoro senza stringere troppo il filo. CONFEZIONE: Cucire le maniche e i lati; cucire bordo contro bordo nell’asola anteriore della m più esterna per evitare una cucitura troppo spessa. Cucire le tasche a ca.5 cm dal bordo inferiore e a 18 cm dal bordo (centro, davanti); cucire nell’asola anteriore della m a punto legaccio da ciascun lato. |
|
 |
|
Avete terminato questo modello?Allora taggate le vostre foto con #dropspattern #helleborecardigan o inviatele alla #dropsfan gallery. Avete bisogno di aiuto con questo modello?Troverete 15 video tutorial, una sezione per i commenti/domande e molto altro guardando il modello su www.garnstudio.com © 1982-2026 DROPS Design A/S. Ci riserviamo tutti i diritti. Questo documento, compreso tutte le sue sotto-sezioni, è protetto dalle leggi sul copyright. Potete leggere quello che potete fare con i nostri modelli alla fine di ogni modello sul nostro sito. |


Con oltre 40 anni di esperienza nel design di modelli di maglia e uncinetto, DROPS Design offre la più estesa collezione di modelli gratuiti su internet - tradotti in 17 lingue. Ad oggi vi possiamo fornire 324 cataloghi e 12290 modelli - 9561 dei quali sono tradotti in Italiano.
Ci stiamo impegnando molto per darvi il meglio che vi possiamo offrire in termini di maglia e uncinetto, ispirazioni e consigli così come filati di grande qualità ad un prezzo incredibile! Volete utilizzare i nostri modelli per qualcosa d'altro oltre al vostro uso personale? Potete leggere tutto ciò che è consentito nel testo sul Copyright in basso su tutte le pagine dei nostri modelli. Buon lavoro!
Lasciare un commento sul modello DROPS 151-30
Noi saremmo felici di ricevere i tuoi commenti e opinioni su questo modello!
Se vuoi fare una domanda, fai per favore attenzione a selezionare la categoria corretta nella casella qui sotto per velocizzare il processo di risposta. I campi richiesti sono indicati da *.