
Categorie popolari
State cercando un filato?


Commenti / Domande (48)
![]() Anton ha scritto:
Anton ha scritto:
Inc. every row from wrong side.
17.07.2015 - 13:45
![]() Isabel ha scritto:
Isabel ha scritto:
On scarf it states increase on every row, but by doing this you have a triangle instead of increase on one side of work! I assume you increase on every second row to achieve straight edge?
16.07.2015 - 23:18DROPS Design ha risposto:
Dear Isabel, inc are done at the beg of every row (see Increase tips at beg of the pattern) until you have a total of 49 sts. Then continue in garter st while you dec 1 st at beg of every row from RS and inc as before at the beg of every row from WS. Happy knitting!
27.07.2015 - 14:16
![]() Danka ha scritto:
Danka ha scritto:
Prosze o bardzo dokladny opis wzoru czapki. co to znaczy: - rzedy skrocone i -rzedy powrotne i -przer sciegie francuskim i w tym samym czasie jestem poczatkujaca i mam z tym problem
27.06.2015 - 11:38DROPS Design ha risposto:
Witam. Rząd skrócony to taki, który nie jest przerabiany do końca. Dochodzimy do jakiegoś punktu (zgodnie z opisem) w środku rzędu i zawracamy, przerabiając teraz rząd powrotny na lewej stronie robótki. Jak to wykonać w praktyce zobaczy Pani na filmach instruktażowych – proszę kliknąć na zakładkę VIDEO (poniżej nazwy, a ponad opisem do wzoru). POWODZENIA
28.06.2015 - 09:40
![]() Eva ha scritto:
Eva ha scritto:
Hola, yo tengo una duda en la bufanda cuando la pieza mide 150 cm las disminuciones se hacen en todas las filas o solo en el lado derecho ? Gracias
20.12.2014 - 19:38DROPS Design ha risposto:
Hola Eva. Las disminuciones (2 pjd) se trabajan al inicio de cada fila (es decir tanto por el LD, como por el LR).
22.12.2014 - 22:46
![]() Mariam ha scritto:
Mariam ha scritto:
Hallo! Na drucie jest 49 oczek, ile razy dodać oczka, a ile zamykać? pozdrawiam Mariam
21.11.2014 - 08:18
![]() Anne ha scritto:
Anne ha scritto:
Hello, I have a question about this pattern. When I knitted the first 6 rows, the row number 7 its like the first one or like the 6th and backwards (6th, 5th, 4rth...)? Thanks in advance.
31.08.2014 - 18:30DROPS Design ha risposto:
Dear Anne, after you have worked the 6 rows, repeat from row 1 to row 6 as before. Happy knitting!
01.09.2014 - 10:00
![]() Raquel Triguero ha scritto:
Raquel Triguero ha scritto:
Tengo otra duda! "Fila 1-2: 8 d., 2 pjd. 33 d., 1 HEB, 9 d. Girar y trabajar la vta ( trabajar la HEB como derecho retorcido)." Entonces, Fila 1 como se explica, fila "2" todo derecho fila 2 como se explica ... ? Gracias
10.01.2014 - 17:48DROPS Design ha risposto:
Hola Raquel. Como trabajamos toda la labor en pt musgo, la fila 1 está explicada en el patrón y la fila 2, después de girar, se trabaja de derecho (la HEB - de derechp retorcido).
11.01.2014 - 16:17
![]() Raquel ha scritto:
Raquel ha scritto:
Hola, tengo una duda: La fila 7 es como la 5 o como la 1? Muchas gracias
10.01.2014 - 17:32DROPS Design ha risposto:
Hola Raquel. Se repiten las filas 1-6, es decir la fila 7 es como la fila 1.
11.01.2014 - 16:10
![]() ROSSI ha scritto:
ROSSI ha scritto:
J'ai voulu commencer le modèle 151-20mais je suis bloquée avec rg1 et 2 du bonnet! est ce que tourner et tricoter le rg retour=1et2 ou le retour ne compte pas ? Merci de me renseigner Monique
04.12.2013 - 10:30DROPS Design ha risposto:
Bonjour Mme Rossi, le bonnet se tricote en rangs raccourcis, ainsi au rang 1, vous tric. toutes les m comme indiqué, et au 2ème rang, toutes les m à l'end (rang "retour"). Les rangs suivants sont des rangs raccourcis : aux rangs 3 et 5, tricotez comme indiqué, tournez et tric. le rang "retour" (= rangs 4 et 6) . Répétez ces 6 rangs (2 sur toutes les m, 4 en rangs raccourcis). Bon tricot!
04.12.2013 - 12:30
![]() Louise Milne ha scritto:
Louise Milne ha scritto:
Sorry but still not sure. Row 1: k8, k2tog, k33, yo, k9 This is where I'm confused. Row 2: Do I repeat: k8, k2tog... OR "Knit" all the way back?
06.11.2013 - 00:39DROPS Design ha risposto:
Dear Mrs Milne, work as follows: Row 1: K8, K2 tog, K33, yo, K9, (all sts are worked) turn and work row 2 on all sts. Row 3: K8, K2 tog, K33, yo, K5, turn (short rows, leave remaining sts unworked on left needle) and work row 4 on these 48 sts. Row5: K8,K2tog,K33,yo,K1, turn (short rows, leave remaining sts unworked on left needle) and work row 6 on these 44 sts. Repeat these 6 rows. Happy knitting!
06.11.2013 - 09:45
|
|
Candy Crush Set#candycrushset |
|
 |
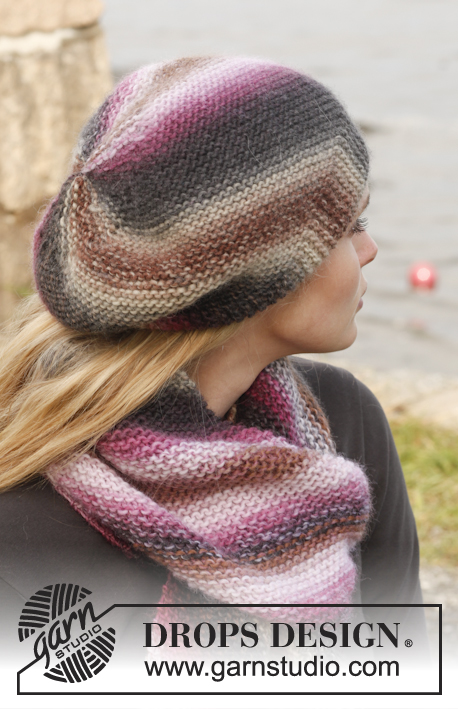 |
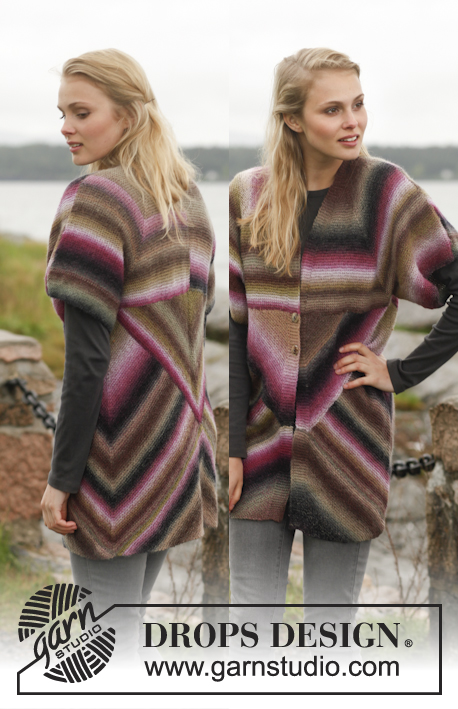
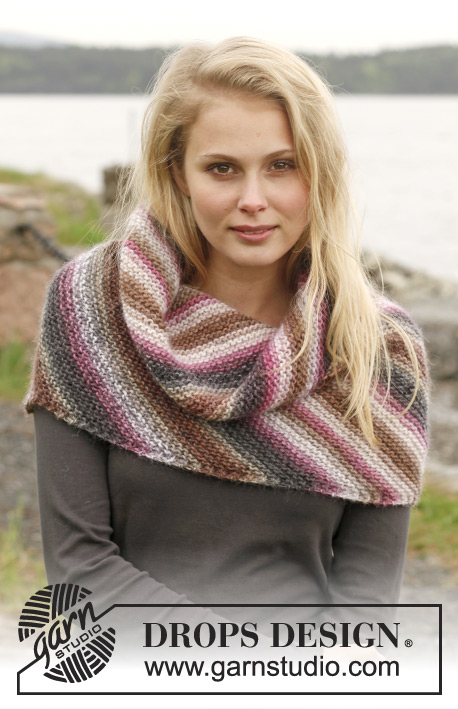
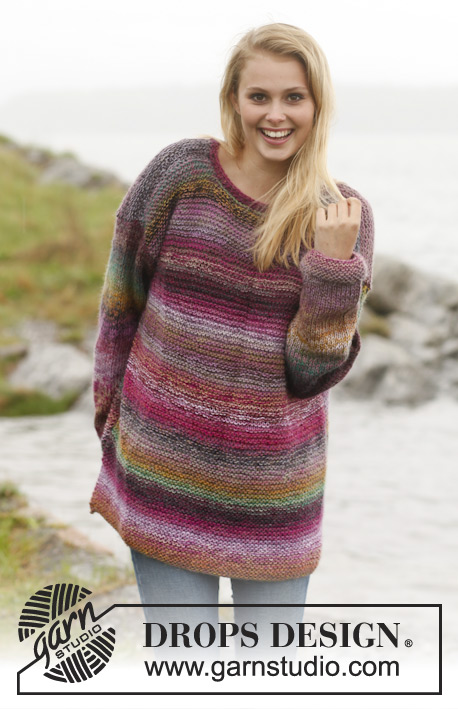
Il set: cappello e sciarpa DROPS a punto legaccio, in "Big Delight".
DROPS 151-20 |
|
|
PUNTO LEGACCIO (avanti e indietro sul f): Lavorare tutti i ferri sul diritto. 1 "cresta" legaccio = 2 ferri a dir. AUMENTI: Per aumentare 1 m, fare 1 gettato dopo la 1° m di vivagno, al ferro successivo, lavorare il gettato a dir ritorto (vuol dire nel filo posteriore della maglia anziché nel filo anteriore) per evitare che si formino buchi. DIMINUZIONI: Per diminuire 1 m all’interno della m vivagno a punto legaccio, lavorare 2 m insieme a dir. ---------------------------------------------------------- CAPPELLO: Si lavora nel senso della lunghezza, avanti e indietro sui ferri, con i ferri accorciati. Avviare 52 m con i f 5 e Big Delight. LavoRare a PUNTO LEGACCIO - vedere le spiegazioni sopra, ALLO STESSO TEMPO, lavorare così – sul diritto: Ferri 1- 2: 8 m dir, 2 m insieme a dir, 33 m dir, 1 gettato, 9 m dir. Girare e lavorare il ferro indietro a dir (lavorare il gettato a dir ritorto). Ferri 3- 4: 8 m dir, 2 m insieme a dir, 33 m dir, 1 gettato, 5 m dir, Girare e lavorare il ferro indietro a dir (lavorare il gettato a dir ritorto). Ferri 5- 6: 8 m dir, 2 m insieme a dir, 33 m dir, 1 gettato, 1 m dir, Girare e lavorare il ferro indietro a dir (lavorare il gettato a dir ritorto). Ripetere questi 6 ferri. Intrecciare quando il lavoro misura 50-52 cm in totale nel punto più lungo (= in basso del cappello). CONFEZIONE: Cucire le maglie intrecciate a quelle avviate. Passare un filo nelle maglie lungo il bordo in alto del cappello e stringere. ---------------------------------------------------------- SCIARPA: Si lavora avanti e indietro sui ferri circolari. Avviare 3 m con i ferri circolari 6 e Big Delight. Lavorare a PUNTO LEGACCIO - vedere le spiegazioni sopra (1° f = diritto del lavoro). Aumentare poi 1 m all’inizio di ogni ferro, - VEDERE AUMENTI. Ripetere questi aumenti finché non ci siano 49 m sul ferro. Il lavoro misura ca 23 cm misurato lungo il alto con gli aumenti. Continuare a punto legaccio, ALLO STESSO TEMPO, diminuire 1 m all’inizio di ogni ferro sul diritto del lavoro - VEDERE DIMINUZIONI, e continuare a aumentare come prima all’inizio di ogni ferro sul rovescio del lavoro. Continuare a aumentare e a diminuire ad ogni lato del lavoro fino alla fine del lavoro (il numero di maglie rimarrà costante). Quando il lavoro misura 150 cm - misurare diritto lungo il lato della sciarpa (non nella direzione del lavoro) diminuire 1 m all’inizio di ogni f lavorando 2 m insieme a dir. Lavorare finché non rimangano 3 m, intrecciare e fissare i fili. |
|
Avete terminato questo modello?Allora taggate le vostre foto con #dropspattern #candycrushset o inviatele alla #dropsfan gallery. Avete bisogno di aiuto con questo modello?Troverete 10 video tutorial, una sezione per i commenti/domande e molto altro guardando il modello su www.garnstudio.com © 1982-2026 DROPS Design A/S. Ci riserviamo tutti i diritti. Questo documento, compreso tutte le sue sotto-sezioni, è protetto dalle leggi sul copyright. Potete leggere quello che potete fare con i nostri modelli alla fine di ogni modello sul nostro sito. |
|


Con oltre 40 anni di esperienza nel design di modelli di maglia e uncinetto, DROPS Design offre la più estesa collezione di modelli gratuiti su internet - tradotti in 17 lingue. Ad oggi vi possiamo fornire 324 cataloghi e 12290 modelli - 9561 dei quali sono tradotti in Italiano.
Ci stiamo impegnando molto per darvi il meglio che vi possiamo offrire in termini di maglia e uncinetto, ispirazioni e consigli così come filati di grande qualità ad un prezzo incredibile! Volete utilizzare i nostri modelli per qualcosa d'altro oltre al vostro uso personale? Potete leggere tutto ciò che è consentito nel testo sul Copyright in basso su tutte le pagine dei nostri modelli. Buon lavoro!
Lasciare un commento sul modello DROPS 151-20
Noi saremmo felici di ricevere i tuoi commenti e opinioni su questo modello!
Se vuoi fare una domanda, fai per favore attenzione a selezionare la categoria corretta nella casella qui sotto per velocizzare il processo di risposta. I campi richiesti sono indicati da *.