
Categorie popolari
State cercando un filato?


Commenti / Domande (48)
![]() Barbara ha scritto:
Barbara ha scritto:
Witam, w jaki sposób zszyć tę czapkę żeby szew był niewidoczny i estetyczny.
25.05.2017 - 14:55DROPS Design ha risposto:
Witaj Barbaro, jak ładnie zszyć robótkę wykonaną ściegiem francuskim znajdziesz TUTAJ. Powodzenia!
25.05.2017 - 17:30
![]() Gail ha scritto:
Gail ha scritto:
I'm working the Candy Crush hat. I understand the 6 rows of the pattern but I'm not sure if I should be doing short rows on both left and right edges of the work?
14.06.2016 - 19:14DROPS Design ha risposto:
Dear Gail, short rows are only worked beg from RS, ie for top of hat. Repeat the 6 rows upwards to the finished measurements. Happy knitting!
15.06.2016 - 08:43
![]() Carmen Maguire ha scritto:
Carmen Maguire ha scritto:
Hallo,, wird Reihe 1 wie beschrieben gestrickt und die Rückreihe glatt rechts gestrickt oder wie Reihe 1? Bei Reihe 3 die Masche 5 am ende und Abheben aber dann als erste der 8 zählen?? Bin etwas iritiert.....
24.01.2016 - 21:38DROPS Design ha risposto:
Die Rück-R (= jede gerade R) wird re gestrickt, d.h. kraus re. Die Umschläge stricken Sie verschränkt, damit ein Loch vermieden wird.
02.02.2016 - 11:03Rainbow ha scritto:
Hi. I have finished the scarf and now it is 150cm. but I'm confused about the finishing. Do i Decrease at the beginning of the row and work regular till the end and turn then decrease again at the beginning?? Thanks
17.01.2016 - 13:06DROPS Design ha risposto:
Dear Mrs Rainbow, that's correct: you will now dec with K2 tog at the beg of every row (both from RS and from WS) until 3 sts remain. Happy knitting!
18.01.2016 - 14:20Rainbow ha scritto:
Thanks for answering previously. But is there a photo for the scarf not we are? Because I don't know if will be when it is finished besides the 150cm long I don't know from where to measure? Thanks.
07.01.2016 - 09:36DROPS Design ha risposto:
Dear Rainbow, measure are taken along the longer side of the scarf. Happy knitting!
07.01.2016 - 17:48Rainbow ha scritto:
Is the increase from the right side only??
06.01.2016 - 12:51DROPS Design ha risposto:
Dear Rainbow, increase on the scarf are done at the beg of every row both from RS and from WS until there are 49 sts on needle. Then you dec 1 st at beg of every row from RS and inc at the beg of every row from WS until 150 cm. Then dec at beg of every row until 3 sts remain. Happy knitting!
06.01.2016 - 14:24
![]() Larissa ha scritto:
Larissa ha scritto:
"am Anfang jeder R 1 M abn indem man 2 M re zusammenstrickt" - das stimmt nicht ganz, oder? Ist es nicht so, daß man am Anfang jeder Rückreihe jeweils 2 M re zusammen strickt, damit man eine gerade Abschlußkante bekommt? Liebe Grüße, Larissa
10.10.2015 - 15:54DROPS Design ha risposto:
Nein, Sie machen die Abnahmen am Ende tatsächlich am Anfang JEDER Reihe, also beidseitig der Arbeit. Das ist symmetrisch dazu, dass Sie zu Beginn des Schals am Anfang JEDER R 1 M zugenommen haben.
13.10.2015 - 13:09
![]() Isabel Cunningham ha scritto:
Isabel Cunningham ha scritto:
Hi anton Thank you so much for your help with this! Kind regards isabel
10.08.2015 - 22:24
![]() Isabel ha scritto:
Isabel ha scritto:
Hi anton Just casting off the scarf - should I k2 together on every row and continue to increase as before to keep edge the same? Struggling with this project! Hope you can help! Thanks
23.07.2015 - 22:16DROPS Design ha risposto:
Dear Isabel, see answer below, it should answer your question. Happy knitting!
27.07.2015 - 17:04
![]() Isabel Cunningham ha scritto:
Isabel Cunningham ha scritto:
Hi anton thanks for your reply, that's what I have done!
19.07.2015 - 08:37
|
|
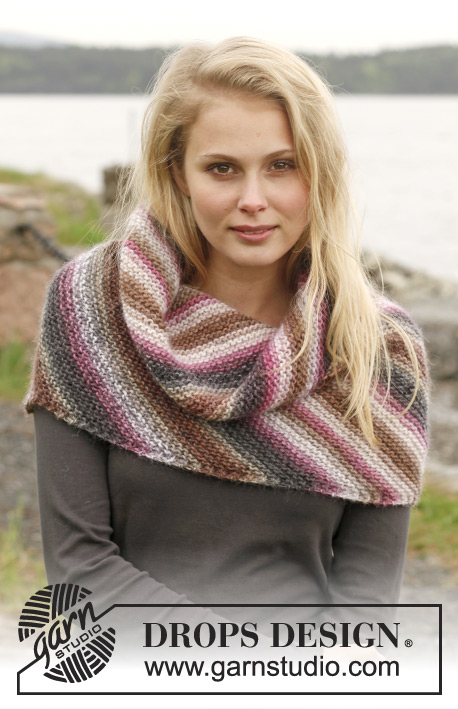
Candy Crush Set#candycrushset |
|
 |
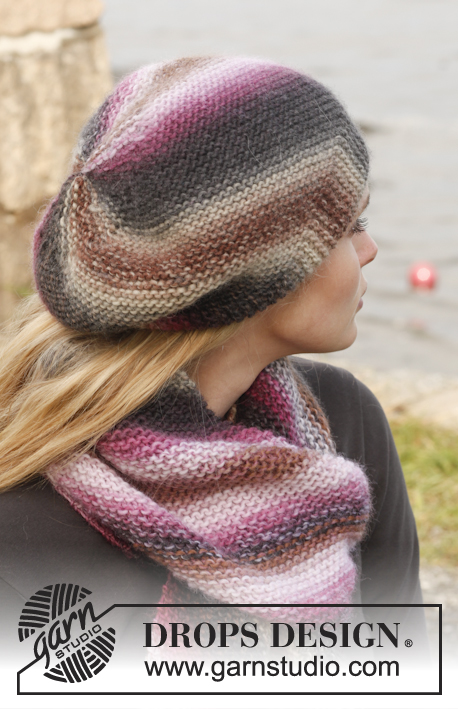 |
Il set: cappello e sciarpa DROPS a punto legaccio, in "Big Delight".
DROPS 151-20 |
|
|
PUNTO LEGACCIO (avanti e indietro sul f): Lavorare tutti i ferri sul diritto. 1 "cresta" legaccio = 2 ferri a dir. AUMENTI: Per aumentare 1 m, fare 1 gettato dopo la 1° m di vivagno, al ferro successivo, lavorare il gettato a dir ritorto (vuol dire nel filo posteriore della maglia anziché nel filo anteriore) per evitare che si formino buchi. DIMINUZIONI: Per diminuire 1 m all’interno della m vivagno a punto legaccio, lavorare 2 m insieme a dir. ---------------------------------------------------------- CAPPELLO: Si lavora nel senso della lunghezza, avanti e indietro sui ferri, con i ferri accorciati. Avviare 52 m con i f 5 e Big Delight. LavoRare a PUNTO LEGACCIO - vedere le spiegazioni sopra, ALLO STESSO TEMPO, lavorare così – sul diritto: Ferri 1- 2: 8 m dir, 2 m insieme a dir, 33 m dir, 1 gettato, 9 m dir. Girare e lavorare il ferro indietro a dir (lavorare il gettato a dir ritorto). Ferri 3- 4: 8 m dir, 2 m insieme a dir, 33 m dir, 1 gettato, 5 m dir, Girare e lavorare il ferro indietro a dir (lavorare il gettato a dir ritorto). Ferri 5- 6: 8 m dir, 2 m insieme a dir, 33 m dir, 1 gettato, 1 m dir, Girare e lavorare il ferro indietro a dir (lavorare il gettato a dir ritorto). Ripetere questi 6 ferri. Intrecciare quando il lavoro misura 50-52 cm in totale nel punto più lungo (= in basso del cappello). CONFEZIONE: Cucire le maglie intrecciate a quelle avviate. Passare un filo nelle maglie lungo il bordo in alto del cappello e stringere. ---------------------------------------------------------- SCIARPA: Si lavora avanti e indietro sui ferri circolari. Avviare 3 m con i ferri circolari 6 e Big Delight. Lavorare a PUNTO LEGACCIO - vedere le spiegazioni sopra (1° f = diritto del lavoro). Aumentare poi 1 m all’inizio di ogni ferro, - VEDERE AUMENTI. Ripetere questi aumenti finché non ci siano 49 m sul ferro. Il lavoro misura ca 23 cm misurato lungo il alto con gli aumenti. Continuare a punto legaccio, ALLO STESSO TEMPO, diminuire 1 m all’inizio di ogni ferro sul diritto del lavoro - VEDERE DIMINUZIONI, e continuare a aumentare come prima all’inizio di ogni ferro sul rovescio del lavoro. Continuare a aumentare e a diminuire ad ogni lato del lavoro fino alla fine del lavoro (il numero di maglie rimarrà costante). Quando il lavoro misura 150 cm - misurare diritto lungo il lato della sciarpa (non nella direzione del lavoro) diminuire 1 m all’inizio di ogni f lavorando 2 m insieme a dir. Lavorare finché non rimangano 3 m, intrecciare e fissare i fili. |
|
Avete terminato questo modello?Allora taggate le vostre foto con #dropspattern #candycrushset o inviatele alla #dropsfan gallery. Avete bisogno di aiuto con questo modello?Troverete 10 video tutorial, una sezione per i commenti/domande e molto altro guardando il modello su www.garnstudio.com © 1982-2026 DROPS Design A/S. Ci riserviamo tutti i diritti. Questo documento, compreso tutte le sue sotto-sezioni, è protetto dalle leggi sul copyright. Potete leggere quello che potete fare con i nostri modelli alla fine di ogni modello sul nostro sito. |
|


Con oltre 40 anni di esperienza nel design di modelli di maglia e uncinetto, DROPS Design offre la più estesa collezione di modelli gratuiti su internet - tradotti in 17 lingue. Ad oggi vi possiamo fornire 324 cataloghi e 12290 modelli - 9561 dei quali sono tradotti in Italiano.
Ci stiamo impegnando molto per darvi il meglio che vi possiamo offrire in termini di maglia e uncinetto, ispirazioni e consigli così come filati di grande qualità ad un prezzo incredibile! Volete utilizzare i nostri modelli per qualcosa d'altro oltre al vostro uso personale? Potete leggere tutto ciò che è consentito nel testo sul Copyright in basso su tutte le pagine dei nostri modelli. Buon lavoro!
Lasciare un commento sul modello DROPS 151-20
Noi saremmo felici di ricevere i tuoi commenti e opinioni su questo modello!
Se vuoi fare una domanda, fai per favore attenzione a selezionare la categoria corretta nella casella qui sotto per velocizzare il processo di risposta. I campi richiesti sono indicati da *.