
Categorie popolari
State cercando un filato?


Commenti / Domande (48)
![]() Lois Busch ha scritto:
Lois Busch ha scritto:
Thank you for your prompt reply Im impressed, most helpful Lois
08.07.2024 - 00:22
![]() Lois Busch ha scritto:
Lois Busch ha scritto:
#db-026 repeat these 6 rows upwards does that mean k rows 6 to 1 Then when I get to 1 do I start again at 6 or do 1 to 6 then 6 to 1. Thanks
06.07.2024 - 23:57DROPS Design ha risposto:
Dear Lois, continue working rows 1 to 6 in the same order. Happy knitting!
07.07.2024 - 22:51
![]() Helga Eitel ha scritto:
Helga Eitel ha scritto:
Ich habe den Schal ohne Probleme gestrickt. Mit der Mütze habe ich insofern Probleme weil ich nicht weiß wie und wo ich die Gesamtlänge von 50 cm messen soll. Die Mütze hat so eine komische Form mit Beulen dass ich ratlos bin. Bitte geben Sie mir einen Tipp. Vielen Dank.
08.09.2022 - 16:34DROPS Design ha risposto:
Liebe Frau Eitel, es wird an der längeren Länge gemessen, dhan der rechten Seiten der Arbeit (von der Vorderseite gesehen), wo Sie immer 8 Masche rechts vor der Abnahmen gestrickt haben). Viel Spaß beim stricken!
09.09.2022 - 08:43
![]() Maski ha scritto:
Maski ha scritto:
Thanks so much for your quick reply.. now I can get on with knitting the hat tonight. Thank you also for sharing the pattern.
24.06.2021 - 23:04
![]() Maski ha scritto:
Maski ha scritto:
Are the instructions given for the hat, for the S size or the L size? I can find only one set of instructions although there are two sizes given at the top.
24.06.2021 - 13:02DROPS Design ha risposto:
Dear Maski, the number of stitches to cast on is the same for both sizes (hat is worked diagonally, but lengthwise), and work the short rows until piece measures 50 cm (S/M) or 52 cm (M/L) towards the bottom of hat. Happy knitting!
24.06.2021 - 17:34
![]() An ha scritto:
An ha scritto:
Wordt er niet eerst een rand gebreid bij de muts aub? Op de foto lijkt het of er een rand is van een 10-15cm alvorens het gedraaide patroon begint. Of ben ik hier fout? Alvast bedankt voor uw antword;
26.04.2021 - 14:08DROPS Design ha risposto:
Dag An,
De muts wordt zijdelings gebreid, waarbij de eerste 8 steken recht worden gebreid. Deze 8 steken zijn de rand. Doordat er na de rand 2 steken samen worden gebreid en aan het eind 1 omslag wordt gemaakt, ontstaat a.h.w. de afschuining.
29.04.2021 - 14:47
![]() Tessa ha scritto:
Tessa ha scritto:
Thank you for answering, but I still don't understand. If I work the entire pattern repeat to create 6 rows, I don't get ribbing on one edge? So is every row typed in the pattern a right side row?
21.03.2021 - 22:56DROPS Design ha risposto:
Dear Tessa, I'm sorry, I don't udnerstand your meaning there, work the pattern as explained: row 1: K8, K2 tog, K33, YO, K9, turn and on row 2 from WS knit all sts (52 sts). work row 3: K8, K2 tog, K33, YO, K5, turn and on row 4 knit all sts (52 sts). Work Row 5: K8, K2 tog, K33, YO, K1, turn and work row 6 from WS (= 44 sts). Repeat these 6 rows. Happy knitting!
22.03.2021 - 09:41
![]() Tessa ha scritto:
Tessa ha scritto:
Hi, even looking through the questions I am confused. When working the wrong side, do I knit every stitch, turn, and resume the pattern on the RS, or do I do the YO/K2tog pattern on the wrong side as well? In other words, are pattern rows counted on the RS only, or is the WS row counted as well - is the pattern repeat 6 or 12 rows total? Thank you
11.03.2021 - 22:23DROPS Design ha risposto:
Dear Tessa, from wrong side just knit all stitches (knit yarn over twsited to avoid holes) - and repeat the 6 rows (row 1 to 6 as described in the pattern, ie 3 rows from right side with their 3 rows worked from wrong side). Happy knitting!
12.03.2021 - 08:38
![]() Anita Abd ha scritto:
Anita Abd ha scritto:
Bonjour je suis débutante et je veux réaliser le bonnet mais je n\'est pas compris comment tricoter en point mousse et en même temps suivre l\'explication !! svp est-ce que je commence par le point mousse et a l\'endroit je suie l\'explication ?? merci infiniment
23.12.2020 - 00:26DROPS Design ha risposto:
Bonjour Anita, le bonnet se tricote au point mousse, autrement dit, vous allez tricoter toutes les mailles à l'endroit et ce, tous les rangs. Tricotez les 6 rangs comme indiqué et répétez les jusqu'à la hauteur souhaitée. Bon tricot!
23.12.2020 - 07:12
![]() Ria De Klerk ha scritto:
Ria De Klerk ha scritto:
In de aangegeven afmeting van de sjaal staat een fout. Er staat daar: maat ongeveer 24 x 150 cm. Ik denk dat daar moet staan: ongeveer 150 cm.
17.11.2020 - 12:31
|
|
Candy Crush Set#candycrushset |
|
 |
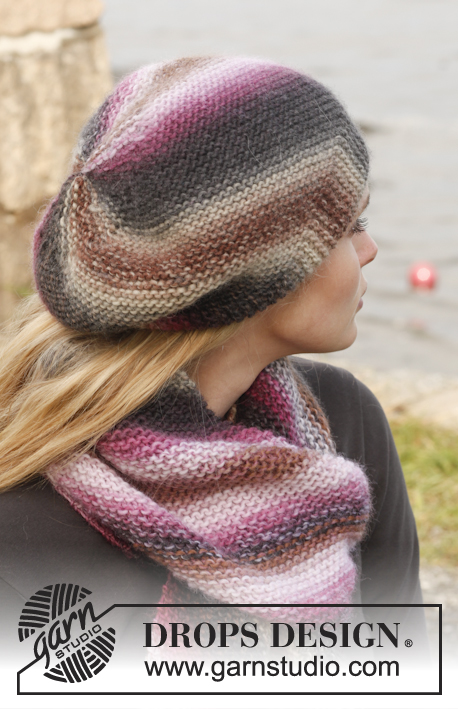 |
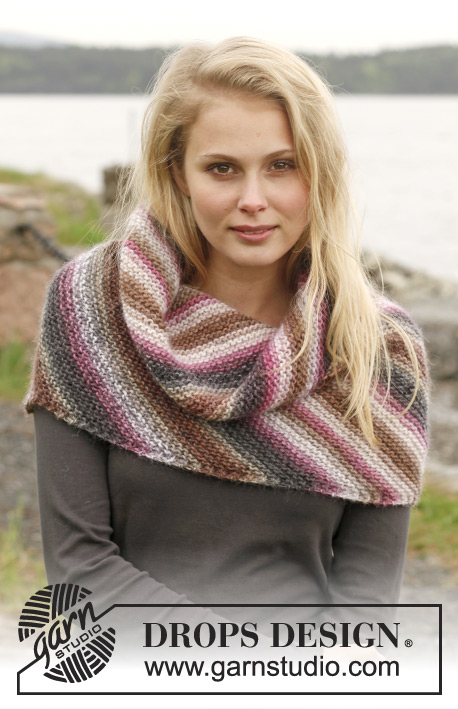
Il set: cappello e sciarpa DROPS a punto legaccio, in "Big Delight".
DROPS 151-20 |
|
|
PUNTO LEGACCIO (avanti e indietro sul f): Lavorare tutti i ferri sul diritto. 1 "cresta" legaccio = 2 ferri a dir. AUMENTI: Per aumentare 1 m, fare 1 gettato dopo la 1° m di vivagno, al ferro successivo, lavorare il gettato a dir ritorto (vuol dire nel filo posteriore della maglia anziché nel filo anteriore) per evitare che si formino buchi. DIMINUZIONI: Per diminuire 1 m all’interno della m vivagno a punto legaccio, lavorare 2 m insieme a dir. ---------------------------------------------------------- CAPPELLO: Si lavora nel senso della lunghezza, avanti e indietro sui ferri, con i ferri accorciati. Avviare 52 m con i f 5 e Big Delight. LavoRare a PUNTO LEGACCIO - vedere le spiegazioni sopra, ALLO STESSO TEMPO, lavorare così – sul diritto: Ferri 1- 2: 8 m dir, 2 m insieme a dir, 33 m dir, 1 gettato, 9 m dir. Girare e lavorare il ferro indietro a dir (lavorare il gettato a dir ritorto). Ferri 3- 4: 8 m dir, 2 m insieme a dir, 33 m dir, 1 gettato, 5 m dir, Girare e lavorare il ferro indietro a dir (lavorare il gettato a dir ritorto). Ferri 5- 6: 8 m dir, 2 m insieme a dir, 33 m dir, 1 gettato, 1 m dir, Girare e lavorare il ferro indietro a dir (lavorare il gettato a dir ritorto). Ripetere questi 6 ferri. Intrecciare quando il lavoro misura 50-52 cm in totale nel punto più lungo (= in basso del cappello). CONFEZIONE: Cucire le maglie intrecciate a quelle avviate. Passare un filo nelle maglie lungo il bordo in alto del cappello e stringere. ---------------------------------------------------------- SCIARPA: Si lavora avanti e indietro sui ferri circolari. Avviare 3 m con i ferri circolari 6 e Big Delight. Lavorare a PUNTO LEGACCIO - vedere le spiegazioni sopra (1° f = diritto del lavoro). Aumentare poi 1 m all’inizio di ogni ferro, - VEDERE AUMENTI. Ripetere questi aumenti finché non ci siano 49 m sul ferro. Il lavoro misura ca 23 cm misurato lungo il alto con gli aumenti. Continuare a punto legaccio, ALLO STESSO TEMPO, diminuire 1 m all’inizio di ogni ferro sul diritto del lavoro - VEDERE DIMINUZIONI, e continuare a aumentare come prima all’inizio di ogni ferro sul rovescio del lavoro. Continuare a aumentare e a diminuire ad ogni lato del lavoro fino alla fine del lavoro (il numero di maglie rimarrà costante). Quando il lavoro misura 150 cm - misurare diritto lungo il lato della sciarpa (non nella direzione del lavoro) diminuire 1 m all’inizio di ogni f lavorando 2 m insieme a dir. Lavorare finché non rimangano 3 m, intrecciare e fissare i fili. |
|
Avete terminato questo modello?Allora taggate le vostre foto con #dropspattern #candycrushset o inviatele alla #dropsfan gallery. Avete bisogno di aiuto con questo modello?Troverete 10 video tutorial, una sezione per i commenti/domande e molto altro guardando il modello su www.garnstudio.com © 1982-2026 DROPS Design A/S. Ci riserviamo tutti i diritti. Questo documento, compreso tutte le sue sotto-sezioni, è protetto dalle leggi sul copyright. Potete leggere quello che potete fare con i nostri modelli alla fine di ogni modello sul nostro sito. |
|


Con oltre 40 anni di esperienza nel design di modelli di maglia e uncinetto, DROPS Design offre la più estesa collezione di modelli gratuiti su internet - tradotti in 17 lingue. Ad oggi vi possiamo fornire 324 cataloghi e 12290 modelli - 9561 dei quali sono tradotti in Italiano.
Ci stiamo impegnando molto per darvi il meglio che vi possiamo offrire in termini di maglia e uncinetto, ispirazioni e consigli così come filati di grande qualità ad un prezzo incredibile! Volete utilizzare i nostri modelli per qualcosa d'altro oltre al vostro uso personale? Potete leggere tutto ciò che è consentito nel testo sul Copyright in basso su tutte le pagine dei nostri modelli. Buon lavoro!
Lasciare un commento sul modello DROPS 151-20
Noi saremmo felici di ricevere i tuoi commenti e opinioni su questo modello!
Se vuoi fare una domanda, fai per favore attenzione a selezionare la categoria corretta nella casella qui sotto per velocizzare il processo di risposta. I campi richiesti sono indicati da *.