
Categorie popolari
State cercando un filato?


Commenti / Domande (189)
![]() Veru ha scritto:
Veru ha scritto:
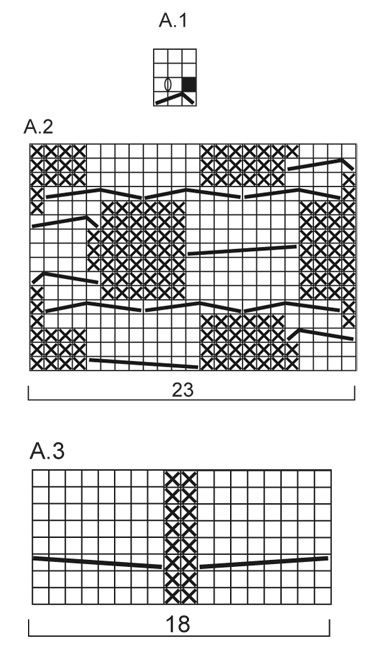
Pozor u páté značky ve vysvětlivkách, je tam chybka... 2 oka nesplétáme, ale pleteme. Tedy popsek ke značce "=1 oko sejmeme hladce, 2 oka Upleteme hladce a sejmuté přes ně přetáhneme"
01.04.2022 - 18:47DROPS Design ha risposto:
Dobrý den, děkujeme za upozornění - opraveno!
04.04.2022 - 10:34
![]() Magdalena Ryšicová ha scritto:
Magdalena Ryšicová ha scritto:
Prosím o radu ohledně návodu na tento krásný svetr a to ke schématu A1 kde tápu nad přidáváním ok. Začínám na třech ocích, ujmu jedno a spletu a přetáhnu, zůstává jedno a potom jedno přidám a mám pořád dvě oka. děkuji za odpověď
01.04.2022 - 18:33DROPS Design ha risposto:
Dobrý den, Magdaleno, v popisku vzorku byla chyba, proto vám počet ok neseděl. Nyní je opraveno - oka nesplétáme, pouze upleteme; po nahození tedy budeme mít opět 3 oka. Hodně zdaru! Hana
04.04.2022 - 10:36
![]() Sandra ha scritto:
Sandra ha scritto:
I am struggling with diagram A2 I've worked from left to rite and from rite to left my pattern don't look the way it should I've also tried from bottom up and top to bottom
03.10.2021 - 13:50DROPS Design ha risposto:
Dear Sandra, you can find a lesson about reading diagrams HERE. Happy stitching!
03.10.2021 - 22:45
![]() Jeanne Fitzgerald ha scritto:
Jeanne Fitzgerald ha scritto:
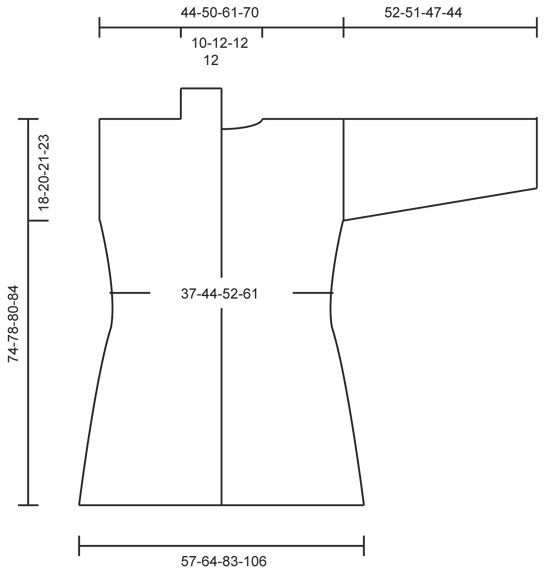
I am trying to start this sweater , but cannot get past the third row. I’m making size M/L, so I have cast on 290 stars, knit across first row and knit and inc 40 sets on the second row for a total of 330 sets. On the hind row I end up with not enough sets to finish the row. Have frogged nd started over twice now and still end up 12 stitches short. Could there be mistake in this pattern? Has there been an update or revision made to the pattern?
15.01.2021 - 01:03DROPS Design ha risposto:
Dear Mrs Fitzgerald, work the 330 sts as follows: 18 sts in garter st, P 8, A.1 (= 3 sts), P 12, A.2 (= 23 sts), P12, * A.1, P12*, repeat from *-* 2 times in total (= over the next 30 sts), A.2, P12, A.1, P 12, A.3 (= 18 sts), P12, A.1, P12, A.2, P12, * A.1, P12*, repeat from *-* 2 times in total (= over the next 30 sts), A.2, P12, A.1, P8, 18 sts in garter st = 18+8+3+12+23 +12+30+23+12+3+12+18+12+3+12+23+12+30+23+12+3+8+18= 330 sts. Happy knitting!
15.01.2021 - 07:30
![]() Nancy Anne Kalista ha scritto:
Nancy Anne Kalista ha scritto:
My daughter would like this jacket and I'm willing to make it for her. However, her bust size in 53". Can you advise how to adjust the pattern to fit her? Thank you so much!
18.12.2020 - 19:20DROPS Design ha risposto:
Dear Nancy, unfortunately we are not able to adjust our patterns to particular personal needs. Should you need any individual assistance, please contact the store where you bought the yarn, even per mail or telephone. Happy knitting!
18.12.2020 - 21:09
![]() Mieke Kokkelink ha scritto:
Mieke Kokkelink ha scritto:
Ik ben patroon 151-1 aan het breien. Ik heb de derdenaald al 5 keer gebreid maar blijf steken te kort komen😟 Ik maak maat M/L heb tussen de bies 330 steken( ook al 5keer geteld) ik kom er niet uit!! Wat gaat verkeerd?
17.05.2020 - 17:04DROPS Design ha risposto:
Dag Mieke,
Het is de bedoeling dat je 330 steken in totaal op de naald hebt op het moment dat je de derde naald gaat breien, dus inclusief de steken van de biezen.
19.05.2020 - 13:30
![]() Melanie ha scritto:
Melanie ha scritto:
Bonjour j aimerai faire ce superbe gilet mais, comme beaucoup de vos models, il est a faire avec des aiguilles circulaire car fait d un seul tenant pour eviter les longues coutures cependant, je suis plus a l aise avec des aiguilles droites aussi aimerai je savoir si il y a une methode pour " decouper" ce tricot en 1 dos et deux devants afin de le faire sur des aiguilles droites et l'assembler de maniere classique apres? merci pour votre reponse et bon tricot a tout(e)s
06.09.2019 - 19:48DROPS Design ha risposto:
Bonjour Mélanie, dans ce modèle, seules les manches se tricotent en rond, le bas du gilet se tricote en allers et retours sur aiguille circulaire; vous trouverez ici comment adapter un modèle sur aiguilles droites. Bon tricot!
09.09.2019 - 07:59
![]() Mary-Alice Varrin ha scritto:
Mary-Alice Varrin ha scritto:
Thank you so much for your quick and clearly explained reply! I so appreciate it! I will now be happily knitting!
03.04.2019 - 15:51
![]() Mary-Alice Varrin ha scritto:
Mary-Alice Varrin ha scritto:
Further to my last email, in approaching the 8cm of the sweater, it requests dec at beg of every p-section then requests "alternately" at beg and end of p-sections 5 more times - does that mean dec from RS THEN next dec from WS? Is this what the directions mean by "alternately"? or do I decrease from RS only but still alternate sides of p-section?
03.04.2019 - 03:40DROPS Design ha risposto:
Dear Mrs Varrin, when you have to decrease alternately at the beg and at the end of each P section you will work the first row with decrease decreasing 1 st at the beginning of each P section (as explained), on the next decrease row, decrease the last 2 sts in the P section (= P2 tog the last 2 sts in the P section) and repeat these decrease, ie next time you will dec by P tog the first 2 sts then on next decrease row you P tog the last 2 sts. Happy knitting!
03.04.2019 - 09:42
![]() Mary-Alice Varrin ha scritto:
Mary-Alice Varrin ha scritto:
I am about to decrease for the "waistline" and wondered if I am increasing on two rows; one being at 40cm and the next at 50cm? Do I increase at the RS of row 1 and then WS of the next increase row thus making the increases at the same vertical spot?
02.04.2019 - 20:42DROPS Design ha risposto:
Dear Mrs Varrin, when piece measures 40 cm, increase from RS 1 st at the beginning of each P-section = 14 sts increased = 236 sts. When piece measures 50 cm, increase from RS 1 stitch at the end of each P-section = 14 sts increased = 236+14 = 250 sts. Happy knitting!
03.04.2019 - 09:28
|
||||||||||||||||||||||||||||||||||
Gwendolen#gwendolencardigan |
||||||||||||||||||||||||||||||||||
 |
 |
|||||||||||||||||||||||||||||||||
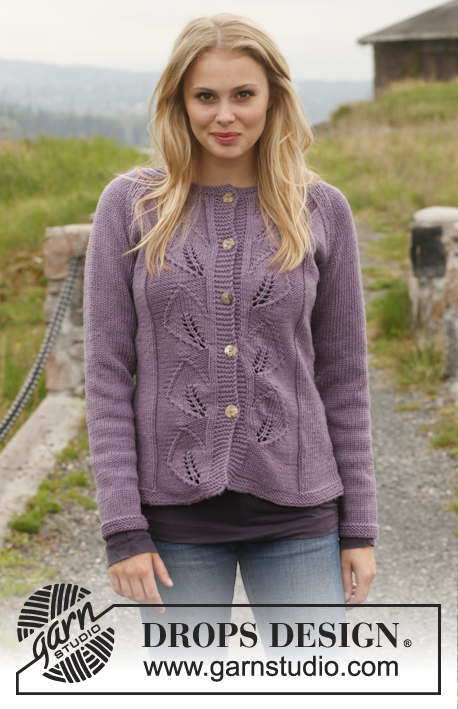
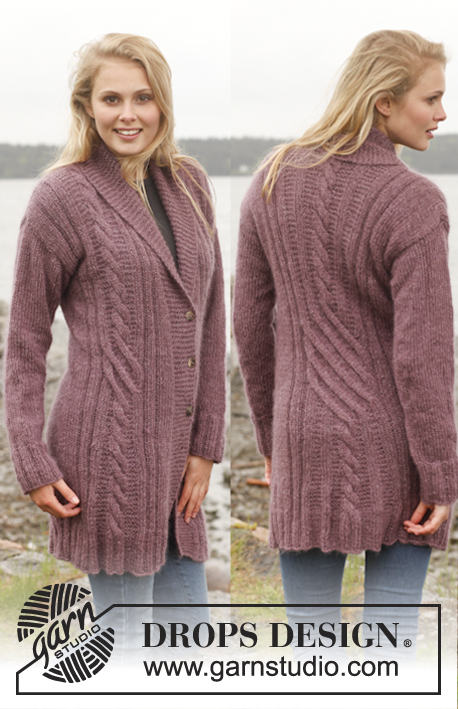
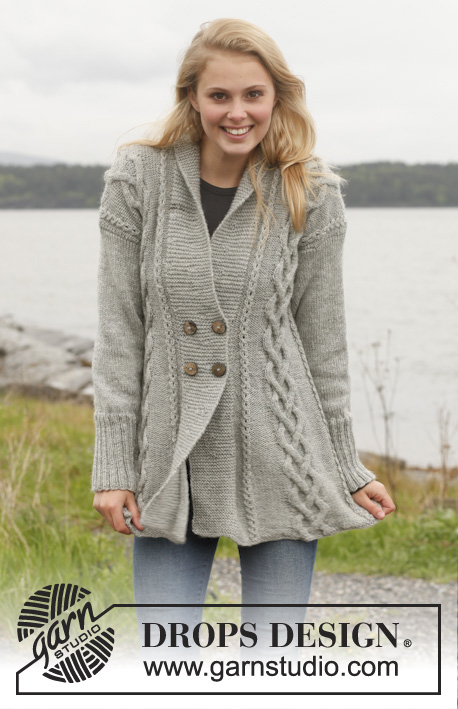
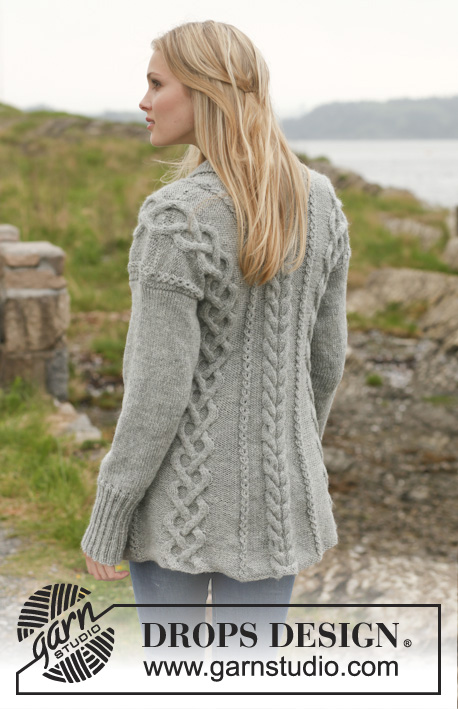
Giacca DROPS ai ferri, con trecce e collo a scialle, in "Karisma". Taglie: Dalla S alla XXXL.
DROPS 151-1 |
||||||||||||||||||||||||||||||||||
|
PUNTO LEGACCIO (avanti e indietro sui ferri): Lavorare tutti i ferri a dir. 1 “costa” a legaccio = 2 ferri a dir. MOTIVO: Vedere i diagrammi da A.1 a A.3. I diagrammi mostrano tutti i ferri del motivo visti sul diritto del lavoro. FERRI ACCORCIATI SUI BORDI DAVANTI: Lavorare ferri accorciati sui bordi davanti per evitare che i bordi stringano troppo il lavoro in altezza. Lavorare come segue ogni 10 ferri – sul diritto del lavoro: Lavorare 18 m (= bordo davanti destro), girare e lavorare il ferro di ritorno. Lavorare 1 ferro su tutte le m come prima. Girare e lavorare 18 m (= bordo davanti sinistro), girare e lavorare il ferro di ritorno. Girare e lavorare 1 ferro su tutte le m come prima. ASOLE: Intrecciare le m per le asole sul bordo davanti destro. 1 asola = lavorare insieme a dir la 3a e la 4a m dal bordo, fare 1 m gettata, 8 m dir, lavorare insieme a dir la 13a e la 14a m dal bordo, fare 1 m gettata (= 2 asole). Intrecciare le m per le asole quando il lavoro misura: TAGLIA S: 29 e 37 cm. TAGLIA M/L: 30 e 38 cm. TAGLIA XL: 31 e 39 cm. TAGLIA XXL/XXXL: 33 e 41 cm. ---------------------------------------------------------- DAVANTI E DIETRO: Si lavorano avanti e indietro sui ferri circolari per avere sufficiente spazio per tutte le m. Avviare 266-290-350-386 m (comprese 18 m per il bordo davanti da ciascun lato) sui ferri circolari n° 4 con il filato Karisma. Lavorare 2 COSTE A LEGACCIO - vedere le spiegazioni sopra; ALLO STESSO TEMPO, nel corso dell’ultimo ferro, aumentare 40 m in modo uniforme = 306-330-390-426 m. Proseguire come segue sul diritto del lavoro: 18 m a punto legaccio (= bordo davanti), 8-8-8-10 m rov, * diagramma A.1 (= 3 m), 10-12-12-14 m rov *, ripetere da *-* 1-1-2-2 volte in tutto, diagramma A.2 (= 23 m), 10-12-12-14 m rov, * diagramma A.1, 10-12-12-14 m rov*, ripetere da *-* 2-2-2-2 volte in tutto, diagramma A.2, * 10-12-12-14 m rov, diagramma A.1 *, ripetere da *-* 1-1-2-2 volte in tutto, 10-12-12-14 m rov, diagramma A.3 (= 18 m), 10-12-12-14 m rov, * diagramma A.1, 10-12-12-14 m rov *, ripetere da *-* 1-1-2-2 volte in tutto, diagramma A.2, 10-12-12-14 m rov, * diagramma A.1, 10-12-12-14 m rov *, ripetere da *-* 2 volte in tutto, diagramma A.2, * 10-12-12-14 m rov, diagramma A.1 *, ripetere da *-* 1-1-2-2 volte in tutto, 8-8-8-10 m rov, 18 m a punto legaccio (= bordo davanti). Proseguire in questo modo; ALLO STESSO TEMPO, lavorare a ferri accorciati sulle m dei bordi davanti – vedere le spiegazioni sopra. ALLO STESSO TEMPO, quando il lavoro misura 8 cm, diminuire 1 m all’inizio di ogni gruppo di m lavorate a rov: per diminuire lavorare insieme a rov le prime 2 m (= vengono diminuite 14-14-18-18 m). Ripetere queste diminuzioni alternativamente all’inizio e alla fine di ogni gruppo di m lavorate a rov, ogni 5-5½-5½-6 cm, altre 5 volte (= 6 volte in tutto) = 222-246-282-318 m. Ricordarsi di intrecciare per le ASOLE sul bordo davanti destro - vedere le spiegazioni sopra. Quando il lavoro misura 40-41-42-44 cm, al ferro successivo, sul diritto del lavoro, aumentare 1 m all’inizio di ogni gruppo di m lavorate a rov; per aumentare fare una m gettata, al ferro successivo lavorare questa m a dir ritorto sul rovescio del lavoro (= vengono aumentate 14-14-18-18 m). Ripetere questi aumenti alla fine di ogni gruppo di m lavorate a rov quando il lavoro misura 50-52-53-55 cm = 250-274-318-354 m. Quando il lavoro misura 56-58-59-61 cm, dividere il lavoro e finire il davanti ed il dietro separatamente, come segue: mettere in attesa su un ferma maglie le prime e le ultime 66-71-82-91 m per i davanti, tagliare il filo; proseguire solo sulle 118-132-154-172 m centrali (= dietro). DIETRO: = 118-132-154-172 m. Proseguire con il motivo come prima. Quando il lavoro misura 72-76-78-82 cm, intrecciare le 22-26-26-26 m centrali per lo scollo = per ogni spalla rimangono 48-53-64-73 m. Finire ogni parte separatamente. Proseguire con il motivo finché il lavoro non misura 74-78-80-84 cm; intrecciare le m. DAVANTI DESTRO: Riportare sui ferri di lavoro le prime 66-71-82-91 m. Proseguire con il motivo come prima. Quando il lavoro misura 74-78-80-84 cm, intrecciare le prime 48-53-64-73 m sul rovescio del lavoro, per la spalla = sui ferri rimangono 18 m. Lavorare le restanti m sul ferro e lavorare a ferri accorciati su queste 18 m come segue – iniziare sul diritto del lavoro: * Lavorare 2 ferri sulle prime 9 m, lavorare 2 ferri su tutte le m *, ripetere da *-* finché il collo non misura 7-8-8-8 cm sul lato più corto. Intrecciare le m. DAVANTI SINISTRO: Lavorare come indicato per il davanti destro ma a specchio. Intrecciare le m per la spalla sul diritto del lavoro e iniziare i ferri accorciati sul rovescio del lavoro. MANICHE: Si lavorano in tondo sui ferri a doppia punta. Avviare 56-60-64-68 m sui ferri a doppia punta n° 3,5 con il filato Karisma. Lavorare a coste = 2 m dir / 2 m rov. Quando il lavoro misura 16-16-16-14 cm, passare ai ferri a doppia punta n° 4; proseguire a maglia rasata e, ALLO STESSO TEMPO, nel corso del primo giro, diminuire 8-8-10-10 m in modo uniforme = 48-52-54-58 m. Inserire 1 segno all’inizio del giro. ALLO STESSO TEMPO, aumentare 1 m da ciascun lato del segno; ripetere questi aumenti ogni 2½-2-1½-1½ cm altre 13-15-16-18 volte (14-16-17-19 volte in tutto) = 76-84-88-96 m. Quando il lavoro misura 52-51-47-44 cm (misure più corte per le taglie più grandi le spalle sono più larghe), intrecciare tutte le m. Lavorare la seconda manica. CONFEZIONE: Cucire le spalle. Cucire le maniche. Cucire le estremità del collo insieme al centro, sul dietro e cucire il collo allo scollo sul dietro. Attaccare i bottoni sul bordo davanti sinistro. |
||||||||||||||||||||||||||||||||||
Spiegazioni del diagramma |
||||||||||||||||||||||||||||||||||
|
||||||||||||||||||||||||||||||||||
 |
||||||||||||||||||||||||||||||||||
 |
||||||||||||||||||||||||||||||||||
Avete terminato questo modello?Allora taggate le vostre foto con #dropspattern #gwendolencardigan o inviatele alla #dropsfan gallery. Avete bisogno di aiuto con questo modello?Troverete 25 video tutorial, una sezione per i commenti/domande e molto altro guardando il modello su www.garnstudio.com © 1982-2026 DROPS Design A/S. Ci riserviamo tutti i diritti. Questo documento, compreso tutte le sue sotto-sezioni, è protetto dalle leggi sul copyright. Potete leggere quello che potete fare con i nostri modelli alla fine di ogni modello sul nostro sito. |
||||||||||||||||||||||||||||||||||


Con oltre 40 anni di esperienza nel design di modelli di maglia e uncinetto, DROPS Design offre la più estesa collezione di modelli gratuiti su internet - tradotti in 17 lingue. Ad oggi vi possiamo fornire 324 cataloghi e 12290 modelli - 9561 dei quali sono tradotti in Italiano.
Ci stiamo impegnando molto per darvi il meglio che vi possiamo offrire in termini di maglia e uncinetto, ispirazioni e consigli così come filati di grande qualità ad un prezzo incredibile! Volete utilizzare i nostri modelli per qualcosa d'altro oltre al vostro uso personale? Potete leggere tutto ciò che è consentito nel testo sul Copyright in basso su tutte le pagine dei nostri modelli. Buon lavoro!
Lasciare un commento sul modello DROPS 151-1
Noi saremmo felici di ricevere i tuoi commenti e opinioni su questo modello!
Se vuoi fare una domanda, fai per favore attenzione a selezionare la categoria corretta nella casella qui sotto per velocizzare il processo di risposta. I campi richiesti sono indicati da *.