
Categorie popolari
State cercando un filato?


Commenti / Domande (11)
![]() Monika Jüngling ha scritto:
Monika Jüngling ha scritto:
Vielen lieben Dank für die schnelle Antwort, wahrscheinlich hätte man mehr überlegen sollen. Klappt prima. Alles Gute und Gruß aus Berlin
19.09.2023 - 10:21
![]() Monika Jüngling ha scritto:
Monika Jüngling ha scritto:
Hallo, können Sie bitte noch einmal so nett sein, es mir in deutsch zu beantworten, wenn ich dieses tolle Teil in Runden stricken möchte. herzlichen Dank Monika Jüngling
17.09.2023 - 13:24
![]() Monika Jüngling ha scritto:
Monika Jüngling ha scritto:
Hallo, können Sie bitte noch einmal so nett sein, es mir in deutsch zu beantworten, wenn ich dieses tolle Teil in Runden stricken möchte. herzlichen Dank Monika Jüngling
17.09.2023 - 13:21DROPS Design ha risposto:
Liebe Frau Jüngling, bei der 1. Runde stricken Sie dann (2 Maschen links, 1 Masche rechts) die ganze Runde, dann stricken Sie die 2. Runde wie bei der 2. Reihe und diese 2 Runden wiederholen Sie. Viel Spaß beim stricken!
18.09.2023 - 15:40
![]() Jacqueline Moore ha scritto:
Jacqueline Moore ha scritto:
Can this hat be knitted in the round on circular needles? I ask because I prefer not to have a seam.
08.12.2020 - 17:47DROPS Design ha risposto:
Dear Mrs Moore, probably, you just have to cast on 2 sts less (= edge sts are not necessary when working in the round) and adjust pattern to be worked on every row from RS. Happy knitting!
09.12.2020 - 06:39
![]() Sanna Koskinen ha scritto:
Sanna Koskinen ha scritto:
I tryed to do this but I notice after trying that start needs to be reverse side. So when in the instruction says 1right "2wrong, 1right" this extent first layer needs to be 1wrong "2right, 1wrong" and second layer needs to be 1right "2wrong, false englsih rib"
17.09.2014 - 20:44Renee ha scritto:
The increase tip states: On next row (WS) K YO twisted (ie work in the back of the loop instead of the front of the loop) to avoid holes. However, on the wrong side when one comes to the YO the stitch that should be knitted is a purl stitch (according to the pattern) not a knit stitch. So you need to purl into the back of the loop, do you not? I have no idea how to do this. Can you please clarify what is needed here.
08.02.2014 - 12:31DROPS Design ha risposto:
Dear Renee, you inc in P sections seen from RS, from WS, these sts are K. Happy knitting!
10.02.2014 - 09:19Renée ha scritto:
In your answer to my query you stated finish with P2 for the WS row. Did you mean you finish with P1? As this is what the pattern states for the WS row. Can you please clarify.
05.02.2014 - 14:45DROPS Design ha risposto:
Dear Renée, you are correct, I'm sorry, WS row are worked starting with K2 and finishing with P1. Happy knitting!
05.02.2014 - 14:59RHS ha scritto:
The pattern states: 'Repeat the 1st and 2nd rows AT THE SAME TIME...', but by this stage in the pattern 3 rows have been knitted. Can you tell me how you continue from this point. What are the 1st and 2nd rows that one needs to continue in/repeat. The pattern is rather unclear.
03.02.2014 - 17:25DROPS Design ha risposto:
Dear RHS, you repeat row 1 (WS) and row 2 (RS) from "False english rib with double sts" until piece measures 12 cm for neckwarmer or 17-18 cm for hat. Happy knitting!
04.02.2014 - 09:03Renee ha scritto:
I worked 1st (RS) and 2nd (WS) rows. Then pattern states: repeat 1st & 2nd rows. Do you continue knitting exactly as you did for the 1st & 2nd rows? Starting each RS row with K1 & then False English rib with double sts, finishing with P2? Then knit each WS row starting with K2 then False English rib & finishing with P1? Or do you just continue after the 1st and 2nd rows with the False English rib with double st pattern?
03.02.2014 - 17:09DROPS Design ha risposto:
Dear Renee, from WS you start row with K2, then repeat from *-* from false english rib row 1 and finish with P2. From RS, you start with K1, repeat from *-* for row 2 in pattern, and finish with P2. Repeat these 2 rows this way. Happy knitting!
04.02.2014 - 09:02Renée ha scritto:
Is this pattern a revised version of an older pattern, with pattern no. ee469? I prefer the hat in pattern ee469, but the neck warmer in this pattern, as it has a firmer around the neck. Do you think it would look odd to knit the hat from the older pattern and the neck warmer from this pattern? As slightly different stitches and needle sizes are used.
30.12.2013 - 13:19DROPS Design ha risposto:
Dear Renée, ee-469 is another version of a set with this kind of pattern but different result. If you like to, you can use both patterns to make your own set. Just have a swatch and check how far you like it. Happy knitting!
30.12.2013 - 15:56
|
|
Red Hot Chili Pepper#redhotchilipepperset |
|
|
|
|
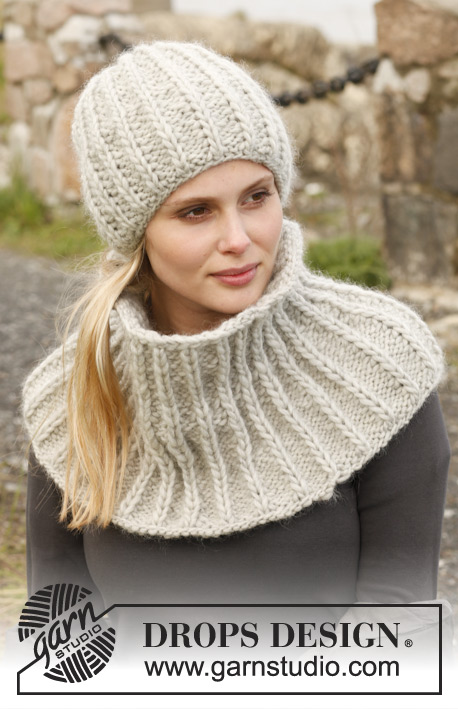
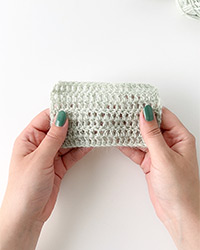
Berretto e scaldacollo DROPS in "Snow" con una variante delle false Fisherman's rib a maglia doppia.
DROPS 150-34 |
|
|
FALSE FISHERMAN'S RIB: Ferro 1 (rovescio del lavoro): * 1 m rov, 2 m dir *. Ferro 2 (diritto del lavoro): * 2 m rov, 1 m dir nella maglia sotto *, ripetere da *-*. Ripetere i ferri 1 e 2. SUGGERIMENTO PER GLI AUMENTI: Aumentare sul diritto del lavoro facendo1 m gettata dopo le m dir. Nel corso del ferro successivo (rovescio del lavoro) lavorare le m gettate a dir ritorto (quindi lavorarle nell’asola posteriore e non in quella anteriore) per evitare che si formi un buco. All’aumento successivo, fare 1 m gettata prima delle m dir in modo che gli aumenti siano alternativamente sulla sinistra e sulla destra dei gruppi di m lavorate a rov. ---------------------------------------------------------- SCALDA COLLO: Si lavora avanti e indietro sui ferri circolari, dall’alto verso il basso. Avviare 42 m sui ferri circolari n° 9 con il filato Snow. Lavorare il primo ferro come segue, sul diritto del lavoro: 1 m dir, * 2 m rov, 1 m dir *, ripetere da *-* e finire con 2 m rov. Lavorare ora come segue, sul rovescio del lavoro: 2 m dir, FALSE FISHERMAN'S RIB - vedere le spiegazioni sopra, finire con 1 m rov. Al ferro successivo, sul diritto del lavoro, lavorare come segue: 1 m dir, false Fisherman's rib, finire con 2 m rov. Ripetere i ferri 1 e 2 e, ALLO STESSO TEMPO, quando il lavoro misura 12 cm, aumentare 1 m rov in ogni gruppo di 2 m lavorate a rov (visti sul diritto del lavoro – diventano quindi gruppi di 3 m rov) = 14 m aumentate – vedere il SUGGERIMENTO PER GLI AUMENTI = 56 m. Ripetere questi aumenti di 1 m rov quando il lavoro misura 14 cm = 70 m. Aumentare in modo uguale ogni 3 cm altre 3 volte = 112 m sui ferri. Quando il lavoro misura 24 cm, intrecciare le m senza stringere troppo il filo. Cucire lo scalda collo bordo contro bordo nell’asola anteriore della m più esterna. BERRETTO: Si lavora avanti e indietro sui ferri circolari. Avviare 44 m sui ferri circolari n° 9 con il filato Snow. Lavorare a coste = 1 m dir / 1 m rov finché il lavoro non misura 4 cm. Al ferro successivo sul diritto del lavoro, aumentare 1 m in ogni gruppo di m lavorate a rov (= 22 m aumentate) = 66 m. Proseguire come segue sul rovescio del lavoro: 2 m dir, FALSE FISHERMAN'S RIB - vedere le spiegazioni sopra, finire con 1 m rov. Al ferro successivo sul diritto del lavoro, lavorare come segue: 1 m dir, false Fisherman's rib, finire con 2 m rov. Ripetere i ferri 1 e 2 finché il lavoro non misura 17-19 cm. Al ferro successivo sul diritto del lavoro, lavorare come segue: 1 m dir, * 2 m insieme a rov, 1 m dir*, ripetere da *-* finché non rimangono 2 m, finire con 2 m rov = 44 m. Lavorare 3 ferri lavorando a dir le m dir e a rov le m rov. Lavorare ora tutte le m insieme a 2 a 2 a dir = 22 m. Tagliare il filo e passarlo attraverso le restanti m: tagliare e stringere il filo. Cucire il berretto bordo contro bordo nell’asola anteriore della m più esterna |
|
Avete terminato questo modello?Allora taggate le vostre foto con #dropspattern #redhotchilipepperset o inviatele alla #dropsfan gallery. Avete bisogno di aiuto con questo modello?Troverete 13 video tutorial, una sezione per i commenti/domande e molto altro guardando il modello su www.garnstudio.com © 1982-2025 DROPS Design A/S. Ci riserviamo tutti i diritti. Questo documento, compreso tutte le sue sotto-sezioni, è protetto dalle leggi sul copyright. Potete leggere quello che potete fare con i nostri modelli alla fine di ogni modello sul nostro sito. |

Con oltre 40 anni di esperienza nel design di modelli di maglia e uncinetto, DROPS Design offre la più estesa collezione di modelli gratuiti su internet - tradotti in 17 lingue. Ad oggi vi possiamo fornire 314 cataloghi e 11822 modelli - 9094 dei quali sono tradotti in Italiano.
Ci stiamo impegnando molto per darvi il meglio che vi possiamo offrire in termini di maglia e uncinetto, ispirazioni e consigli così come filati di grande qualità ad un prezzo incredibile! Volete utilizzare i nostri modelli per qualcosa d'altro oltre al vostro uso personale? Potete leggere tutto ciò che è consentito nel testo sul Copyright in basso su tutte le pagine dei nostri modelli. Buon lavoro!
Lasciare un commento sul modello DROPS 150-34
Noi saremmo felici di ricevere i tuoi commenti e opinioni su questo modello!
Se vuoi fare una domanda, fai per favore attenzione a selezionare la categoria corretta nella casella qui sotto per velocizzare il processo di risposta. I campi richiesti sono indicati da *.